Difference between revisions of "Modbus and Bluetooth data sending to Node-RED"
Justas.Cip (talk | contribs) |
Justas.Cip (talk | contribs) |
||
| (19 intermediate revisions by the same user not shown) | |||
| Line 18: | Line 18: | ||
There are a couple of different use cases with Node-RED and Teltonika devices: | There are a couple of different use cases with Node-RED and Teltonika devices: | ||
| − | # [[ | + | # [[Modbus_and_Bluetooth_data_sending_to_Node-RED#MQTT_Gateway | MQTT gateway using either Node-RED or Teltonika device as MQTT broker.]] |
| − | # [[ | + | # [[Modbus_and_Bluetooth_data_sending_to_Node-RED#Modbus_Data_to_Server_via_MQTT_protocol | Modbus data to server using either Node-RED or Teltonika device as MQTT broker.]] |
| − | # [[ | + | # [[Modbus_and_Bluetooth_data_sending_to_Node-RED#Bluetooth_Data_to_Server_via_MQTT_protocol | Bluetooth data to Node-RED server.]] |
| − | # [[ | + | # [[Modbus_and_Bluetooth_data_sending_to_Node-RED#Modbus_Data_to_Server_via_HTTP_protocol | HTTP data to Node-RED server.]] |
| − | |||
==Node-RED installation and setup== | ==Node-RED installation and setup== | ||
| Line 54: | Line 53: | ||
==MQTT Gateway== | ==MQTT Gateway== | ||
| − | MQTT Gateway allows to query the device from MQTT Clients, in this section we will configure it to work with the Node-RED. | + | MQTT Gateway allows to query the device from MQTT Clients, in this section we will configure it to work with the Node-RED. |
| − | |||
| − | |||
===Using Teltonika device as an MQTT broker=== | ===Using Teltonika device as an MQTT broker=== | ||
---- | ---- | ||
| + | |||
| + | Here is connection topology for this use case: | ||
| + | |||
| + | [[File:Nodered configurationexample topo5gw.png|border|700px|class=tlt-border]] | ||
| + | |||
Router setup when using the router as a broker consists of two parts. First, we are going to set up a local broker. In order to do so, navigate to '''Services -> MQTT -> Broker''' and enable the broker. | Router setup when using the router as a broker consists of two parts. First, we are going to set up a local broker. In order to do so, navigate to '''Services -> MQTT -> Broker''' and enable the broker. | ||
| Line 138: | Line 140: | ||
===Using Node-RED as an MQTT broker=== | ===Using Node-RED as an MQTT broker=== | ||
---- | ---- | ||
| + | |||
| + | Here we are using Node-RED as MQTT Broker, so we are going to do necessary changes in order for this functionality to work. | ||
| + | |||
| + | Here is the connection topology for this use case: | ||
| + | |||
| + | [[File:Nodered configurationexample topo1.png|border|700px|class=tlt-border]] | ||
| + | |||
====Adjusting Node-RED configuration==== | ====Adjusting Node-RED configuration==== | ||
| Line 155: | Line 164: | ||
To test the configuration, '''deploy''' the nodes again and send the message by clicking on the '''inject''' node. | To test the configuration, '''deploy''' the nodes again and send the message by clicking on the '''inject''' node. | ||
| + | |||
| + | ===MQTT gateway using MQTT explorer and Node-RED broker=== | ||
| + | ---- | ||
| + | In this example, we are going to use the same Node-RED broker configured in previous parts of this article, only this time we are going to use [http://mqtt-explorer.com/ MQTT Explorer] app to Publish and Subscribe to Modbus data. | ||
| + | |||
| + | Here's connection topology for this use case: | ||
| + | |||
| + | [[File:Nodered configurationexample topo6.png|border|800px|class=tlt-border]] | ||
| + | |||
| + | ====Device setup==== | ||
| + | ---- | ||
| + | Navigate to '''Services -> Modbus -> MQTT Gateway'''. Follow these steps for the configuration: | ||
| + | # '''Enable''': on | ||
| + | # '''Host''': input '''192.168.10.139''', or if you would like to use local broker on the device - input '''127.0.0.1''' | ||
| + | Leave everything else as default, or adjust according to your needs | ||
| + | |||
| + | [[File:MQTT gateway settings node red local router.png|border|500px|class=tlt-border]] | ||
| + | |||
| + | ====MQTT explorer setup and testing==== | ||
| + | ---- | ||
| + | Open MQTT Explorer application and in the default screen input the '''Host IP (1)''' of MQTT Broker, then press '''Connect (2)'''. | ||
| + | |||
| + | [[File:Mqtt explorer server connection to broker example.png|border|600px|class=tlt-border]] | ||
| + | |||
| + | Once done, locate Publish section on the right side. You can use the same settings as in previous sections of MQTT Gateway: | ||
| + | |||
| + | # '''Topic:''' request | ||
| + | # '''Data:''' 0 65432 0 192.168.10.1 502 5 1 3 6 2 | ||
| + | |||
| + | [[File:Publish from mqtt explorer node red example.png|border|500px|class=tlt-border]] | ||
| + | |||
| + | If everything is set up correctly, then you should be able to see response from the router: | ||
| + | |||
| + | [[File:Mqtt explorer response from router.png|border|400px|class=tlt-border]] | ||
==Modbus Data to Server via MQTT protocol== | ==Modbus Data to Server via MQTT protocol== | ||
| Line 162: | Line 205: | ||
Here's connection topology for this use case: | Here's connection topology for this use case: | ||
| − | [[File:Nodered configurationexample topo2.png| | + | [[File:Nodered configurationexample topo2.png|850px|class=tlt-border]] |
===Device configuration=== | ===Device configuration=== | ||
| Line 206: | Line 249: | ||
# '''Topic''': rutx (input any preferred topic, make sure to subscribe on the same topic) | # '''Topic''': rutx (input any preferred topic, make sure to subscribe on the same topic) | ||
| − | [[File:Data sender settings to node red with node red broker.png|border| | + | [[File:Data sender settings to node red with node red broker.png|border|800px|class=tlt-border]] |
===Node-RED setup=== | ===Node-RED setup=== | ||
| Line 235: | Line 278: | ||
Here's connection topology for this use case: | Here's connection topology for this use case: | ||
| − | [[File:Nodered configurationexample topo3.png|border| | + | [[File:Nodered configurationexample topo3.png|border|800px|class=tlt-border]] |
===Device configuration=== | ===Device configuration=== | ||
| Line 254: | Line 297: | ||
# '''Topic''': beacon (input any preferred topic, make sure to subscribe on the same topic) | # '''Topic''': beacon (input any preferred topic, make sure to subscribe on the same topic) | ||
| − | [[File:Bluetooth data sender settings rutx11.png|border| | + | [[File:Bluetooth data sender settings rutx11.png|border|800px|class=tlt-border]] |
===Node-RED setup=== | ===Node-RED setup=== | ||
| Line 268: | Line 311: | ||
Here's connection topology for this use case: | Here's connection topology for this use case: | ||
| − | [[File:Nodered configurationexample topo4.png|border| | + | [[File:Nodered configurationexample topo4.png|border|800px|class=tlt-border]] |
===Device configuration=== | ===Device configuration=== | ||
| Line 300: | Line 343: | ||
[[File:Nodered configurationexample httpData incoming v1.png|border|400px|class=tlt-border]] | [[File:Nodered configurationexample httpData incoming v1.png|border|400px|class=tlt-border]] | ||
| − | |||
| − | |||
| − | |||
| − | |||
| − | |||
| − | |||
| − | |||
| − | |||
| − | |||
| − | |||
| − | |||
| − | |||
| − | |||
| − | |||
| − | |||
| − | |||
| − | |||
| − | |||
| − | |||
| − | |||
| − | |||
| − | |||
| − | |||
| − | |||
| − | |||
| − | |||
| − | |||
| − | |||
| − | |||
| − | |||
| − | |||
| − | |||
| − | |||
| − | |||
==Summary== | ==Summary== | ||
Latest revision as of 16:41, 20 February 2023
Introduction
The information in this page is updated in accordance with the RUTXXX_R_00_07_03 firmware version.
Node-RED is a flow-based programming tool developed by IBM Emerging Technology and written in Node.js. It provides a browser-based editor for wiring together hardware devices, APIs, and online services using a visual programming interface. More information about Node-RED could be found here.
This article provides an extensive configuration example with details on how to use Node-RED with Teltonika Routers via MQTT and HTTP protocols.
Configuration overview and prerequisites
Before we begin, let's overview the configuration that we are attempting to achieve and the prerequisites that make it possible.
Prerequisites:
- Teltonika RUTXXX router or TRBXXX gateway. We are going to use the RUTX11 in this example.
- At least one end device (PC, Laptop, Tablet, Smartphone) to configure the devices.
- Linux Virtual Machine to host Node-RED server.
There are a couple of different use cases with Node-RED and Teltonika devices:
- MQTT gateway using either Node-RED or Teltonika device as MQTT broker.
- Modbus data to server using either Node-RED or Teltonika device as MQTT broker.
- Bluetooth data to Node-RED server.
- HTTP data to Node-RED server.
Node-RED installation and setup
We are going to set up Node-RED in Linux virtual machine. For Node-RED to work, you would need to install Node.js version 14.00 or higher, if you already have Node.js installed, verify Node.js version using this command:
node -v
If you do not have Node.js installed, run these commands to install it:
sudo apt install curl
curl -fsSL https://deb.nodesource.com/setup_14.x | sudo -E bash –
sudo apt-get install -y nodejs
Once we have Node.js installed, we can install Node-RED. Use this command to install:
sudo npm install -g –unsafe-perm node-red
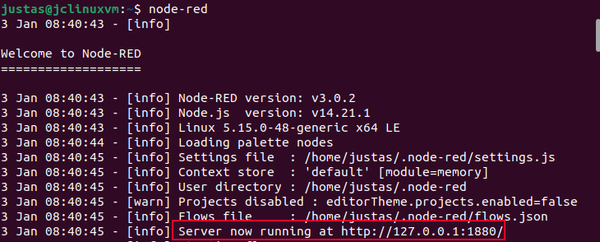
Use the command node-red to start a local server. Here is how the terminal should look like if the server starts correctly:
Once you have the local server running, use the local IP and port number in your internet browser. In this case, we are using 127.0.0.1:1880:

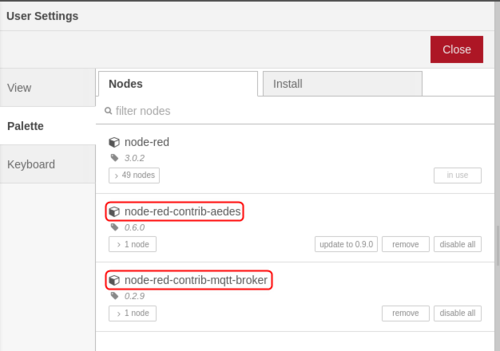
For MQTT usage, we are going to need MQTT-specific nodes. Use the side menu to navigate to Manage Palette section and install these nodes:
- node-red-contrib-aedes
- node-red-contrib-mqtt-broker
MQTT Gateway
MQTT Gateway allows to query the device from MQTT Clients, in this section we will configure it to work with the Node-RED.
Using Teltonika device as an MQTT broker
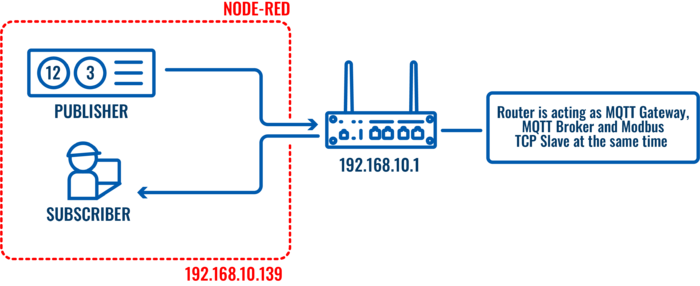
Here is connection topology for this use case:
Router setup when using the router as a broker consists of two parts. First, we are going to set up a local broker. In order to do so, navigate to Services -> MQTT -> Broker and enable the broker.
Once done, navigate to Services -> Modbus -> MQTT Gateway. Follow these steps for the configuration:
- Enable: on
- Host: since we are using a local broker on the router – input 127.0.0.1
Leave everything else as default, or adjust according to your needs
Node-RED setup when using Teltonika device as an MQTT broker
For this example, we are going to need MQTT-in and MQTT-out nodes. We are not going to need a broker node for now, since we are using our router as an MQTT broker. In order to send request and get response messages, we are also going to need inject and debug nodes. Drag required nodes onto the screen and click on them to configure accordingly:
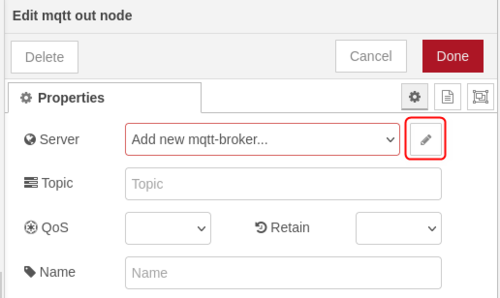
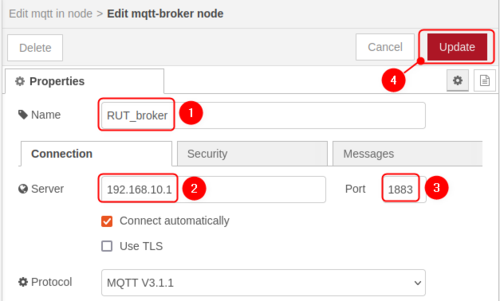
- MQTT-out node - click on this node and then click on the pencil icon to configure Node-RED for Teltonika broker usage.
In the next screen configure settings accordingly:
- Name: RUT_broker for this example
- Server: 192.168.10.1 (Router's LAN IP address)
- Port: Default port 1883
- Press Update
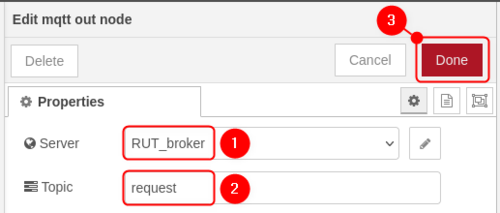
Now we are going to go back to MQTT-out node configuration and adjust settings as shown below:
- Server: RUT_broker
- Topic: request
- Press Done
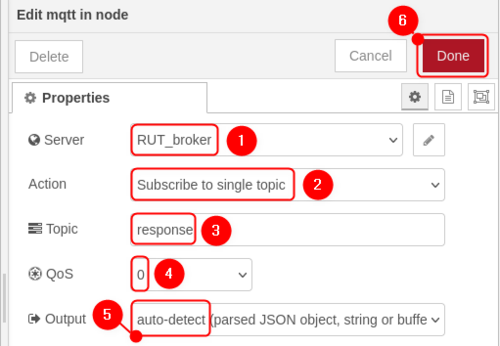
MQTT-in node - configure settings as shown below:
- Server: RUT_broker
- Action: Subscribe to single topic
- Topic: response
- QoS: 0
- Output: auto-detect
- Press Done
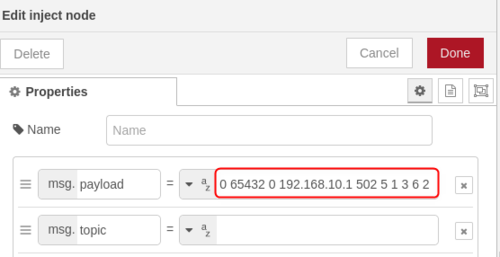
- Inject node - here we only need to input a payload. To find required message format, refer to this article: Modbus TCP Master MQTT Gateway
For this example, we will try to get router's temperature, so we are going to use payload in this format: 0 65432 0 192.168.10.1 502 5 1 3 6 2
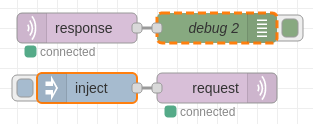
There is no need to configure debug node. Here is how the finished flowchart should look like:
In order to test the configuration, press Deploy in the top right corner:
Now press on Inject node and look for incoming message on the right side of the screen:
Here we can see that the router's temperature is 38.0 degrees.
Using Node-RED as an MQTT broker
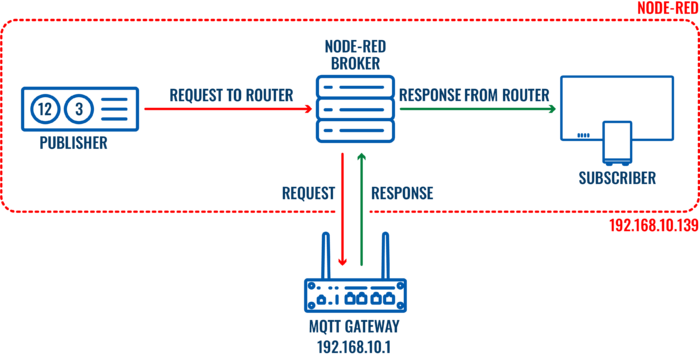
Here we are using Node-RED as MQTT Broker, so we are going to do necessary changes in order for this functionality to work.
Here is the connection topology for this use case:
Adjusting Node-RED configuration
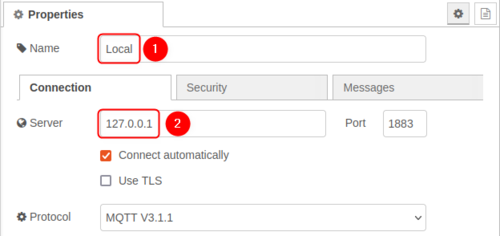
If you would like to use Node-RED as a broker, there are a couple of changes needed to be made. Similarly as shown before, click on MQTT Subscriber node and click edit in the Server section. Input name (1) and address 127.0.0.1 (2) in order to use Node-RED broker and press Done.
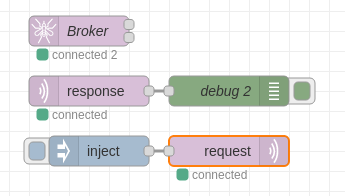
In order for the broker to be available, add broker node to the flowchart. Now the flowchart should look like this:
Adjusting Teltonika device configuration
Navigate to Services -> Modbus -> MQTT Gateway. Change the host IP to your Linux Virtual Machine IP address (192.168.10.139 in this example):
To test the configuration, deploy the nodes again and send the message by clicking on the inject node.
MQTT gateway using MQTT explorer and Node-RED broker
In this example, we are going to use the same Node-RED broker configured in previous parts of this article, only this time we are going to use MQTT Explorer app to Publish and Subscribe to Modbus data.
Here's connection topology for this use case:
Device setup
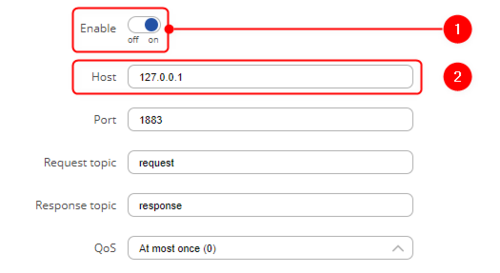
Navigate to Services -> Modbus -> MQTT Gateway. Follow these steps for the configuration:
- Enable: on
- Host: input 192.168.10.139, or if you would like to use local broker on the device - input 127.0.0.1
Leave everything else as default, or adjust according to your needs
MQTT explorer setup and testing
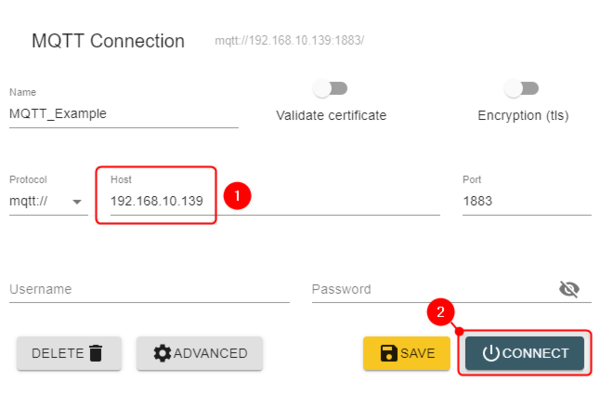
Open MQTT Explorer application and in the default screen input the Host IP (1) of MQTT Broker, then press Connect (2).
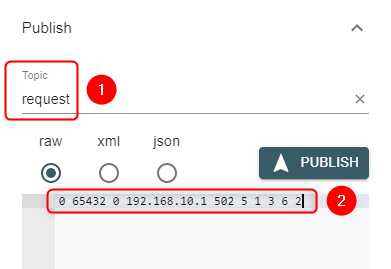
Once done, locate Publish section on the right side. You can use the same settings as in previous sections of MQTT Gateway:
- Topic: request
- Data: 0 65432 0 192.168.10.1 502 5 1 3 6 2
If everything is set up correctly, then you should be able to see response from the router:
Modbus Data to Server via MQTT protocol
In this section, we are going to upload Modbus data to server on Node-RED. First of all, we are going to need Modbus data source, in this example we are using the same device as Modbus TCP Slave and Master.
Here's connection topology for this use case:
Device configuration
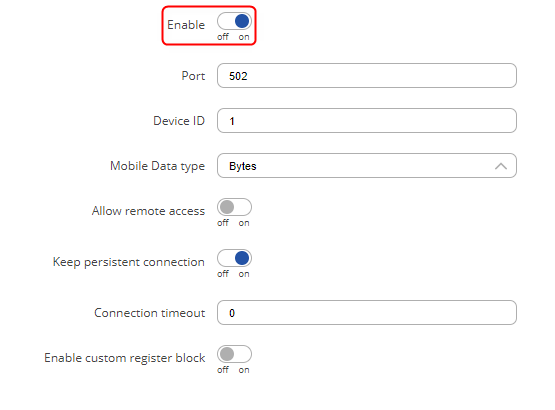
To start with, navigate to Services -> Modbus -> Modbus TCP slave. Press enable to enable the instance and you can leave everything else as default:
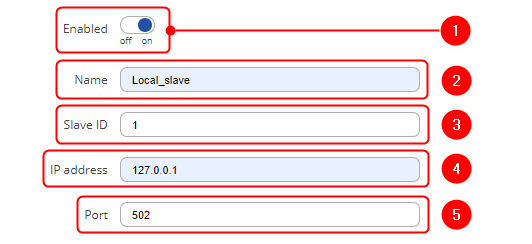
Next, navigate to Services -> Modbus -> Modbus TCP master. Adjust settings here accordingly:
- Enabled: on
- Name: Local_slave (input any preferred name)
- Slave ID: 1
- IP address: 127.0.0.1 (since we are using local TCP slave - input the IP address of your slave if you are using external device as Modbus Slave)
- Port: 502
Add new request and adjust settings according to your needs. For this example, we are going to pull device name from the registers, so our configuration looks like this:
- Name: test (input any preferred name)
- Data type: ASCII (to get a string of text)
- Function: Read holding registers (3)
- First register number: 72
- Register count/values: 3
- Brackets: use brackets
Press enable to enable the Modbus request.
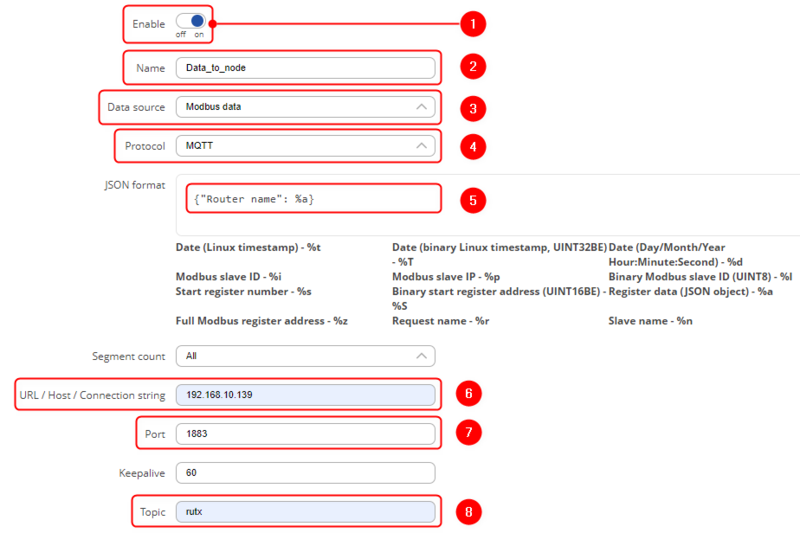
To finish up the device configuration, navigate to Services -> Data to server. Add new data sender and configure settings accordingly:
- Enable: on
- Name: Data_to_node (input any preferred name)
- Data source: MODBUS data
- Protocol: MQTT
- JSON format: {"Router name": %a} - adjust this according to your needs
- URL/Host/Connection string: 192.168.10.139 (virtual machine address)
- Port: 1883
- Topic: rutx (input any preferred topic, make sure to subscribe on the same topic)
Node-RED setup
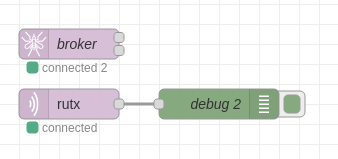
Node-RED setup to get Modbus data is simple, we are going to need one MQTT Subscriber node, one MQTT broker node so we could use broker on Node-RED and we will use debug node to read MQTT messages. Here is how the flowchart should look like:
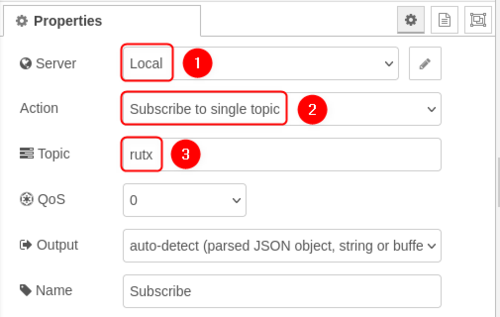
Adjust MQTT Subscriber node settings accordingly:
- Server: Local (from previous example)
- Action: Subscribe to single topic
- Topic: rutx
Leave everything else as default.
Deploy the nodes and look for incoming data in the debug window - based on Period time in Data to server settings. Here is incoming message with router name:
If you would like to use MQTT broker on the Teltonika device, change Server: Local to Server: RUT_Broker (which uses the IP 192.168.10.1).
Bluetooth Data to Server via MQTT protocol
In this section, we are going to upload Bluetooth data to server on Node-RED. The configuration is going to be similar to Modbus data to server. More information about Bluetooth functionality ant usage with beacons could be found in Teltonika EYE device pairing and data sender configuration example.
Here's connection topology for this use case:
Device configuration
First of all we are going to need a Bluetooth device which is paired to Teltonika device. For this example, we are using Teltonika EYE Beacon and we have it paired to the device. You can pair Bluetooth device by navigating to Services -> Bluetooth and clicking Scan. Then select your device and click Pair. Here's how a paired device looks like:
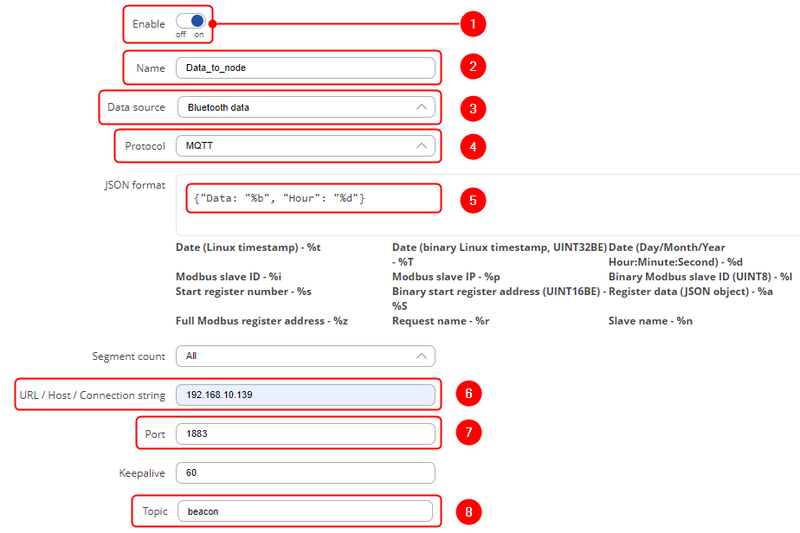
After that, navigate to Services -> Data to server. Add new data sender and configure settings accordingly:
- Enable: on
- Name: BT_data (input any preferred name)
- Data source: Bluetooth data
- Protocol: MQTT
- JSON format: {"Data": "%b", "Hour": "%d"} - adjust this according to your needs
- URL/Host/Connection string: 192.168.10.139 (virtual machine address)
- Port: 1883
- Topic: beacon (input any preferred topic, make sure to subscribe on the same topic)
Node-RED setup
The setup is the same as with Modbus data to server, just change MQTT Subscriber settings to subscribe on the beacon topic. if everything is setup correctly, you will be able to see incoming messages on the right side of the screen:
Modbus Data to Server via HTTP protocol
In this section, we will adjust the configuration in order to get the data via HTTP protocol.
Here's connection topology for this use case:
Device configuration
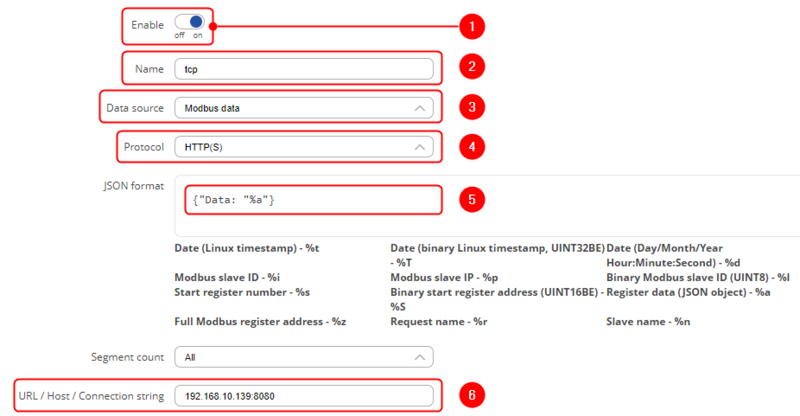
Look into Modbus data to server via MQTT section for Modbus Slave and Master setup. Navigate to navigate to Services -> Data to server. Add new data sender and configure settings accordingly:
- Enable: on
- Name: tcp (input any preferred name)
- Data source: MODBUS data
- Protocol: HTTP(S)
- JSON format: {"Data": %a} - adjust this according to your needs
- URL/Host/Connection string: 192.168.10.139:8080 (virtual machine address and port number)
Node-RED setup
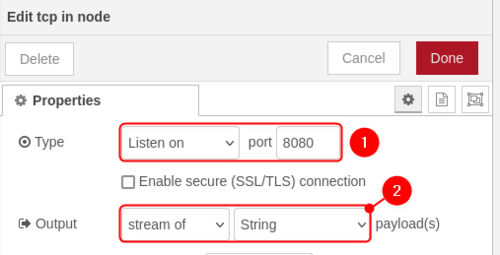
For this configuration we are going to need two nodes: TCP and debug. Drag in both nodes and click on TCP node. Adjust settings accordingly:
- Type: Listen on port 8080
- Output: stream of String payload
Flowchart for this example should look like this:
Testing the configuration
If configured correctly, you should be able to see incoming Modbus data to the Node-RED debug window:
Summary
In this article, several use cases are discussed, such as MQTT gateway using Node-RED or Teltonika device as MQTT broker, Modbus data to server, Bluetooth data to server, HTTP data to Node-RED server, and MQTT gateway using MQTT Explorer. The article provides steps on how to install Node-RED on a Linux virtual machine, install MQTT-specific nodes, and set up a local server. The article also explains how to use the Teltonika device as an MQTT broker and set up Node-RED to work with it.
References
Modbus TCP Master MQTT Gateway
Teltonika EYE device pairing and data sender configuration example
