Difference between revisions of "Template:Networking rutos manual users"
| (17 intermediate revisions by 2 users not shown) | |||
| Line 1: | Line 1: | ||
| − | + | {{Template: Networking_rutos_manual_fw_disclosure | |
| − | + | | fw_version ={{Template: Networking_rutos_manual_latest_fw | |
| − | The <b> | + | | series = {{{series}}} |
| + | | name = {{{name}}} | ||
| + | }} | ||
| + | }} | ||
| + | |||
| + | ==Change Password== | ||
| + | |||
| + | The <b>Change Password</b> page is used to change the password of the current user. | ||
| − | [[File: | + | [[File:Networking_rutos_users_change_password.png|border|class=tlt-border]] |
| − | {{# | + | {{#ifeq:{{{series}}}|TAP100||==Users Management== |
| − | + | ===Summary=== | |
---- | ---- | ||
| − | The <b> | + | The <b>Users Management</b> page is used to add new user accounts that can access the device with different user credentials than the default ones. The newly added users can be assigned to one of two groups, either of which can be modified to limit WebUI read/write access rights for users belonging to each specific group. |
<b>This page is unrelated to SSH users.</b> By default, there is one SSH user named "root" and it shares the same password as the default WebUI user named "admin". | <b>This page is unrelated to SSH users.</b> By default, there is one SSH user named "root" and it shares the same password as the default WebUI user named "admin". | ||
| Line 19: | Line 26: | ||
}} | }} | ||
| − | + | ===Groups=== | |
---- | ---- | ||
The <b>Groups</b> section lists available user groups of which there are three: | The <b>Groups</b> section lists available user groups of which there are three: | ||
| − | [[File: | + | [[File:Networking_rutos_users_groups_v1.png|border|class=tlt-border]] |
---- | ---- | ||
<ul> | <ul> | ||
| Line 38: | Line 45: | ||
<li>limited read access; by default, users belonging to this group cannot view these pages: | <li>limited read access; by default, users belonging to this group cannot view these pages: | ||
<ul> | <ul> | ||
| − | <li>System → [[{{{name}}} | + | <li>System → [[{{{name}}} Users|Users]].</li> |
</ul> | </ul> | ||
</li> | </li> | ||
| Line 52: | Line 59: | ||
<ul> | <ul> | ||
{{#ifeq:{{{mobile}}}|0||<li>Services → Mobile Utilities → Messages → [[{{{name}}} Mobile_Utilities#Send_Messages|Send Messages]];</li>}} | {{#ifeq:{{{mobile}}}|0||<li>Services → Mobile Utilities → Messages → [[{{{name}}} Mobile_Utilities#Send_Messages|Send Messages]];</li>}} | ||
| − | <li>System → [[{{{name}}} | + | <li>System → [[{{{name}}} Users|Users]];</li> |
<li>System → [[{{{name}}} Firmware|Firmware]];</li> | <li>System → [[{{{name}}} Firmware|Firmware]];</li> | ||
<li>System → [[{{{name}}} Reboot|Reboot]].</li> | <li>System → [[{{{name}}} Reboot|Reboot]].</li> | ||
| Line 64: | Line 71: | ||
<b>Additional note</b>: you can view and/or edit settings for each group by clicking the 'Edit' button next to them. More on information on how to edit group access settings is located in the following section of this manual page. | <b>Additional note</b>: you can view and/or edit settings for each group by clicking the 'Edit' button next to them. More on information on how to edit group access settings is located in the following section of this manual page. | ||
| − | + | ====Group Settings (edit group)==== | |
---- | ---- | ||
A group's parameters can be set in its <b>Group Settings</b> page. To access the Groups Settings page, click the 'Edit' button next to the group's name. Below is an example of the Group Settings section: | A group's parameters can be set in its <b>Group Settings</b> page. To access the Groups Settings page, click the 'Edit' button next to the group's name. Below is an example of the Group Settings section: | ||
| Line 78: | Line 85: | ||
<tr> | <tr> | ||
<td>Write action</td> | <td>Write action</td> | ||
| − | <td>Allow | + | <td>Allow | Deny; default: <b>Allow</b></td> |
<td>Specifies whether to allow or deny write actions for users in the group. Write actions consist of changing configurations and performing certain actions (such as clicking buttons).<br>This field directly correlates with the "Write access" field below it, because the selected write action will apply to pages specified in that field.</td> | <td>Specifies whether to allow or deny write actions for users in the group. Write actions consist of changing configurations and performing certain actions (such as clicking buttons).<br>This field directly correlates with the "Write access" field below it, because the selected write action will apply to pages specified in that field.</td> | ||
</tr> | </tr> | ||
| Line 92: | Line 99: | ||
<tr> | <tr> | ||
<td>Read action</td> | <td>Read action</td> | ||
| − | <td>Allow | + | <td>Allow | Deny; default: <b>Deny</b></td> |
<td>Specifies whether to allow or deny read actions for users in the group. Read actions consist of viewing pages on the WebUI.<br>This field directly correlates with the "Read access" field below it, because the selected read action will apply to pages specified in that field.</td> | <td>Specifies whether to allow or deny read actions for users in the group. Read actions consist of viewing pages on the WebUI.<br>This field directly correlates with the "Read access" field below it, because the selected read action will apply to pages specified in that field.</td> | ||
</tr> | </tr> | ||
<tr> | <tr> | ||
<td>Read access</td> | <td>Read access</td> | ||
| − | <td>path(s) to page(s); default: | + | <td>path(s) to page(s); default: <b> |
<ul> | <ul> | ||
<li><b>services/mobile_utilities/sms/send</b></li> | <li><b>services/mobile_utilities/sms/send</b></li> | ||
| Line 117: | Line 124: | ||
</table> | </table> | ||
| − | + | =====Examples===== | |
---- | ---- | ||
The easiest way to master the syntax is to navigate to page that you want to generate a path for and the copy the path from the URL of that page. | The easiest way to master the syntax is to navigate to page that you want to generate a path for and the copy the path from the URL of that page. | ||
| Line 137: | Line 144: | ||
<b>*</b> | <b>*</b> | ||
| − | + | ===Users=== | |
---- | ---- | ||
The <b>Users</b> section lists all created users and provides the possibility to change their passwords and the group they belong to (with the exception of the default user "admin" which always belongs to the <i>root</i> group). | The <b>Users</b> section lists all created users and provides the possibility to change their passwords and the group they belong to (with the exception of the default user "admin" which always belongs to the <i>root</i> group). | ||
| Line 143: | Line 150: | ||
By default, there is only one user called "admin": | By default, there is only one user called "admin": | ||
| − | [[File: | + | [[File:Networking_rutos_users_users_v2.png|border|class=tlt-border]] |
| − | + | ====User Settings (edit user)==== | |
---- | ---- | ||
Each user's password and group parameters can be set in their <b>User Settings</b> pages. To access the User Settings page, click the 'Edit' button next to the user's name. | Each user's password and group parameters can be set in their <b>User Settings</b> pages. To access the User Settings page, click the 'Edit' button next to the user's name. | ||
| Line 151: | Line 158: | ||
<u>However</u>, you may want to add a new user at first. This can be done from the [[{{{name}}}_Users#Add_New_User|Add New User]] section below: | <u>However</u>, you may want to add a new user at first. This can be done from the [[{{{name}}}_Users#Add_New_User|Add New User]] section below: | ||
| − | [[File: | + | [[File:Networking_rutos_users_add_new_user_example.png]] |
<ol> | <ol> | ||
| Line 162: | Line 169: | ||
Below is an example of a newly added user's settings page: | Below is an example of a newly added user's settings page: | ||
| − | [[File: | + | [[File:Networking_rutos_users_user_settings.png|border|class=tlt-border]] |
<table class="nd-mantable"> | <table class="nd-mantable"> | ||
| Line 178: | Line 185: | ||
<td>New password</td> | <td>New password</td> | ||
<td>string; default: <b>none</b></td> | <td>string; default: <b>none</b></td> | ||
| − | <td | + | <td>Create a new password for the user. The password must contain at least 8 characters, including at least one upper case letter and one digit.</td> |
</tr> | </tr> | ||
<tr> | <tr> | ||
| Line 189: | Line 196: | ||
<td>admin {{!}} user; default: <b>user</b></td> | <td>admin {{!}} user; default: <b>user</b></td> | ||
<td>The group to which the user belongs.</td> | <td>The group to which the user belongs.</td> | ||
| − | |||
| − | |||
| − | |||
| − | |||
| − | |||
</tr> | </tr> | ||
</table> | </table> | ||
| − | + | ===Add New User=== | |
---- | ---- | ||
The <b>Add New User</b> section is used to create additional users that can access the WebUI. After a new user is added, it will appear in the [[{{{name}}} Users#Users|Users]] section. | The <b>Add New User</b> section is used to create additional users that can access the WebUI. After a new user is added, it will appear in the [[{{{name}}} Users#Users|Users]] section. | ||
| − | [[File: | + | [[File:Networking_rutos_users_add_new_user.png|border|class=tlt-border]] |
<table class="nd-mantable"> | <table class="nd-mantable"> | ||
| Line 217: | Line 219: | ||
<td>Password</td> | <td>Password</td> | ||
<td>string; default: <b>none</b></td> | <td>string; default: <b>none</b></td> | ||
| − | <td | + | <td>A password for the new user. The password must contain at least 8 characters, including at least one upper case letter and one digit.</td> |
</tr> | </tr> | ||
</table>}} | </table>}} | ||
| + | |||
| + | [[Category:{{{name}}} System section]] | ||
Revision as of 15:13, 9 March 2023
Template:Networking rutos manual fw disclosure
Change Password
The Change Password page is used to change the password of the current user.

Users Management
Summary
The Users Management page is used to add new user accounts that can access the device with different user credentials than the default ones. The newly added users can be assigned to one of two groups, either of which can be modified to limit WebUI read/write access rights for users belonging to each specific group.
This page is unrelated to SSH users. By default, there is one SSH user named "root" and it shares the same password as the default WebUI user named "admin".
This manual page provides an overview of the Users page in {{{name}}} devices.
If you're having trouble finding this page or some of the parameters described here on your device's WebUI, you should turn on "Advanced WebUI" mode. You can do that by clicking the "Advanced" button, located at the top of the WebUI.

Groups
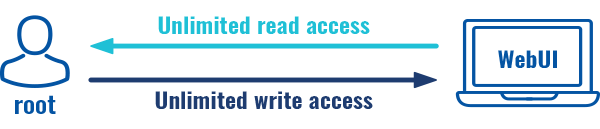
The Groups section lists available user groups of which there are three:

- root - highest level of authority. Key elements that define this group:
- has unlimited read/write access;
- additional users cannot be added to this group;
- access rights for this group cannot be modified.
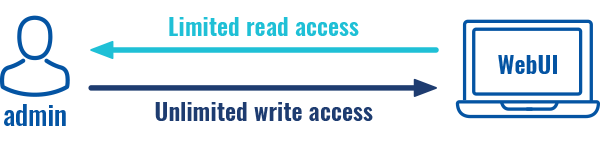
- admin - second highest level of authority. Key elements that define this group:
- limited read access; by default, users belonging to this group cannot view these pages:
- System → [[{{{name}}} Users|Users]].
- unlimited write access by default;
- access rights can be modified.
- limited read access; by default, users belonging to this group cannot view these pages:
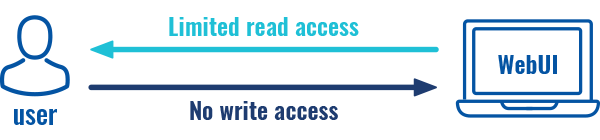
- user - lowest level of authority. Key elements that define this group:
- no write access;
- limited read access; by default, users belonging to this group cannot view these pages:
- Services → Mobile Utilities → Messages → [[{{{name}}} Mobile_Utilities#Send_Messages|Send Messages]];
- System → [[{{{name}}} Users|Users]];
- System → [[{{{name}}} Firmware|Firmware]];
- System → [[{{{name}}} Reboot|Reboot]].
- access rights can be modified.


Additional note: you can view and/or edit settings for each group by clicking the 'Edit' button next to them. More on information on how to edit group access settings is located in the following section of this manual page.
Group Settings (edit group)
A group's parameters can be set in its Group Settings page. To access the Groups Settings page, click the 'Edit' button next to the group's name. Below is an example of the Group Settings section:

| Field | Value | Description |
|---|---|---|
| Write action | Allow
[[Category:{{{name}}} System section]] |

