SSH RSA key authentication (Windows): Difference between revisions
PauliusRug (talk | contribs) No edit summary |
|||
| (2 intermediate revisions by one other user not shown) | |||
| Line 64: | Line 64: | ||
</li> | </li> | ||
<li> | <li> | ||
If you're using SSH remotely, don't forget to use the router's public IP address when logging in and enable remote SSH access on the router. You can do that by | If you're using SSH remotely, don't forget to use the router's public IP address when logging in and enable remote SSH access on the router. You can do that by issuing the following commands: | ||
[ | <pre> | ||
uci set firewall.@rule[5].enabled=1 | |||
uci commit | |||
/etc/init.d/firewall restart | |||
</pre> | |||
</li> | </li> | ||
</ul> | </ul> | ||
| Line 77: | Line 81: | ||
<pre> | <pre> | ||
uci set dropbear.@dropbear[0].PasswordAuth=off | uci set dropbear.@dropbear[0].PasswordAuth=off | ||
uci commit | uci commit | ||
/etc/init.d/dropbear restart | /etc/init.d/dropbear restart | ||
</pre> | </pre> | ||
| Line 86: | Line 90: | ||
<pre> | <pre> | ||
uci set dropbear.@dropbear[0].RootPasswordAuth=off | uci set dropbear.@dropbear[0].RootPasswordAuth=off | ||
uci commit | uci commit | ||
/etc/init.d/dropbear restart | /etc/init.d/dropbear restart | ||
</pre> | </pre> | ||
| Line 101: | Line 105: | ||
<pre> | <pre> | ||
uci set dropbear.@dropbear[0].PasswordAuth=on #### use uci set dropbear.@dropbear[0].RootPasswordAuth=on instead if you had only disabled password authentication for root | uci set dropbear.@dropbear[0].PasswordAuth=on #### use uci set dropbear.@dropbear[0].RootPasswordAuth=on instead if you had only disabled password authentication for root | ||
uci commit | uci commit | ||
/etc/init.d/dropbear restart | /etc/init.d/dropbear restart | ||
</pre> | </pre> | ||
| Line 117: | Line 121: | ||
* https://www.chiark.greenend.org.uk/~sgtatham/putty/latest.html - PuTTY downloads page | * https://www.chiark.greenend.org.uk/~sgtatham/putty/latest.html - PuTTY downloads page | ||
[[Category:Configuration Examples]] | |||
Revision as of 14:31, 1 August 2023
Main Page > General Information > Configuration Examples > SSH RSA key authentication (Windows)Introduction
Secure Shell (SSH) is a cryptographic network protocol for operating network services securely over an unsecured network. The best known example application is for remote login to computer systems by users.
Typically an SSH login involves specifying a user name, IP address or hostname and the password for the user. When you login to a certain IP address/hostname, the system generates a public/private RSA key pair between the two parties. There is a possibility to login to via SSH using only that type of key with the help of the dropbear service, thus, eliminating the password step. This article provides instructions on how to set up public key authentication for logging in to a RUTxxx router via SSH using a Windows OS. For the Linux guide, click here.
Prerequisites
To achieve the configuration described in this article you will need the following:
- A computer running on Windows
- PuTTY client and PuTTYgen (download link here)
- A RUTxxx router of any type
Configuration
-
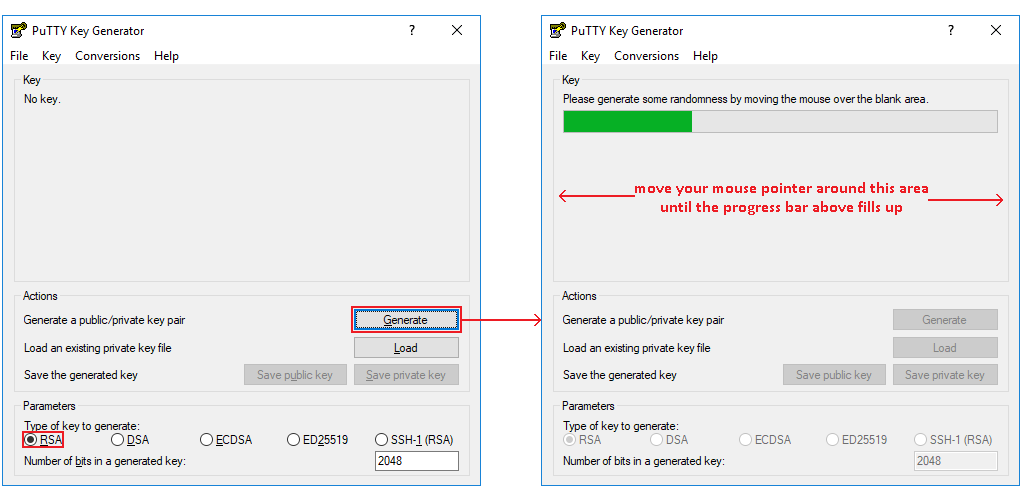
First, we'll need to generate the rsa key. For this we'll use PuTTYgen - a key generator for PuTTY on Windows. It will be installed along with PuTTY automatically, so just search for PuTTYgen in your computer, launch it and click "Generate". A progress bar will appear at the top of the window. Move your mouse pointer around the grey are to generate the key until the progress bar fills up:
-
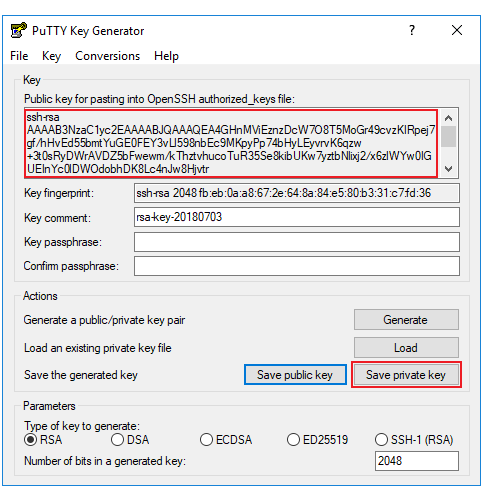
Then copy the contents of the key file and save your key:
-
Open PuTTY and make the following changes:
-
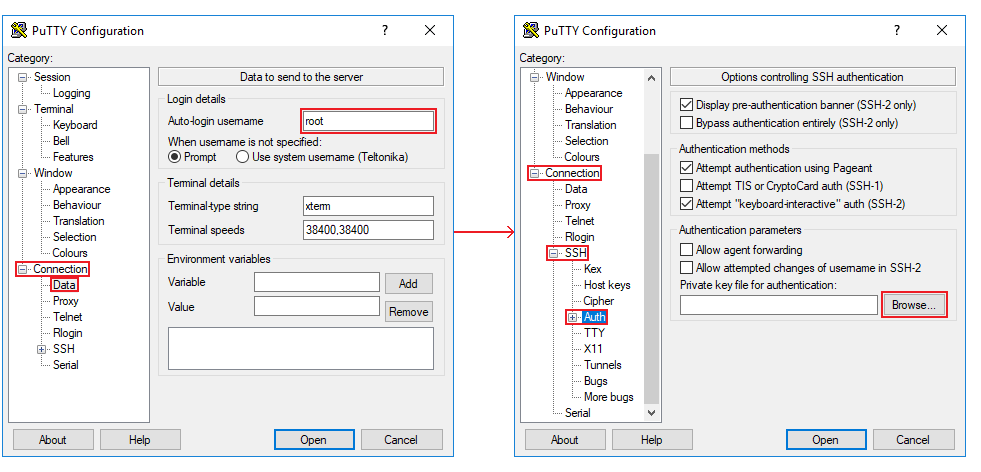
In the "Category" section on the left go to Connection → Data and set "Auto-login username" to root; in Connection → SSH → Auth click browse and select you key file:
-
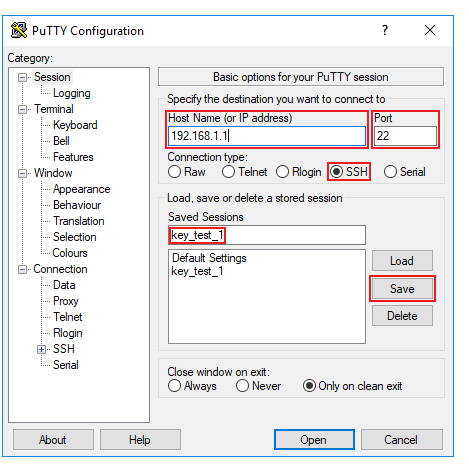
Go back to the "Session" section and enter your router's IP address, select the SSH port (22 by default) and SSH connection type. Additionally you can enter a name for this configuration and click "Save". This way the next time you wish to login you won't have to set everything up over again. To complete the connection click "Open":
-
In the "Category" section on the left go to Connection → Data and set "Auto-login username" to root; in Connection → SSH → Auth click browse and select you key file:
-
When you login, paste the contents of the key file to the /etc/dropbear/authorized_keys file. You can edit files with the vi command:
vi /etc/dropbear/authorized_keys
This will open a text editing environment. To start editing, press "I" on your keyboard. To paste something, right-click where you want the text to appear. To save and close the editor, press "Esc" on your keyboard, type :x and press "Enter".
-
Next, while still connected to the router, add read, write and execute permissions for the /etc/dropbear directory and read, write permissions for the /etc/dropbear/authorized_keys file:
chmod 700 /etc/dropbear
chmod 600 /etc/dropbear/authorized_keys
- At this point, the configuration is complete. To test it, terminate your current SSH connection (you can do so by executing the exit command) and try logging in again - if everything is in order, the router should no longer require a password when connecting via SSH.
-
Additional notes:
- Other devices will not be able to connect using your key, but keep in mind that if someone gains physical access to your computer, they will be able to connect to the router without a password.
-
If you're using SSH remotely, don't forget to use the router's public IP address when logging in and enable remote SSH access on the router. You can do that by issuing the following commands:
uci set firewall.@rule[5].enabled=1
uci commit
/etc/init.d/firewall restart
(Optional) Adding additional security
-
You can also add additional security for your router's SSH connections by disabling the password login entirely. To do so, SSH to your router and execute the following commands:
uci set dropbear.@dropbear[0].PasswordAuth=off
uci commit
/etc/init.d/dropbear restart
-
If you have configured other users besides root and want to leave access with password ON for them, you can disable password login only for the user root by executing these commands instead:
uci set dropbear.@dropbear[0].RootPasswordAuth=off
uci commit
/etc/init.d/dropbear restart
-
Additional notes:
- When you disable SSH password authentication, only users with keys will be able to login via SSH. If another user needs access via SSH, you can temporarily enable SSH password authentication until the user in question sets up their authentication. Or the user can generate the key, send it to you and you can add it to the /etc/dropbear/authorized_keys file.
-
When you disable SSH password authentication, make sure you don't accidentally delete your key as you will not be able to connect to your router via SSH. However, if this does happen, you can still login via the Command Line Interface (CLI) from the router's WebUI (Services → CLI) or other forms of CLI described here. When you login, simply enable SSH password authentication with these commands:
uci set dropbear.@dropbear[0].PasswordAuth=on #### use uci set dropbear.@dropbear[0].RootPasswordAuth=on instead if you had only disabled password authentication for root
uci commit
/etc/init.d/dropbear restart
See also
- SSH RSA key authentication (Linux) - the same guide but aimed at Linux users
- Command line interfaces - descriptions and instruction for all types of command line interfaces supported by RUTxxx devices
External links
- https://www.chiark.greenend.org.uk/~sgtatham/putty/latest.html - PuTTY downloads page


