|
|
| (6 intermediate revisions by the same user not shown) |
| Line 1: |
Line 1: |
| | __TOC__ | | __TOC__ |
| − | <p style="color:red">The information on this page is updated in accordance with the [https://wiki.teltonika-networks.com/view/FW_%26_SDK_Downloads'''00.07.08'''] firmware version.</p>
| |
| | ==Summary== | | ==Summary== |
| | + | <span style="color: red;">The information in this page is updated in accordance with the <span style="color: #0054A6;"><b>RUTXXX_R_00_07_02</b></span> firmware version.</span> |
| | | | |
| − | In this example we will setup redundant links using dynamic routing where 2 routers will be connected using multiple links directly – Main WAN and two Backup WANs in order to make sure LAN devices on each end would be available in case Main links fail. | + | In this example we will setup redundant links using dynamic routing where 2 routers will be connected using multiple links directly – Main WAN and two Backup WANs in order to make sure LAN devices on each end would be available in case Main links fail. |
| | | | |
| | == Configuration Overview & Prerequisites== | | == Configuration Overview & Prerequisites== |
| Line 10: |
Line 10: |
| | | | |
| | Each WAN on both ends has to be in the same private network. In other words: | | Each WAN on both ends has to be in the same private network. In other words: |
| − | *Router1 WAN1 interface must be able to reach Router2 WAN1 interface; | + | *RUT1 WAN1 interface must be able to reach RUT2 WAN1 interface; |
| − | * Router1 WAN2 interface must be able to reach Router2 WAN2 interface; | + | * RUT1 WAN2 interface must be able to reach RUT2 WAN2 interface; |
| − | *Router1 WAN3 interface must be able to reach Router2 WAN3 interface. | + | *RUT1 WAN3 interface must be able to reach RUT2 WAN3 interface. |
| | | | |
| | ==Network Topology== | | ==Network Topology== |
| | | | |
| − | [[File:OSPF_WAN_TOPOLOGY_1.png|center|1100px]] | + | [[File:OSPF Route Failover Topology v1.png|center]] |
| | | | |
| − | ==Configuration Example== | + | == Configuring Routers== |
| | + | We will not go too deep into basics. Assuming we already have VLANs set up to have three different links between routers according to the topology, we can jump straight into configuring dynamic routes using OSPF. |
| | | | |
| − | ===Router 1 Configuration===
| + | OSPF can be configured in WebUI, by navigating to '''Network → Routing → Dynamic Routing → OSPF'''. |
| − | ----
| |
| − | ====VLAN Configurtion====
| |
| − | ----
| |
| − | Open router‘s WebUI and navigate to '''Network → VLAN → Port Based''' configuration:
| |
| − | | |
| − | =====Port based VLAN=====
| |
| − | ----
| |
| − | Add new VLANs by clicking [[File:Add Button.png|40x70px]] and Make following changes to 3 new VLANS:
| |
| − | | |
| − | # VLAN ID: '''192''' | lan1: '''Untagged''' | Lan2: '''Off''' | Lan3: '''Off'''
| |
| − | # VLAN ID: '''10''' | lan1: '''Off''' | Lan2: '''Untagged''' | Lan3: '''Off'''
| |
| − | # VLAN ID: '''172''' | lan1: '''Off''' | Lan2: '''Off''' | Lan3: '''Untagged'''
| |
| − | | |
| − | [[File:OSPF_WAN_1.png|border|class=tlt-border|1100px]]
| |
| − | | |
| − | ====WAN Interface Configurtion====
| |
| − | ----
| |
| − | Open router‘s '''WebUI''' and navigate to '''Network → WAN → WAN interfaces''' configuration:
| |
| − | ====Creating And Configuring WAN 1 Interface====
| |
| − | ----
| |
| − | Add new WAN by clicking [[File:Add Button.png|40x70px]] and Make following changes to new interface configurtion:
| |
| − | =====General Settings=====
| |
| − | ----
| |
| − | Make the following changes:
| |
| − | # Enter Name: '''Wan1Main'''
| |
| − | # Select Protocol: '''Static'''
| |
| − | # Enter IPv4 address: '''192.168.110.1'''
| |
| − | # Enter IPv4 net mask: '''255.255.255.252'''
| |
| − | [[File:OSPF_ROUTER1_WAN1_General.png|border|class=tlt-border|center| 1100px]]
| |
| − | =====Physical Settings=====
| |
| − | ----
| |
| − | Make the following changes:
| |
| − | # Select interface: '''eth0.192'''
| |
| − | [[File:OSPF_ROUTER2_WAN1_Physical.png|border|class=tlt-border|center| 1100px]]
| |
| − | | |
| − | | |
| − | ====Creating And Configuring WAN 2 Interface====
| |
| − | ----
| |
| − | Add new WAN by clicking [[File:Add Button.png|40x70px]] and Make following changes to new interface configurtion:
| |
| − | =====General Settings=====
| |
| − | ----
| |
| − | Make the following changes:
| |
| − | # Enter Name: '''Wan2Backup'''
| |
| − | # Select Protocol: '''Static'''
| |
| − | # Enter IPv4 address: '''10.0.110.1'''
| |
| − | # Enter IPv4 net mask: '''255.255.255.252'''
| |
| − | [[File:OSPF_ROUTER1_WAN2_General.png|border|class=tlt-border|center| 1100px]]
| |
| − | | |
| − | =====Physical Settings=====
| |
| − | ----
| |
| − | Make the following changes:
| |
| − | # Select interface: '''eth0.10'''
| |
| − | [[File:OSPF_ROUTER2_WAN2_Physical.png|border|class=tlt-border|center]]
| |
| − | | |
| − | ====Creating And Configuring WAN 3 Interface====
| |
| − | ----
| |
| − | Add new WAN by clicking [[File:Add Button.png|40x70px]] and Make following changes to new interface configurtion:
| |
| − | =====General Settings=====
| |
| − | ----
| |
| − | Make the following changes:
| |
| − | # Enter Name: '''Wan3Backup'''
| |
| − | # Select Protocol: '''Static'''
| |
| − | # Enter IPv4 address: '''172.16.110.1'''
| |
| − | # Enter IPv4 net mask: '''255.255.255.252'''
| |
| − | [[File:OSPF_ROUTER1_WAN3_General.png|border|class=tlt-border|center|1100px]]
| |
| − | | |
| − | =====Physical Settings=====
| |
| − | ----
| |
| − | Make the following changes:
| |
| − | # Select interface: '''eth0.172'''
| |
| − | [[File:OSPF_ROUTER2_WAN3_Physical.png|border|class=tlt-border|center|1100px]]
| |
| − | | |
| − | ====OSPF Configuration====
| |
| − | ----
| |
| − | Open router‘s '''WebUI''' and navigate to '''Network → Routing → Dynamic routes → OSPF''' configuration:
| |
| − | =====OSPF - Global Settings=====
| |
| − | ----
| |
| − | Make following changes:
| |
| − | # Enable Service: '''on'''
| |
| − | # Enable Vty: '''on'''
| |
| − | # Enter Router ID: '''192.168.110.1'''
| |
| − | # Select External Route: '''Default'''
| |
| − | # Select Redistribution Options: '''Connected'''
| |
| − | [[File:OSPF_GLOBAL_ROUTER1.png|border|class=tlt-border|center| 1100px]]
| |
| − | | |
| − | =====OSPF interfaces=====
| |
| − | ----
| |
| − | Add new OSPF interface for each WAN interface created by clicking [[File:Add Button.png|40x70px]]
| |
| − | | |
| − | Make following changes to new interfaces:
| |
| − | # Select Interface: '''eth0.192 (WanMAIN)''' | Enable Interface: '''on'''
| |
| − | # Select Interface: '''eth0.10 (Wan2Backup)''' | Enable Interface: '''on'''
| |
| − | # Select Interface: '''eth0.172 (Wan3Backup)''' | Enable Interface: '''on'''
| |
| − | | |
| − | [[File:OSPF_INTERFACES_1.png|border|class=tlt-border|center| 1100px]]
| |
| − | | |
| − | =====OSPF area=====
| |
| − | ----
| |
| − | Add new OSPF area for each WAN interface by entering the area name and clicking [[File:Add Button.png|40x70px]]
| |
| − | | |
| − | Make following changes to the areas:
| |
| − | # Name: '''First''' | Area: '''1005''' | Stub: '''off''' | '''on'''
| |
| − | # Name: '''Second''' | Area: '''1004''' | Stub: '''off''' | '''on'''
| |
| − | # Name: '''Third''' | Area: '''1003''' | Stub: '''off''' | '''on'''
| |
| − | [[File:OSPF_AREA_1.png|border|class=tlt-border|center|1100px]]
| |
| − | | |
| − | =====OSPF networks=====
| |
| − | ----
| |
| − | Add new OSPF network for each WAN interface by entering the area name and clicking [[File:Add Button.png|40x70px]]
| |
| − | | |
| − | Make following changes to the netwroks:
| |
| − | # Name: '''WAN1''' | Network: '''192.168.110.0/30''' | Area: '''First''' | '''on'''
| |
| − | # Name: '''WAN2''' | Network: '''10.0.110.0/30''' | Area: '''Second''' | '''on'''
| |
| − | # Name: '''WAN3''' | Netwrok: '''172.16.110.0/30''' | Area: '''Third''' | '''on'''
| |
| − | [[File:OSPF_NETWORKS_1.png|border|class=tlt-border|center| 1100px]]
| |
| − | | |
| − | ===Router 2 Configuration===
| |
| − | ----
| |
| − | | |
| − | | |
| − | ====VLAN Configurtion====
| |
| − | ----
| |
| − | Open router‘s WebUI and navigate to '''Network → VLAN → Port Based''' configuration:
| |
| − | | |
| − | =====Port based VLAN=====
| |
| − | ----
| |
| − | Add new VLANs by clicking [[File:Add Button.png|40x70px]] and Make following changes to 3 new VLANS:
| |
| − | | |
| − | # VLAN ID: '''192''' | lan1: '''Untagged''' | Lan2: '''Off''' | Lan3: '''Off'''
| |
| − | # VLAN ID: '''10''' | lan1: '''Off''' | Lan2: '''Untagged''' | Lan3: '''Off'''
| |
| − | # VLAN ID: '''172''' | lan1: '''Off''' | Lan2: '''Off''' | Lan3: '''Untagged'''
| |
| − | | |
| − | [[File:OSPF_WAN_1.png|border|class=tlt-border|1100px]]
| |
| − | | |
| − | ====WAN Interface Configurtion====
| |
| − | ----
| |
| − | Open router‘s '''WebUI''' and navigate to '''Network → WAN → WAN interfaces''' configuration:
| |
| − | =====Creating And Configuring WAN 1 Interface=====
| |
| − | ----
| |
| − | Add new WAN by clicking [[File:Add Button.png|40x70px]] and Make following changes to new interface configurtion:
| |
| − | =====General Settings=====
| |
| − | ----
| |
| − | Make the following changes:
| |
| − | # Enter Name: '''Wan1Main'''
| |
| − | # Select Protocol: '''Static'''
| |
| − | # Enter IPv4 address: '''192.168.110.2'''
| |
| − | # Enter IPv4 net mask: '''255.255.255.252'''
| |
| − | [[File:OSPF_ROUTER2_WAN1_General.png|border|class=tlt-border|center|1100px]]
| |
| − | =====Physical Settings=====
| |
| − | ----
| |
| − | Make the following changes:
| |
| − | # Select interface: '''eth0.192'''
| |
| − | [[File:OSPF_ROUTER2_WAN1_Physical.png|border|class=tlt-border|center|1100px]]
| |
| − | | |
| − | | |
| − | ====Creating And Configuring WAN 2 Interface====
| |
| − | ----
| |
| − | Add new WAN by clicking [[File:Add Button.png|40x70px]] and Make following changes to new interface configurtion:
| |
| − | =====General Settings=====
| |
| − | ----
| |
| − | Make the following changes:
| |
| − | # Enter Name: '''Wan2Backup'''
| |
| − | # Select Protocol: '''Static'''
| |
| − | # Enter IPv4 address: '''10.0.110.2'''
| |
| − | # Enter IPv4 net mask: '''255.255.255.252'''
| |
| − | [[File:OSPF_ROUTER2_WAN2_General.png|border|class=tlt-border|center| 1100px]]
| |
| − | | |
| − | =====Physical Settings=====
| |
| − | ----
| |
| − | Make the following changes:
| |
| − | # Select interface: '''eth0.10'''
| |
| − | [[File:OSPF_ROUTER2_WAN2_Physical.png|border|class=tlt-border|center| 1100px]]
| |
| − | | |
| − | ====Creating And Configuring WAN 3 Interface====
| |
| − | ----
| |
| − | Add new WAN by clicking [[File:Add Button.png|40x70px]] and Make following changes to new interface configurtion:
| |
| − | =====General Settings=====
| |
| − | ----
| |
| − | Make the following changes:
| |
| − | # Enter Name: '''Wan3Backup'''
| |
| − | # Select Protocol: '''Static'''
| |
| − | # Enter IPv4 address: '''172.16.110.2'''
| |
| − | # Enter IPv4 net mask: '''255.255.255.252'''
| |
| − | [[File:OSPF_ROUTER2_WAN3_General.png|border|class=tlt-border|center|1100px]]
| |
| | | | |
| − | ======Physical Settings======
| + | '''Note:''' if dynamic routing is not available in WebUI, you can install an additional package by navigating to '''Services → Package Manager'''. |
| − | ----
| |
| − | Make the following changes:
| |
| − | # Select interface: '''eth0.172'''
| |
| − | [[File:OSPF_ROUTER2_WAN3_Physical.png|border|class=tlt-border|center|1100px]]
| |
| | | | |
| − | ====OSPF Configuration====
| + | ===OSPF - General settings=== |
| − | ---- | |
| − | Open router‘s '''WebUI''' and navigate to '''Network → Routing → Dynamic routes → OSPF''' configuration:
| |
| − | =====OSPF - Global Settings=====
| |
| | ---- | | ---- |
| − | Make following changes:
| + | [[File:OSPF Route failover general settings v1.png|border|class=tlt-border|1075x1075px]] |
| − | # Enable Service: '''on''' | + | #Enable Service |
| − | # Enable Vty: '''on''' | + | #Enable vty |
| − | # Enter Router ID: '''192.168.110.2'''
| + | #Set Router ID (Can be set to any number or IP address) |
| − | # Select External Route: '''Default''' | + | #Set ''"Generate a default" external'' route as '''''Default''''' |
| − | # Select Redistribution Options: '''Connected'''
| + | #Select '''''Connected''''' in ''"Redistribution options"'' |
| − | [[File:OSPF_GLOBAL_ROUTER2.png|border|class=tlt-border|center|1100px]]
| |
| | | | |
| − | =====OSPF interfaces=====
| + | ===OSPF Interface settings=== |
| − | ---- | + | ----[[File:OSPF Route failover interface settings v1.png|border|class=tlt-border|1091x1091px]] |
| − | Add new OSPF interface for each WAN interface created by clicking [[File:Add Button.png|40x70px]]
| + | #Add 3 new interfaces for wan, WAN2 and WAN3 |
| | + | #(Optional) Set interface priorities and custom dead times |
| | + | #Leave other settings as default |
| | | | |
| − | Make following changes to new interfaces:
| + | ===OSPF Area settings=== |
| − | # Select Interface: '''eth0.192 (WanMAIN)''' | Enable Interface: '''on'''
| + | ----[[File:OSPF Route failover area settings v1.png|border|class=tlt-border|1089x1089px]] |
| − | # Select Interface: '''eth0.10 (Wan2Backup)''' | Enable Interface: '''on''' | + | #Create 3 new instances with different Area codes and enable them: |
| − | # Select Interface: '''eth0.172 (Wan3Backup)''' | Enable Interface: '''on''' | + | ##1005 |
| | + | ## 1004 |
| | + | ##1003 |
| | | | |
| − | [[File:OSPF_INTERFACES_1.png|border|class=tlt-border|center| 1100px]] | + | ===OSPF Networks settings=== |
| | + | ----[[File:OSPF Route failover networks settings v1.png|border|class=tlt-border|1096x1096px]] |
| | + | #Add new instance, Network: 192.168.110.0/24; Assign first area |
| | + | #Add new instance, Network: 10.0.110.0/24; Assign second area |
| | + | #Add new instance, Network: 172.16.110.0/24; Assign third area |
| | | | |
| − | =====OSPF area===== | + | ===Second router=== |
| | ---- | | ---- |
| − | Add new OSPF area for each WAN interface by entering the area name and clicking [[File:Add Button.png|40x70px]]
| |
| − |
| |
| − | Make following changes to the areas:
| |
| − | # Name: '''First''' | Area: '''1005''' | Stub: '''off''' | '''on'''
| |
| − | # Name: '''Second''' | Area: '''1004''' | Stub: '''off''' | '''on'''
| |
| − | # Name: '''Third''' | Area: '''1003''' | Stub: '''off''' | '''on'''
| |
| − | [[File:OSPF_AREA_1.png|border|class=tlt-border|center|1100px]]
| |
| | | | |
| − | =====OSPF networks=====
| + | Second router should be configured analogously as the first router. |
| − | ----
| |
| − | Add new OSPF network for each WAN interface by entering the area name and clicking [[File:Add Button.png|40x70px]]
| |
| | | | |
| − | Make following changes to the networks:
| + | OSPF will now set routes dynamically depending on availability of the connected links, therefore if Main link fails, traffic will route through a backup link. |
| − | # Name: '''WAN1''' | Network: '''192.168.110.0/30''' | Area: '''First''' | '''on'''
| |
| − | # Name: '''WAN2''' | Network: '''10.0.110.0/30''' | Area: '''Second''' | '''on'''
| |
| − | # Name: '''WAN3''' | Netwrok: '''172.16.110.0/30''' | Area: '''Third''' | '''on'''
| |
| − | [[File:OSPF_NETWORKS_1.png|border|class=tlt-border|center|1100px]]
| |
| | | | |
| − | ==Configuration Testing== | + | ==Testing Configuration== |
| | | | |
| | If everything was set up correctly, we should see routes to the second network through the main link in the routing table: | | If everything was set up correctly, we should see routes to the second network through the main link in the routing table: |
| Line 268: |
Line 72: |
| | As we can see, dynamic routing automatically switched to the next available route. | | As we can see, dynamic routing automatically switched to the next available route. |
| | | | |
| − | ===Testing Communication Between LAN Devices=== | + | ===Testing communication between LAN devices=== |
| | ---- | | ---- |
| | | | |
| Line 278: |
Line 82: |
| | | | |
| | [[File:OSPF Route failover ping testing v1.png]] | | [[File:OSPF Route failover ping testing v1.png]] |
| | + | |
| | | | |
| | We can see that after a short delay, laptop on the second router continued communication, which means dynamic routes are being set correctly. | | We can see that after a short delay, laptop on the second router continued communication, which means dynamic routes are being set correctly. |
| | | | |
| − | ==External links== | + | ==See Also== |
| | | | |
| − | #https://wiki.teltonika-networks.com/view/VLAN_Set_Up
| + | *[[VLAN Set Up]] |
| | + | [[Category:Connection backup]] |
Summary
The information in this page is updated in accordance with the RUTXXX_R_00_07_02 firmware version.
In this example we will setup redundant links using dynamic routing where 2 routers will be connected using multiple links directly – Main WAN and two Backup WANs in order to make sure LAN devices on each end would be available in case Main links fail.
Configuration Overview & Prerequisites
For this example, we will need two routers with 3 separate WAN interfaces. It can either be Wired links or Private Mobile networks. In this example we will use 3 wired links for the simplicity of testing. However, there can be other variations, such as 1 Wired link and 2 Mobile links.
Each WAN on both ends has to be in the same private network. In other words:
- RUT1 WAN1 interface must be able to reach RUT2 WAN1 interface;
- RUT1 WAN2 interface must be able to reach RUT2 WAN2 interface;
- RUT1 WAN3 interface must be able to reach RUT2 WAN3 interface.
Network Topology
Configuring Routers
We will not go too deep into basics. Assuming we already have VLANs set up to have three different links between routers according to the topology, we can jump straight into configuring dynamic routes using OSPF.
OSPF can be configured in WebUI, by navigating to Network → Routing → Dynamic Routing → OSPF.
Note: if dynamic routing is not available in WebUI, you can install an additional package by navigating to Services → Package Manager.
OSPF - General settings
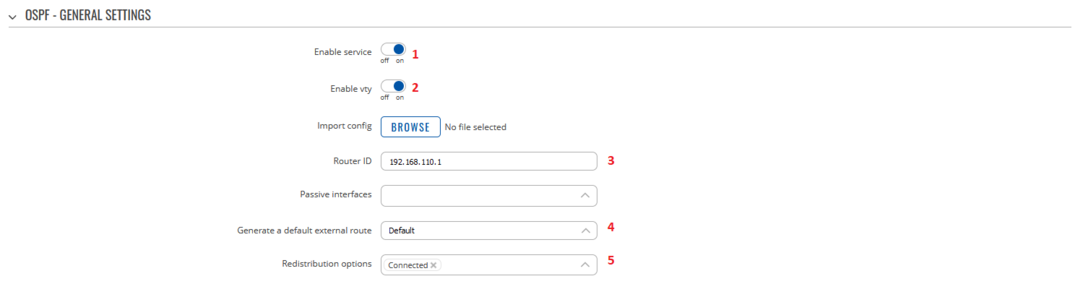
- Enable Service
- Enable vty
- Set Router ID (Can be set to any number or IP address)
- Set "Generate a default" external route as Default
- Select Connected in "Redistribution options"
OSPF Interface settings

- Add 3 new interfaces for wan, WAN2 and WAN3
- (Optional) Set interface priorities and custom dead times
- Leave other settings as default
OSPF Area settings
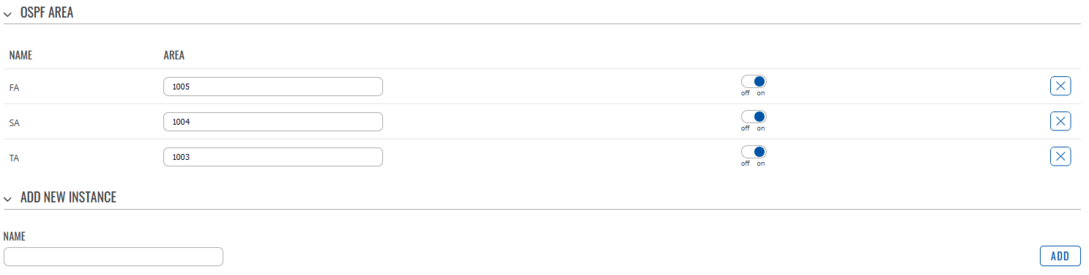
- Create 3 new instances with different Area codes and enable them:
- 1005
- 1004
- 1003
OSPF Networks settings
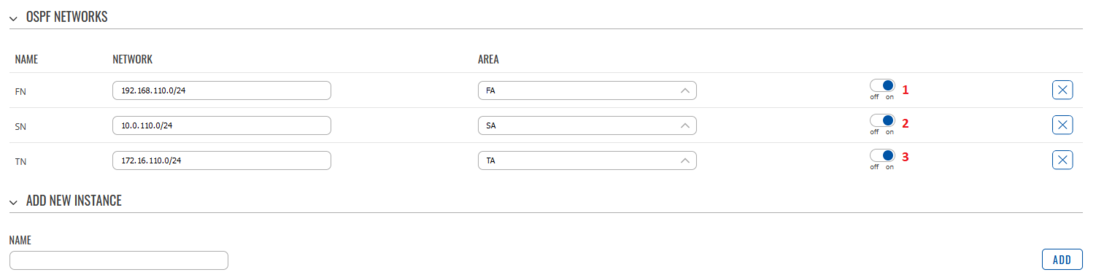
- Add new instance, Network: 192.168.110.0/24; Assign first area
- Add new instance, Network: 10.0.110.0/24; Assign second area
- Add new instance, Network: 172.16.110.0/24; Assign third area
Second router
Second router should be configured analogously as the first router.
OSPF will now set routes dynamically depending on availability of the connected links, therefore if Main link fails, traffic will route through a backup link.
Testing Configuration
If everything was set up correctly, we should see routes to the second network through the main link in the routing table:

Let us simulate Main link failure by disconnecting the cable and see how that affects routes to the second network:

As we can see, dynamic routing automatically switched to the next available route.
Testing communication between LAN devices
Let us connect a LAN device to each of the routers and see if they can communicate with each other, for this example, we will connect laptop to the first router and another laptop to the second router:
- Laptop 1 IP: 192.168.1.220
- Laptop 2 IP: 192.168.2.5
Let us run a ping command from the first laptop to the second and disconnect the Main link cable midway through:
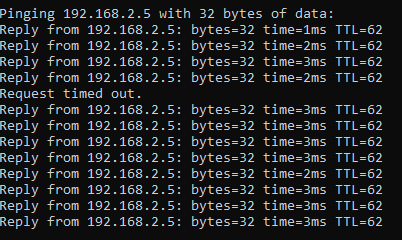
We can see that after a short delay, laptop on the second router continued communication, which means dynamic routes are being set correctly.
See Also


