Template:Configure your computer LAN Windows: Difference between revisions
(Created page with "== Configure your computer LAN (Windows)== <table> <tr> <td style="border-bottom: 1px solid #e8e8e8; vertical-align: top; margin: 10px; padding-bottom: 25px;">1....") |
|||
| Line 1: | Line 1: | ||
== | == Configure your computer LAN (Windows)== | ||
<table> | <table> | ||
<tr> | <tr> | ||
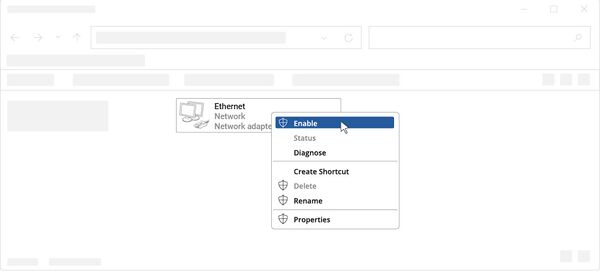
<td style="border-bottom: 1px solid #e8e8e8; vertical-align: top; margin: 10px; padding-bottom: 25px;">1. | <td style="border-bottom: 1px solid #e8e8e8; vertical-align: top; margin: 10px; padding-bottom: 25px;">1. Ensure the Network connection is Enabled. Go to Start — Control Panel — Network and Internet — Network and Sharing Center. Click on the '''Change adapter settings''' in the left panel, then right-click on Network Adapter, and select Enable.</td> | ||
<td style="border-bottom: 1px solid #e8e8e8; vertical-align: top; width: 680px; margin: 10px; padding-bottom: 25px;">[[File:Configure-your-network-1.jpg|right|600 px]]</td> | <td style="border-bottom: 1px solid #e8e8e8; vertical-align: top; width: 680px; margin: 10px; padding-bottom: 25px;">[[File:Configure-your-network-1.jpg|right|600 px]]</td> | ||
</tr> | </tr> | ||
<tr> | <tr> | ||
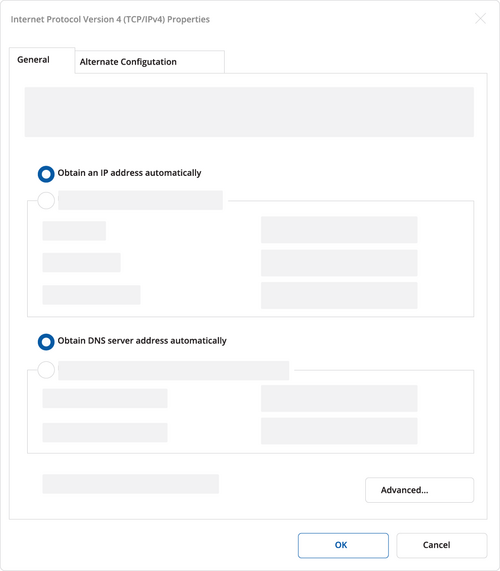
<td style="border-bottom: 1px solid #e8e8e8; vertical-align: top; padding-top: 25px;">2. | <td style="border-bottom: 1px solid #e8e8e8; vertical-align: top; padding-top: 25px;">2. Check if IP and DNS are obtained automatically. Right-click on Wireless Network Adapter and select Properties. Then select '''Internet Protocol Version 4''' and click Properties. | ||
<br>3. | <br>3. If not selected, check to '''obtain an IP address''' and '''obtain DNS server address automatically'''. Click OK.</td> | ||
<td style="border-bottom: 1px solid #e8e8e8; vertical-align: top; padding-bottom: 25px; padding-top: 25px;">[[File:Configure_your_computer_step_2.png|right|500 px]]</td> | <td style="border-bottom: 1px solid #e8e8e8; vertical-align: top; padding-bottom: 25px; padding-top: 25px;">[[File:Configure_your_computer_step_2.png|right|500 px]]</td> | ||
</tr></table> | </tr></table> | ||


