RUT240 Setup Wizard: Difference between revisions
No edit summary |
No edit summary |
||
| (11 intermediate revisions by 5 users not shown) | |||
| Line 1: | Line 1: | ||
{{Template: Networking_rutos_manual_setup_wizard_rut2_rut9 | |||
<!------------------------DEVICE-----------------------> | |||
| name = RUT240 | |||
| series = RUT2 | |||
<!----------------------SEPARATORS---------------------> | |||
---- | | lan = 1 <!-- For default LAN subnet. Usage: 192.168.{{{lan}}}.1 --> | ||
| mobile = 1 | |||
| rms = mac <!-- mac or imei --> | |||
| wifi = 2 <!-- 5 or 2 (GHz) --> | |||
| wireless = 1 | |||
}} | |||
---- | |||
---- | |||
= | |||
---- | |||
Latest revision as of 09:53, 9 April 2024
Main Page > EOL Products > RUT240 > RUT240 Manual > RUT240 WebUI > RUT240 System section > RUT240 Setup WizardThe information in this page is updated in accordance with firmware version RUT2_R_00.07.06.16.
Note: click here for the old style WebUI (FW version RUT2XX_R_00.01.14.7 and earlier) user manual page.
Summary
The Setup Wizard is a tool that offers a simplified version of other WebUI pages used to set some of the most relevant device parameters:
You will be greeted with the Setup Wizard the first time you login, after you have changed the device default password. On other logins you will be redirected to the Overview page, but you can reach the Setup Wizard any time via the System → Setup Wizard page.
This page is an overview of the Setup Wizard tool for RUT240 devices.
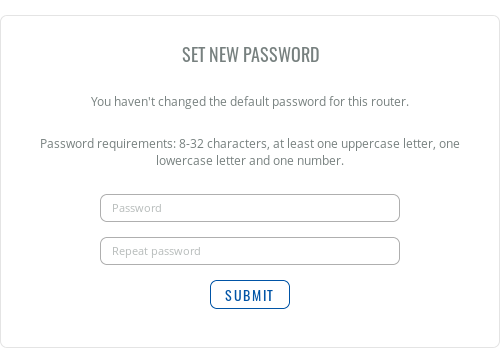
Set new password
On your very first login you will be required to change the device default password. This is done for safety reasons. In many cases devices are used to provide access to remote networks and systems. Since many manufacturers use similar default passwords (like admin, admin01, admin123, etc.) it is easy for attackers to gain access to devices that use such passwords and compromise the systems behind them. Therefore, to avoid such malicious attacks, this step is mandatory and you will not able to access the rest of the WebUI before you change the password.
The new password must contain:
- 8-32 characters;
- at least one upper case letter;
- at least one lower case letter;
- at least one digit.
After you have entered the new password, click 'Submit'. Afterwards you will be redirected to the first page of the Setup Wizard.
General
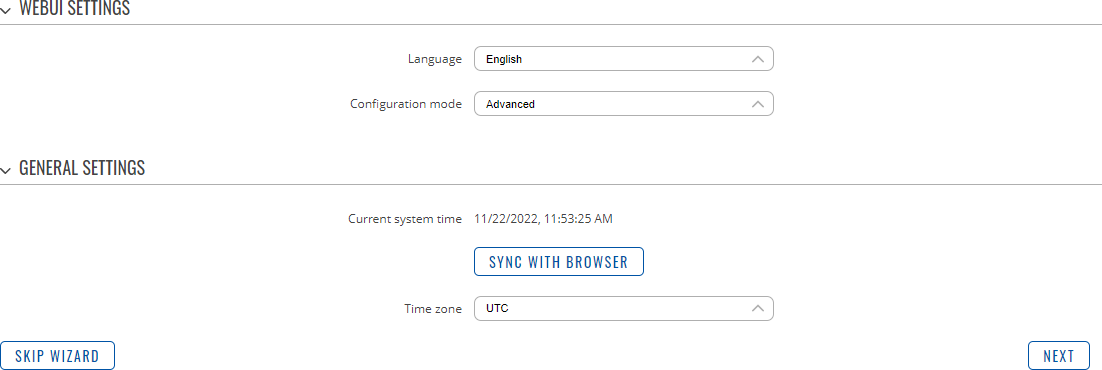
The General section is used to configure the device's time, language and WebUI mode settings.
If you wish to set the device's time zone settings later instead, you can do so via the Administration → NTP page.
If you're having trouble finding this page or some of the parameters described here on your device's WebUI, you should turn on "Advanced WebUI" mode. You can do that by clicking the "Advanced" button, located at the top of the WebUI.
LAN
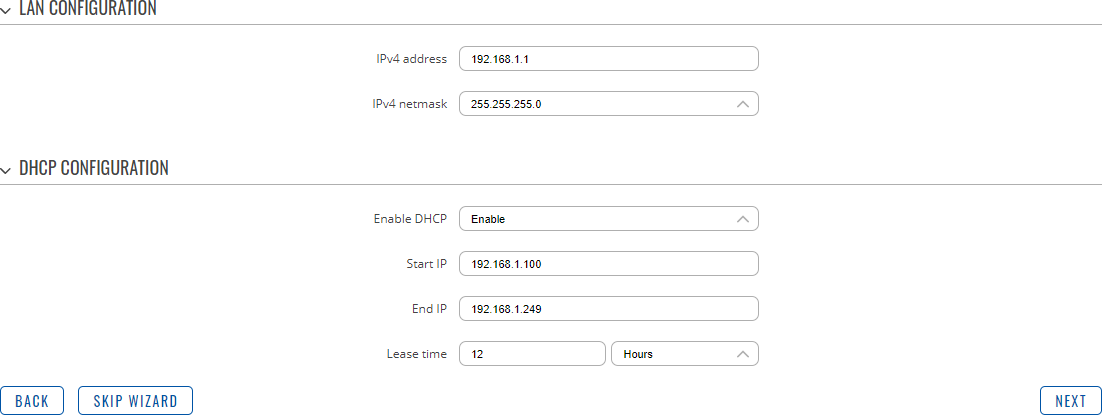
The LAN section is used to configure the device's local area network (LAN) and DHCP server settings. A DHCP (Dynamic Host Configuration Protocol) server can automatically configure the TCP/IP settings for any device that requests such a service. If you connect a device that has been configured to obtain an IP address automatically, the DHCP server will lease out an IP address from the available IP pool and the device will be able to communicate within the device's private network.
| Field | Value | Description |
|---|---|---|
| IP address | ip; default: 192.168.1.1 | The LAN interface's IPv4 address. An IP address identifies a device on a network and allows it to communicate with other devices. |
| Netmask | netmask; default: 255.255.255.0 | A netmask is used to define how "large" a network is by specifying which part of the IP address denotes the network and which part denotes the device. |
| Enable DHCP | off | on; default: on | Turns the DHCP server on or off. |
| Start IP | integer [1..255]; default: 100 | The DHCP server's IP address range start value. |
| End IP | integer [1..255]; default: 150 | End IP, i.e., the last possible IP in the selected range for the DHCP server. |
| Lease time | integer [2..999999]; default: 12 | A DHCP lease will expire after the amount of time specified in this field and the device that was using the lease will have to request a new one. However, if the device stays connected, its lease will be renewed after half of the specified amount of time passes (e.g., if lease time is 12 hours, then every 6 hours the device will ask the DHCP server to renew its lease). The minimal amount of time that can be specified is 2 minutes. |
| Units | Hours | Minutes; default: Hours | Lease time measuring units. |
If you wish to set the device's LAN and DHCP settings later instead, you can do so via the Network → LAN page.
Mobile
The Mobile section is used to configure the device's SIM card parameters.
| Field | Value | Description |
|---|---|---|
| Auto APN | off | on; default: on | An Access Point Name (APN) is a gateway between a GSM, GPRS, 3G or 4G mobile network and another computer network. Depending on the contract, some operators may require you to enter the APN just to complete the registration to a network. In other cases an APN is used to get special parameters from the operator (e.g., a public IP address) depending on the contract. Auto APN scans an internal Android APN database and selects an APN based on the SIM card's operator and country. If the first automatically selected APN doesn't work, it attempts to use the next existing APN from the database. |
| Off: APN | Suggestion from device | Custom; default: Suggestion from device | Select between a suggested APN from device or enter your custom APN. |
| Custom: Custom APN | string; default: none | Custom APN Network Identifier. Cannot start with any of the following strings: "rac", "lac", "sgsn" or "rnc"; it cannot end in ".gprs" and it cannot take the value "*". |
| Custom: Authentication Type | None | PAP/CHAP (both) | PAP | CHAP; default: None | The method that your carrier uses to authenticate new connections on its network. If you select PAP, CHAP or both you will be required to enter a username and password. |
| PIN | string; default: none | A 4-digit long numeric password used to authenticate the modem to the SIM card. |
Note: this table has coloring scheme to indicate which fields can be seen with different configuration.
If you wish to set the device's Mobile WAN settings later instead, you can do so via the Network → WAN page.
WiFi
The WiFi section is used to configure the device's WiFi Access Point (AP).
| Field | Value | Description |
|---|---|---|
| Enable | off | on; default: on | Turns the WiFi access point on or off. |
| ESSID | string; default: RUT_<last 4 symbols of WiFi MAC> | An identification string (name) for the access point. It is how the access point will be seen by connecting devices. |
| Password | string; default: unique to each device | A password used to authenticate users to this access point. |
If you wish to set the device's WiFi settings later instead, you can do so via the Network → Wireless page.
RMS
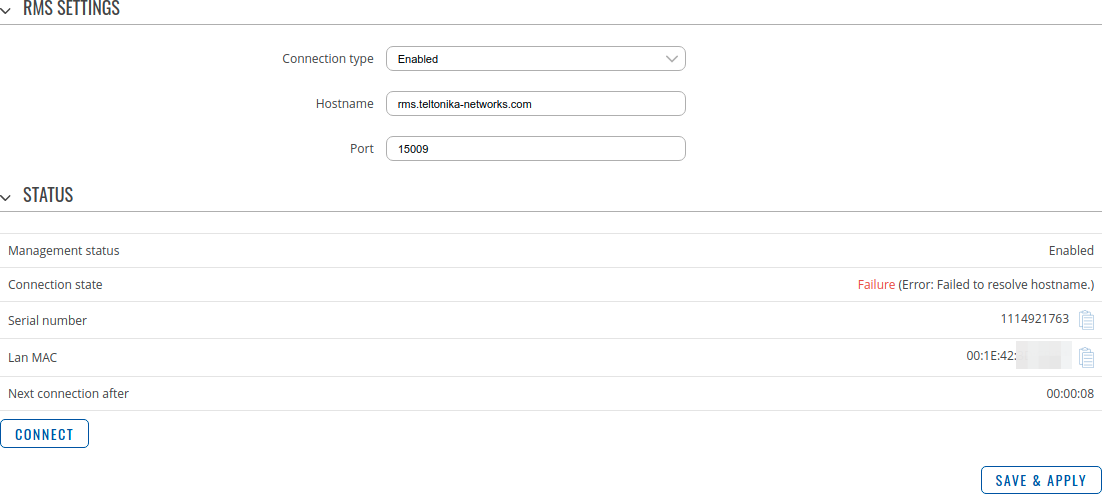
This section is used to configure the settings required to connect the device to the RMS (Remote Management System) - a cloud system designed by Teltonika and intended for remote monitoring and management of Teltonika-Networks products.
In order to add a device(s) to RMS, get yourself acquainted by watching this instructional video and register an account by clicking here. Each unique device receives a free month-long RMS license when added to RMS for the first time.
| Field | Value | Description |
|---|---|---|
| Connection type | Enabled | Standby | Disabled; default: Enabled | Defines how the device will connect to RMS:
|
| Hostname | host | ip; default: rms.teltonika.lt | Address of the RMS server. If you're using regular RMS, just leave the default address (rms.teltonika.lt). |
| Port | integer [0..65535]; default: 15009 | Port number for connecting to RMS. If you're using regular RMS, just leave the default port (15009). |
If you wish to set the device's RMS settings later instead, you can do so via the Services → Cloud Solutions → RMS page.


