Difference between revisions of "Template:Networking rutos manual opcua"
Gytispieze (talk | contribs) (Created page with "{{Template: Networking_rutos_manual_fw_disclosure | fw_version ={{Template: Networking_rutos_manual_latest_fw | series = {{{series}}} | name = {{{name}}} }} }} ==Summary...") |
|||
| (6 intermediate revisions by 4 users not shown) | |||
| Line 1: | Line 1: | ||
| − | {{Template: | + | {{Template: Networking_device_manual_fw_disclosure |
| − | | fw_version ={{Template: | + | | series = {{{series}}} |
| + | | name = {{{name}}} | ||
| + | | fw_version ={{Template: Networking_device_manual_latest_fw | ||
| series = {{{series}}} | | series = {{{series}}} | ||
| name = {{{name}}} | | name = {{{name}}} | ||
| Line 14: | Line 16: | ||
This manual page provides an overview of the OPC UA functionality in {{{name}}} devices. | This manual page provides an overview of the OPC UA functionality in {{{name}}} devices. | ||
| − | <b>Note:</b> OPC UA is additional software that can be installed from the <b> | + | <b>Note:</b> OPC UA is additional software that can be installed from the <b>System → [[{{{name}}} Package Manager|Package Manager]]</b> page.</u> |
| − | ==OPC UA | + | ==OPC UA Servers== |
| − | The | + | The OPC Server is the basis of OPC communication. It is a software that implements the OPC standard and thus provides the standardized OPC interfaces to the outside world. |
| − | + | Notice the Global section config. It is used to outright turn the service off or on if any active configurations are present. | |
| − | + | [[File:Networking rutos manual opcua opcua client devices global button v1.png|border|class=tlt-border]] | |
| − | + | ||
| − | + | Clicking the Cog icon opens a modal window. The global configuration slider can be set and it's state saved. | |
| − | + | ||
| − | + | [[File:Networking rutos manual modbus modbus tcp client modbus tcp server devices global config modal v1.png|border|class=tlt-border]] | |
| − | + | ||
| − | + | To add a new server, enter an instance name and click the 'Add' button. | |
| − | |||
| − | |||
| − | |||
| − | |||
| − | |||
| − | + | <b>Note:</b> A maximum of <b>10</b> servers is allowed. | |
| − | |||
[[File:Networking_rutos_manual_opcua_opcua_servers_add_button_v1.png|border|class=tlt-border]] | [[File:Networking_rutos_manual_opcua_opcua_servers_add_button_v1.png|border|class=tlt-border]] | ||
| Line 45: | Line 41: | ||
The <b>OPC UA Server Configuration</b> section is used to configure the parameters of an OPC UA Server. | The <b>OPC UA Server Configuration</b> section is used to configure the parameters of an OPC UA Server. | ||
| − | [[File: | + | [[File:Networking_rutos_manual_opcua_opcua_servers_server_configuration_v2.png|border|class=tlt-border]] |
<table class="nd-mantable"> | <table class="nd-mantable"> | ||
| Line 82: | Line 78: | ||
By default, there are no nodes configured. To add a new server node, enter an instance name and click the 'Add' button. | By default, there are no nodes configured. To add a new server node, enter an instance name and click the 'Add' button. | ||
| + | |||
| + | <b>Note:</b> A maximum of <b>50</b> nodes per server are allowed. | ||
[[File:Networking_rutos_manual_opcua_opcua_servers_server_node_add_button_v1.png|border|class=tlt-border]] | [[File:Networking_rutos_manual_opcua_opcua_servers_server_node_add_button_v1.png|border|class=tlt-border]] | ||
| Line 91: | Line 89: | ||
The <b>OPC UA Server node Configuration</b> section is used to configure the parameters of an OPC UA Server Node. | The <b>OPC UA Server node Configuration</b> section is used to configure the parameters of an OPC UA Server Node. | ||
| − | [[File: | + | [[File:Networking_rutos_manual_opcua_opcua_servers_server_node_configuration_v2.png|border|class=tlt-border]] |
<table class="nd-mantable"> | <table class="nd-mantable"> | ||
| Line 127: | Line 125: | ||
By default, there are no value groups configured. To add a new group, enter an instance name and click the 'Add' button. | By default, there are no value groups configured. To add a new group, enter an instance name and click the 'Add' button. | ||
| + | |||
| + | <b>Note:</b> A maximum of <b>20</b> value groups are allowed. | ||
[[File:Networking_rutos_manual_opcua_opcua_value_groups_add_button_v1.png|border|class=tlt-border]] | [[File:Networking_rutos_manual_opcua_opcua_value_groups_add_button_v1.png|border|class=tlt-border]] | ||
| Line 203: | Line 203: | ||
By default, there are no group values configured. To add a new value, enter an instance name and click the 'Add' button. | By default, there are no group values configured. To add a new value, enter an instance name and click the 'Add' button. | ||
| + | |||
| + | <b>Note:</b> A maximum of <b>50</b> values per value group is allowed. | ||
[[File:Networking_rutos_manual_opcua_opcua_value_groups_group_value_add_button_v1.png|border|class=tlt-border]] | [[File:Networking_rutos_manual_opcua_opcua_value_groups_group_value_add_button_v1.png|border|class=tlt-border]] | ||
Latest revision as of 11:25, 15 April 2024
The information in this page is updated in accordance with firmware version .
Summary
OPC Unified Architecture (OPC UA) is a cross-platform, open-source, IEC62541 standard for data exchange from sensors to cloud applications developed by the OPC Foundation. The UA in OPC UA stands for “Unified Architecture” and refers to the latest specification of the standard. It differs from its predecessor in that it is platform-independent, moving away from COM/DCOM to purely binary TCP/IP or alternatively SOAP.
This manual page provides an overview of the OPC UA functionality in {{{name}}} devices.
Note: OPC UA is additional software that can be installed from the System → [[{{{name}}} Package Manager|Package Manager]] page.
OPC UA Servers
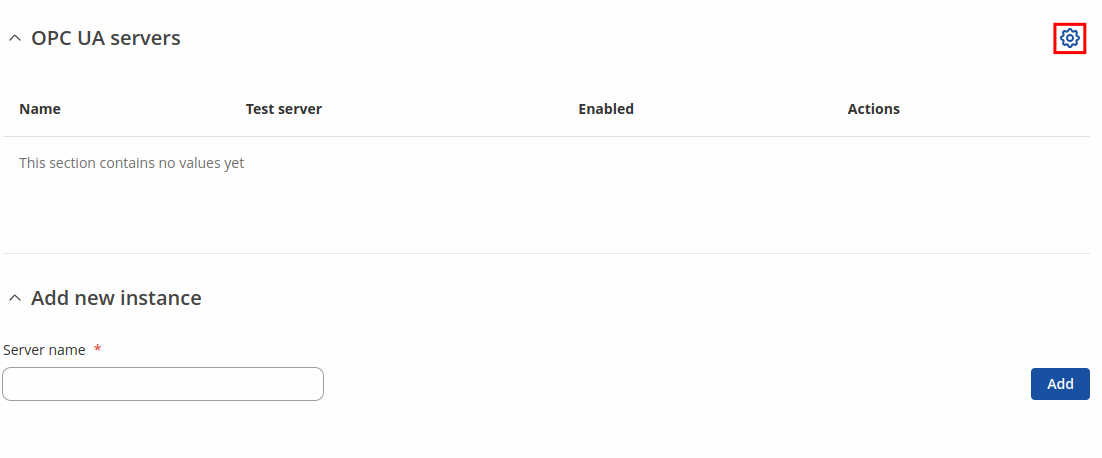
The OPC Server is the basis of OPC communication. It is a software that implements the OPC standard and thus provides the standardized OPC interfaces to the outside world.
Notice the Global section config. It is used to outright turn the service off or on if any active configurations are present.
Clicking the Cog icon opens a modal window. The global configuration slider can be set and it's state saved.
To add a new server, enter an instance name and click the 'Add' button.
Note: A maximum of 10 servers is allowed.
After clicking 'Add' you will be redirected to the newly added server's configuration page.
OPC UA Server Configuration
The OPC UA Server Configuration section is used to configure the parameters of an OPC UA Server.
| Field | Value | Description |
|---|---|---|
| Enable | off | on; default: off | Enables specific OPC UA server instance. |
| Name | string; default: none | Name of the server, used for management purposes only. |
| URL | url; default: none | Specifies OPC UA endpoint URL. |
| Timeout | integer [10..3600000]; default: none | Specifies server timeout in ms. |
OPC UA Server Nodes
A node is the basic unit of data in the OPC UA address space, which provides a standard way for OPC UA servers to represent objects to OPC UA clients. Nodes are pieces of information (for example, a unique temperature) and consist of attributes, the actual data value, and one or more references to other nodes, each in its own address space. A unique temperature will therefore take up multiple addresses in an address space.
By default, there are no nodes configured. To add a new server node, enter an instance name and click the 'Add' button.
Note: A maximum of 50 nodes per server are allowed.
After clicking 'Add' you will be redirected to the newly added server node's configuration page.
OPC UA Server Node Configuration
The OPC UA Server node Configuration section is used to configure the parameters of an OPC UA Server Node.
| Field | Value | Description |
|---|---|---|
| Name | string; default: none | Name of the node instance, used for management purposes only. |
| ID namespace | integer [0..65535]; default: none | Specifies node ID namespace. |
| ID type | Numeric | String | GUID | Bytestring; default: Numeric | Specifies node ID type. |
| ID | dynamic; default: none | Specifies node ID (validation varies depending on ID type). |
OPC UA Value Groups
A Value Group is a collection of different specific group values. Each value configured under this group will be returned inside the same group array.
By default, there are no value groups configured. To add a new group, enter an instance name and click the 'Add' button.
Note: A maximum of 20 value groups are allowed.
After clicking 'Add' you will be redirected to the newly added value group's configuration page.
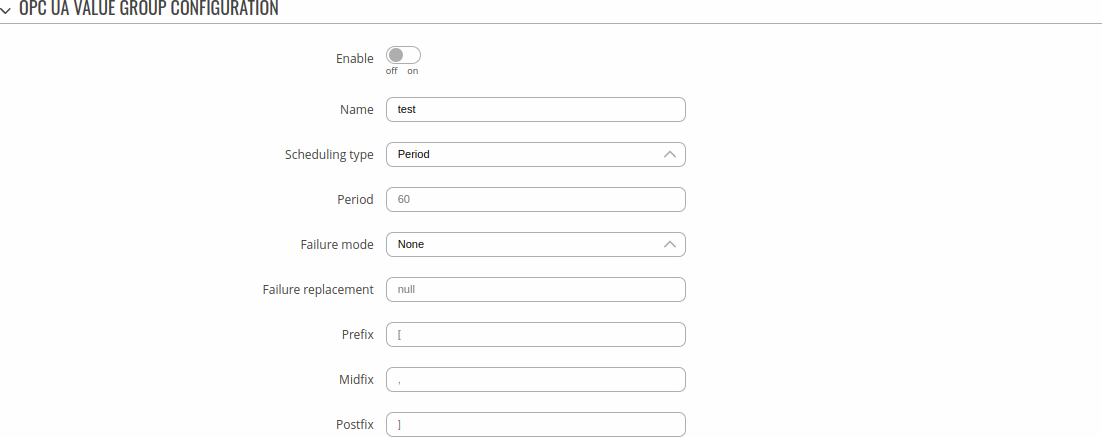
OPC UA Value Group Configuration
The OPC UA Value Group Configuration section is used to configure the parameters of an OPC UA Value Group.
| Field | Value | Description |
|---|---|---|
| Enable | off | on; default: off | Enables specific OPC UA value group instance. |
| Name | string; default: none | Name of the value group instance, used for management purposes only. |
| Scheduling type | Period; default: Period | Specifies method of scheduling data retrievals. |
| Period | integer [1..86400]; default: none | Specifies time duration between data retrievals in seconds. |
| Failure mode | None | Any | All; default: None | |
| Failure storage | off | on; default: off | Whether to store results of a failure. |
| Failure replacement | string; default: none | Results of a failure will be replaced by this string |
| Prefix | string; default: none | String going before all the values. |
| Midfix | string; default: none | String going between all the values. |
| Postfix | string; default: none | String going after all the values. |
OPC UA Group Values
A Group Value is a specific value retrieved from a defined server node.
By default, there are no group values configured. To add a new value, enter an instance name and click the 'Add' button.
Note: A maximum of 50 values per value group is allowed.
After clicking 'Add' you will be redirected to the newly added group value's configuration page.
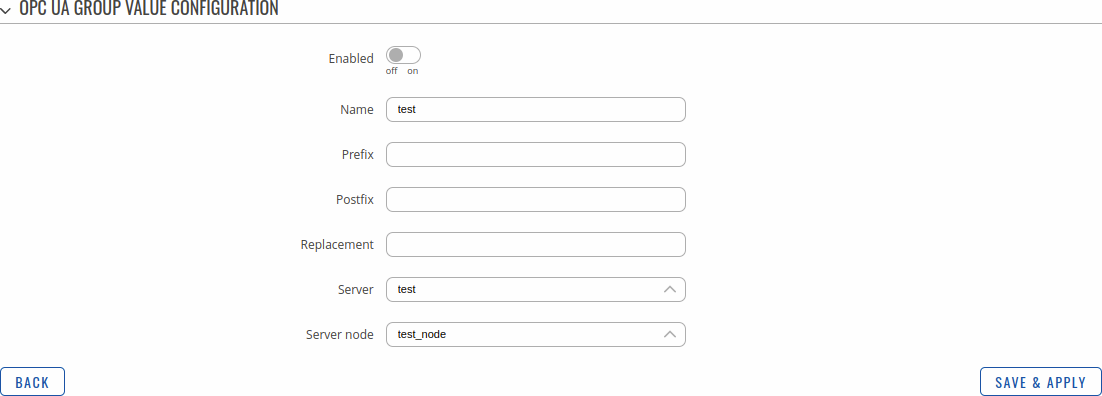
OPC UA Group Value Configuration
The OPC UA Group Value Configuration section is used to configure the parameters of an OPC UA Group Value.
| Field | Value | Description |
|---|---|---|
| Enable | off | on; default: off | Enables specific OPC UA value instance. |
| Name | string; default: none | Name of the group value instance, used for management purposes only. |
| Prefix | string; default: none | String before the value. |
| Postfix | string; default: none | String after the value. |
| Replacement | string; default: none | String to replace everything in case of failure. |
| Server to retrieve data from | OPC UA server instance; default: none | Specifies which server to retrieve data from. |
| Server node | OPC UA server node instance; default: none | Specifies which server node to retrieve data from. |
[[Category:{{{name}}} Services section]]


