RMS VPN Hubs: Difference between revisions
No edit summary |
|||
| (13 intermediate revisions by 4 users not shown) | |||
| Line 4: | Line 4: | ||
RMS VPN is a service designed for remote efficient, low-cost management of large-scale networks. As opposed to point-to-point VPN service, RMS VPN allows creating encrypted VPN tunnels for secure access of multiple endpoints within a matter of seconds. Let's illustrate with some examples. | RMS VPN is a service designed for remote efficient, low-cost management of large-scale networks. As opposed to point-to-point VPN service, RMS VPN allows creating encrypted VPN tunnels for secure access of multiple endpoints within a matter of seconds. Let's illustrate with some examples. | ||
[[File:RMS VPN tunnel 1280 v1.png|800px| | [[File:RMS VPN tunnel 1280 v1.png|800px|border|class=tlt-border]] | ||
Manufacturing facilities or plants use various PLCs and HMIs running on different protocols. The growing automation trends of such entities require enabling remote access due to increasing efficiency, reducing downtime, and optimizing costs. Using RMS VPN allows secure remote access to multiple applications simultaneously regardless of their protocol, checking and changing configurations, and completing other essential tasks. | Manufacturing facilities or plants use various PLCs and HMIs running on different protocols. The growing automation trends of such entities require enabling remote access due to increasing efficiency, reducing downtime, and optimizing costs. Using RMS VPN allows secure remote access to multiple applications simultaneously regardless of their protocol, checking and changing configurations, and completing other essential tasks. | ||
| Line 20: | Line 20: | ||
==Video - How to set up an RMS VPN Hub == | ==Video - How to set up an RMS VPN Hub == | ||
<br> | |||
<youtube>dfAudZR2wPY</youtube> | <youtube>dfAudZR2wPY</youtube> | ||
<br> | <br> | ||
== | |||
==Tutorial== | |||
Follow the steps to create and configure an RMS VPN Hub. | Follow the steps to create and configure an RMS VPN Hub. | ||
| Line 32: | Line 34: | ||
# To start the configuration, make sure your device is connected to RMS. | # To start the configuration, make sure your device is connected to RMS. | ||
# Select RMS Hubs on the left sidebar in the RMS VPN section. | # Select RMS Hubs on the left sidebar in the RMS VPN section. | ||
# To add a new VPN Hub go to Left sidebar panel ('''RMS VPN''' → '''VPN Hubs''') and click on '''VPN Hubs'''. | # To add a new VPN Hub go to Left sidebar panel ('''RMS VPN''' → '''VPN Hubs''') and click on '''VPN Hubs'''. <br> | ||
[[File:VPN Hubs.png|border|class=tlt-border]] | |||
Click on a '''Add new VPN Hub +''' area or move your mouse pointer to the '''VPN Hub''' menu and select '''Add new VPN Hub''' (VPN Hub → Add new VPN Hub). | Click on a '''Add new VPN Hub +''' area or move your mouse pointer to the '''VPN Hub''' menu and select '''Add new VPN Hub''' (VPN Hub → Add new VPN Hub). | ||
[[File:Add New Hub.png|border|class=tlt-border]] | |||
* Enter the name of the Hub, optionally set the description and tags. | * Enter the name of the Hub, optionally set the description and tags. | ||
[[File:Hub details.png|border|class=tlt-border]] | |||
===Set up VPN hub=== | ===Set up VPN hub=== | ||
---- | ---- | ||
1. Click on Add Client button and select an RMS user from the list. | |||
[[File:Client RMS user.png|border|class=tlt-border]] | |||
2. Click on Add Client button and select an RMS device from the list. | |||
[[File:Client RMS device.png|border|class=tlt-border]] | |||
===Adding routes=== | ===Adding routes=== | ||
---- | ---- | ||
1. Go to the Routes tab. <br> | |||
2. Click Add route button to set up a new route. | |||
[[File:RMS Add Route.png|border|class=tlt-border]] | |||
3. From Auto Scan, select your specific device. Or alternatively use the manual tab. | |||
[[File:Auto Scan RMS.png|border|class=tlt-border]] | |||
4. To implement the changes, you must Restart the hub. | |||
[[File:RMS restart HUB.png|border|class=tlt-border]] | |||
===Downloading OVPN configuration file=== | ===Downloading OVPN configuration file=== | ||
---- | ---- | ||
You will find the RMS VPN configuration file is in the Clients tab. | |||
1. In the Actions column, click on the Download icon. | |||
[[File:Download Icon OVPN.png|border|class=tlt-border]] | |||
2. Your PC will download .OVPN configuration file. | |||
===Connecting to your RMS VPN Hub=== | ===Connecting to your RMS VPN Hub=== | ||
---- | ---- | ||
====RMS VPN app==== | |||
[[File:Rmsvpnvideo.mp4|thumb|Connecting to VPN via RMS VPN application]] | |||
We have an official Teltonika RMS VPN application using which you will not be hassled by downloading config files, instead just logging in and you're just one click away of being connected to your VPN hub. | |||
More information about the app is available [[RMS VPN App|'''here''']]. | |||
---- | |||
====OpenVPN Client==== | |||
1. Or alternatively, to connect, you can use [https://openvpn.net/client-connect-vpn-for-windows/ OpenVPN Connect software]. Or any other alternative OpenVPN software. <br> | |||
2. To establish a connection import your .OVPN file. and click Connect. | |||
[[File:OVPN import.png|border|class=tlt-border]] | |||
3. You have successfully connected to your RMS VPN hub, now you can reach your remote device. | |||
[[Category:RMS VPN]] | [[Category:RMS VPN]] | ||
== LAN to LAN communication== | |||
To set up LAN to LAN communication via RMS VPN Hub, you would need some additional configuration. As shown in the topology below, we are going to set up communication between two end devices connected to Teltonika Networks routers, which are RMS VPN clients. | |||
[[File:Vpnhubstopology.jpg|700px|border|class=tlt-border]] | |||
The topology above contains two Teltonika routers ('''RUT1''' and '''RUT2''') with two end devices ('''END1''' and '''END2'''), each connected to a separate router's LAN. Both routers are added to the same RMS VPN Hub as RMS VPN clients. When this configuration is completed, not only will the two routers be able to communicate with each other, but the end devices will also be reachable to one another and from each router. | |||
=== Adding VPN Clients=== | |||
---- | |||
To start, you would need to set up a VPN Hub as shown in the previous example. Once the Hub is set up and two RMS devices are added to the Hub, the clients tab should look like this: | |||
[[File:RMS Clients tab.png|700px|border|class=tlt-border]] | |||
=== Adding Routes=== | |||
---- | |||
Before adding routes to end devices, we have to enable the LAN forwarding feature. LAN forwarding modifies Firewall Zone covering RMS VPN, to allow VPN traffic to reach end device's LAN network. If you were to enable WAN forwarding, you would be able to reach end point connected to the device's WAN port. To enable forwarding, follow these steps: | |||
* Click on the Hub and navigate to the '''Routes''' section. | |||
* In the '''Clients''' tab, click on the LAN toggle to enable forwarding. | |||
Client with enabled LAN forwarding should look like this: | |||
[[File:RMS Lan forwarding.png|border|class=tlt-border]] | |||
The next step is to add Routes to the end devices. Follow these steps to add routes: | |||
*Navigate to the '''Routes''' section. | |||
*Press '''Add Route''' button to open an additional menu. | |||
*You could choose from either '''Auto Scan''' or '''Manual''' add route method. In this example, we are using '''Auto Scan'''. | |||
*To add a route, select an RMS device from the list and press '''Scan Device'''. | |||
*The procedure scans all devices that are connected to '''RUT1''' LAN. | |||
[[File:RMS Route to end device.png|border|class=tlt-border]] | |||
Once the scan is completed, follow the steps to continue: | |||
*Select the end device‘s IP address (in this example 192.168.1.211) and press add. | |||
*In this configuration, we are going to need to add routes in both '''RUT1''' and '''RUT2'''. | |||
*To add a route to the '''RUT2''' network end device, just follow the procedure above. | |||
Once both routes are added, '''restart the RMS Hub'''. If you have completed the steps correctly, the routes tab should look like this: | |||
[[File:RMS both routes.png|border|class=tlt-border]] | |||
=== Modifying Firewall Zones=== | |||
---- | |||
For the end devices to be able to reach each other, we are going to need to modify Firewall zones in both '''RUT1''' and '''RUT2'''. Follow these steps to edit Firewall zones: | |||
*Navigate to '''Network -> Firewall -> General settings'''. | |||
*In the zones section, click the edit button on LAN zone: | |||
[[File:Newfilelan.png|950px|border|class=tlt-border]] | |||
*In the '''Inter-Zone Forwarding''' section, click on '''Allow forwarding to destination zones''' and select '''rms''' (for example, rms_xzkEgQ: openvpn). This allows traffic from LAN to reach RMS VPN. | |||
[[File:Forwardingzoneslan.png|450px|border|class=tlt-border]] | |||
After clicking on '''Save & Apply''' for both routers, the setup is completed and the LAN to LAN communication between devices should work. | |||
=== Testing the configuration=== | |||
---- | |||
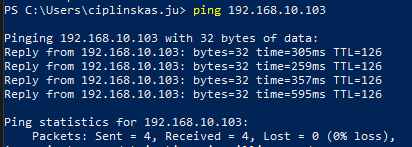
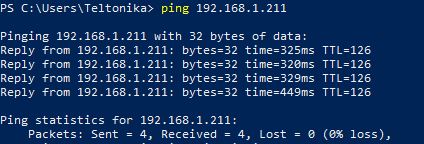
As with any other configuration, it is always wise to test the setup in order to make sure that it works properly. To test LAN to LAN communication via RMS Hub, we could try to '''ping''' one end device from the other. | |||
Pinging '''END2''' from '''END1''': | |||
[[File:Ping to END2 device.png|border|class=tlt-border]] | |||
Pinging '''END1''' from '''END2''': | |||
[[File:Ping to END1 device.jpg|border|class=tlt-border]] | |||
If the ping requests are successful, congratulations, your setup works. If not, we suggest that you review all the steps once more. | |||
Latest revision as of 14:56, 16 July 2024
Main Page > IoT Platforms > RMS > RMS Manual > RMS VPN > RMS VPN HubsWhat is RMS VPN?
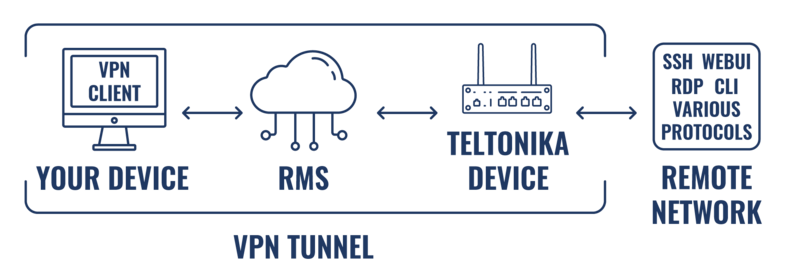
RMS VPN is a service designed for remote efficient, low-cost management of large-scale networks. As opposed to point-to-point VPN service, RMS VPN allows creating encrypted VPN tunnels for secure access of multiple endpoints within a matter of seconds. Let's illustrate with some examples.
Manufacturing facilities or plants use various PLCs and HMIs running on different protocols. The growing automation trends of such entities require enabling remote access due to increasing efficiency, reducing downtime, and optimizing costs. Using RMS VPN allows secure remote access to multiple applications simultaneously regardless of their protocol, checking and changing configurations, and completing other essential tasks.
RMS VPN may also be handy in the enterprise sector. Here is an example especially relevant to the current day. Imagine that company's employees must suddenly switch to a work-from-home scenario due to a pandemic. However, all company's systems and databases are available only on-site via LAN. Hence the possibilities to complete their job duties become very limited. So, here comes the RMS VPN service, enabling to add employees computers to a virtual network and allowing them to reach internal systems and applications from their homes.
Summary
The VPN Hubs section is located in the RMS VPN menu and it allow to easily set up and configure VPN connections on Teltonika Networks devices. And to reach the equipment which is plugged into Teltonika Networks devices.
Video - How to set up an RMS VPN Hub
Tutorial
Follow the steps to create and configure an RMS VPN Hub.
Add new VPN hub
- Connect to your RMS account.
- To start the configuration, make sure your device is connected to RMS.
- Select RMS Hubs on the left sidebar in the RMS VPN section.
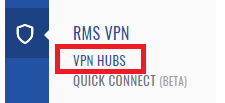
- To add a new VPN Hub go to Left sidebar panel (RMS VPN → VPN Hubs) and click on VPN Hubs.
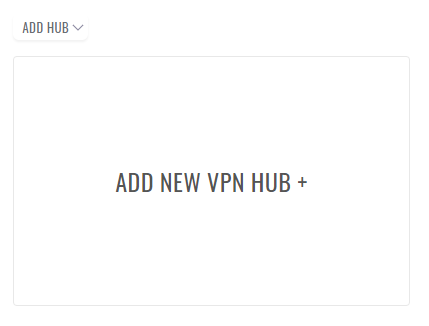
Click on a Add new VPN Hub + area or move your mouse pointer to the VPN Hub menu and select Add new VPN Hub (VPN Hub → Add new VPN Hub).
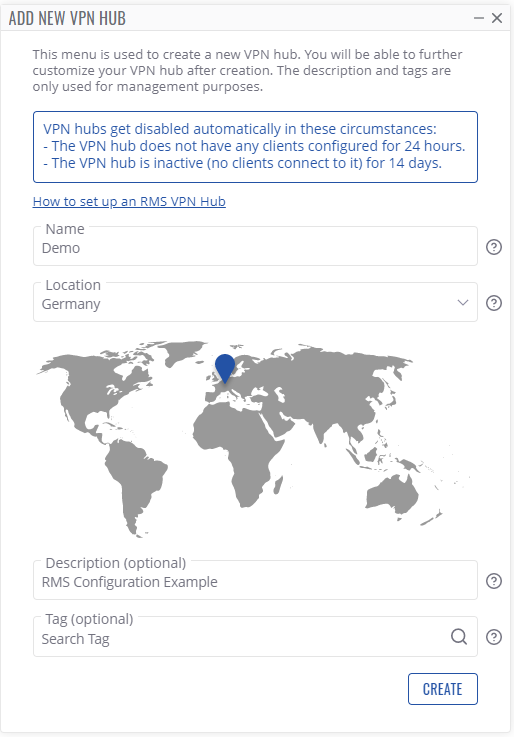
- Enter the name of the Hub, optionally set the description and tags.
Set up VPN hub
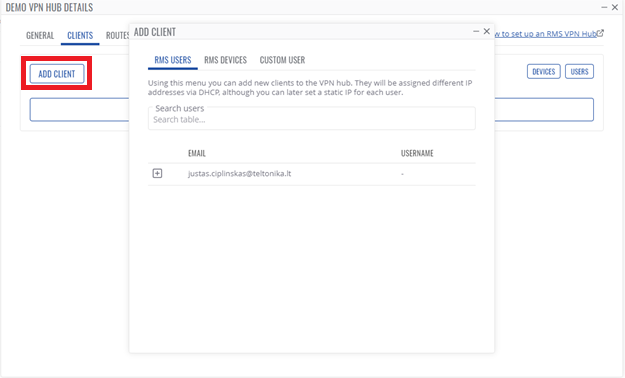
1. Click on Add Client button and select an RMS user from the list.
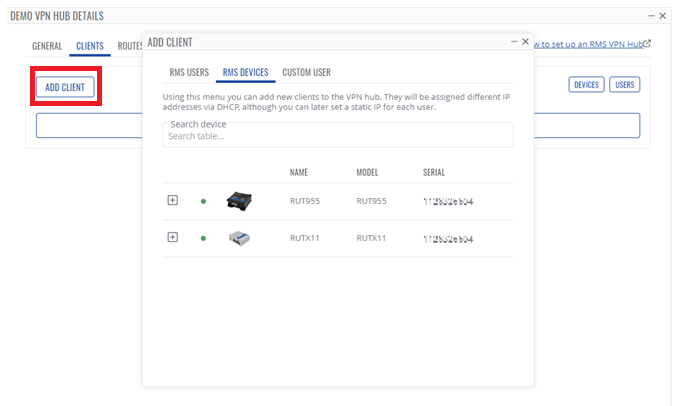
2. Click on Add Client button and select an RMS device from the list.
Adding routes
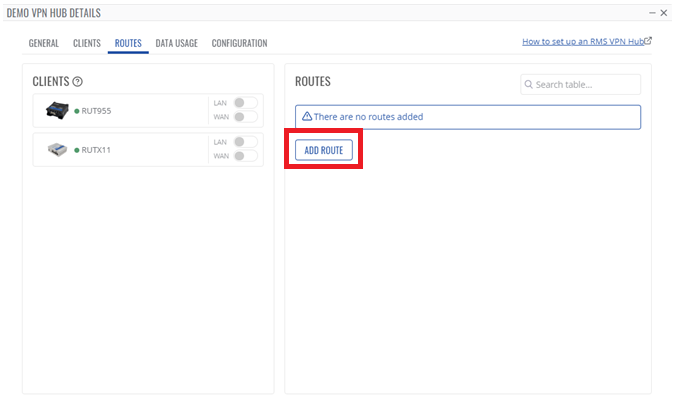
1. Go to the Routes tab.
2. Click Add route button to set up a new route.
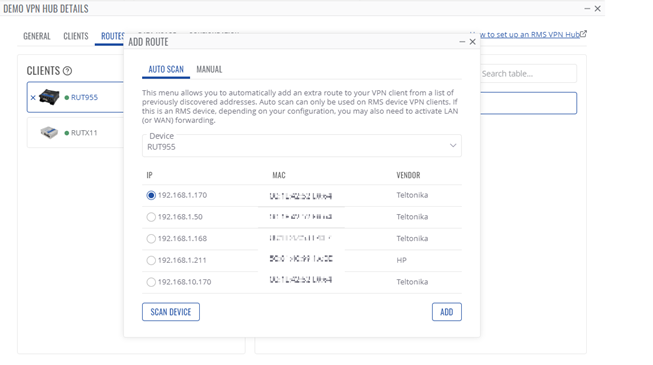
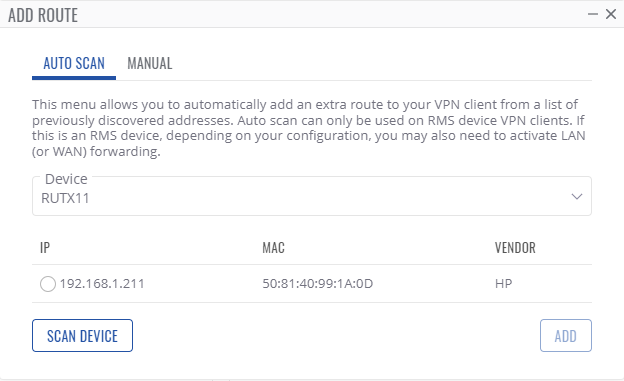
3. From Auto Scan, select your specific device. Or alternatively use the manual tab.
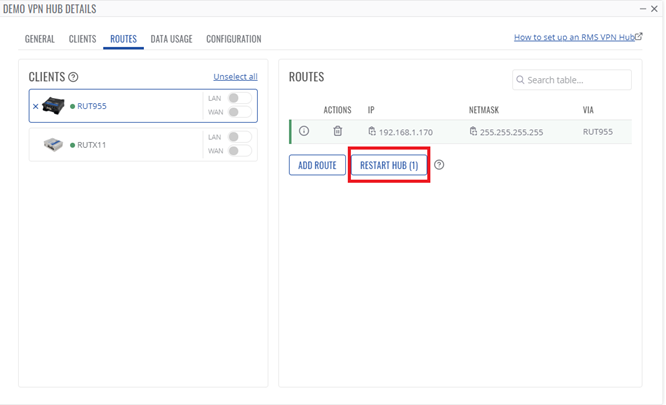
4. To implement the changes, you must Restart the hub.
Downloading OVPN configuration file
You will find the RMS VPN configuration file is in the Clients tab. 1. In the Actions column, click on the Download icon.
2. Your PC will download .OVPN configuration file.
Connecting to your RMS VPN Hub
RMS VPN app
We have an official Teltonika RMS VPN application using which you will not be hassled by downloading config files, instead just logging in and you're just one click away of being connected to your VPN hub.
More information about the app is available here.
OpenVPN Client
1. Or alternatively, to connect, you can use OpenVPN Connect software. Or any other alternative OpenVPN software.
2. To establish a connection import your .OVPN file. and click Connect.
3. You have successfully connected to your RMS VPN hub, now you can reach your remote device.
LAN to LAN communication
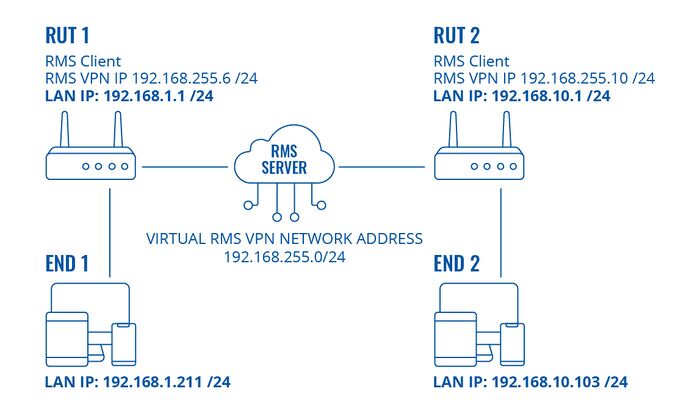
To set up LAN to LAN communication via RMS VPN Hub, you would need some additional configuration. As shown in the topology below, we are going to set up communication between two end devices connected to Teltonika Networks routers, which are RMS VPN clients.
The topology above contains two Teltonika routers (RUT1 and RUT2) with two end devices (END1 and END2), each connected to a separate router's LAN. Both routers are added to the same RMS VPN Hub as RMS VPN clients. When this configuration is completed, not only will the two routers be able to communicate with each other, but the end devices will also be reachable to one another and from each router.
Adding VPN Clients
To start, you would need to set up a VPN Hub as shown in the previous example. Once the Hub is set up and two RMS devices are added to the Hub, the clients tab should look like this:
Adding Routes
Before adding routes to end devices, we have to enable the LAN forwarding feature. LAN forwarding modifies Firewall Zone covering RMS VPN, to allow VPN traffic to reach end device's LAN network. If you were to enable WAN forwarding, you would be able to reach end point connected to the device's WAN port. To enable forwarding, follow these steps:
- Click on the Hub and navigate to the Routes section.
- In the Clients tab, click on the LAN toggle to enable forwarding.
Client with enabled LAN forwarding should look like this:
The next step is to add Routes to the end devices. Follow these steps to add routes:
- Navigate to the Routes section.
- Press Add Route button to open an additional menu.
- You could choose from either Auto Scan or Manual add route method. In this example, we are using Auto Scan.
- To add a route, select an RMS device from the list and press Scan Device.
- The procedure scans all devices that are connected to RUT1 LAN.
Once the scan is completed, follow the steps to continue:
- Select the end device‘s IP address (in this example 192.168.1.211) and press add.
- In this configuration, we are going to need to add routes in both RUT1 and RUT2.
- To add a route to the RUT2 network end device, just follow the procedure above.
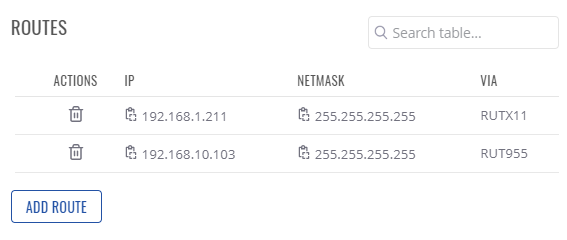
Once both routes are added, restart the RMS Hub. If you have completed the steps correctly, the routes tab should look like this:
Modifying Firewall Zones
For the end devices to be able to reach each other, we are going to need to modify Firewall zones in both RUT1 and RUT2. Follow these steps to edit Firewall zones:
- Navigate to Network -> Firewall -> General settings.
- In the zones section, click the edit button on LAN zone:
- In the Inter-Zone Forwarding section, click on Allow forwarding to destination zones and select rms (for example, rms_xzkEgQ: openvpn). This allows traffic from LAN to reach RMS VPN.
After clicking on Save & Apply for both routers, the setup is completed and the LAN to LAN communication between devices should work.
Testing the configuration
As with any other configuration, it is always wise to test the setup in order to make sure that it works properly. To test LAN to LAN communication via RMS Hub, we could try to ping one end device from the other.
Pinging END2 from END1:
Pinging END1 from END2:
If the ping requests are successful, congratulations, your setup works. If not, we suggest that you review all the steps once more.

