Template:Networking rutos configuration example l2tp over ipsec android: Difference between revisions
No edit summary |
|||
| (21 intermediate revisions by one other user not shown) | |||
| Line 3: | Line 3: | ||
<th width=325; style="border-bottom: 1px solid white;></th> | <th width=325; style="border-bottom: 1px solid white;></th> | ||
<th width=820; style="border-bottom: 1px solid white;" rowspan=2;> | <th width=820; style="border-bottom: 1px solid white;" rowspan=2;> | ||
[[File: | [[File:Networking_rutos_configuration_example_l2tp_over_ipsec_android_topology_v1.png|border|class=tlt-border|750px|right]]</th> | ||
</tr> | </tr> | ||
<tr> | <tr> | ||
| Line 21: | Line 21: | ||
* At least one Android device | * At least one Android device | ||
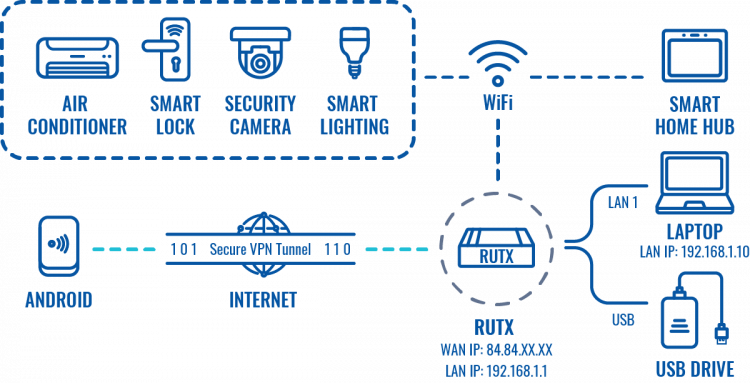
The topology above depicts the L2TP/IPsec scheme. | The topology above depicts the L2TP/IPsec scheme. The router with the Public IP address ('''RUTX''') acts as the '''L2TP/IPsec server''' and the '''Android device''' acts as '''client'''. L2TP connects the networks of '''RUTX''' and '''Android client''', IPsec provides the encryption for the L2TP tunnel. Created VPN tunnel will allow Android device to reach home network behind the RUTX router, but the rest of Android device network traffic will not be redirected through VPN. This way the VPN tunnel will not be under a huge load and will provide greater speeds. | ||
When the scheme is realized, you will be able to | When the scheme is realized, you will be able to log on to your home network from anywhere - work, hotel, car. You will have access to all of your home resources, and your data will still be secure, even if you will be using public WiFi. | ||
==Configuring home router (RUTX)== | ==Configuring home router (RUTX)== | ||
As mentioned in the prerequisites section, the router that acts as the server must have a Public Static or Public Dynamic IP address (more information on the subject can be found here). If that is in order, we should start configuring the server. | |||
===L2TP=== | ===L2TP=== | ||
<table class="nd-othertables_2"> | <table class="nd-othertables_2"> | ||
<tr> | <tr> | ||
<th width=355; style="border-bottom: 1px solid white;></th> | <th width=355; style="border-bottom: 1px solid white;></th> | ||
<th width=790; style="border-bottom: 1px solid white;" rowspan=2> | <th width=790; style="border-bottom: 1px solid white;" rowspan=2> [[File:RutOS_L2TP_IPsec_VPN_7,8_add_L2TP_Server.png|770px|right]]</th> | ||
[[File: | |||
</tr> | </tr> | ||
<tr> | <tr> | ||
| Line 39: | Line 39: | ||
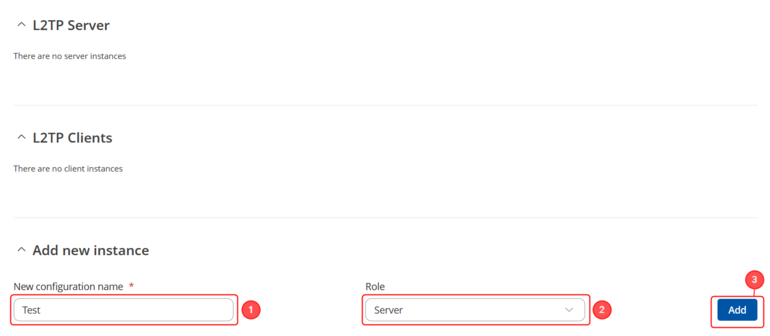
Login to the router's WebUI and navigate to the '''Services → VPN → L2TP''' page and do the following: | Login to the router's WebUI and navigate to the '''Services → VPN → L2TP''' page and do the following: | ||
<ol> | <ol> | ||
<li>Select '''Role: Server'''.</li> | |||
<li>Enter a '''custom configuration name'''.</li> | <li>Enter a '''custom configuration name'''.</li> | ||
<li>Click the '''Add''' button. You will be prompted to the configuration window</li> | |||
<li>Click the '''Add''' button. | |||
</ol> | </ol> | ||
</td> | </td> | ||
| Line 53: | Line 52: | ||
<tr> | <tr> | ||
<th width=355; style="border-bottom: 1px solid white;></th> | <th width=355; style="border-bottom: 1px solid white;></th> | ||
<th width=790; style="border-bottom: 1px solid white;" rowspan=2> | <th width=790; style="border-bottom: 1px solid white;" rowspan=2>[[File:RutOS_L2TP_IPsec_VPN_7,8_add_L2TP_Server_config.png|770px|right]]</th> | ||
[[File: | |||
</tr> | </tr> | ||
<tr> | <tr> | ||
| Line 60: | Line 58: | ||
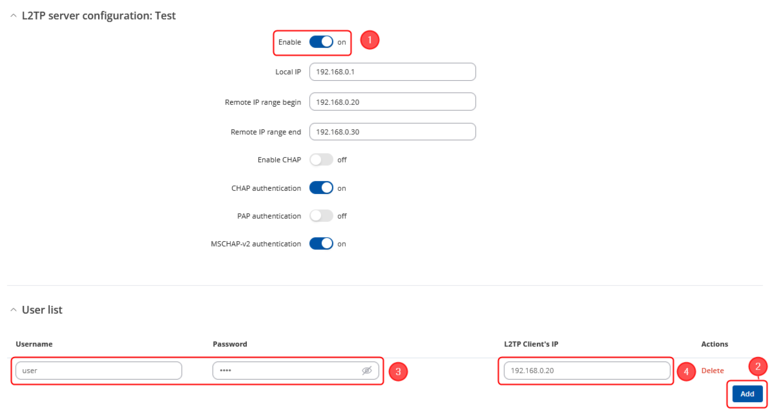
<ol> | <ol> | ||
<li>'''Enable''' the L2TP instance.</li> | <li>'''Enable''' the L2TP instance.</li> | ||
<li>Enter a ''' | <li>Click on the '''Add''' button to add a new user</li> | ||
<li>Optionally, set a fixed IP for this client (if left empty, client will receive first free IP from the IP range).</li> | <li>Enter a '''User name''' and '''Password''' for authentication for the client.</li> | ||
<li>Optionally, set a fixed IP for this client (if left empty, the client will receive the first free IP from the IP range).</li> | |||
<li>Don't forget to '''Save''' the changes.</li> | <li>Don't forget to '''Save''' the changes.</li> | ||
</ol> | </ol> | ||
| Line 74: | Line 73: | ||
<tr> | <tr> | ||
<th width=355; style="border-bottom: 1px solid white;></th> | <th width=355; style="border-bottom: 1px solid white;></th> | ||
<th width=790; style="border-bottom: 1px solid white;" rowspan=2> | <th width=790; style="border-bottom: 1px solid white;" rowspan=2>[[File:RutOS_L2TP_IPsec_VPN_7,8_add_Ipsec_Server.png|770px|right]]</th> | ||
[[File: | |||
</tr> | </tr> | ||
<tr> | <tr> | ||
| Line 81: | Line 79: | ||
Go to the '''Services → VPN → IPsec''' page and do the following: | Go to the '''Services → VPN → IPsec''' page and do the following: | ||
<ol> | <ol> | ||
<li>Enter a custom | <li>Enter a custom name for the IPsec instance.</li> | ||
<li>Click the '''Add''' button. | <li>Click the '''Add''' button. You will be prompted to the configuration window</li> | ||
</ol> | </ol> | ||
</td> | </td> | ||
| Line 94: | Line 91: | ||
<tr> | <tr> | ||
<th width=355; style="border-bottom: 1px solid white;></th> | <th width=355; style="border-bottom: 1px solid white;></th> | ||
<th width=790; style="border-bottom: 1px solid white;" rowspan=2> | <th width=790; style="border-bottom: 1px solid white;" rowspan=2>[[File:RutOS_L2TP_IPsec_VPN_7,8_add_Ipsec_Server_config_instnace222.png|770px|right]]</th> | ||
[[File: | </tr> | ||
<tr> | <tr> | ||
<td style="border-bottom: 1px solid white> | <td style="border-bottom: 1px solid white> | ||
| Line 103: | Line 99: | ||
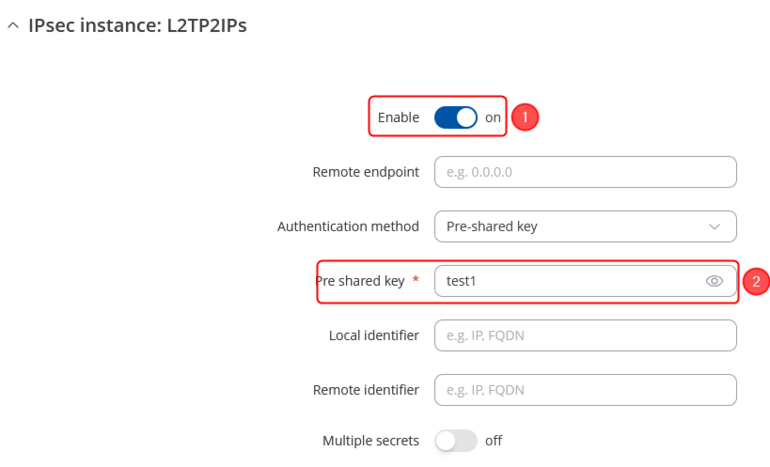
<li>'''Enable''' the instance.</li> | <li>'''Enable''' the instance.</li> | ||
<li>Enter your '''Pre-shared key'''.</li> | <li>Enter your '''Pre-shared key'''.</li> | ||
</ol> | |||
</td> | |||
</tr> | |||
</table> | |||
<table class="nd-othertables_2"> | |||
<tr> | |||
<th width=355; style="border-bottom: 1px solid white;></th> | |||
<th width=790; style="border-bottom: 1px solid white;" rowspan=2>[[File:RutOS_L2TP_IPsec_VPN_7,8_add_Ipsec_Server_config_instance_connection.png|770px|right]]</th> | |||
</tr> | |||
<tr> | |||
<td style="border-bottom: 1px solid white> | |||
<ol> | |||
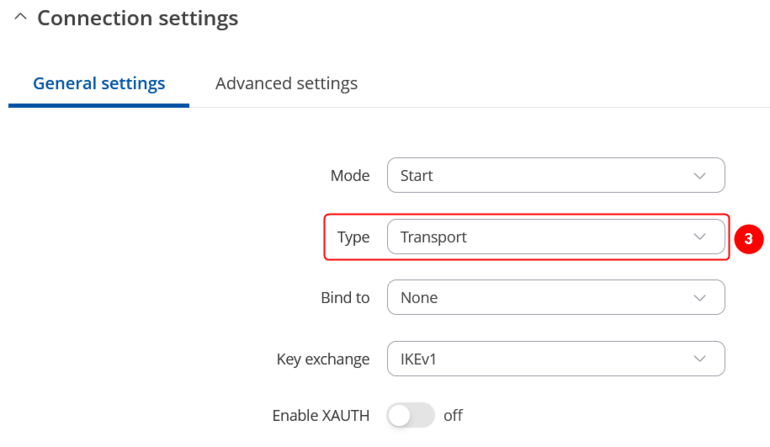
'''3.''' Select '''Type: Transport'''. | |||
<br> | |||
Do not forget to '''Save''' changes. | |||
</ol> | |||
</td> | |||
</tr> | |||
</table> | |||
---- | |||
'''Note:''' ''This is only an example of a secure configuration. Other algorithms or even combinations of them could be used. However, we strongly recommend refraining from using older encryption and hashing algorithms unless support for certain legacy systems is required.'' | |||
Make the following changes: | |||
<table class="nd-othertables_2"> | |||
<tr> | |||
<th width=330; style="border-bottom: 1px solid white;></th> | |||
<th width=800; style="border-bottom: 1px solid white;" rowspan=2>[[File:Networking_webui_manual_IPsec_configuration_proposal_phase1_settings_v1.png|border|class=tlt-border|671x336px|center]]</th> | |||
</tr> | |||
<tr> | |||
<td style="border-bottom: 4px solid white> | |||
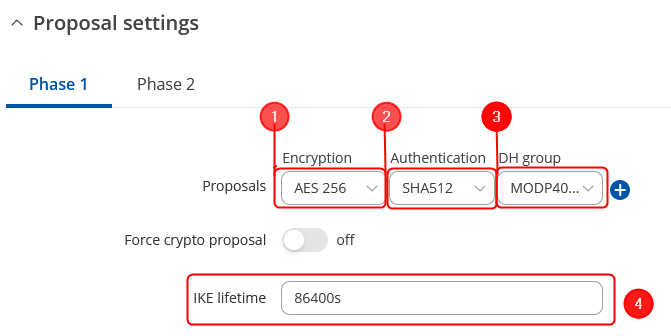
# Encryption - '''''AES256;''''' | |||
# Authentication - '''''SHA512;''''' | |||
# DH group - '''''MODP4096;''''' | |||
# IKE lifetime - '''86400s'''. | |||
</td> | |||
</tr> | |||
</table> | |||
---- | |||
<table class="nd-othertables_2"> | |||
<tr> | |||
<th width=330; style="border-bottom: 1px solid white;></th> | |||
<th width=800; style="border-bottom: 1px solid white;" rowspan=2>[[File:Networking_webui_manual_IPsec_configuration_proposal_phase2_settings_v1.png|border|class=tlt-border|644x331px|center]]</th> | |||
</tr> | |||
<tr> | |||
<td style="border-bottom: 4px solid white> | |||
# Encryption - '''''AES256;''''' | |||
# Authentication - '''''SHA512;''''' | |||
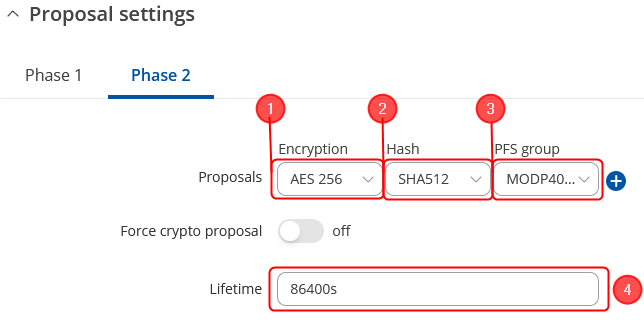
# PFS group - '''''MODP4096;''''' | |||
# Lifetime – '''''86400s;''''' | |||
</td> | |||
</tr> | |||
</table> | |||
===Firewall=== | |||
---- | |||
Now go to the '''Network → Firewall → General Settings''' page | |||
---- | |||
<table class="nd-othertables_2"> | |||
<tr> | |||
<th width=355; style="border-bottom: 1px solid white;></th> | |||
<th width=790; style="border-bottom: 1px solid white;" rowspan=2> | |||
[[File:RutOS_L2TP_IPsec_android_7.8_1.png|770px|right]]</th> | |||
</tr> | |||
<tr> | |||
<td style="border-bottom: 1px solid white> | |||
<ol> | |||
<li>Set '''Forward: accept'''.</li> | |||
<li>'''Save''' changes.</li> | <li>'''Save''' changes.</li> | ||
</ol> | </ol> | ||
| Line 133: | Line 196: | ||
<th width=525; style="border-bottom: 1px solid white;"></th> | <th width=525; style="border-bottom: 1px solid white;"></th> | ||
<th width=620; style="border-bottom: 1px solid white;" rowspan=2> | <th width=620; style="border-bottom: 1px solid white;" rowspan=2> | ||
[[File: | [[File:Networking_rutos_configuration_example_l2tp_over_ipsec_android_6_v3.png|border|class=tlt-border|300px|center]]</th> | ||
</tr> | </tr> | ||
<tr> | <tr> | ||
| Line 154: | Line 217: | ||
<th width=525; style="border-bottom: 1px solid white;"></th> | <th width=525; style="border-bottom: 1px solid white;"></th> | ||
<th width=620; style="border-bottom: 1px solid white;" rowspan=2> | <th width=620; style="border-bottom: 1px solid white;" rowspan=2> | ||
[[File: | [[File:Networking_rutos_configuration_example_l2tp_over_ipsec_android_7_v3.png|border|class=tlt-border|300px|center]]</th> | ||
</tr> | </tr> | ||
<tr> | <tr> | ||
| Line 160: | Line 223: | ||
<ol> | <ol> | ||
<li>Write the '''DNS servers''' you are planning to use (in this example we used google DNS servers).</li> | <li>Write the '''DNS servers''' you are planning to use (in this example we used google DNS servers).</li> | ||
<li>Add '''Forwarding routes''' ( | <li>Add '''Forwarding routes''' (RUTX LAN network).</li> | ||
<li>'''Save''' settings.</li> | <li>'''Save''' settings.</li> | ||
</ol> | </ol> | ||
| Line 217: | Line 280: | ||
</tr> | </tr> | ||
</table> | </table> | ||
---- | |||
'''Disclaimer:''' | '''Disclaimer:''' | ||
This configuration example was created by using Android version 10. The IPsec '''Phase 1''' and '''Phase 2''' settings, which were used in this configuration example, might not work with other Android versions. | This configuration example was created by using Android version 10. The IPsec '''Phase 1''' and '''Phase 2''' settings, which were used in this configuration example, might not work with other Android versions and might require adjustment. | ||
Latest revision as of 11:51, 22 August 2024
 |
|
|---|---|
|
|
Configuration overview and prerequisites
Prerequisites:
- One RUTX router of any type
- A Public Static or Public Dynamic IP address
- At least one Android device
The topology above depicts the L2TP/IPsec scheme. The router with the Public IP address (RUTX) acts as the L2TP/IPsec server and the Android device acts as client. L2TP connects the networks of RUTX and Android client, IPsec provides the encryption for the L2TP tunnel. Created VPN tunnel will allow Android device to reach home network behind the RUTX router, but the rest of Android device network traffic will not be redirected through VPN. This way the VPN tunnel will not be under a huge load and will provide greater speeds.
When the scheme is realized, you will be able to log on to your home network from anywhere - work, hotel, car. You will have access to all of your home resources, and your data will still be secure, even if you will be using public WiFi.
Configuring home router (RUTX)
As mentioned in the prerequisites section, the router that acts as the server must have a Public Static or Public Dynamic IP address (more information on the subject can be found here). If that is in order, we should start configuring the server.
L2TP
IPsec
 |
|
|---|---|
|
Go to the Services → VPN → IPsec page and do the following:
|
 |
|
|---|---|
|
In the IPsec Configuration page, do the following (and leave the rest as defaults, unless your specific configuration requires otherwise):
|
 |
|
|---|---|
Do not forget to Save changes. |
Note: This is only an example of a secure configuration. Other algorithms or even combinations of them could be used. However, we strongly recommend refraining from using older encryption and hashing algorithms unless support for certain legacy systems is required.
Make the following changes:
 |
|
|---|---|
|
 |
|
|---|---|
|
Firewall
Now go to the Network → Firewall → General Settings page
 |
|
|---|---|
|
Android phone
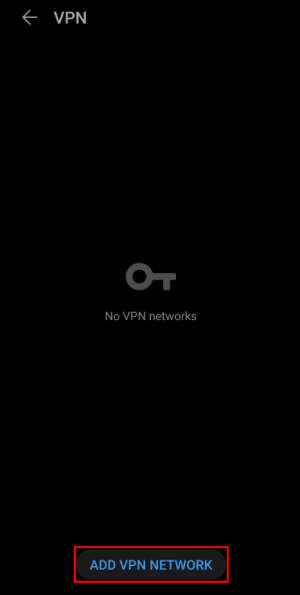 |
|
|---|---|
|
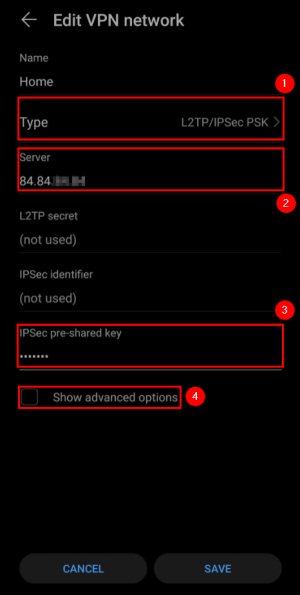
Go to your Android device VPN settings and create a new VPN network: |
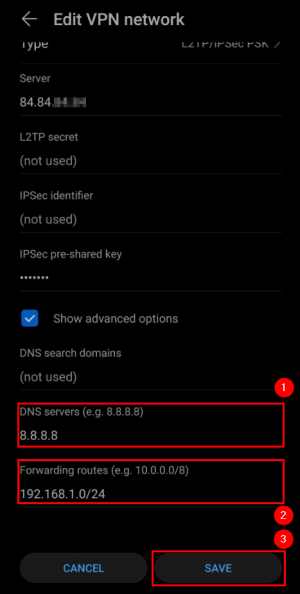 |
|
|---|---|
|
 |
|
|---|---|
|
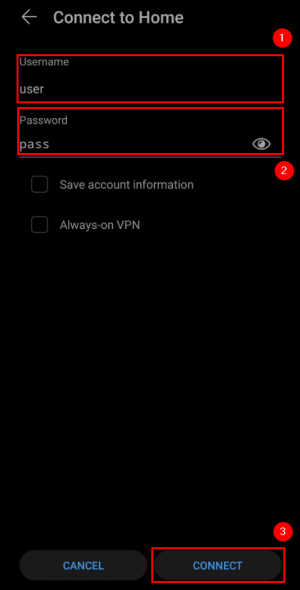
Now open your newly created VPN instance and connect to it:
|
 |
|
|---|---|
|
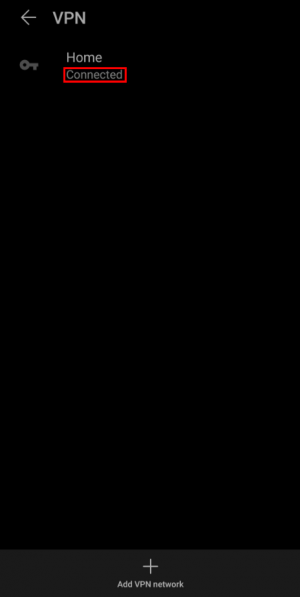
If you applied the configuration correctly, after a moment it should indicate Connected: |
Results
Disclaimer:
This configuration example was created by using Android version 10. The IPsec Phase 1 and Phase 2 settings, which were used in this configuration example, might not work with other Android versions and might require adjustment.

