Difference between revisions of "SMS Forwarding Configuration Example"
| (2 intermediate revisions by the same user not shown) | |||
| Line 4: | Line 4: | ||
==Prerequisites== | ==Prerequisites== | ||
* Device with SIM card; | * Device with SIM card; | ||
| + | * Teltonika router or gateway that supports mobile connectivity; | ||
* End device for configuration | * End device for configuration | ||
* [https://Beeceptor.com Beeceptor] account and created Mock server; | * [https://Beeceptor.com Beeceptor] account and created Mock server; | ||
| Line 33: | Line 34: | ||
<tr> | <tr> | ||
<td style="border-bottom: 4px solid white> | <td style="border-bottom: 4px solid white> | ||
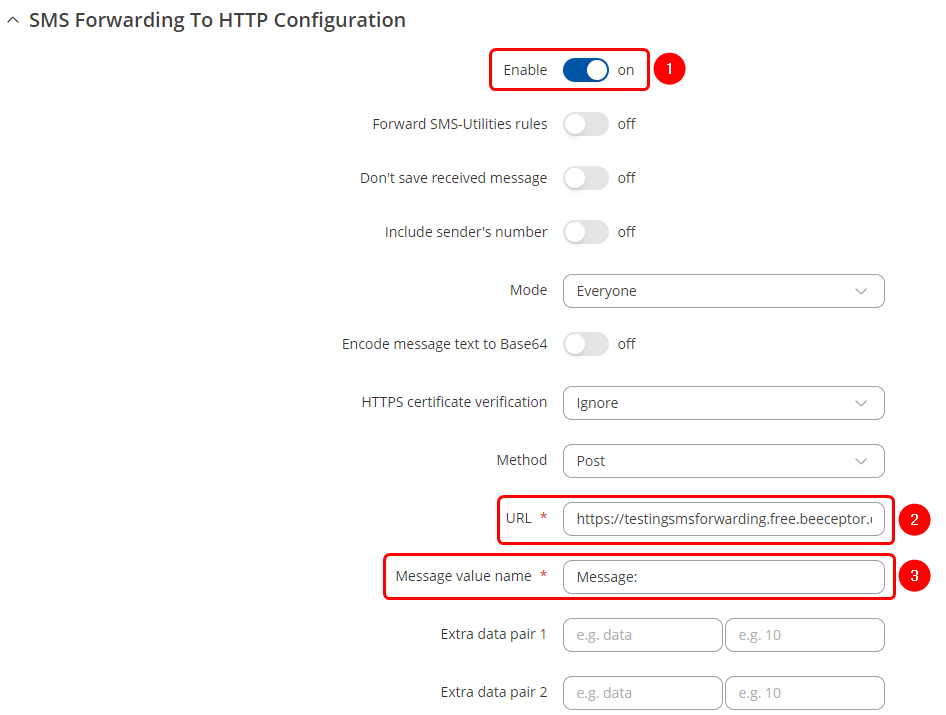
| − | # '''Check''' Enable | + | # '''Check''' Enable. |
# '''Enter''' the URL where the SMS should be forwarded. (For this configuration we are using beeceptor) | # '''Enter''' the URL where the SMS should be forwarded. (For this configuration we are using beeceptor) | ||
# '''Define''' the "Message value name" to represent the message text. | # '''Define''' the "Message value name" to represent the message text. | ||
| Line 54: | Line 55: | ||
</table> | </table> | ||
==SMS Forwarding To SMS configuration== | ==SMS Forwarding To SMS configuration== | ||
| + | ===Configuring device=== | ||
<table class="nd-othertables_2"> | <table class="nd-othertables_2"> | ||
<tr> | <tr> | ||
| Line 62: | Line 64: | ||
<td style="border-bottom: 4px solid white> | <td style="border-bottom: 4px solid white> | ||
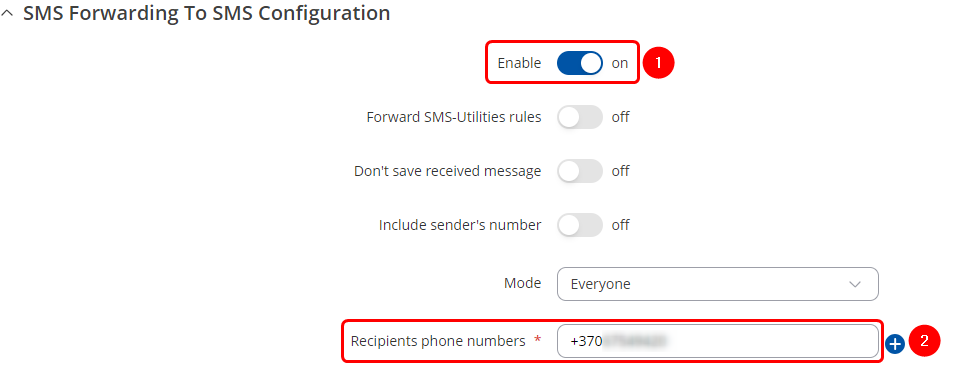
# Check '''Enable''' | # Check '''Enable''' | ||
| − | # '''Enter''' the recipients phone number. If needed press | + | # '''Enter''' the recipients phone number. If needed press [[File:Plus_Button.png|Plus_Button.png]] to add more numbers. |
</td> | </td> | ||
</tr> | </tr> | ||
</table> | </table> | ||
| − | ''' | + | '''Configure''' the rest of the settings to achieve desired configuration. After that press '''Save & Apply''' |
===Testing configuration=== | ===Testing configuration=== | ||
---- | ---- | ||
| Line 90: | Line 92: | ||
<tr> | <tr> | ||
<th width=270; style="border-bottom: 1px solid white;></th> | <th width=270; style="border-bottom: 1px solid white;></th> | ||
| − | <th width=800; style="border-bottom: 1px solid white"; rowspan=2>[[File: | + | <th width=800; style="border-bottom: 1px solid white"; rowspan=2>[[File:EmailUser.png|border|class=tlt-border|right]]</th> |
</tr> | </tr> | ||
<tr> | <tr> | ||
<td style="border-bottom: 4px solid white> | <td style="border-bottom: 4px solid white> | ||
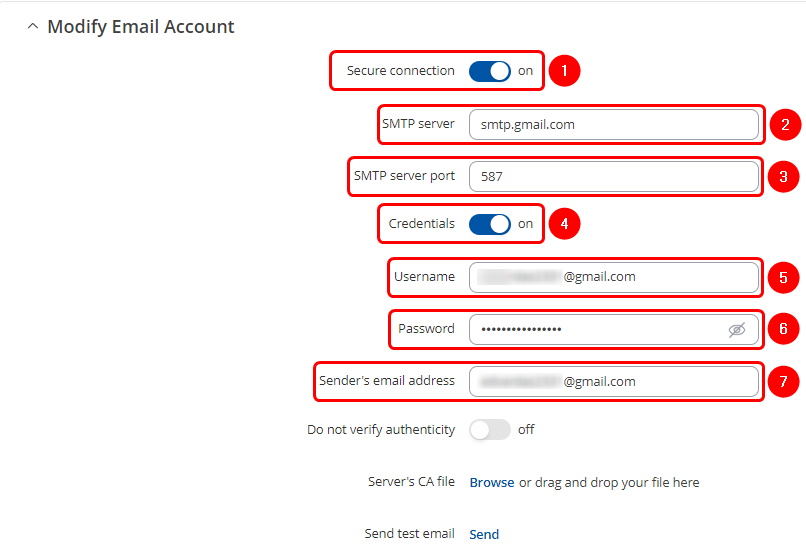
| − | + | # '''Enable''' secure connection. | |
| + | # '''Write''' SMTP server. For this example gmail SMTP will be used. | ||
| + | # '''Write''' SMTP server port. | ||
| + | # '''Enable''' credentials. | ||
| + | # '''Write''' username. (email address) | ||
| + | # '''Write''' password. Since this example is using gmail SMTP we will need to use app password. More information about it [https://support.google.com/accounts/answer/185833?hl=en here]. | ||
| + | # '''Write''' sender's email address (the email address that will be used to send email from) | ||
</td> | </td> | ||
</tr> | </tr> | ||
</table> | </table> | ||
| + | '''Configure''' the rest of the settings to achieve desired configuration. After that press '''Save & Apply''' | ||
===Configuring the device=== | ===Configuring the device=== | ||
---- | ---- | ||
| Line 103: | Line 112: | ||
<tr> | <tr> | ||
<th width=270; style="border-bottom: 1px solid white;></th> | <th width=270; style="border-bottom: 1px solid white;></th> | ||
| − | <th width=800; style="border-bottom: 1px solid white"; rowspan=2>[[File: | + | <th width=800; style="border-bottom: 1px solid white"; rowspan=2>[[File:STE.png|border|class=tlt-border|right]]</th> |
</tr> | </tr> | ||
<tr> | <tr> | ||
<td style="border-bottom: 4px solid white> | <td style="border-bottom: 4px solid white> | ||
| − | # '''Check''' Enable | + | # '''Check''' Enable. |
| − | |||
| − | |||
| − | |||
| − | |||
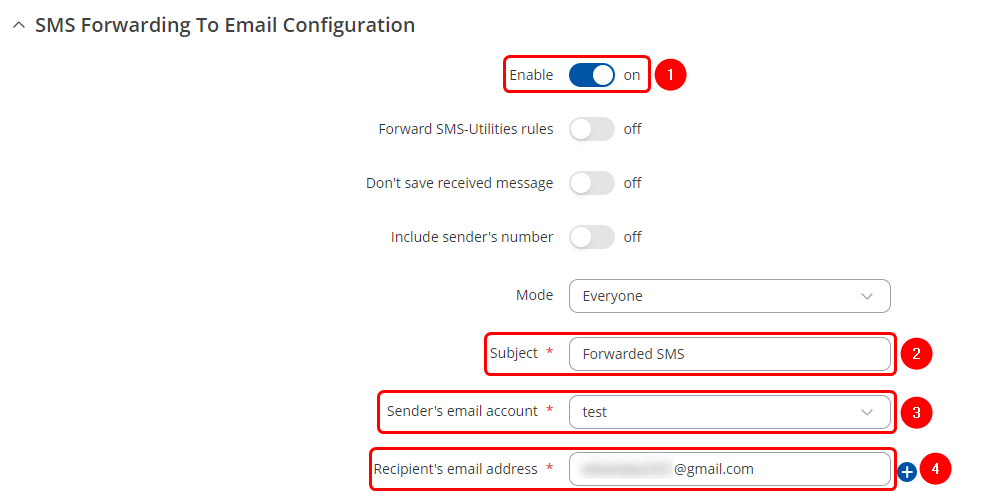
# '''Enter''' the "Subject" for the forwarded email. | # '''Enter''' the "Subject" for the forwarded email. | ||
# '''Select''' the "Sender's email account" that will send the forwarded message. | # '''Select''' the "Sender's email account" that will send the forwarded message. | ||
# '''Enter''' the "Recipient's email address" where the forwarded SMS should be sent. | # '''Enter''' the "Recipient's email address" where the forwarded SMS should be sent. | ||
| + | </td> | ||
| + | </tr> | ||
| + | </table> | ||
| + | '''Configure''' the rest of the settings to achieve desired configuration. After that press '''Save & Apply''' | ||
| + | ===Testing configuration=== | ||
| + | ---- | ||
| + | <table class="nd-othertables_2"> | ||
| + | <tr> | ||
| + | <th width=400; style="border-bottom: 1px solid white;></th> | ||
| + | <th width=500; style="border-bottom: 1px solid white"; rowspan=2>[[File:STET.png|border|class=tlt-border|right]]</th> | ||
| + | </tr> | ||
| + | <tr> | ||
| + | <td style="border-bottom: 4px solid white> | ||
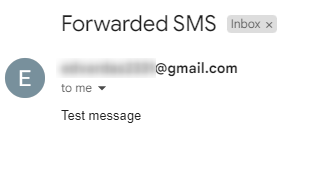
| + | To test the configuration, send a SMS to the device and check recipient's email address. | ||
</td> | </td> | ||
</tr> | </tr> | ||
</table> | </table> | ||
Latest revision as of 14:51, 23 September 2024
The information in this page is updated in accordance with 00.07.09.2 firmware version.
Introduction
This page contains instructions how to configure SMS forwarding. SMS forwarding can be utilized if there is a need to monitor received messages via HTTP, SMS or email.
Prerequisites
- Device with SIM card;
- Teltonika router or gateway that supports mobile connectivity;
- End device for configuration
- Beeceptor account and created Mock server;
- Pre-configured email user;
SMS Forwarding To HTTP Configuration
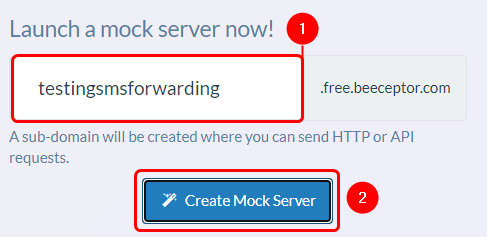
Creating server In order to test the functionality, you will need to set up a server. There are many ways how you can create a server to which SMS forwarding will forward SMS. In this example we are going to be using a Beeceptor's Mock server. If you don't have a Beeceptor account yet – create it or login via Google account.
|
Configuring device
Open router’s WebUI, navigate to Services → Mobile Utilities → SMS Gateway and press SMS forwarding tab.
|
Configure the rest of the settings to achieve desired configuration. After that press Save & Apply
Testing configuration
|
To test the configuration, send a SMS to the device and check beeceptor Mock server. |
SMS Forwarding To SMS configuration
Configuring device
Configure the rest of the settings to achieve desired configuration. After that press Save & Apply
Testing configuration
|
To test the configuration, send a SMS to the device. The recipient’s number should receive forwarded message. |
SMS Forwarding To Email configuration
Email account configuration
In order to achieve SMS forwarding to email first we need to create email account from which emails will be sent.
For this configuration we will use Gmail SMTP.
Navigate to System→Administration→Recipients, press Email Users. In here enter the desired name for new instance and press
![]() .
.
|
Configure the rest of the settings to achieve desired configuration. After that press Save & Apply
Configuring the device
|
Configure the rest of the settings to achieve desired configuration. After that press Save & Apply
Testing configuration
|
To test the configuration, send a SMS to the device and check recipient's email address. |
