Template:Networking rutos manual users: Difference between revisions
No edit summary |
No edit summary |
||
| (14 intermediate revisions by 2 users not shown) | |||
| Line 1: | Line 1: | ||
== | ===Change Password=== | ||
---- | ---- | ||
The <b>User | The <b>User configuration</b> section is used to change the password of the current user. | ||
[[File: | [[File:Networking_rutos_users_change_password_v5.png|border|class=tlt-border]] | ||
===Password Policy=== | |||
---- | |||
The <b>Password policy</b> section is used to configure password policy and password expiration settings. | |||
[[File:Networking_rutos_users_password_policy_v3.png|border|class=tlt-border]] | |||
<table class="nd-mantable"> | |||
<tr> | |||
<th>Field</th> | |||
<th>Value</th> | |||
<th>Description</th> | |||
</tr> | |||
<tr> | |||
<td>Minimum password length</td> | |||
<td>integer; default: <b>8</b></td> | |||
<td>Minimum password length is from 8 to 64 characters.</td> | |||
</tr> | |||
<tr> | |||
<td>Digits</td> | |||
<td>off {{!}} on; default: <b>on</b></td> | |||
<td>Password must contain at least one digit (0-9).</td> | |||
</tr> | |||
<tr> | |||
<td>Upper / lower case characters</td> | |||
<td>off {{!}} on; default: <b>on</b></td> | |||
<td>Password must contain at least one upper and lower case letter (A-Z, a-z).</td> | |||
</tr> | |||
<tr> | |||
<td>Special characters</td> | |||
<td>off {{!}} on; default: <b>on</b></td> | |||
<td>Password must contain at least one special character (~`! @#$%^&*()-_+={}[]|\;:"<>,./?).</td> | |||
</tr> | |||
<tr> | |||
<td>Password expiration</td> | |||
<td>off {{!}} on; default: <b>off</b></td> | |||
<td>A new password will need to be created once the current one reaches its expiration date. The password expiration period can be set from 1 to 365 days.</td> | |||
</tr> | |||
</table> | |||
{{#switch:{{{series}}}|TAP100|TAP200=|#default= ===System Users=== | {{#switch:{{{series}}}|TAP100|TAP200=|#default= ===System Users=== | ||
---- | |||
====Summary==== | ====Summary==== | ||
---- | ---- | ||
| Line 14: | Line 53: | ||
This manual page provides an overview of the Users page in {{{name}}} devices. | This manual page provides an overview of the Users page in {{{name}}} devices. | ||
====Groups==== | ====Groups==== | ||
| Line 38: | Line 73: | ||
<li>limited read access; by default, users belonging to this group cannot view these pages: | <li>limited read access; by default, users belonging to this group cannot view these pages: | ||
<ul> | <ul> | ||
<li>System → | <li>System → Administration → Users Settings → System Users</li> | ||
<li>System → Administration → Profiles</li> | |||
<li>System → Maintenance → Backup</li> | |||
<li>System → Firmware</li> | |||
<li>System → Maintenance → CLI</li> | |||
<li>System → Setup Wizard</li> | |||
<li>System → Maintenance → Custom Scripts</li> | |||
</ul> | |||
</li> | |||
<li>limited write access; by default, users belonging to this group cannot view these pages: | |||
<ul> | |||
<li>System → Administration → Users Settings → System Users</li> | |||
<li>System → Maintenance → Backup</li> | |||
<li>System → Firmware</li> | |||
<li>System → Maintenance → CLI</li> | |||
<li>System → Setup Wizard</li> | |||
<li>System → Maintenance → Custom Scripts</li> | |||
<li>System → Administration → Access Control → General</li> | |||
<li>System → Administration → Profiles</li> | |||
</ul> | </ul> | ||
</li> | </li> | ||
<li>access rights can be modified.</li> | <li>access rights can be modified.</li> | ||
</ul><br>[[File:Networking_rutos_manual_users_admin_visualization.png]] | </ul><br>[[File:Networking_rutos_manual_users_admin_visualization.png]] | ||
| Line 51: | Line 103: | ||
<li>limited read access; by default, users belonging to this group cannot view these pages: | <li>limited read access; by default, users belonging to this group cannot view these pages: | ||
<ul> | <ul> | ||
<li>System → Administration → Users Settings → System Users</li> | |||
<li>System → | <li>System → Firmware</li> | ||
<li>System → | <li>System → Maintenance → Backup</li> | ||
<li> | <li>System → Administration → Access Control</li> | ||
<li>System → Maintenance → CLI</li> | |||
<li>System → Maintenance → Custom Scripts</li> | |||
<li>System → Maintenance → Troubleshoot</li> | |||
<li>System → Package Manager</li> | |||
<li>Network</li> | |||
<li>System → Setup Wizard</li>{{#ifeq:{{{wifi}}}|1| | |||
<li>Status → Wireless → Channel Analysis</li>|}} | |||
<li>Services → Hotspot → General → Userscripts</li>{{#ifeq:{{{mobile}}}|1| | |||
<li>Services → Mobile Utilitites → Messages → Send Messages</li>|}} | |||
</ul> | </ul> | ||
</li> | </li> | ||
| Line 68: | Line 129: | ||
A group's parameters can be set in its <b>Group Settings</b> page. To access the Groups Settings page, click the 'Edit' button next to the group's name. Below is an example of the Group Settings section: | A group's parameters can be set in its <b>Group Settings</b> page. To access the Groups Settings page, click the 'Edit' button next to the group's name. Below is an example of the Group Settings section: | ||
[[File: | [[File:Networking_rutos_users_groups_group_settings_v3.png|border|class=tlt-border]] | ||
<table class="nd-mantable"> | <table class="nd-mantable"> | ||
| Line 75: | Line 136: | ||
<th style="width:300px">Value</th> | <th style="width:300px">Value</th> | ||
<th>Description</th> | <th>Description</th> | ||
</tr> | |||
<tr> | |||
<td>Hide sensitive information</td> | |||
<td>off {{!}} on; default: <b>on</b></td> | |||
<td>Enabling this option will restrict this user group from viewing sensitive information, such as passwords, private keys and related data. Editing rights for sensitive information fields will remain available, if applicable.</td> | |||
</tr> | </tr> | ||
<tr> | <tr> | ||
<td>Write action</td> | <td>Write action</td> | ||
<td>Allow {{!}} Deny; default: <b>Allow</b></td> | <td>Allow {{!}} Deny; default: <b>Allow</b></td> | ||
<td>Specifies whether to allow | <td>Specifies whether to deny or allow write access for users belonging the group.</td> | ||
</tr> | </tr> | ||
<tr> | <tr> | ||
| Line 85: | Line 151: | ||
<td>path(s) to page(s); default: <b> | <td>path(s) to page(s); default: <b> | ||
<ul> | <ul> | ||
<li><b> | <li><b>System > Administration > User Settings > Change Password</b></li> | ||
</ul> | </ul> | ||
</b></td> | </b></td> | ||
<td> | <td>Controls the ability of users to change and execute the contents (e.g. Network > Lan).</td> | ||
</tr> | </tr> | ||
<tr> | <tr> | ||
<td>Read action</td> | <td>Read action</td> | ||
<td>Allow {{!}} Deny; default: <b>Deny</b></td> | <td>Allow {{!}} Deny; default: <b>Deny</b></td> | ||
<td>Specifies whether to allow | <td>Specifies whether to deny or allow read access for users belonging the group.</td> | ||
</tr> | </tr> | ||
<tr> | <tr> | ||
<td>Read access</td> | <td>Read access</td> | ||
<td>path(s) to page(s); default: | <td>path(s) to page(s); default: <b>in the picture above</b></td> | ||
<td>Path(s) to the page(s) to which the selected "Read action" will be applied. Click the plus symbol to add more entries.</td> | <td>Path(s) to the page(s) to which the selected "Read action" will be applied. Click the plus symbol to add more entries.</td> | ||
</tr> | </tr> | ||
| Line 144: | Line 195: | ||
[[File:Networking_rutos_users_users_v3.png|border|class=tlt-border]] | [[File:Networking_rutos_users_users_v3.png|border|class=tlt-border]] | ||
=====Admin user===== | |||
---- | |||
[[File:Networking_rutos_users_admin_user.png|border|class=tlt-border]] | |||
<table class="nd-mantable"> | |||
<tr> | |||
<th>Field</th> | |||
<th>Value</th> | |||
<th>Description</th> | |||
</tr> | |||
<tr> | |||
<td>Username</td> | |||
<td>admin; default: <b>admin</b></td> | |||
<td>Displays the user's name.</td> | |||
</tr> | |||
<tr> | |||
<td>Current password</td> | |||
<td>string; default: <b>none</b></td> | |||
<td>Enter your current user password.</td> | |||
</tr> | |||
<tr> | |||
<td>New password</td> | |||
<td>string; default: <b>none</b></td> | |||
<td><li>Create a new password for the user. The password must contain at least 8 characters, including at least one upper case letter and one digit.</li><li>Another option is to use the 'Dice' icon, which generates random passwords.</li></td> | |||
</tr> | |||
<tr> | |||
<td>Confirm new password</td> | |||
<td>string; default: <b>none</b></td> | |||
<td>Repeat the new password.</td> | |||
</tr> | |||
<tr> | |||
<td>Group</td> | |||
<td>root; default: <b>root</b></td> | |||
<td>The group to which the user belongs.</td> | |||
</tr> | |||
<tr> | |||
<td>Enable SSH access</td> | |||
<td>off {{!}} on; default: <b>off</b></td> | |||
<td>Enables SSH access (only for 'root' users).</td> | |||
</tr> | |||
</table> | |||
=====User Settings (edit user)===== | =====User Settings (edit user)===== | ||
| Line 151: | Line 246: | ||
<u>However</u>, you may want to add a new user at first. This can be done from the [[{{{name}}}_Users#Add_New_User|Add New User]] section below: | <u>However</u>, you may want to add a new user at first. This can be done from the [[{{{name}}}_Users#Add_New_User|Add New User]] section below: | ||
[[File: | [[File:Networking_rutos_users_add_new_user_example_v3.png|border|class=tlt-border]] | ||
<ol> | <ol> | ||
| Line 162: | Line 257: | ||
Below is an example of a newly added user's settings page: | Below is an example of a newly added user's settings page: | ||
[[File: | [[File:Networking_rutos_users_user_settings_v3.png|border|class=tlt-border]] | ||
<table class="nd-mantable"> | <table class="nd-mantable"> | ||
| Line 178: | Line 273: | ||
<td>New password</td> | <td>New password</td> | ||
<td>string; default: <b>none</b></td> | <td>string; default: <b>none</b></td> | ||
<td>Create a new password for the user. The password must contain at least 8 characters, including at least one upper case letter and one digit.</td> | <td><li>Create a new password for the user. The password must contain at least 8 characters, including at least one upper case letter and one digit.</li><li>Another option is to use the 'Dice' icon, which generates random passwords.</li></td> | ||
</tr> | </tr> | ||
<tr> | <tr> | ||
| Line 193: | Line 288: | ||
<td>Enable SSH access</td> | <td>Enable SSH access</td> | ||
<td>off {{!}} on; default: <b>off</b></td> | <td>off {{!}} on; default: <b>off</b></td> | ||
<td>Enables SSH access | <td>Enables SSH access (only for 'root' users).</td> | ||
</tr> | </tr> | ||
</table> | </table> | ||
| Line 201: | Line 296: | ||
The <b>Add New User</b> section is used to create additional users that can access the WebUI. After a new user is added, it will appear in the [[{{{name}}} Users#Users|Users]] section. | The <b>Add New User</b> section is used to create additional users that can access the WebUI. After a new user is added, it will appear in the [[{{{name}}} Users#Users|Users]] section. | ||
[[File: | [[File:Networking_rutos_users_add_new_user_v3.png|border|class=tlt-border]] | ||
<table class="nd-mantable"> | <table class="nd-mantable"> | ||
| Line 217: | Line 312: | ||
<td>Password</td> | <td>Password</td> | ||
<td>string; default: <b>none</b></td> | <td>string; default: <b>none</b></td> | ||
<td>A password for the new user. The password must contain at least 8 characters, including at least one upper case letter and one digit.</td> | <td><li>A password for the new user. The password must contain at least 8 characters, including at least one upper case letter and one digit.</li><li>Another option is to use the 'Dice' icon, which generates random passwords.</li></td> | ||
</tr> | </tr> | ||
</table>}} | </table>}} | ||
Latest revision as of 08:01, 19 August 2025
Change Password
The User configuration section is used to change the password of the current user.

Password Policy
The Password policy section is used to configure password policy and password expiration settings.

| Field | Value | Description |
|---|---|---|
| Minimum password length | integer; default: 8 | Minimum password length is from 8 to 64 characters. |
| Digits | off | on; default: on | Password must contain at least one digit (0-9). |
| Upper / lower case characters | off | on; default: on | Password must contain at least one upper and lower case letter (A-Z, a-z). |
| Special characters | off | on; default: on | Password must contain at least one special character (~`! @#$%^&*()-_+={}[]|\;:"<>,./?). |
| Password expiration | off | on; default: off | A new password will need to be created once the current one reaches its expiration date. The password expiration period can be set from 1 to 365 days. |
System Users
Summary
The System Users page is used to add new user accounts that can access the device with different user credentials than the default ones. The newly added users can be assigned to one of two groups, either of which can be modified to limit WebUI read/write access rights for users belonging to each specific group.
This page is unrelated to SSH users. By default, there is one SSH user named "root" and it shares the same password as the default WebUI user named "admin".
This manual page provides an overview of the Users page in {{{name}}} devices.
Groups
The Groups section lists available user groups of which there are three:

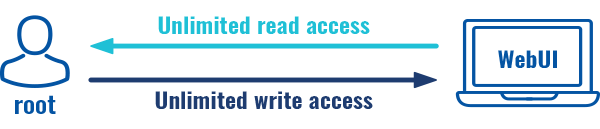
- root - highest level of authority. Key elements that define this group:
- has unlimited read/write access;
- additional users cannot be added to this group;
- access rights for this group cannot be modified.
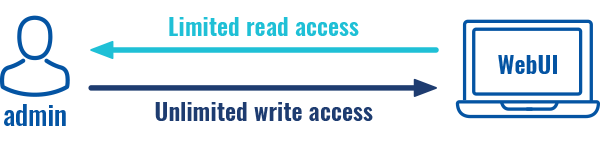
- admin - second highest level of authority. Key elements that define this group:
- limited read access; by default, users belonging to this group cannot view these pages:
- System → Administration → Users Settings → System Users
- System → Administration → Profiles
- System → Maintenance → Backup
- System → Firmware
- System → Maintenance → CLI
- System → Setup Wizard
- System → Maintenance → Custom Scripts
- limited write access; by default, users belonging to this group cannot view these pages:
- System → Administration → Users Settings → System Users
- System → Maintenance → Backup
- System → Firmware
- System → Maintenance → CLI
- System → Setup Wizard
- System → Maintenance → Custom Scripts
- System → Administration → Access Control → General
- System → Administration → Profiles
- access rights can be modified.
- limited read access; by default, users belonging to this group cannot view these pages:
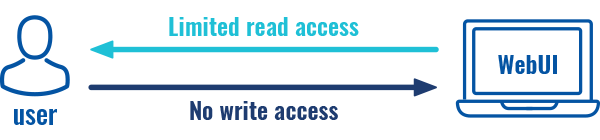
- user - lowest level of authority. Key elements that define this group:
- no write access;
- limited read access; by default, users belonging to this group cannot view these pages:
- System → Administration → Users Settings → System Users
- System → Firmware
- System → Maintenance → Backup
- System → Administration → Access Control
- System → Maintenance → CLI
- System → Maintenance → Custom Scripts
- System → Maintenance → Troubleshoot
- System → Package Manager
- Network
- System → Setup Wizard
- Services → Hotspot → General → Userscripts
- access rights can be modified.


Additional note: you can view and/or edit settings for each group by clicking the 'Edit' button next to them. More on information on how to edit group access settings is located in the following section of this manual page.
Group Settings (edit group)
A group's parameters can be set in its Group Settings page. To access the Groups Settings page, click the 'Edit' button next to the group's name. Below is an example of the Group Settings section:

| Field | Value | Description |
|---|---|---|
| Hide sensitive information | off | on; default: on | Enabling this option will restrict this user group from viewing sensitive information, such as passwords, private keys and related data. Editing rights for sensitive information fields will remain available, if applicable. |
| Write action | Allow | Deny; default: Allow | Specifies whether to deny or allow write access for users belonging the group. |
| Write access | path(s) to page(s); default:
|
Controls the ability of users to change and execute the contents (e.g. Network > Lan). |
| Read action | Allow | Deny; default: Deny | Specifies whether to deny or allow read access for users belonging the group. |
| Read access | path(s) to page(s); default: in the picture above | Path(s) to the page(s) to which the selected "Read action" will be applied. Click the plus symbol to add more entries. |
Examples
The easiest way to master the syntax is to navigate to page that you want to generate a path for and the copy the path from the URL of that page.
For example, to specify the path to the Network → Mobile page, navigate to the page, copy the page's URL address starting from the symbol "#" and paste it into one of the access fields:

However, the VPN window contains links to many different types of VPN pages. If you want to specify only one of them, you can do it as well. For example, to to specify the path to the IPsec page, add "/ipsec" to the path string:
services/vpn/ipsec
An asterisk (*) in the path string means that the every page from that point on is included in that path. For example, to generate a path that includes pages in the Services menu tab:
services/*
Or to simply include everything in the entire WebUI (if this path is combined with Read action: Deny, users from that group will not be able to login to the WebUI):
*
Users
The Users section lists all created users and provides the possibility to change their passwords and the group they belong to (with the exception of the default user "admin" which always belongs to the root group).
By default, there is only one user called "admin":

Admin user

| Field | Value | Description |
|---|---|---|
| Username | admin; default: admin | Displays the user's name. |
| Current password | string; default: none | Enter your current user password. |
| New password | string; default: none | |
| Confirm new password | string; default: none | Repeat the new password. |
| Group | root; default: root | The group to which the user belongs. |
| Enable SSH access | off | on; default: off | Enables SSH access (only for 'root' users). |
User Settings (edit user)
Each user's password and group parameters can be set in their User Settings pages. To access the User Settings page, click the 'Edit' button next to the user's name.
However, you may want to add a new user at first. This can be done from the [[{{{name}}}_Users#Add_New_User|Add New User]] section below:

- create a username;
- create a password for the user (must contain at least 8 characters, including at least one upper case letter and one digit);
- click the 'Add' button;
- click the 'Edit' next to newly added user.
Below is an example of a newly added user's settings page:

| Field | Value | Description |
|---|---|---|
| Username | string; default: none | Displays the user's name. |
| New password | string; default: none | |
| Confirm new password | string; default: none | Repeat the new password. |
| Group | admin | user; default: user | The group to which the user belongs. |
| Enable SSH access | off | on; default: off | Enables SSH access (only for 'root' users). |
Add New User
The Add New User section is used to create additional users that can access the WebUI. After a new user is added, it will appear in the [[{{{name}}} Users#Users|Users]] section.

| Field | Value | Description |
|---|---|---|
| Username | string; default: none | A custom name for the new user. |
| Password | string; default: none |