RUT230 Input/Output: Difference between revisions
No edit summary |
|||
| (14 intermediate revisions by 7 users not shown) | |||
| Line 1: | Line 1: | ||
==Summary== | |||
This chapter is an overview of the Input/Output function in RUT240 routers. | |||
<!----------- | ==Status== | ||
In the '''Status''' page you can review the current state the router’s input and output. | |||
[[Image:Services inputoutput status rut240.PNG]] | |||
===Custom Labels=== | |||
---- | |||
If the default Input/Output labels do not suit your needs, you can always configure custom ones. The configuration is simple, just click the '''Edit''' button next to the desired Input or Output and you will be redirected to a window such as this: | |||
[[Image:Services inputoutput status label.PNG]] | |||
The figure above represents how custom label configuration for '''Digital Input''' looks like, but the configuration for the Output is analogous. The changes are purely cosmetic and used for easier management purposes: you can change the Input's/Output's name and the names of its states. | |||
==Input== | |||
The '''Input''' section is used to configure Input. | |||
===Input Rules=== | |||
---- | |||
'''Input Rules''' Allow you to set up input parameters and specify what actions should be taken after a specified trigger takes place. | |||
[[Image:Services inputoutput input configuration.PNG]] | |||
<table class="nd-mantable"> | |||
<tr> | |||
<th>field name</th> | |||
<th>value</th> | |||
<th>description</th> | |||
</tr> | |||
<tr> | |||
<td>Enable</td> | |||
<td>yes {{!}} no; Default: '''yes'''</td> | |||
<td>Toggles the Input rule ON or OFF</td> | |||
</tr> | |||
<tr> | |||
<td>Input type</td> | |||
<td>Digital; Default: '''Digital'''</td> | |||
<td>Selects which Input is tied to the rule</td> | |||
</tr> | |||
<tr> | |||
<td>Trigger</td> | |||
<td>Input open {{!}} Input shorted {{!}} Both; Default: '''Input open'''</td> | |||
<td>Specifies the Trigger after which the rule will take effect</td> | |||
</tr> | |||
<tr> | |||
<td>Action</td> | |||
<td>Send SMS {{!}} Change SIM card {{!}} Send email {{!}} Change profile {{!}} Turn on WiFi {{!}} Turn off WiFi {{!}} Reboot {{!}} Activate output {{!}} HTTP POST/GET; Default: '''Send SMS'''</td> | |||
<td>Action to be taken after the Trigger takes place | |||
'''Send SMS''' - sends an SMS message to a specified number(s). The message text is custom | |||
'''Send email''' - sends an email to the specified address. You will be prompted to enter your email account's authentication information | |||
'''Change profile''' - switches the profile in use to the specified profile | |||
'''Turn on WiFi/Turn off WiFi''' - turns WiFi ON or OFF | |||
'''Reboot''' - reboots the router after a specified amount of time | |||
'''Activate output''' - activates specified output</td> | |||
</tr> | |||
</table> | |||
==Output== | |||
The '''Output''' section is used to configure the router's outputs. | |||
===Output Configuration=== | |||
---- | |||
The '''Output Configuration''' tab is used to change the default state of outputs. | |||
[[Image:Services inputoutput output configuration rut240.PNG]] | |||
<table class="nd-mantable"> | |||
<tr> | |||
<th>field name</th> | |||
<th>value</th> | |||
<th>description</th> | |||
</tr> | |||
<tr> | |||
<td>Open collector output</td> | |||
<td>High level {{!}} Low level; Default: '''Low level'''</td> | |||
<td>OC Output state</td> | |||
</tr> | |||
</table> | |||
===ON/OFF=== | |||
---- | |||
The '''ON/OFF''' section is used to turn the Output ON or OFF, but it doesn't save the state permanently, meaning that after a reboot the states will revert back to their default values. | |||
[[Image:Services inputoutput output onoff rut240.PNG]] | |||
===Post/Get Configuration=== | |||
---- | |||
[[Image:Services inputoutput output post get.PNG]] | |||
<table class="nd-mantable"> | |||
<tr> | |||
<th>field name</th> | |||
<th>value</th> | |||
<th>description</th> | |||
</tr> | |||
<tr> | |||
<td>Enable</td> | |||
<td>yes {{!}} no; Default: '''no'''</td> | |||
<td>Toggles Output POST/GET function ON or OFF</td> | |||
</tr> | |||
<tr> | |||
<td>Username</td> | |||
<td>string Default: " "</td> | |||
<td>POST/GET service user name</td> | |||
</tr> | |||
<tr> | |||
<td>Password</td> | |||
<td>string Default: " "</td> | |||
<td>POST/GET service user passwor</td> | |||
</tr> | |||
</table> | |||
===Periodic Control=== | |||
---- | |||
'''Periodic control''' allows you to set up Output control rules. | |||
[[Image:Services inputoutput output periodic rut240.PNG]] | |||
<table class="nd-mantable"> | |||
<tr> | |||
<th>field name</th> | |||
<th>value</th> | |||
<th>description</th> | |||
</tr> | |||
<tr> | |||
<td>Enable</td> | |||
<td>yes {{!}} no; Default: '''no'''</td> | |||
<td>Toggles the rule ON or OFF</td> | |||
</tr> | |||
<tr> | |||
<td>Output</td> | |||
<td>Digital OC output; Default: '''Digital OC output'''</td> | |||
<td>To which output the rule pertains</td> | |||
</tr> | |||
<tr> | |||
<td>Action</td> | |||
<td>On {{!}} Off; Default: '''On'''</td> | |||
<td>Periodic action to be taken</td> | |||
</tr> | |||
<tr> | |||
<td>Action timeout</td> | |||
<td>On {{!}} Off; Default: '''On'''</td> | |||
<td>Activates action timeout. Action timeout specifies whether an action should end after some time. For example, if the specified Action is to turn Digital OC output On and the action triggers, the Action timeout then turns Digital OC output back off after a specified amount of time in seconds specified in this field</td> | |||
</tr> | |||
<tr> | |||
<td>Timeout (sec)</td> | |||
<td>integer; Default: " "</td> | |||
<td>Specifies how long the Action timeout is</td> | |||
</tr> | |||
<tr> | |||
<td>Mode</td> | |||
<td>Fixed {{!}} Interval; Default: '''Fixed'''</td> | |||
<td>'''Fixed''' mode triggers the specified action on a specified day(s), hour and minute. For example, every Sunday at 8:30 AM<br> | |||
'''Interval''' provides you with the possibility to set up an interval after which the same action takes place</td> | |||
</tr> | |||
</table> | |||
===Scheduler=== | |||
---- | |||
'''Scheduler''' lets you configure a schedule of when the Output is to be enabled or disabled. | |||
[[Image:Services inputoutput output scheduler rut240.PNG]] | |||
Revision as of 10:28, 14 December 2018
Main Page > EOL Products > RUT230 > RUT230 Manual > RUT230 WebUI > RUT230 Services section > RUT230 Input/OutputSummary
This chapter is an overview of the Input/Output function in RUT240 routers.
Status
In the Status page you can review the current state the router’s input and output.
Custom Labels
If the default Input/Output labels do not suit your needs, you can always configure custom ones. The configuration is simple, just click the Edit button next to the desired Input or Output and you will be redirected to a window such as this:
The figure above represents how custom label configuration for Digital Input looks like, but the configuration for the Output is analogous. The changes are purely cosmetic and used for easier management purposes: you can change the Input's/Output's name and the names of its states.
Input
The Input section is used to configure Input.
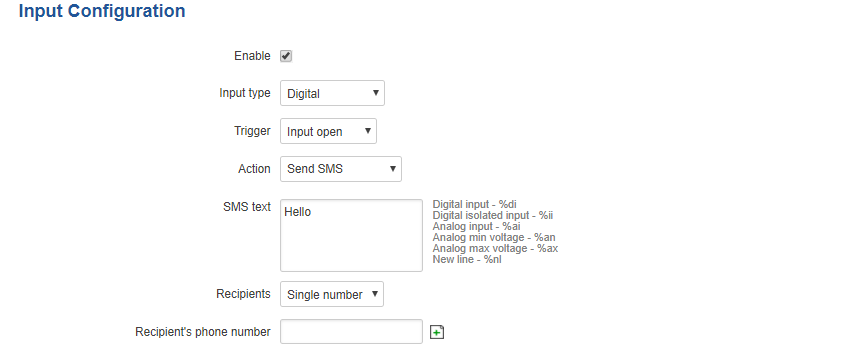
Input Rules
Input Rules Allow you to set up input parameters and specify what actions should be taken after a specified trigger takes place.
| field name | value | description |
|---|---|---|
| Enable | yes | no; Default: yes | Toggles the Input rule ON or OFF |
| Input type | Digital; Default: Digital | Selects which Input is tied to the rule |
| Trigger | Input open | Input shorted | Both; Default: Input open | Specifies the Trigger after which the rule will take effect |
| Action | Send SMS | Change SIM card | Send email | Change profile | Turn on WiFi | Turn off WiFi | Reboot | Activate output | HTTP POST/GET; Default: Send SMS | Action to be taken after the Trigger takes place
Send SMS - sends an SMS message to a specified number(s). The message text is custom Send email - sends an email to the specified address. You will be prompted to enter your email account's authentication information Change profile - switches the profile in use to the specified profile Turn on WiFi/Turn off WiFi - turns WiFi ON or OFF Reboot - reboots the router after a specified amount of time Activate output - activates specified output |
Output
The Output section is used to configure the router's outputs.
Output Configuration
The Output Configuration tab is used to change the default state of outputs.
| field name | value | description |
|---|---|---|
| Open collector output | High level | Low level; Default: Low level | OC Output state |
ON/OFF
The ON/OFF section is used to turn the Output ON or OFF, but it doesn't save the state permanently, meaning that after a reboot the states will revert back to their default values.
Post/Get Configuration
| field name | value | description |
|---|---|---|
| Enable | yes | no; Default: no | Toggles Output POST/GET function ON or OFF |
| Username | string Default: " " | POST/GET service user name |
| Password | string Default: " " | POST/GET service user passwor |
Periodic Control
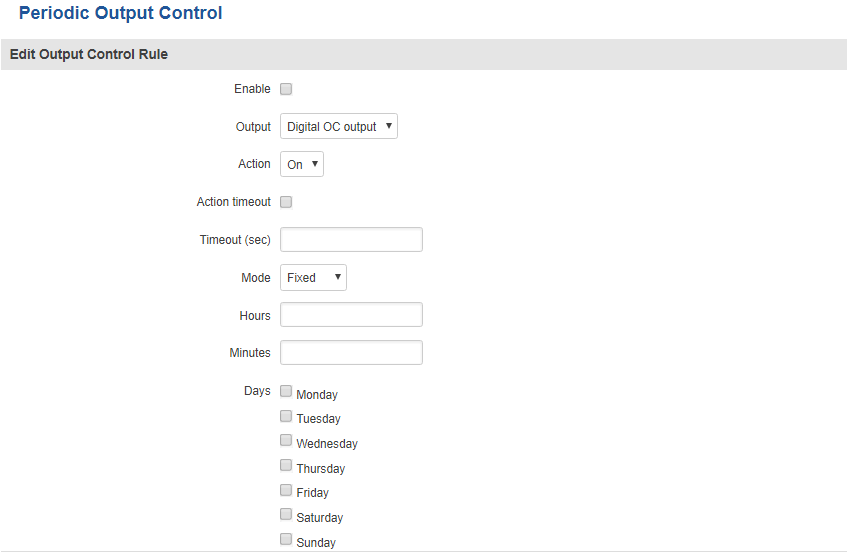
Periodic control allows you to set up Output control rules.
| field name | value | description |
|---|---|---|
| Enable | yes | no; Default: no | Toggles the rule ON or OFF |
| Output | Digital OC output; Default: Digital OC output | To which output the rule pertains |
| Action | On | Off; Default: On | Periodic action to be taken |
| Action timeout | On | Off; Default: On | Activates action timeout. Action timeout specifies whether an action should end after some time. For example, if the specified Action is to turn Digital OC output On and the action triggers, the Action timeout then turns Digital OC output back off after a specified amount of time in seconds specified in this field |
| Timeout (sec) | integer; Default: " " | Specifies how long the Action timeout is |
| Mode | Fixed | Interval; Default: Fixed | Fixed mode triggers the specified action on a specified day(s), hour and minute. For example, every Sunday at 8:30 AM Interval provides you with the possibility to set up an interval after which the same action takes place |
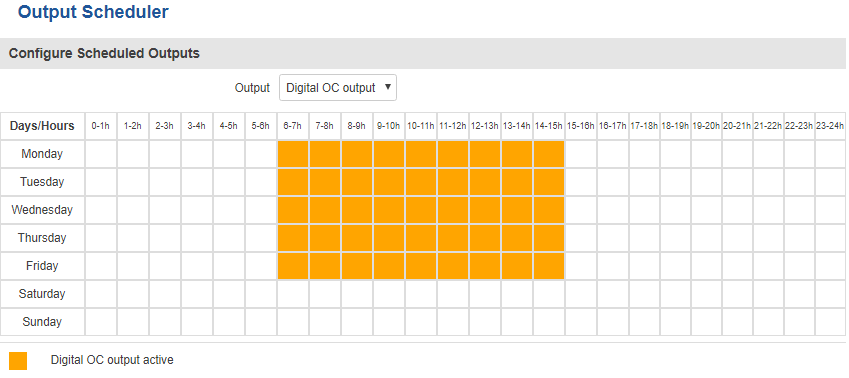
Scheduler
Scheduler lets you configure a schedule of when the Output is to be enabled or disabled.


