Template:Netoworking rutxxx configuration example mikrotik l2tp ipsec: Difference between revisions
m (Protected "Template:Netoworking rutxxx configuration example mikrotik l2tp ipsec" ([Edit=Allow only administrators] (indefinite) [Move=Allow only administrators] (indefinite))) |
|||
| (11 intermediate revisions by one other user not shown) | |||
| Line 9: | Line 9: | ||
* One RUTxxx router of any type | * One RUTxxx router of any type | ||
* One Mikrotik router (this configuration example was created using Mikrotik rb750gr3) | * One Mikrotik router (this configuration example was created using Mikrotik rb750gr3) | ||
* Server must have a Public Static or Public Dynamic IP address | * Server must have a Public Static or Public Dynamic IP address (client can have private or public IP address) | ||
* At least one end device (PC, Laptop) to configure the routers | * At least one end device (PC, Laptop) to configure the routers | ||
* WinBox application | * WinBox application | ||
==Configuration scheme== | ==Configuration scheme== | ||
[[File:Networking_rutxxx_configuration_example_l2tp_ipsec_mikrotik_topology_v1.png|border|class=tlt-border|700px]] | |||
==Mikrotik configuration== | ==Mikrotik configuration== | ||
| Line 19: | Line 21: | ||
Connect to MikroTik by using '''WinBox''' application and press '''New Terminal'''. | Connect to MikroTik by using '''WinBox''' application and press '''New Terminal'''. | ||
[[File:]] | [[File:Networking_rutxxx_configuration_example_l2tp_ipsec_mikrotik_1_v1.jpg|border|class=tlt-border]] | ||
The first step is to create a PPP Profile on the MikroTik. Use a 192.168.102.1 for the local address (the VPN Gateway), assuming this is not already in use. You will also need to add a DNS Server. Use this command: | The first step is to create a PPP Profile on the MikroTik. Use a 192.168.102.1 for the local address (the VPN Gateway), assuming this is not already in use. You will also need to add a DNS Server. Use this command: | ||
| Line 53: | Line 55: | ||
Now go to '''IP > Firewall''' and change positions of the 2 Firewall rules you just created (drag it to the top like in the example) in order to move them, press '''#''' sign. | Now go to '''IP > Firewall''' and change positions of the 2 Firewall rules you just created (drag it to the top like in the example) in order to move them, press '''#''' sign. | ||
[[File:]] | [[File:Networking_rutxxx_configuration_example_l2tp_ipsec_mikrotik_2_v1.jpg|border|class=tlt-border]] | ||
==RUT configuration== | ==RUT configuration== | ||
Access RUTxxx WebUI and go to '''Services > VPN > L2TP'''. There create a new configuration by selecting role '''Client'', writing '''New configuration name''' | Access RUTxxx WebUI and go to '''Services > VPN > L2TP'''. There create a new configuration by selecting role '''Client'', writing '''New configuration name''' and pressing '''Add New''' button. It should appear after a few seconds. Then press '''Edit'''. | ||
[[File:]] | [[File:Networking_rutxxx_configuration_example_l2tp_ipsec_mikrotik_3_v1.jpg|border|class=tlt-border]] | ||
Then apply the following configuration. | Then apply the following configuration. | ||
[[File:]] | [[File:Networking_rutxxx_configuration_example_l2tp_ipsec_mikrotik_4_v1.jpg|border|class=tlt-border]] | ||
# '''Enable''' instance. | # '''Enable''' instance. | ||
| Line 74: | Line 76: | ||
Now go to '''Services > VPN > IPsec'''. | Now go to '''Services > VPN > IPsec'''. | ||
[[File:]] | [[File:Networking_rutxxx_configuration_example_l2tp_ipsec_mikrotik_5_v1.jpg|border|class=tlt-border]] | ||
# Write '''Pre-shared key''' (write the password which you created with this command /ip ipsec identity add generate-policy=port-override auth-method=pre-shared-key secret="password" peer=l2tpserver ). | # Write '''Pre-shared key''' (write the password which you created with this command /ip ipsec identity add generate-policy=port-override auth-method=pre-shared-key secret="password" peer=l2tpserver ). | ||
# Press '''Save'''. | # Press '''Save'''. | ||
# Write '''IPsec''' interface name | # Write '''IPsec''' interface name and press '''Add'''. | ||
# When the interface appears like in the example, press '''Edit'''. | # When the interface appears like in the example, press '''Edit'''. | ||
[[File:]] | [[File:Networking_rutxxx_configuration_example_l2tp_ipsec_mikrotik_6_v1.jpg|border|class=tlt-border]] | ||
# '''Enable''' instance. | # '''Enable''' instance. | ||
| Line 94: | Line 96: | ||
Go to '''Status > Routes''' and in the '''Active IP Routes''' table you should see this new route: | Go to '''Status > Routes''' and in the '''Active IP Routes''' table you should see this new route: | ||
[[File:]] | [[File:Networking_rutxxx_configuration_example_l2tp_ipsec_mikrotik_7_v1.jpg|border|class=tlt-border]] | ||
Try to ping the remote VPN endpoint via '''CLI''' or '''SSH''' using this command: | |||
ping 192.168.102.1 | |||
[[File:Networking_rutxxx_configuration_example_l2tp_ipsec_mikrotik_8_v1.jpg|border|class=tlt-border]] | |||
Also, you can check whether '''IPsec''' is working by writing this command to CLI: | Also, you can check whether '''IPsec''' is working by writing this command to '''CLI''': | ||
ipsec status | ipsec status | ||
| Line 104: | Line 112: | ||
Security Associations (1 up, 0 connecting) | Security Associations (1 up, 0 connecting) | ||
[[File:]] | [[File:Networking_rutxxx_configuration_example_l2tp_ipsec_mikrotik_9_v1.jpg|border|class=tlt-border]] | ||
Latest revision as of 14:30, 3 April 2020
Introduction
Because of the lack of confidentiality inherent in the Layer 2 Networking Protocol (L2TP) protocol, Internet Protocol Security (IPsec) is often used to secure L2TP packets by providing confidentiality, authentication and integrity. The combination of these two protocols is generally known as L2TP over IPsec (or simply L2TP/IPsec).
This article provides a guide on how to configure L2TP/IPsec tunnel between RUTxxx and Mikrotik routers.
Prerequisites
- One RUTxxx router of any type
- One Mikrotik router (this configuration example was created using Mikrotik rb750gr3)
- Server must have a Public Static or Public Dynamic IP address (client can have private or public IP address)
- At least one end device (PC, Laptop) to configure the routers
- WinBox application
Configuration scheme
Mikrotik configuration
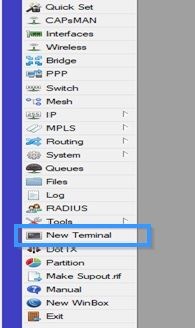
Connect to MikroTik by using WinBox application and press New Terminal.
The first step is to create a PPP Profile on the MikroTik. Use a 192.168.102.1 for the local address (the VPN Gateway), assuming this is not already in use. You will also need to add a DNS Server. Use this command:
/ppp profile add name=ipsec_vpn local-address=192.168.102.1 dns-server=1.1.1.1
Next, you need to add an L2TP-server interface and set the allowed authentication methods, mschap1 and mschap2. Use this command:
/interface l2tp-server server set enabled=yes default-profile=ipsec_vpn authentication=mschap1,mschap2
Then you need to define the peering of IPSec and also the default IPsec policy. You will also set the pre-shared-key secret in the process. Use these commands to do so:
/ip ipsec policy set [ find default=yes ] src-address=0.0.0.0/0 dst-address=0.0.0.0/0 protocol=all proposal=default template=yes
/ip ipsec peer add exchange-mode=main passive=yes name=l2tpserver
/ip ipsec identity add generate-policy=port-override auth-method=pre-shared-key secret="password" peer=l2tpserver
Next, set the default encryption algorithms:
/ip ipsec proposal set default auth-algorithms=sha1 enc-algorithms=3des pfs-group=modp1024
Now, add a user and allocate an IP Address:
/ppp secret add name="username" password="password" service=l2tp profile=ipsec_vpn remote-address=192.168.102.2
Open the IPSec ports from the WAN:
/ip firewall filter add chain=input action=accept protocol=udp port=1701,500,4500
/ip firewall filter add chain=input action=accept protocol=ipsec-esp
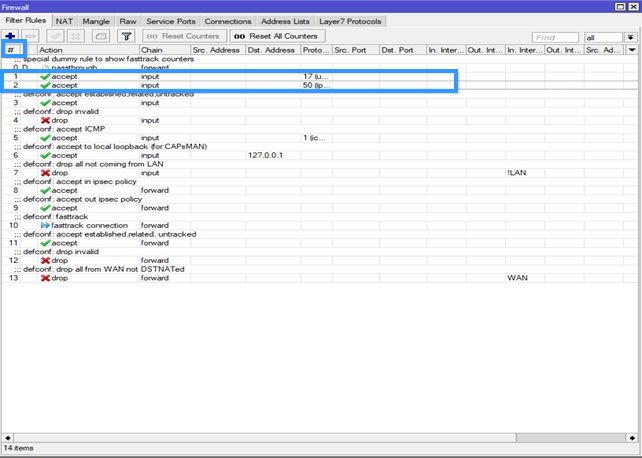
Now go to IP > Firewall and change positions of the 2 Firewall rules you just created (drag it to the top like in the example) in order to move them, press # sign.
RUT configuration
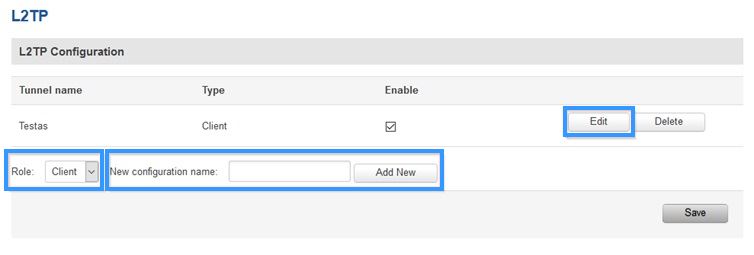
Access RUTxxx WebUI and go to Services > VPN > L2TP'. There create a new configuration by selecting role Client, writing New configuration name and pressing Add New button. It should appear after a few seconds. Then press Edit.
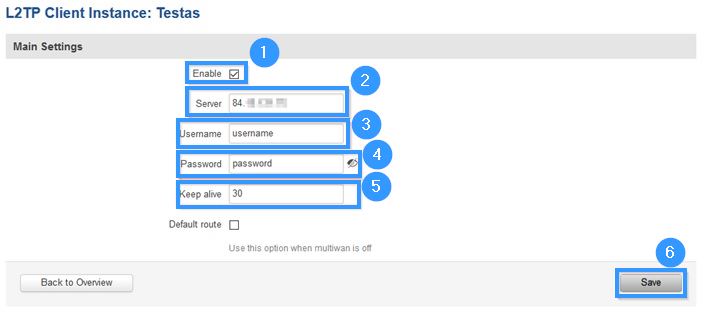
Then apply the following configuration.
- Enable instance.
- Write Server IP address (MikroTik public IP address).
- Write Username (write the username which you created with this command /ppp secret add name="username" password="password" service=l2tp profile=ipsec_vpn remote-address=192.168.102.2).
- Write Password (write the password which you created with this command /ppp secret add name="username" password="password" service=l2tp profile=ipsec_vpn remote-address=192.168.102.2).
- Set Keep alive (30).
- Press Save.
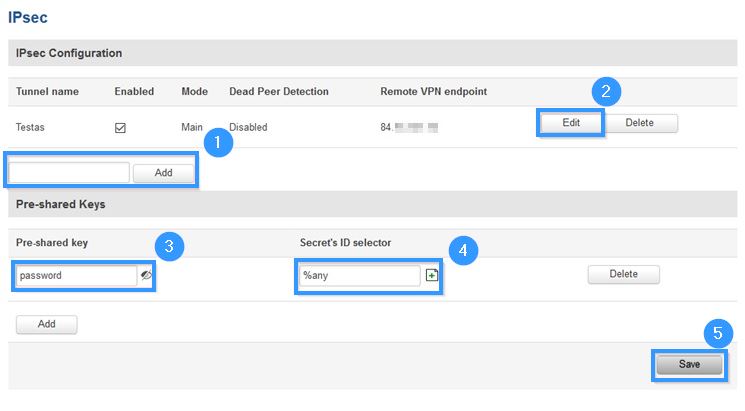
Now go to Services > VPN > IPsec.
- Write Pre-shared key (write the password which you created with this command /ip ipsec identity add generate-policy=port-override auth-method=pre-shared-key secret="password" peer=l2tpserver ).
- Press Save.
- Write IPsec interface name and press Add.
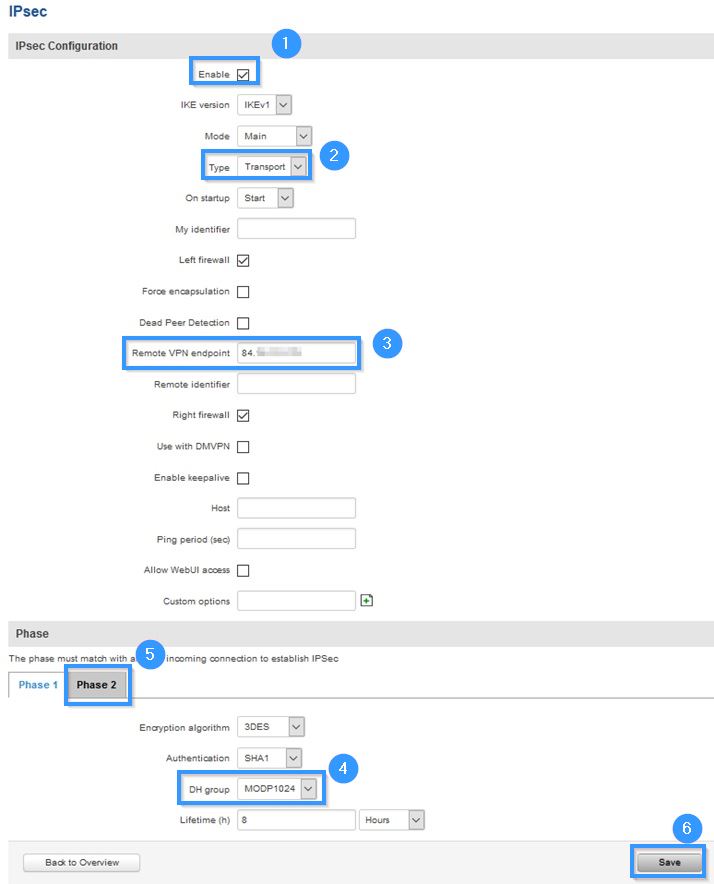
- When the interface appears like in the example, press Edit.
- Enable instance.
- Select Type (Transport).
- Write Remote VPN endpoint (MikroTik public IP address).
- Select DH group (MODP1024)
- Set all of the settings in Phase 2 to be exactly the same as in the Phase 1.
- Press Save.
Testing configuration
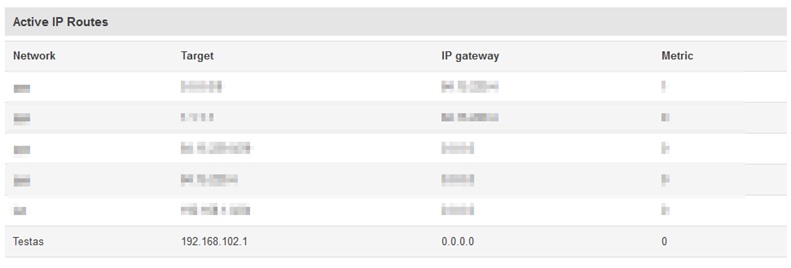
Go to Status > Routes and in the Active IP Routes table you should see this new route:
Try to ping the remote VPN endpoint via CLI or SSH using this command:
ping 192.168.102.1
Also, you can check whether IPsec is working by writing this command to CLI:
ipsec status
It should show:
Security Associations (1 up, 0 connecting)


