|
|
| (28 intermediate revisions by the same user not shown) |
| Line 1: |
Line 1: |
| − | <!--<font size="-1"><i>Last edit was on <u>{{REVISIONMONTH}}/{{REVISIONDAY}}/{{REVISIONYEAR}}</u></i></font>-->
| + | {{Template: Networking_rutxxx_configuration_example_use_LAN_as_WAN |
| − | ==Introduction==
| + | | name = RUT955 |
| − | | + | | fw_version = RUT9XX_R_00.06.05.3 |
| − | This article provides a guide on how to configure the LAN ports as WAN. It can be useful as wired ISP redundant connection or even to change the port for physical damage or a custom mounting.
| + | | file_scheme = Networking_rut955_configuration_examples_lan_port_as_wan_scheme_v1.png |
| − | | + | }} |
| − | ==Configuration overview and prerequisites==
| |
| − | | |
| − | Before we begin, let's overview the configuration that we are attempting to achieve and the prerequisites that make it possible.
| |
| − | | |
| − | '''Prerequisites''':
| |
| − | * One RUTxxx series router (excluding [[RUT850]]).
| |
| − | * At least two wired Internet connections.
| |
| − | * An end device for test the configuration.<br>
| |
| − | | |
| − | '''Configuration scheme:'''
| |
| − | | |
| − | [[File:Networking_rut955_configuration_examples_lan_port_as_wan_scheme_v1.png|border|class=tlt-border]]
| |
| − | | |
| − | ==WebUI Router configuration==
| |
| − | | |
| − | Connect to the router’s WebUI navigate to '''Network → VLAN → LAN Network''' and create a new interface by entering name and clicking '''Add New'''.
| |
| − | | |
| − | [[File:Networking_rutxxx_configuration_examples_use_lan_as_wan_1_v3.png|border|class=tlt-border]]
| |
| − | | |
| − | After you clicked '''Add New''' new configuration window will pop-up, there you leave as default and press '''Save.'''
| |
| − | | |
| − | [[File:Networking_rutxxx_configuration_examples_use_lan_as_wan_2_v1.png|border|class=tlt-border]]
| |
| − | | |
| − | After saving settings, you will be redirected back to '''Network → VLAN → VLAN Networks''', now you need to open VLAN Network tab in the same window and you will need to:
| |
| − | | |
| − | <ul>
| |
| − | <li>Select VLAN mode: Port based</li>
| |
| − | <li>Current LAN interface:<br>
| |
| − | - Enable wireless access<br>
| |
| − | - Select your current LAN interface.<br>
| |
| − | - Turn off LAN port 3 <i>(which will be used as WAN port)</i><br>
| |
| − | - Press '''Save'''.</li>
| |
| − | <i><b>Note:</b> Make sure that you are not connected to that LAN port which you going to disable.</i>
| |
| − | <li>New LAN_WAN interface:<br>
| |
| − | - Click '''Add''' and a new row will appear.<br>
| |
| − | - Turn off LAN ports 1-2 and leave only LAN port 3 on.<br>
| |
| − | - Select your newly created interface in the LAN section and click '''Save'''.</li>
| |
| − | </ul>
| |
| − | | |
| − | [[File:Networking_rutxxx_configuration_examples_use_lan_as_wan_3_v1.png|border|class=tlt-border]]
| |
| − | | |
| − | ==CLI/SSH Router configuration==
| |
| − | | |
| − | For the next part you will be configuring router via SSH. For this you need to use the command line interface (CLI) or a SSH software if you’re using Windows or iOS. In this example software '''putty''' will be used. Open '''putty''' enter routers LAN IP address and press '''Open'''.
| |
| − | | |
| − | [[File:Networking_rutxxx_configuration_examples_use_lan_as_wan_8_v1.png]]
| |
| − | | |
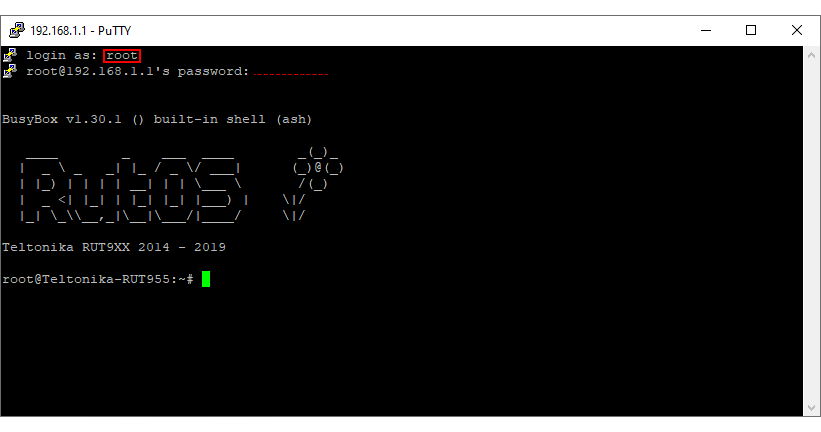
| − | After clicking '''Open''' you will need to enter router credentials.
| |
| − | | |
| − | </ul>
| |
| − | <li>Login as: '''root'''</li>
| |
| − | <li>Password: routers admin password (by default admin01)</li>
| |
| − | </ul>
| |
| − | | |
| − | [[File:Networking_rutxxx_configuration_examples_use_lan_as_wan_9_v1.png]]<br><br>
| |
| − | | |
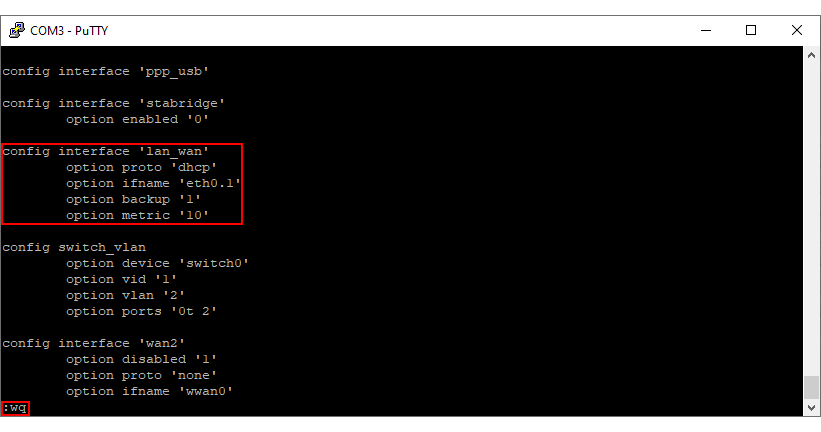
| − | Now when you are connected you will need to make changes to network settings, this will be achieved via SSH command: '''vi''', which allows you to edit settings in the router. Enter following command in SSH:
| |
| − | | |
| − | <pre>vi /etc/config/network</pre>
| |
| − | | |
| − | Then press the 'I' button on your keyboard to enable editing.
| |
| − | | |
| − | ===Using DHCP===
| |
| − | ----
| |
| − | Using the arrow keys on your keyboard, navigate and find '''config interface 'lan_wan'''' erase the current configuration and write these options:
| |
| − | | |
| − | <ul>
| |
| − | <li><i>option proto 'dhcp'</i></li>
| |
| − | <li><i>option ifname 'eth0.1'</i></li>
| |
| − | <li><i>option backup '1'</i></li>
| |
| − | <li><i>option metric '10'</i><br>[[File:Networking_rutxxx_configuration_examples_use_lan_as_wan_4_v1.png]]</li>
| |
| − | <li>Press the <b>Escape (E<small>SC</small>)</b> button on your keyboard; type <b><i>:wq</i></b> and press <b>Enter</b> to close the editor and save the changes.</li>
| |
| − | <li>Restart the network service on the router in order to apply the changes by executing this command:<br><pre>/etc/init.d/network restart</pre></li>
| |
| − | </ul>
| |
| − | ----
| |
| − | <ul>
| |
| − | <li>You can exit PuTTY after this return to the WebUI; navigate to the <b>Network → Firewall → General Settings</b> page.</li>
| |
| − | <li>Scroll down to the <i>Zone Forwarding</i> section, find <i>source zone: <u>lan_wan</u></i>.</li>
| |
| − | <li>Change <i>Default forwarding action</li> from <b>reject</b> to <b>accept</b>, tick the <b>Masquerading</b> checkbox and save the changes.<br>[[File:Networking_rutxxx_configuration_examples_use_lan_as_wan_6_v1.png|border|class=tlt-border]]</li>
| |
| − | </ul>
| |
| − | | |
| − | ===Using Static IP===
| |
| − | ----
| |
| − | <font size="-1"><u><i>If you're using DHCP, jump to the [[#Testing the configuration|next section of this guide]]</i></u></font>
| |
| − | ----
| |
| − | Use the arrow keys to navigate the file and find the <b><i>config interface 'lan_wan'</i></b> section. Add these four options to the configuration:
| |
| − | | |
| − | <ul>
| |
| − | <li><i>option gateway '192.168.10.1'</i></li>
| |
| − | <li><i>option dns '8.8.8.8'</i></li>
| |
| − | <li><i>option backup '1'</i></li>
| |
| − | <li><i>option metric '10'</i><br>[[File:Networking_rutxxx_configuration_examples_use_lan_as_wan_5_v1.png]]</li>
| |
| − | <li>Press the <b>Escape (E<small>SC</small>)</b> button on your keyboard; type <b><i>:wq</i></b> and press <b>Enter</b> to close the editor and save the changes.</li>
| |
| − | <li>Restart the network service on the router in order to apply the changes by executing this command:<br><pre>/etc/init.d/network restart</pre></li>
| |
| − | </ul>
| |
| − | ----
| |
| − | <ul>
| |
| − | <li>You can exit PuTTY after this return to the WebUI; navigate to the <b>Network → Firewall → General Settings</b> page.</li>
| |
| − | <li>Scroll down to the <i>Zone Forwarding</i> section, find <i>source zone: <u>lan_wan</u></i>.</li>
| |
| − | <li>Change <i>Default forwarding action</li> from <b>reject</b> to <b>accept</b>, tick the <b>Masquerading</b> checkbox and save the changes.<br>[[File:Networking_rutxxx_configuration_examples_use_lan_as_wan_6_v1.png|border|class=tlt-border]]</li>
| |
| − | </ul>
| |
| − | | |
| − | ==Testing the configuration==
| |
| − | | |
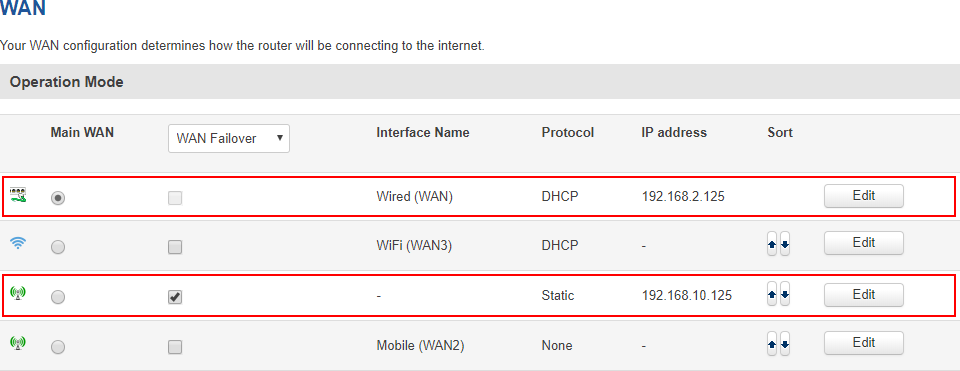
| − | If everything went well, your device should now have two wired WAN connections. To test this go to the <i>Network → WAN</i> page and check if the new interface is enabled and if it has an IP address.
| |
| − | | |
| − | <ul>
| |
| − | <li>Set the Wired (WAN) interface as the main WAN connection.</li>
| |
| − | <li>Set the new interface as WAN failover and save the changes.<br>[[File:Networking_rutxxx_configuration_examples_use_lan_as_wan_7_v1.png|border|class=tlt-border]]</li>
| |
| − | <li>Go to [www.whatsmyip.com] and check your public IP address.<br>[[File:0011.png|border|class=tlt-border|960px]]</li>
| |
| − | <li>Then unplug the main WAN cable and check again. If the interface failed over correctly, the website should a different IP address than before.<br>[[File:0012.png|border|class=tlt-border|960px]]</li>
| |
| − | <li>Plug the main WAN cable back in and wait a bit. Refresh the website; the IP should have change back to the one shown in the first place.</li>
| |
| − | </ul>
| |
| − | | |
| − | [[Category:-Network Control]] [[Category:RUT955 Config Examples]] [[Category:RUT950 Config Examples]] [[Category:RUT900 Config Examples]] [[Category:RUT240 Config Examples]] [[Category:RUT230 Config Examples]]
| |
Introduction
The information in this page is updated in accordance with the RUT9XX_R_00.06.05.3 firmware version.
This article provides a guide on how to configure the LAN ports as WAN. It can be usefull as wired ISP redundant connection or even to change the port for physical damage or a custom mounting.
Configuration overview and prerequisites
Before we begin, let's overview the configuration that we are attempting to achieve and the prerequisites that make it possible.
Prerequisites:
- One RUTxxx series router (excluding RUT850).
- At least two wired Internet connections.
- An end device for test the configuration.
Configuration scheme:
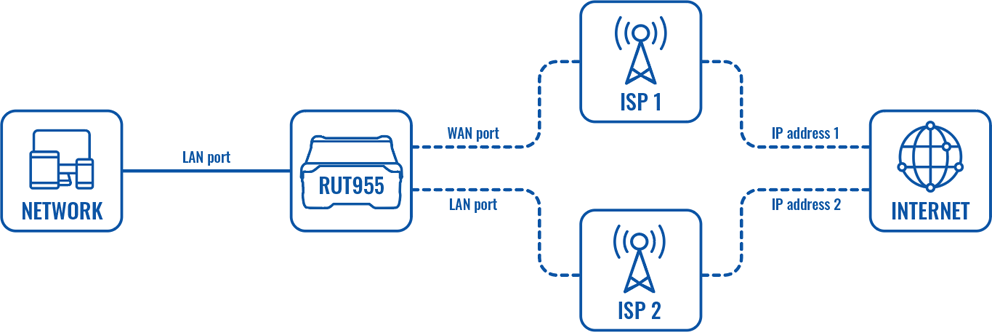
WebUI Router configuration
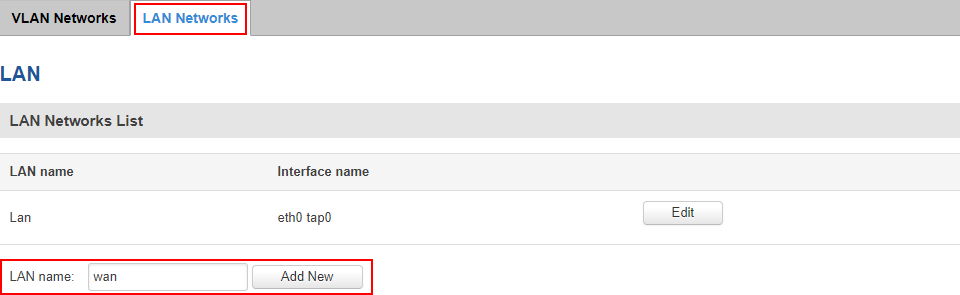
Connect to the router’s WebUI navigate to Network -> VLAN -> LAN Network and create a new interface by entering name and clicking Add New.
After you clicked Add New new configuration window will pop-up, there you leave as default and press Save.

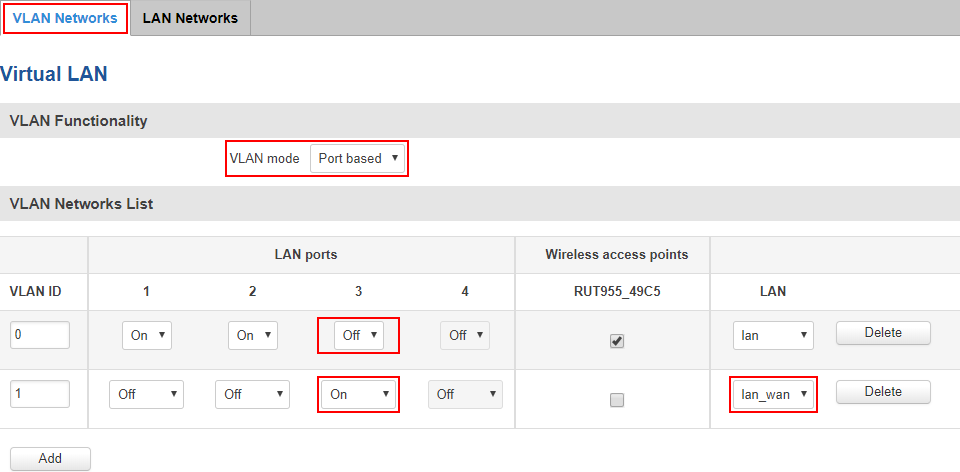
After saving settings, you will be redirected back to Network -> VLAN -> VLAN Networks, now you need to open VLAN Network tab in the same window and you will need to:
- Select VLAN mode: Port based
- Current LAN interface:
- Enable wireless access
- Select your current LAN interface.
- Turn off LAN port 3 (which will be used as WAN port)
- Press Save.
Note: Make sure that you are not connected to that LAN port which you going to disable.
- New LAN_WAN interface:
- Click Add and a new row will appear.
- Turn off LAN ports 1-2 and leave only LAN port 3 on.
- Select your newly created interface in the LAN section and click Save.
CLI/SSH Router configuration
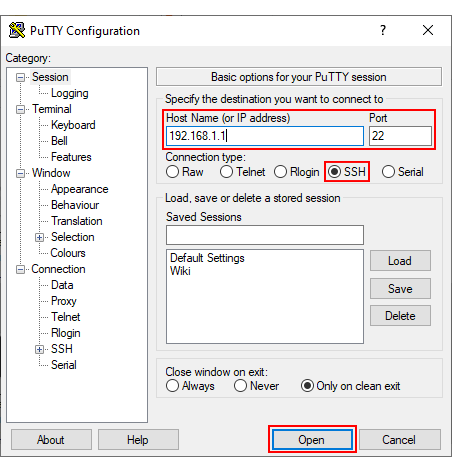
The next step of the configuration will be done over SSH/CLI. For this example we'll be using "PuTTY" - a free SSH client that can run on Windows.
Open "PuTTY", enter the router's LAN IP address into the "Host Name (or IP Address)" field and click 'Open'.
Next, enter the login credentials:
login as: root
[email protected]'s password: <admin_password>
Next, we'll have to edit the network config file using the built-in "vi" text editor. To begin editing the network config file:
vi /etc/config/network
Then hit the "I" key on your keyboard to enable editing.
There are two distinct configurations described below. One is a static IP configuration for setting the new WAN port manually, the other is DHCP - for automatic network configuration of the new WAN port. Follow only the instruction that suits your needs.
DHCP
Using the arrow keys on your keyboard, navigate and find config interface 'lan_wan' erase the current configuration and write these options:
option proto 'dhcp'
option ifname 'eth0.1'
option backup '1'
option metric '10'
Static IP
Using arrows navigate and find config interface 'lan_wan' leave the current configuration and add these four options:
option gateway '192.168.10.1'
option dns '8.8.8.8'
option backup '1'
option metric '10'
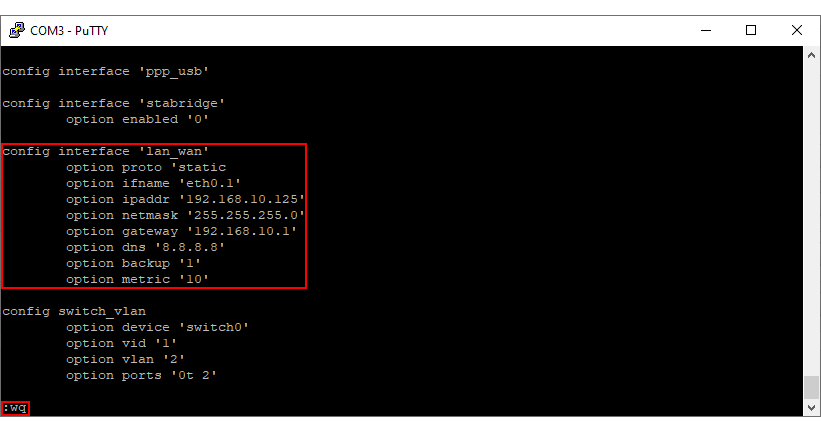
To exit the "vi" editor, press the "Esc" key, type in :wq and hit "Enter". While still on the command line, restart the network service on the router - this will apply the changes made to the configuration. Use this command:
/etc/init.d/network restart
Next go back to the WebUI and navigate to Network → Firewall → General Settings page. Scroll down to the "Zone Forwarding" section to find source zone 'lan_wan' and change the following:
- Default forwarding action: accept
- Masquerading: on
- Save changes

Testing the configuration
If you did the steps in the right way, your end device should have internet connection according the scheme.
Go to Network --> WAN and check if the new LAN_WAN is enable and if it has an assigned IP.
Set up your WAN as a main connection
Set up your configured LAN port as WAN failover backup.
Go to www.whatsmyip.com and check your public IP.

After that, unplug the WAN cable and check again your Public IP. Your end device should have internet connection and a differt public IP

So, plug again the WAN internet connection and wait a few seconds. The public IP should change again to the first IP shown.


