Cumulocity Configuration: Difference between revisions
No edit summary |
No edit summary |
||
| (11 intermediate revisions by 5 users not shown) | |||
| Line 22: | Line 22: | ||
<ul> | <ul> | ||
<li><b>[https://signup.softwareag.cloud/#/?product=cumulocity Register an account]</b> on Cumulocity.</li> | <li><b>[https://signup.softwareag.cloud/#/?product=cumulocity Register an account]</b> on Cumulocity.</li> | ||
<li>Wait a few minutes after the registration | <li>Wait a few minutes after the registration and open your email account. You should have received an email with the subject 'Welcome to Cumulocity IoT'. Open the email and <b>click 'Login to Cumulocity IoT'</b>.<br>[[File:Networking_rutos_configuration_examples_cumulocity_1.png|border|class=tlt-border]]</li> | ||
<li>Upon a successful login you should be redirected to the <b>Cumulocity Cockpit</b>.<br>[[File:Networking_rutos_configuration_examples_cumulocity_2.png|border|class=tlt-border]]</li> | <li>Upon a successful login you should be redirected to the <b>Cumulocity Cockpit</b>.<br>[[File:Networking_rutos_configuration_examples_cumulocity_2.png|border|class=tlt-border]]</li> | ||
</ul> | </ul> | ||
| Line 32: | Line 32: | ||
<ul> | <ul> | ||
<li>Log in to your device's WebUI.</li> | <li>Log in to your device's WebUI.</li> | ||
<li>Go to | <li><b>Go to Services → Package Manager</b> and install Cumulocity.<br>[[File:Networking_rutos_configuration_examples_cumulocity_3.png|border|class=tlt-border]]</li> | ||
<li></b>Go to Services → Cloud Solutions → Cumulocity</b> and configure it as follows. | |||
<li>Go to | |||
<ol> | <ol> | ||
<li>Enable Cumulocity</li> | <li>Enable Cumulocity</li> | ||
<li>Specify your Cumulocity server's address in the 'Server Address' field.</li> | <li>Specify your Cumulocity server's address in the 'Server Address' field.</li> | ||
<li>Set a connection frequency interval (at least 1 minute).</li> | <li>Set a connection frequency interval (at least 1 minute).</li> | ||
<li>Click 'Save & Apply'.</li> | <li>Click 'Save & Apply'.</li> | ||
</ol>[[File: | </ol>[[File:Networking_rutos_configuration_examples_cumulocity_4.png|border|class=tlt-border]] | ||
</li> | </li> | ||
</ul> | </ul> | ||
| Line 58: | Line 56: | ||
</ol>[[File:Networking_rutos_configuration_examples_cumulocity_7.png]] | </ol>[[File:Networking_rutos_configuration_examples_cumulocity_7.png]] | ||
</li> | </li> | ||
<li>If the device connects successfully, you should see an indication similar to the one below. Click 'Complete' to finish the registration. | <li>If the device connects successfully, you should see an indication similar to the one below. Click 'Complete' to finish the registration.</li> | ||
</ul> | </ul> | ||
<!-- | |||
==Installing example application== | |||
First, you need to install Cumulocity. Go to System -> Package manager: | |||
[[File:Package manager.jpg]] | |||
When you open package manager you will see a list of packages. You need click install on Cumulocity, see below: | |||
[[File:Screenshot from 2019-11-27 16-00-24.png]] | |||
==Configuring and launching example application== | |||
After you successfully installed Cumulocity, in „Services“ tab there should be an option called „IoT Platforms“. | |||
[[File:cumiot.png]] | |||
[[File:cumiotwindow.png]] | |||
Only single field is required, which is Server Address. This is the same URL of Cumulocity Cockpit website. In this example, it is myservername.cumulocity.com. | |||
Explanation of other options: | |||
Use SSL/TLS – connection will use TLS, however, you need to have a signed SSL certificate, otherwise application would not be able to connect to the Cumulocity server. | |||
Reset Auth – once device has been removed from the Cumulocity Device Management, you will need to reset authentication in order to re-register device. | |||
Also click „Enable“ to enable example application. See below: | |||
[[File:cumiotvalues.png]] | |||
Now click „Save“ and if everything is correct – example application will successfully connect to the Cumulocity server. | |||
Now you need to register device on Device Management in Cumulocity Cockpit. | |||
Device registration is done by writing down device's serial number. In order to obtain your device's serial number, look at the backplate of it or navigate to your device's control panel and then to „Status → Device“ page: | |||
[[File:cumdevice.png]] | |||
In this case, serial number is 09516845. | |||
Now log into your Cumulocity Cockpit portal, in this example URL is https://myservername.cumulocity.com. | |||
Go to the Device Management page: | |||
[[File:cumcockpit.png]] | |||
[[File:cumdevicemanagement.png]] | |||
Then navigate to Registration page: | |||
[[File:cumdevicepage.png]] | |||
Click „Register device“: | |||
[[File:cumdeviceregister.png]] | |||
Click „General device registration“: | |||
[[File:cumnewdevice.png]] | |||
Write device’s serial number in „Device ID“ field and click „Next“: | |||
[[File:cumdeviceregistration.png]] | |||
As shown below, registration is successful: | |||
[[File:cumsuccessresgister.png]] | |||
Click „Finish“ to close this pop-up. Now if everything is correct, a new device widget should show up with a status „PENDING ACCEPTANCE“: | |||
[[File:cumpendingdevice.png]] | |||
Click „Accept“ button to accept this device. | |||
Now navigate to „All devices“ page: | |||
[[File:cumalldevices.png]] | |||
Here you should be able to see list of all registered devices: | |||
[[File:cumallregistereddevices.png]] | |||
Click on „TLT-RUT955 Router“ name to get into information page: | |||
[[File:cumdeviceinfo.png]] | |||
Notice „Device Data“ widget, it contains information from the router device. By navigating to „Control“ tab, you can restart device by clicking „More → Restart Device“: | |||
[[File:cumdevicecontrol.png]] | |||
You can go back to Cumulocity Cockpit page the same way you entered Device managemant page: | |||
[[File:cumnavigatecockpit.png]] | |||
Then navigate to „Home“ page: | |||
[[File:cumnavigatehome.png]] | |||
And then click „Add widget“: | |||
[[File:cumaddwidget.png]] | |||
Select „Asset properties“ widget and type title, then select „TLT-RUT955 Router“ in „Target Assets or Devices“: | |||
[[File:cumcreatewidget.png]] | |||
To add more information into widget, click „Add property“ and click on „Show“ to add that property. | |||
In example application, these properties are used: | |||
Hardware – Model, Revision, Serial Number | |||
Mobile – Cell ID, Connection Type, Current Operator, ICCID, IMEI and Signal | |||
WAN – IP and Wan Type | |||
Total properties: | |||
[[File:cumtotalprops.png]] | |||
Then click „Save“ and you should be able to see widget with properties you have set: | |||
[[File:cumdevicewidgetinfo.png]] | |||
==Explanation of example application== | ==Explanation of example application== | ||
There are two steps when adding new properties: | There are two steps when adding new properties: | ||
| Line 228: | Line 349: | ||
For more information about Lua API, download Cumulocity C++ SDK: https://bitbucket.org/m2m/cumulocity-sdk-c/downloads and look up inside „sdk/doc/lua.html“ with a browser. | For more information about Lua API, download Cumulocity C++ SDK: https://bitbucket.org/m2m/cumulocity-sdk-c/downloads and look up inside „sdk/doc/lua.html“ with a browser. | ||
==External Links== | ==External Links== | ||
| Line 296: | Line 359: | ||
{{Template: trademark disclaimer}} | {{Template: trademark disclaimer}} | ||
[[Category:IoT Platforms]]--> | |||
[[Category:IoT | |||
Revision as of 13:38, 21 July 2020
Main Page > General Information > Configuration Examples > Third party services > IoT platforms > Cumulocity Configuration
Cumulocity IoT is a cloud-based, real-time IoT management platform that's also compatible with Teltonika-Networks devices.
Introduction
This article contains step-by-step instructions on how to set up a Cumulocity server and register a Teltonika-Networks device on it.
Basic setup
Basic setup consists of:
- Creating a Cumulocity account
- Configuring Cumulocity on a Teltonika-Networks device
- Registering the device on your Cumulocity server
Create an account
First of all, you will need to set up your Cumulocity environment (server).
- Register an account on Cumulocity.
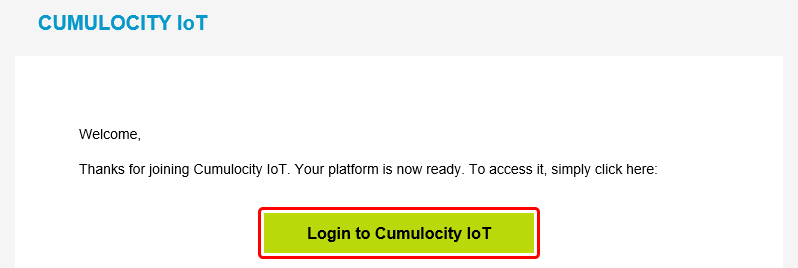
- Wait a few minutes after the registration and open your email account. You should have received an email with the subject 'Welcome to Cumulocity IoT'. Open the email and click 'Login to Cumulocity IoT'.
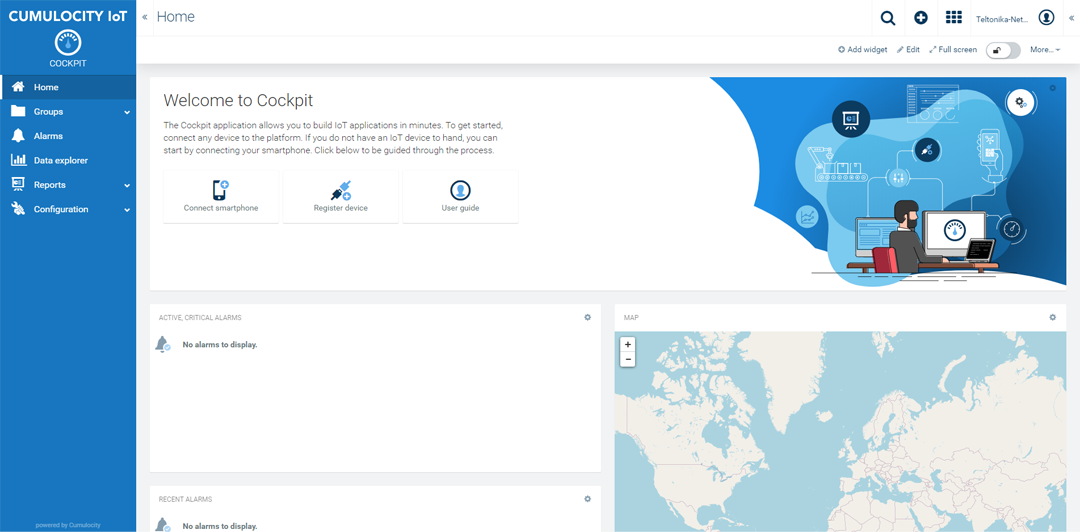
- Upon a successful login you should be redirected to the Cumulocity Cockpit.
Configure a device
Set up Cumulocity on your Teltonika-Networks device.
- Log in to your device's WebUI.
- Go to Services → Package Manager and install Cumulocity.

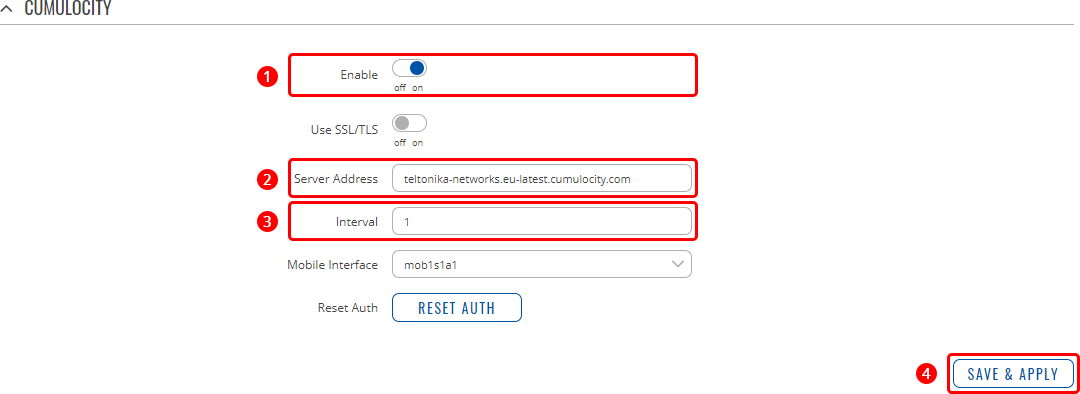
- Go to Services → Cloud Solutions → Cumulocity and configure it as follows.
- Enable Cumulocity
- Specify your Cumulocity server's address in the 'Server Address' field.
- Set a connection frequency interval (at least 1 minute).
- Click 'Save & Apply'.
Register a device
Register your Teltonika-Networks device on Cumulocity.
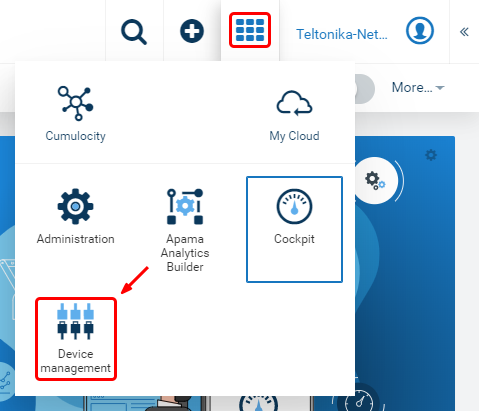
- Find the 'Application switcher' in the top-right corner of the Cumulocity dashboard and go to 'Device management'.
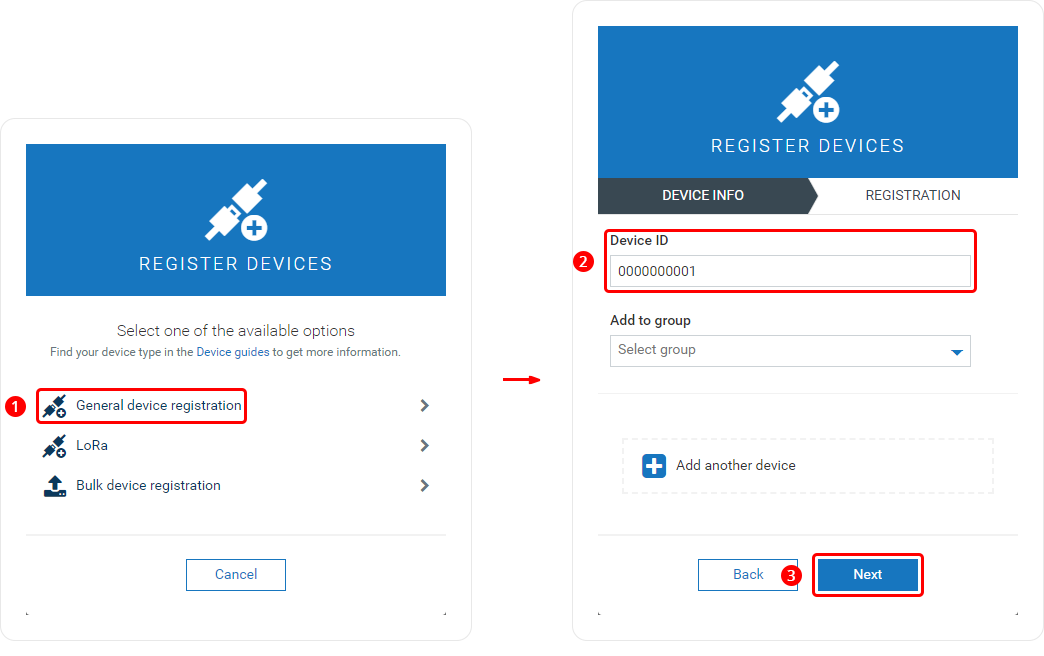
- Then expand the 'Devices' tab in left-hand menu, go to 'Registration' and click 'Register device'.

- Complete the registration.
- Choose 'General device registration'.
- Enter your device's serial number into the 'Device ID' field. The serial number can be found on the device's housing, box or in the WebUI, Status → System page.
- Click 'Next'.
- If the device connects successfully, you should see an indication similar to the one below. Click 'Complete' to finish the registration.
