RUTX12 Cloud Solutions: Difference between revisions
No edit summary |
No edit summary |
||
| (One intermediate revision by the same user not shown) | |||
| Line 1: | Line 1: | ||
{{Template: Networking_rutos_manual_cloud_solutions | {{Template:Networking_rutos_manual_cloud_solutions | ||
| name = RUTX12 | | name = RUTX12 | ||
| series = RUTX | | series = RUTX | ||
| modem = 1 | |||
| modem = 1 | |||
}} | }} | ||
Revision as of 14:17, 21 July 2020
Main Page > RUTX Routers > RUTX12 > RUTX12 Manual > RUTX12 WebUI > RUTX12 Services section > RUTX12 Cloud SolutionsThe information in this page is updated in accordance with firmware version RUTX_R_00.07.10.
Summary
The Cloud Solutions section is used to configure how the device will connect to certain cloud management systems.
This chapter of the user manual provides an overview of the Cloud Solutions page for RUTX12 devices.
Note: Each Cloud Solutions service, except RMS, is additional software that can be installed from the System → Package Manager page.
If you're having trouble finding this page or some of the parameters described here on your device's WebUI, you should turn on "Advanced WebUI" mode. You can do that by clicking the "Advanced" button, located at the top of the WebUI.
RMS
RMS (Remote Management System) is a cloud system designed by Teltonika and intended for remote monitoring and management of Teltonika-Networks products.
In order to add a device(s) to RMS, get yourself acquainted by watching this instructional video and register an account by clicking here. Each unique device receives a free month-long RMS license when added to RMS for the first time.
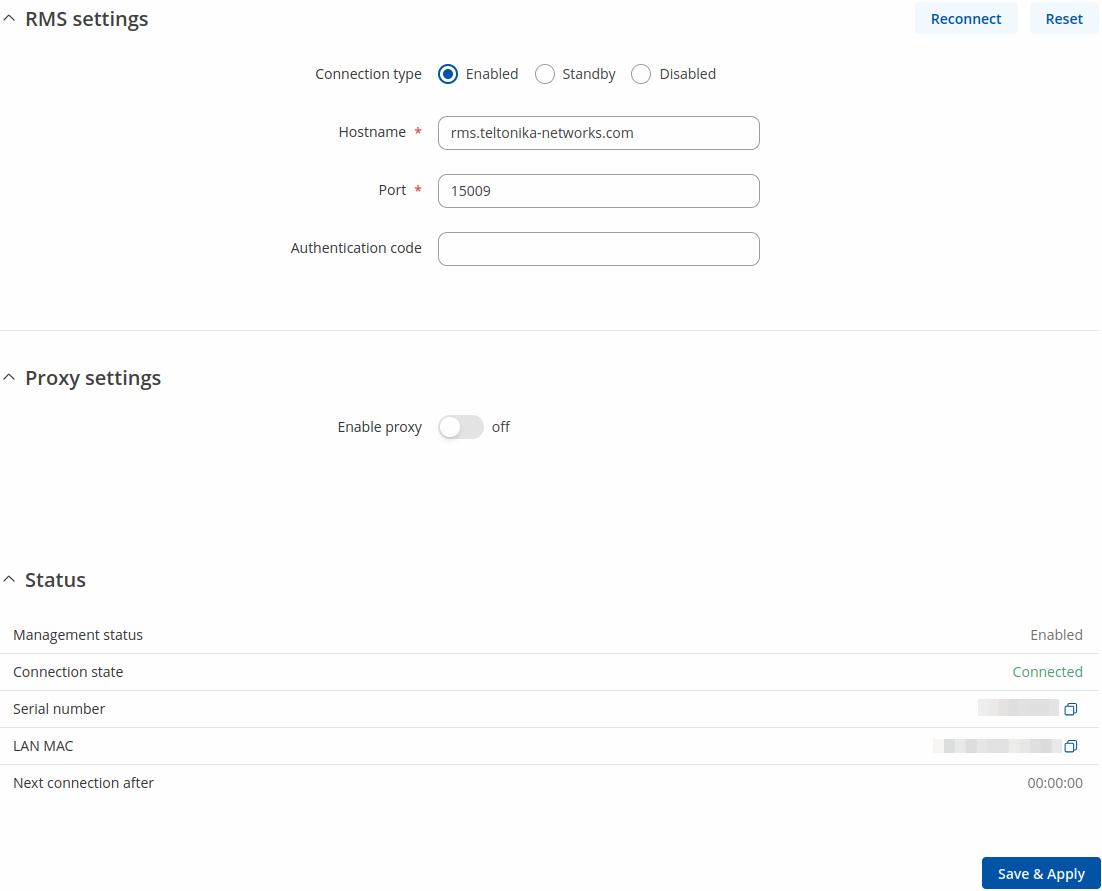
The figure below is a screenshot of the RMS section taken from a device which has been connected to RMS:
| Field | Value | Description |
|---|---|---|
| Connection type | Enabled | Standby | Disabled; default: Enabled | Defines how the device will connect to RMS:
|
| Hostname | host | ip; default: rms.teltonika.lt | Address of the RMS server. If you're using regular RMS, just leave the default address (rms.teltonika.lt). |
| Port | integer [1..65535]; default: 15009 | Port number for connecting to RMS. If you're using regular RMS, just leave the default port (15009). |
| Authentication code | string; default: none | Authentication code provided by RMS after adding the device. |
| Proxy settings | Value | Description |
| Enable proxy | off | on; default: off | Enable RMS connection through proxy. |
| Proxy address | domain names or IP addresses; default: none | Specify proxy address. |
| Proxy SOCKS5 port | integer [1..65535]; default: 1080 | SOCKS5 proxy server port. |
| Use credentials | off | on; default: off | SOCKS5 proxy server port. |
| SOCKS5 username | string; default: none | Specify username for SOCKS5 proxy connection. |
| SOCKS5 password | string; default: none | Specify password for SOCKS5 proxy connection. |
The RMS server waits for incoming connections. Since the device attempts to connect at a fixed interval, it may not connect instantly after you add it to RMS. While it is disconnected, you can check how much time is left until the next connection attempt in the Status section:
[[File:Networking_rutos_manual_cloud_solutions_rms_disconnected_rms_{{{rms}}}_v5.png|border|class=tlt-border]]
To speed up the process by initiating an immediate connection attempt, click the Connect button.
[[File:Networking_rutos_manual_cloud_solutions_rms_connect_{{{rms}}}_v3.png|border|class=tlt-border]]
If a failure or unknown status occurs, there is an alternative to try to reconnect again, click the Reconnect button.
[[File:Networking_rutos_manual_cloud_solutions_rms_reconnect_{{{rms}}}_v3.png|border|class=tlt-border]]
When the device is already connected a Reset button becomes visible. Use it to terminate the device's connection to RMS.
[[File:Networking_rutos_manual_cloud_solutions_rms_unregister_{{{rms}}}_v3.png|border|class=tlt-border]]
For more information on Teltonika Networks Remote Management System (RMS) refer to the RMS Manual or RMS FAQ pages.
Azure IoT Hub
Azure IoT Hub is Microsoft's ever-expanding set of cloud services to help your organization meet your business challenges. Azure IoT Hub is compatible with Teltonika Networks devices.
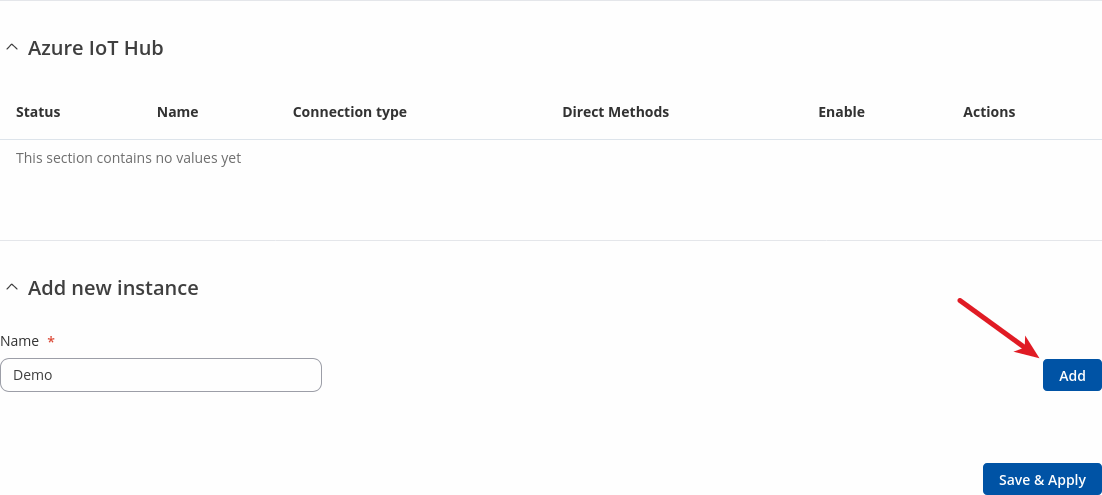
By default, the Azure IoT list is empty. To add a new connection, enter a custom name and click the 'Add' button.
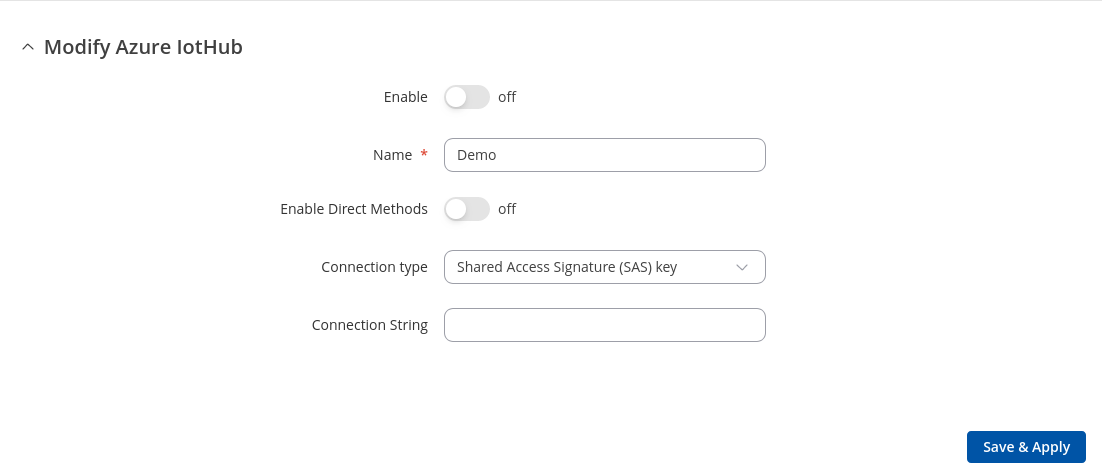
Modify Azure IoTHub
| Field | Value | Description |
|---|---|---|
| Enable | off | on; default: off | Enable Azure IoT service. |
| Name | string; default: none | Connection name. |
| Enable Direct Methods | off | on; default: off | Enable Direct Method feature set. |
| Device Model ID | string; default: dtmi:Teltonika:genericDevice;1 | Model ID of the Digital Twins Definition Language. |
| Connection type | Shared Access Signature (SAS) key | Device Provisioning Service (DPS); default: Shared Access Signature (SAS) key | Connection type to an existing IoT Hub. |
| Connection String | string; default: none | Connection string based on primary key used in API calls which allows device to communicate with IoT Hub. |
| ID Scope | string; default: none | Unique identifier that is assigned to an Azure IoT Hub during its creation and is used to uniquely identify the specific provisioning service the device will register through. |
| Registration ID | string; default: none | The registration ID is used to uniquely identify a device registration with the Device Provisioning Service. |
| Global Device Endpoint | string; default: global.azure-devices-provisioning.net | Destination for messages sent by IoT devices to the Azure IoT Hub. |
| Attestation mechanism | X.509 certificates | Symmetric Key; default: X.509 certificates | Method used to confirm a device's identity in Device Provisioning Service. |
| X.509 Certificate | -interactive button; default: | Upload the "leaf" certificate file. |
| X.509 Private Key | -interactive button; default: | Upload the "leaf" key file. |
| Symmetric Key | string; default: none | The the derived device key from the DPS Primary Key. |
Cloud of Things
The Cloud of Things is an IoT cloud platform which provides the possibility to remotely monitor, manage and control your connected devices and machines – plug-and-play, without extensive installation.
| Field | Value | Description |
|---|---|---|
| Enable | off | on; default: off | Turns the Cloud of Things service on or off. |
| Server Address | ip | host; default: none | Cloud of Things server IP address or hostname. |
| Interval | integer; default: none | Push connection interval in minutes. |
| Reset Auth | - (interactive button) | Resets authentication data so that device could be re-registered on the Cloud of Things Device Management platform. |
Cumulocity
Cumulocity IoT is a cloud-based, real-time IoT management platform that's also compatible with Teltonika-Networks devices.
The figure and table below provide explanations for Cumulocity configuration parameters available on the device. For a detailed configuration guide, click here.
| Field | Value | Description |
|---|---|---|
| Enable | off | on; default: off | Turns the Cumulocity service on or off. |
| Use SSL/TLS | off | on; default: off | Turn SSL/TLS protocol support on or off. |
| Server Address | host; default: none | Hostname of your Cumulocity server. It should match the Environment name from the Cumulocity registration. For example: teltonika-networks.eu-latest.cumulocity.com |
| Interval | integer; default: none | Connection push interval in minutes. This field defines how often the device will try to connect to the Cumulocity server. |
| Reset Auth | - (interactive button) | Resets authentication for this device. If you click this, you'll have to authorize this from Cumulocity dashboard before it can successfully connect to the server. |
ThingWorx
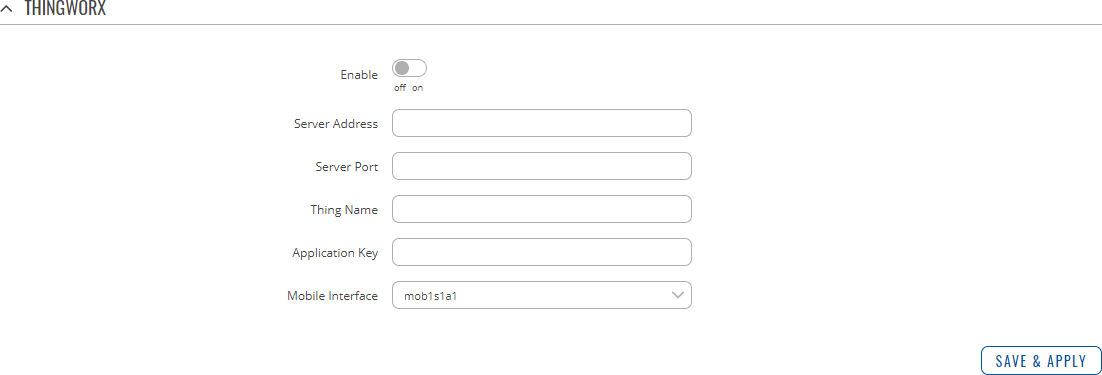
| Field | Value | Description |
|---|---|---|
| Enable | off | on; default: off | Turns the ThingWorx service on or off. |
| Server Address | ip | host; default: none | Thingworx server IP address or hostname. |
| Server Port | integer [0..65535]; default: none | Thingworx server's port number. |
| Thing Name | string; default: none | Thing name defined in ThingWorx CP. |
| Application Key | string; default: none | Application key generated in ThingWorx CP. |
| Mobile Interface | network interface; default: mob1s1a1 | Interface whose GSM parameters will be sent to the ThingWorx server for monitoring. |
Greengrass
| Field | Value | Description |
|---|---|---|
| Enable | off | on; default: off | Turns the AWS Greengrass service on or off. |
| Config file | .tar.gz file; default: none | Core-specific config file. |
AWS IoT Core
AWS IoT Core is a utility meant to interact with Amazon Web Services cloud platform. It provides AWS IoT Core Jobs support that lets the device be controlled from AWS IoT Core platform by using device's API.
To add new 'AWS job', press Add button:
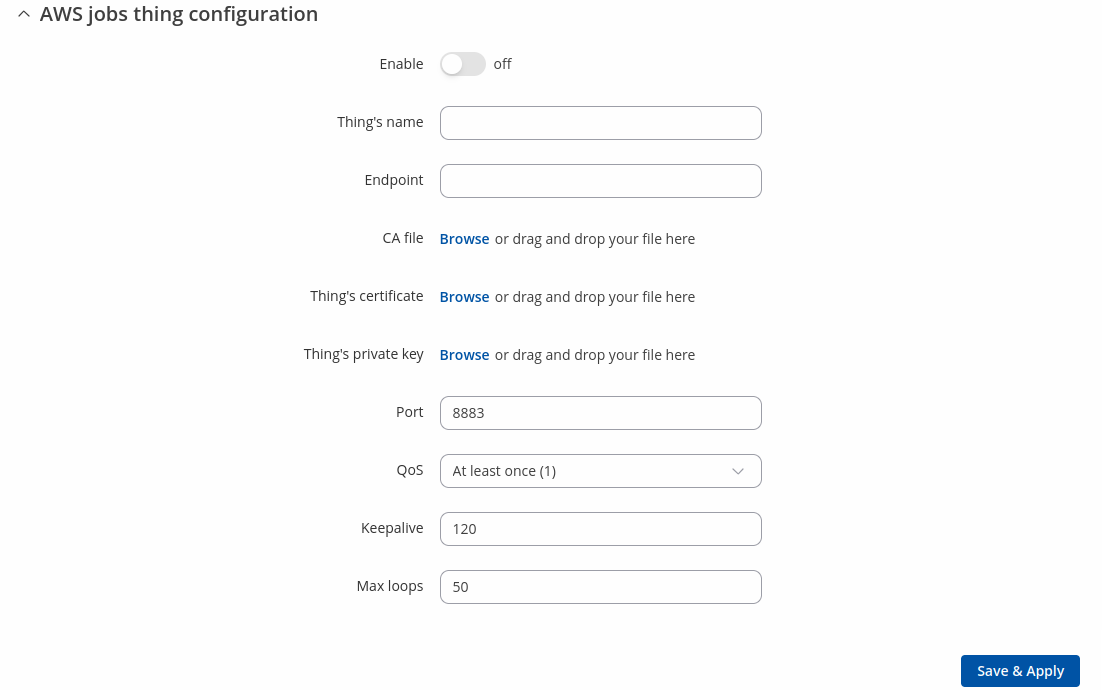
After that you will be redirected to AWS jobs thing configuration:
| Field | Value | Description |
|---|---|---|
| Enable | off | on; default: off | Turns the thing instance on or off. |
| Thing's name | string; default: none | Thing's name on AWS IoT Core platform. |
| Endpoint | domain; default: none | AWS IoT Core platform endpoint used to determine AWS account to connect to. |
| CA file | .ca file; default: none | AWS CA certificate obtained from AWS IoT Core platform. |
| Thing's certificate | .crt file; default: none | Thing's certificate obtained from AWS IoT Core platform. |
| Thing's private key | .key file; default: none | Thing's private key obtained from AWS IoT Core platform. |
| Port | integer [1..65535]; default: 8883 | MQTT port number. |
| QoS | At most once (0) | At least once (1); default: At least once (1) | MQTT Quality of Service. Allowed values:
|
| Keepalive | integer [30..65535]; default: 120 | MQTT keepalive time in seconds. |
| Max loops | integer [10..200]; default: 50 | MQTT max loops - during initial subscription to topics the service has to wait for a successful subscription acknowledgement. The service performs mosquitto loops to wait for the answer. This option determines how many loops can be performed while waiting for subscription acknowledgement. |


