Template:Networking rut configuration example vlan guest wifi: Difference between revisions
No edit summary Tags: Visual edit Mobile edit Mobile web edit |
|||
| (2 intermediate revisions by 2 users not shown) | |||
| Line 8: | Line 8: | ||
<table class="nd-othertables_2"> | <table class="nd-othertables_2"> | ||
<tr> | <tr> | ||
<th width=395; style="border-bottom: 1px solid white;></th> | <th width="395;" style="border-bottom: 1px solid white;"></th> | ||
<th width=700; style="border-bottom: 1px solid white;" | <th rowspan="2" width="700;" style="border-bottom: 1px solid white;"> [[File:Networking rut2 configuration examples vlan guest wifi 3 v1.png|border|class=tlt-border]]</th> | ||
</tr> | </tr> | ||
<tr> | <tr> | ||
<td style="border-bottom: 1px solid white;> | <td style="border-bottom: 1px solid white;"> | ||
Login to the router's WebUI and navigate to the '''Network → Wireless''' page and do the following: | Login to the router's WebUI and navigate to the '''Network → Wireless''' page and do the following: | ||
<ol> | <ol> | ||
| Line 29: | Line 29: | ||
<table class="nd-othertables_2"> | <table class="nd-othertables_2"> | ||
<tr> | <tr> | ||
<th width=395; style="border-bottom: 1px solid white;></th> | <th width="395;" style="border-bottom: 1px solid white;"></th> | ||
<th width=700; style="border-bottom: 1px solid white;" | <th rowspan="2" width="700;" style="border-bottom: 1px solid white;">[[File:Networking rut configuration examples vlan guest wifi 1 v3.png|border|class=tlt-border]]</th> | ||
</tr> | </tr> | ||
<tr> | <tr> | ||
<td style="border-bottom: 1px solid white> | <td style="border-bottom: 1px solid white"> | ||
Switch to '''Wireless Security''' tab | Switch to '''Wireless Security''' tab | ||
<ol> | <ol> | ||
| Line 50: | Line 50: | ||
<table class="nd-othertables_2"> | <table class="nd-othertables_2"> | ||
<tr> | <tr> | ||
<th width=395; style="border-bottom: 1px solid white;></th> | <th width="395;" style="border-bottom: 1px solid white;"></th> | ||
<th width=700; style="border-bottom: 1px solid white;" | <th rowspan="2" width="700;" style="border-bottom: 1px solid white;">[[File:Networking rut2 configuration examples vlan guest wifi 4 v1.png|border|class=tlt-border]]</th> | ||
</tr> | </tr> | ||
<tr> | <tr> | ||
<td style="border-bottom: 1px solid white> | <td style="border-bottom: 1px solid white"> | ||
Wait for configuration to apply. Two Wireless Access Points should be enabled | Wait for configuration to apply. Two Wireless Access Points should be enabled | ||
<ol> | <ol> | ||
| Line 68: | Line 68: | ||
==New LAN== | ==New LAN== | ||
<table class="nd-othertables_2"> | <table class="wikitable sortable mw-collapsible nd-othertables_2"><caption></caption><tr> | ||
<th width="395;" style="border-bottom: 1px solid white;"></th> | |||
<th width=395; style="border-bottom: 1px solid white;></th> | <th rowspan="2" width="700;" style="border-bottom: 1px solid white;"> | ||
<th width=700; style="border-bottom: 1px solid white;" | |||
[[File:Networking rut configuration examples vlan guest wifi 3 v1.1.png|border|class=tlt-border]]</th> | [[File:Networking rut configuration examples vlan guest wifi 3 v1.1.png|border|class=tlt-border]]</th> | ||
</tr> | </tr> | ||
<tr> | <tr> | ||
<td style="border-bottom: 1px solid white;> | <td style="border-bottom: 1px solid white;"> | ||
Navigate to the '''Network → VLAN → LAN Networks''' page. There create a new LAN by writing the '''Name''' and clicking '''Add''' button. | Navigate to the '''Network → VLAN → LAN Networks''' page. There create a new LAN by writing the '''Name''' and clicking '''Add''' button. | ||
<ol> | <ol> | ||
| Line 91: | Line 90: | ||
<table class="nd-othertables_2"> | <table class="nd-othertables_2"> | ||
<tr> | <tr> | ||
<th width=395; style="border-bottom: 1px solid white;></th> | <th width="395;" style="border-bottom: 1px solid white;"></th> | ||
<th width=700; style="border-bottom: 1px solid white;" | <th rowspan="2" width="700;" style="border-bottom: 1px solid white;"> | ||
[[File:Networking rut2 configuration examples vlan guest wifi 7 v1.png|border|class=tlt-border]]</th> | [[File:Networking rut2 configuration examples vlan guest wifi 7 v1.png|border|class=tlt-border]]</th> | ||
</tr> | </tr> | ||
<tr> | <tr> | ||
<td style="border-bottom: 1px solid white;> | <td style="border-bottom: 1px solid white;"> | ||
Then you will be automatically forwarded to the new configuration settings. Now apply the following configuration: | Then you will be automatically forwarded to the new configuration settings. Now apply the following configuration: | ||
<ol> | <ol> | ||
| Line 112: | Line 111: | ||
<table class="nd-othertables_2"> | <table class="nd-othertables_2"> | ||
<tr> | <tr> | ||
<th width=395; style="border-bottom: 1px solid white;></th> | <th width="395;" style="border-bottom: 1px solid white;"></th> | ||
<th width=700; style="border-bottom: 1px solid white;" | <th rowspan="2" width="700;" style="border-bottom: 1px solid white;"> | ||
[[File:Networking rut2 configuration examples vlan guest wifi 8 v1.png|border|class=tlt-border]]</th> | [[File:Networking rut2 configuration examples vlan guest wifi 8 v1.png|border|class=tlt-border]]</th> | ||
</tr> | </tr> | ||
<tr> | <tr> | ||
<td style="border-bottom: 1px solid white;> | <td style="border-bottom: 1px solid white;"> | ||
Navigate to the '''Network → VLAN → VLAN Networks''' page and do the following | Navigate to the '''Network → VLAN → VLAN Networks''' page and do the following | ||
<ol> | <ol> | ||
| Line 143: | Line 142: | ||
<table class="nd-othertables_2"> | <table class="nd-othertables_2"> | ||
<tr> | <tr> | ||
<th width=525; style="border-bottom: 1px solid white;"></th> | <th width="525;" style="border-bottom: 1px solid white;"></th> | ||
<th width=620; style="border-bottom: 1px solid white;" | <th rowspan="2" width="620;" style="border-bottom: 1px solid white;"> | ||
[[File:Networking rutos configuration examples guest wifi 12 v2.jpg|border|class=tlt-border|300px|center]]</th> | [[File:Networking rutos configuration examples guest wifi 12 v2.jpg|border|class=tlt-border|300px|center]]</th> | ||
</tr> | </tr> | ||
<tr> | <tr> | ||
<td style="border-bottom: 1px solid white> | <td style="border-bottom: 1px solid white"> | ||
Wireless users connected to SSID: “'''GUEST'S_WIFI'''”, will be assign to LAN “Guest”, and will get IP from new pool '''10.10.10.0/24'''. | Wireless users connected to SSID: “'''GUEST'S_WIFI'''”, will be assign to LAN “Guest”, and will get IP from new pool '''10.10.10.0/24'''. | ||
<ol> | <ol> | ||
| Line 163: | Line 162: | ||
<table class="nd-othertables_2"> | <table class="nd-othertables_2"> | ||
<tr> | <tr> | ||
<th width=525; style="border-bottom: 1px solid white;"></th> | <th width="525;" style="border-bottom: 1px solid white;"></th> | ||
<th width=620; style="border-bottom: 1px solid white;" | <th width="620;" style="border-bottom: 1px solid white;"> | ||
[[File:Networking rutos configuration examples guest wifi 11 v1.jpg|border|class=tlt-border|300px|center]]</th> | [[File:Networking rutos configuration examples guest wifi 11 v1.jpg|border|class=tlt-border|300px|center]]</th> | ||
</tr> | </tr> | ||
<tr> | <tr> | ||
<td style="border-bottom: 1px solid white> | <td style="border-bottom: 1px solid white"> | ||
Guest hosts are unable to access any data from pool 192.168.1.0/24. And access to | '''Guest hosts are unable to access any data from pool 192.168.1.0/24. And access to RUT Web UI or SSH is restricted.''' | ||
<ol> | <ol> | ||
<li></li> | <li></li> | ||
| Line 175: | Line 174: | ||
<li></li> | <li></li> | ||
</ol> | </ol> | ||
</td> | </td><th></th></tr> | ||
</table> | </table> | ||
Latest revision as of 06:28, 23 August 2020
Introduction
Sometimes there is a need to share your internet connection with visitors. It is not secure to share local area network with guest’s. They might accidentally download a malicious program or connect an already infected phone or laptop to the network. Also if you have lots of home smart devices (IoT), they tend to be far more vulnerable than computers. That means that if they are connected to the main network and hacked, intruders can get into your other devices. One of the possible solutions is to create Guest WiFi separated by VLAN. This guide will show you how to do this for RUT devices.
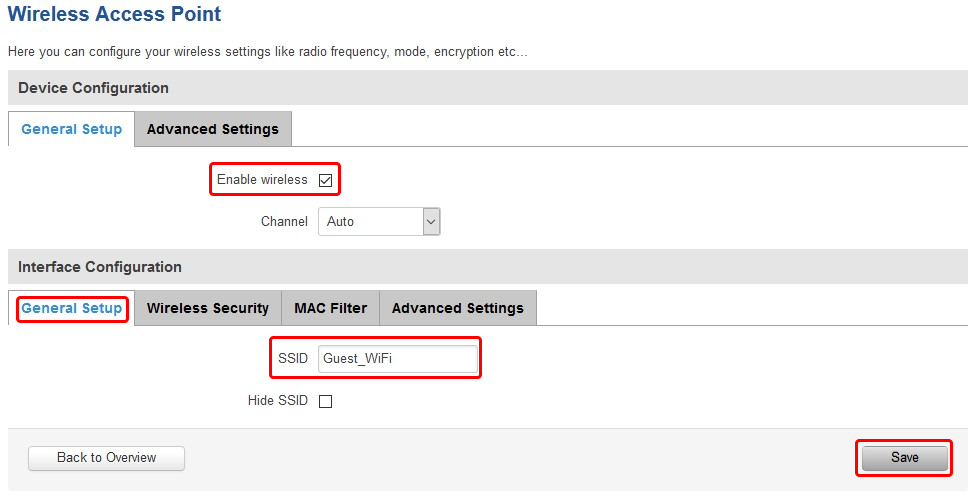
New wireless access point
 |
|
|---|---|
|
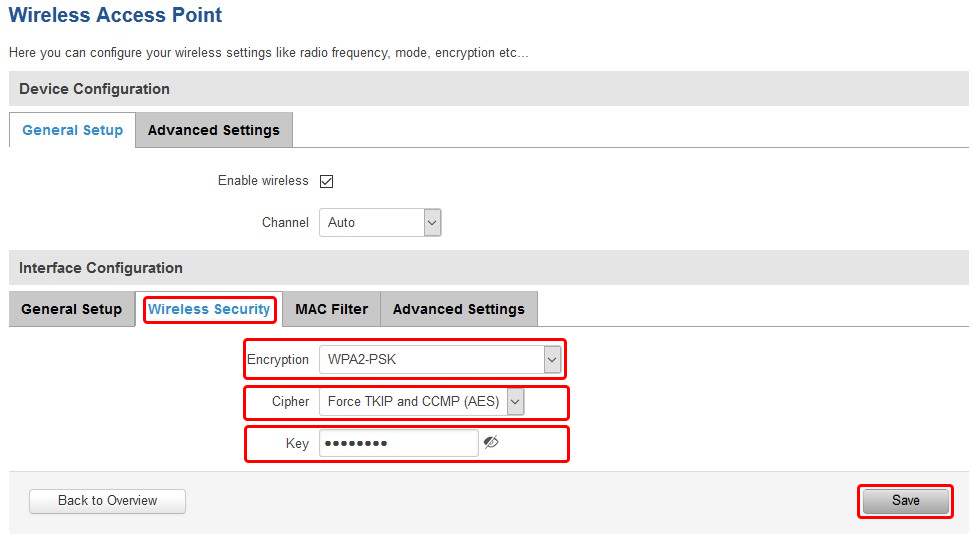
Switch to Wireless Security tab
|
 |
|
|---|---|
|
Wait for configuration to apply. Two Wireless Access Points should be enabled |
New LAN
 |
|
|---|---|
|
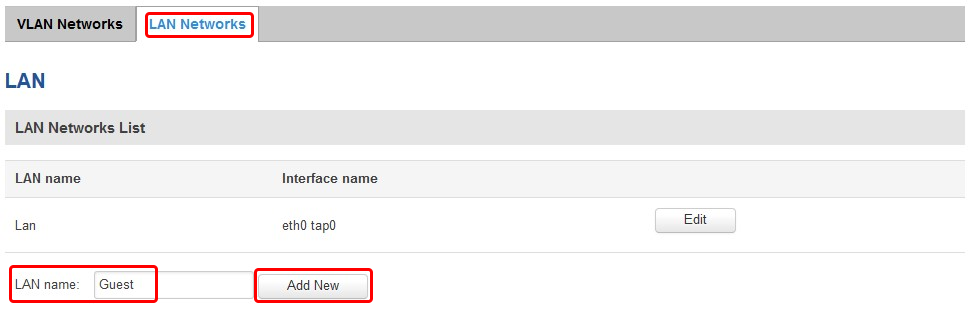
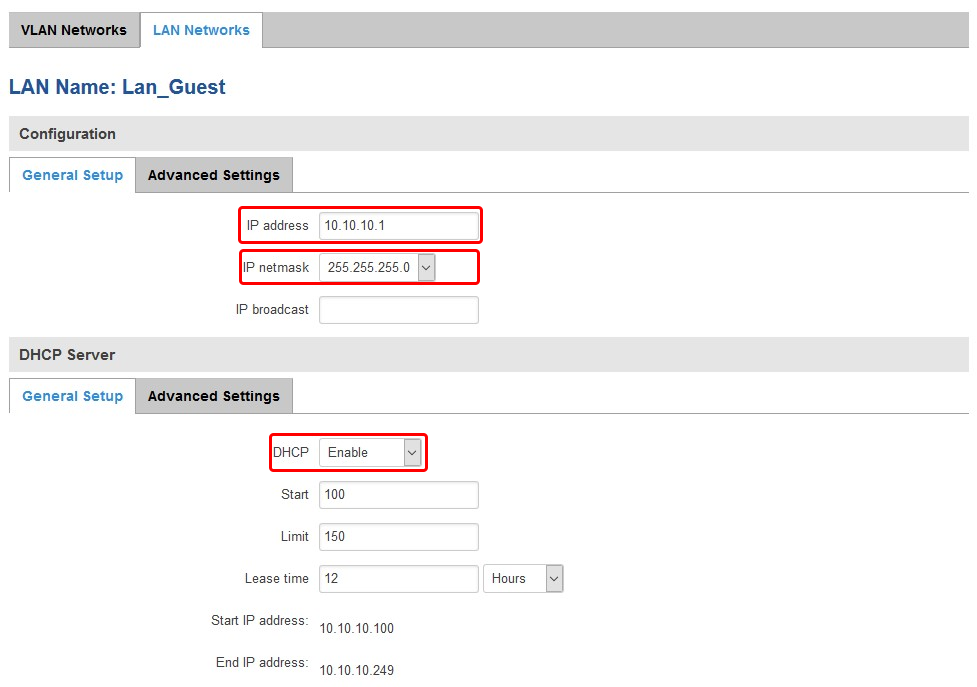
Navigate to the Network → VLAN → LAN Networks page. There create a new LAN by writing the Name and clicking Add button.
|
 |
|
|---|---|
|
Then you will be automatically forwarded to the new configuration settings. Now apply the following configuration:
|
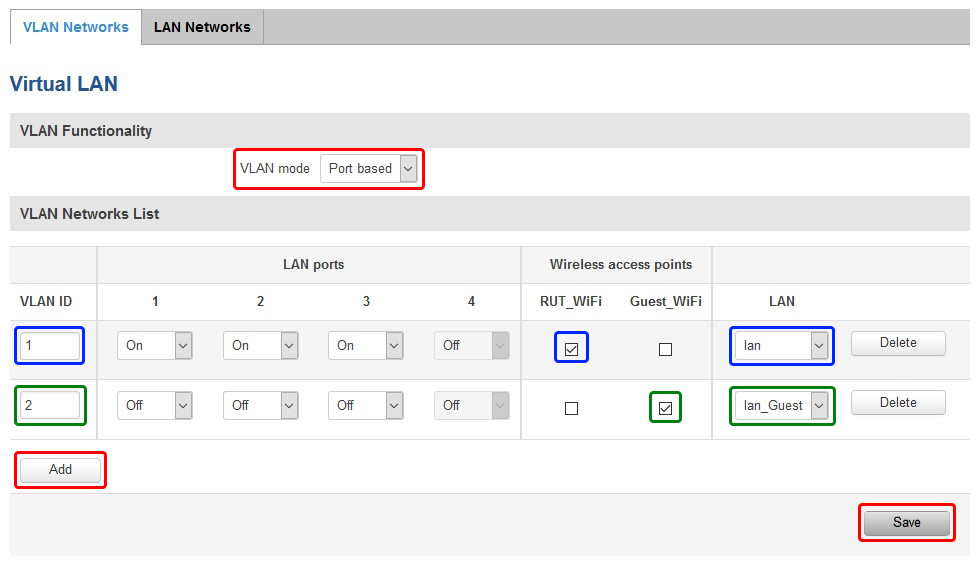
LAN to VLAN
Results
If you've followed all the steps presented above, your configuration should be finished. If you are near a RUT, that is, in a wireless zone, turn on WiFi on your device and view the available networks. You should see the available SSID - "RUT_WiFi" and "Guest_WiFi". Select one of them and enter the appropriate WiFi password.
Wireless users connected to SSID: “RUT_WiFi”, will be assign to “lan”, and will get IP from main pool 192.168.1.0/24.
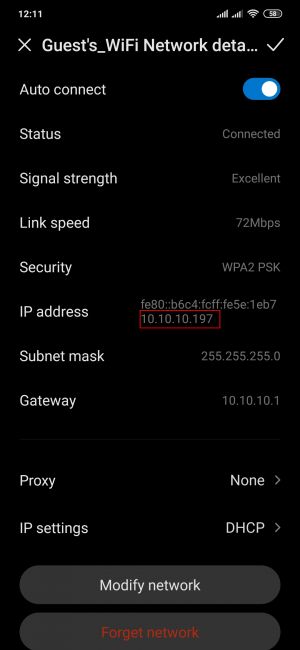
Wireless users connected to SSID: “Guest_WiFi”, will be assign to “lan_Guest”, and will get IP from new pool 10.10.10.0/24.
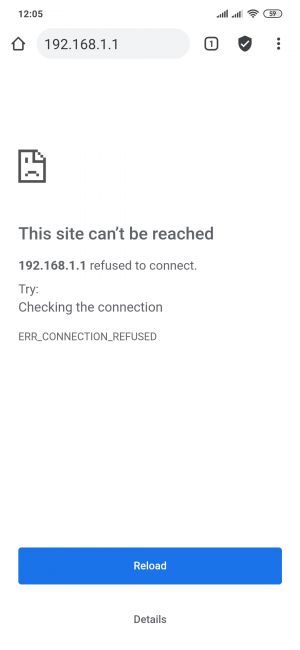
Guest hosts cannot access any data from the pool 192.168.1.0/24 and vise versa.
 |
|
|---|---|
|
Wireless users connected to SSID: “GUEST'S_WIFI”, will be assign to LAN “Guest”, and will get IP from new pool 10.10.10.0/24. |
 |
|
|---|---|
|
Guest hosts are unable to access any data from pool 192.168.1.0/24. And access to RUT Web UI or SSH is restricted. |

