ThingWorx: Difference between revisions
No edit summary |
No edit summary |
||
| (23 intermediate revisions by 5 users not shown) | |||
| Line 1: | Line 1: | ||
== | [[File:tttwx.png|right|160px]] | ||
==Description== | |||
ThingWorx is the industry-leading industrial innovation platform that is designed to rapidly deliver IoT applications and Augmented Reality (AR) experiences that unlock the value of the converged digital and physical worlds. | |||
==Summary== | |||
The example application, written by Teltonika, streams information from the router. Once the service is enabled, you should be able to view the following information in your ThingWorx server | |||
* WAN Type | |||
* WAN IP | |||
* Mobile Operator Name | |||
* Mobile Signal Strength | |||
* Mobile Network Type | |||
This information is sent to your ThingWorx server continuously, at a specified ''(default - 5 seconds)'' interval. | |||
==Launching the ThingWorx server== | |||
In order to | In order to receive information from the router, you will need a ThingWorx server to act an end-point. In order to get the server up and running, you will first need to create an account here: https://developer.thingworx.com/en/signup | ||
After signing-up, you have to confirm your e-mail address to be able to use their products. | |||
After | After a successful registration you should be automatically logged-in and redirected to: https://developer.thingworx.com/en | ||
Here you can find a free evaluation trial for 30 days. Start your hosted trial and launch the ThingWorx server. The server should start-up in a couple of minutes. | |||
After the server starts, you will be given information about the servers hostname. This is important, so make sure you save this information. Alternatively, you can always go back to it later. | |||
'' | Press 'Launch' to enter into the ThingWorx composer. You have now successfully launched your ThingWorx server. | ||
==Generating application key== | ==Generating application key== | ||
For the server to be able to connect to the router and retrieve information, an application key is required. This section will explain how to generate this application key in the ThingWorx Composer. | |||
You must generate at least one application key, although it is recommended to use different keys for each device, which will be connected to ThingWorx IoT platform. ThingWorx server must be running and you should be in ThingWorx Composer page. If it is not the case, please repeat server start up steps. | |||
When in the ThingWorx Composer page, on the left of the screen locate the 'Browse' section and click on it. | |||
The scroll bar should now change to a list containing various objects you can add. Navigate down to the 'Security' section and click on 'Application Keys'. | |||
In the main window, you will now see a list of available application keys. You need to create a new one, so click 'New' and fill in the required fields. | |||
The name field has to be unique (eg. RouterThing), for testing, in the 'User name reference' field input 'Administrator' (a user that already exists) and set the expiration date to anything you like. | |||
==Creating a Thing== | |||
Now you will create a Thing for our ThingWorx example application, which contains these properties: | Now you will create a Thing for our ThingWorx example application, which contains these properties: | ||
WAN Type | * WAN Type | ||
Mobile Operator | * WAN IP | ||
Mobile Signal | * Mobile Operator Name | ||
Mobile Network Type | * Mobile Signal Strength | ||
* Mobile Network Type | |||
ThingWorx server must be running and you should be in ThingWorx Composer page. If it is not the case, please repeat server start up steps in 1). | ThingWorx server must be running and you should be in ThingWorx Composer page. If it is not the case, please repeat server start up steps in 1). | ||
| Line 115: | Line 97: | ||
[[File:Tableee.png]] | [[File:Tableee.png]] | ||
Main | '''Main parameters:''' | ||
Persistent – if this option is used, once device is disconnected, property’s value will be set as default. If default value was not specified, value will be set as empty. | * Persistent – if this option is used, once device is disconnected, property’s value will be set as default. If default value was not specified, value will be set as empty. | ||
* Read-only – this property is read only. | |||
Read-only – this property is read only. | * Logged – should be used when property’s value is updated from the device everytime, at some interval. | ||
Logged – should be used when property’s value is updated from the device everytime, at some interval. | |||
See below: | See below: | ||
| Line 133: | Line 113: | ||
Once all properties are created, press “Save” to save changes. | Once all properties are created, press “Save” to save changes. | ||
== | ==Installing example application== | ||
First, you need to install ThingWorx. Go to System -> Package manager: | |||
[[File:Package manager.jpg]] | |||
When you open package manager you will see a list of packages. You need click install on ThingWorx, see below: | |||
[[File:Screenshot from 2019-11-27 16-01-53.png]] | |||
==Configuring and launching example application== | |||
After you successfully installed ThingWorx, in „Services“ tab there should be an option called „IoT Platforms“. | |||
After you successfully | |||
[[File:Cumiot.png]] | |||
[[File:ThingWorx.png]] | [[File:ThingWorx.png]] | ||
| Line 155: | Line 133: | ||
All of the shown fields are required. Explanation of each field: | All of the shown fields are required. Explanation of each field: | ||
Server Address – ThingWorx main server IP address. For example: „PP-0803200705RN.Devportal.Ptc.Io“. | * Server Address – ThingWorx main server IP address. For example: „PP-0803200705RN.Devportal.Ptc.Io“. | ||
* Server Port – ThingWorx main server port. It is recommended to use SSL, which is automatically used with „443“ port. | |||
* Thing Name – Thing name, which was created in ThingWorx Composer. In this example it is „RouterThing“. | |||
* Application Key – Application key for this ThingWorx application. It was generated in step 2). so copy it from there. | |||
Also click „Enable“ to enable example application. | |||
See below: | See below: | ||
| Line 178: | Line 154: | ||
Now click on „Manage Bindings“ button. A new window should show up: | Now click on „Manage Bindings“ button. A new window should show up: | ||
[[File:ManageBindings.png]] | [[File:ManageBindings.png|1150px]] | ||
Now click on „Remote“ tab and you should be able to see all properties from your device: | Now click on „Remote“ tab and you should be able to see all properties from your device: | ||
[[File:RemotePropertiesTab.png]] | [[File:RemotePropertiesTab.png|1150px]] | ||
Now by using drag’n’drop principle, drag each remote property (left side) to the right side in the right one „Source/Remote Name“: | Now by using drag’n’drop principle, drag each remote property (left side) to the right side in the right one „Source/Remote Name“: | ||
[[File:MobileNetworkproperty.png]] | [[File:MobileNetworkproperty.png|1150px]] | ||
Now do this for every property: | Now do this for every property: | ||
[[File:AllDevicesBound.png]] | [[File:AllDevicesBound.png|1150px]] | ||
and click „Done“ and then „Save“. Everything should be ready, after a couple of seconds, data from the device should be updated. Click refresh button on „Value“ field to see the changes. | and click „Done“ and then „Save“. Everything should be ready, after a couple of seconds, data from the device should be updated. Click refresh button on „Value“ field to see the changes. | ||
[[File:StreamedProperties.png]] | [[File:StreamedProperties.png|1150px]] | ||
==Explanation of example application's streaming methods== | ==Explanation of example application's streaming methods== | ||
| Line 237: | Line 213: | ||
As you can see, example application contains the same properties as our Thing in ThingWorx Composer. | As you can see, example application contains the same properties as our Thing in ThingWorx Composer. | ||
== | ==External Links== | ||
https://developer.thingworx.com/resources/guides/c-sdk-reference | https://developer.thingworx.com/resources/guides/c-sdk-reference | ||
{{Template: trademark disclaimer}} | |||
[[Category:IoT]] | |||
Latest revision as of 13:24, 25 August 2020
Main Page > IoT Platforms > IoT > ThingWorx
Description
ThingWorx is the industry-leading industrial innovation platform that is designed to rapidly deliver IoT applications and Augmented Reality (AR) experiences that unlock the value of the converged digital and physical worlds.
Summary
The example application, written by Teltonika, streams information from the router. Once the service is enabled, you should be able to view the following information in your ThingWorx server
- WAN Type
- WAN IP
- Mobile Operator Name
- Mobile Signal Strength
- Mobile Network Type
This information is sent to your ThingWorx server continuously, at a specified (default - 5 seconds) interval.
Launching the ThingWorx server
In order to receive information from the router, you will need a ThingWorx server to act an end-point. In order to get the server up and running, you will first need to create an account here: https://developer.thingworx.com/en/signup
After signing-up, you have to confirm your e-mail address to be able to use their products.
After a successful registration you should be automatically logged-in and redirected to: https://developer.thingworx.com/en
Here you can find a free evaluation trial for 30 days. Start your hosted trial and launch the ThingWorx server. The server should start-up in a couple of minutes.
After the server starts, you will be given information about the servers hostname. This is important, so make sure you save this information. Alternatively, you can always go back to it later.
Press 'Launch' to enter into the ThingWorx composer. You have now successfully launched your ThingWorx server.
Generating application key
For the server to be able to connect to the router and retrieve information, an application key is required. This section will explain how to generate this application key in the ThingWorx Composer.
You must generate at least one application key, although it is recommended to use different keys for each device, which will be connected to ThingWorx IoT platform. ThingWorx server must be running and you should be in ThingWorx Composer page. If it is not the case, please repeat server start up steps.
When in the ThingWorx Composer page, on the left of the screen locate the 'Browse' section and click on it.
The scroll bar should now change to a list containing various objects you can add. Navigate down to the 'Security' section and click on 'Application Keys'.
In the main window, you will now see a list of available application keys. You need to create a new one, so click 'New' and fill in the required fields.
The name field has to be unique (eg. RouterThing), for testing, in the 'User name reference' field input 'Administrator' (a user that already exists) and set the expiration date to anything you like.
Creating a Thing
Now you will create a Thing for our ThingWorx example application, which contains these properties:
- WAN Type
- WAN IP
- Mobile Operator Name
- Mobile Signal Strength
- Mobile Network Type
ThingWorx server must be running and you should be in ThingWorx Composer page. If it is not the case, please repeat server start up steps in 1).
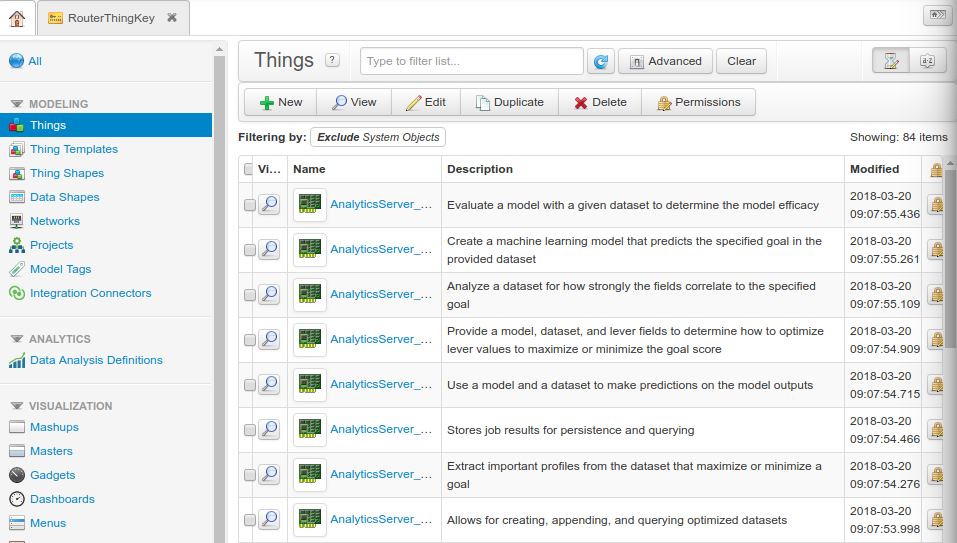
In ThingWorx Composer page, on the main menu, click on „Modeling“ tab and then on „Things“. Similar to Application Key generation, you should see here a list of Things and modify them.
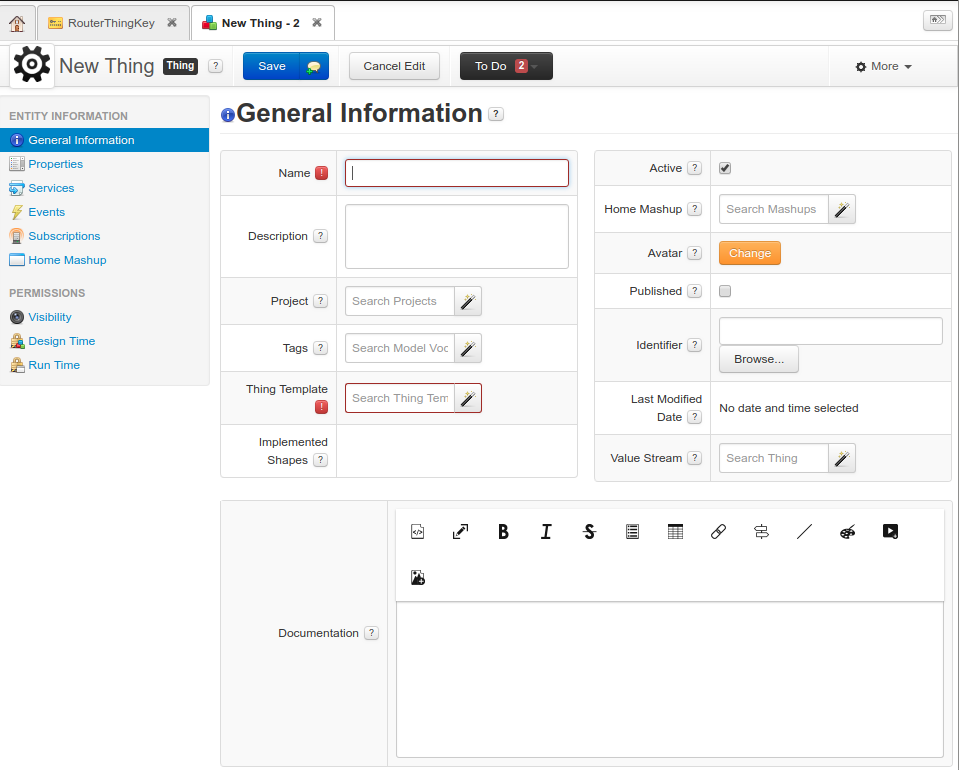
To add a new Thing, click on the green plus icon with a name „New“ and now you should be in adifferent page, see below:
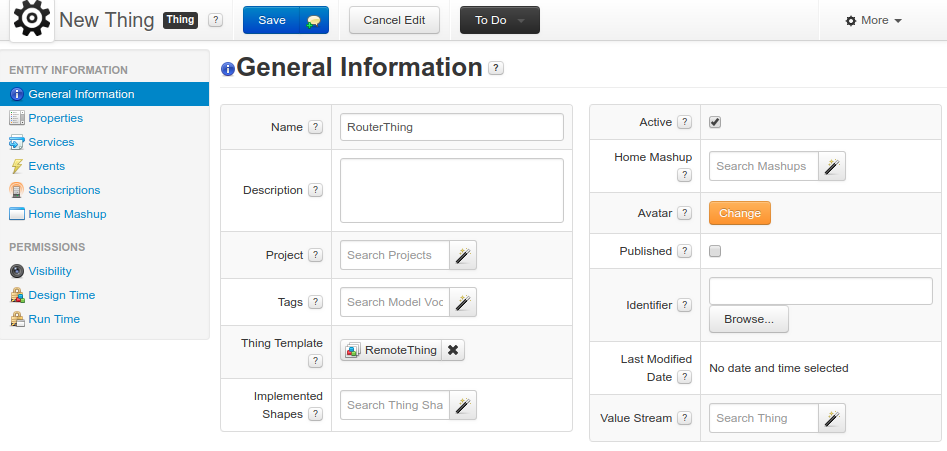
Once again, there are many fields in here, but only a few are required for our example application. The required ones are: Name and Thing Template.
Name must be unique. You can write something like: „RouterThing“. In the Thing Template select „RemoteThing“ option.
Note 1: One thing per device. This means that if you have multiple devices of the same model, you would need to create a multiple things with different names.
Note 2: Remember Thing’s name, because you will need it later.
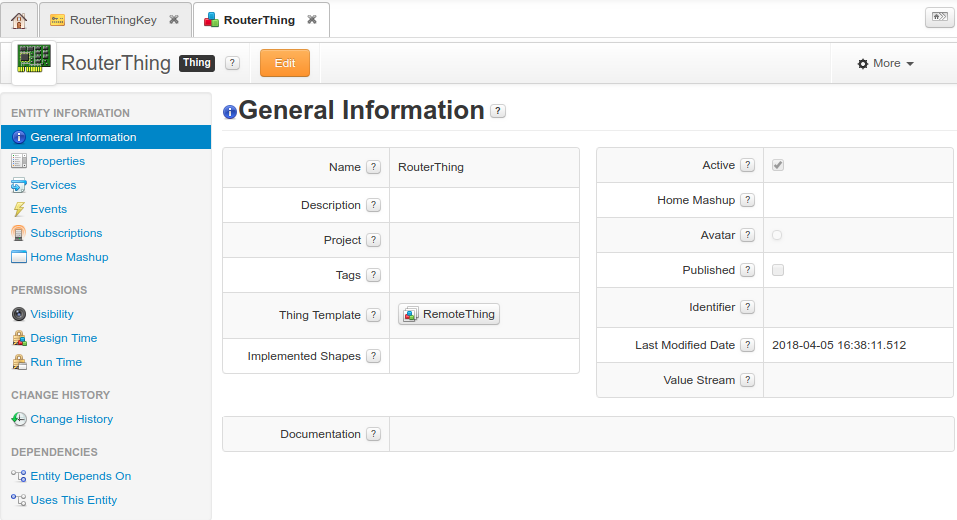
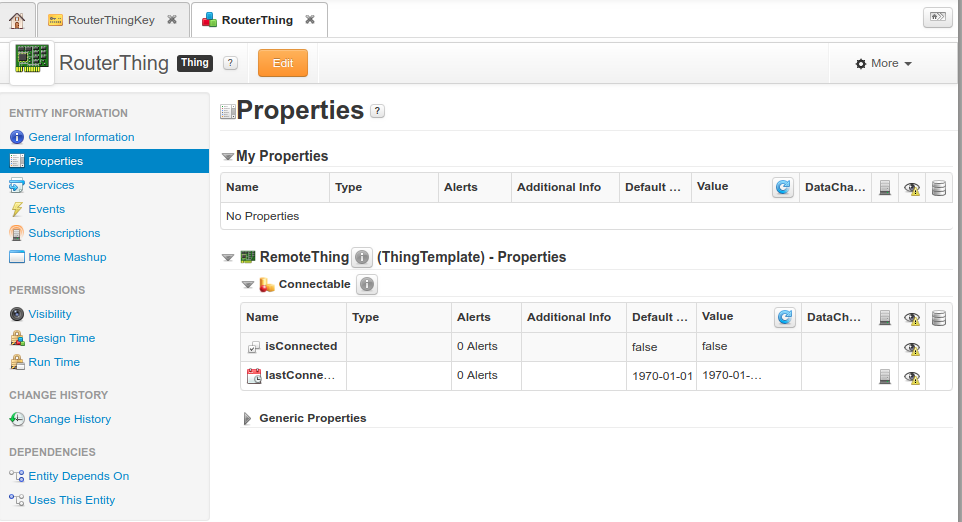
Once required fields are set, you can click „Save“ and you should be redirected to newly created Thing information page:
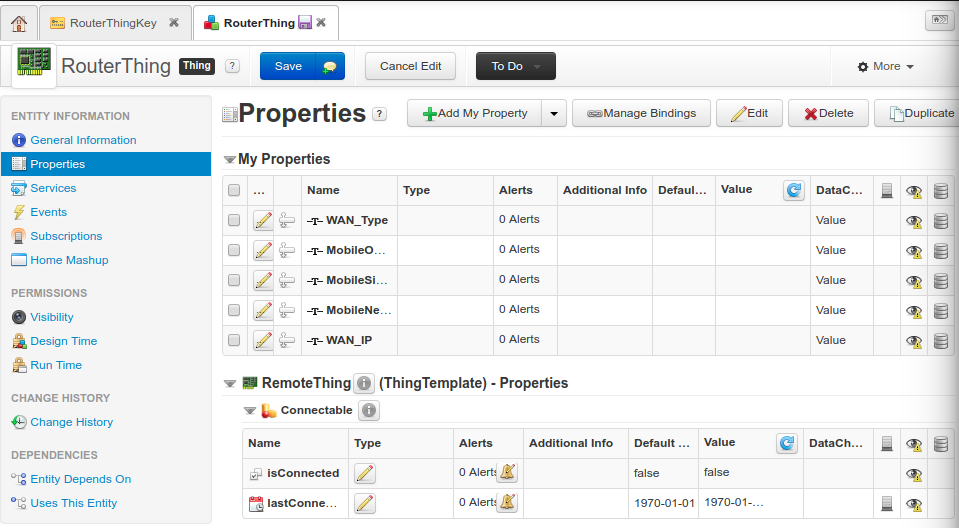
Now you need to create streaming properties for this thing. To view properties, click on the „Properties“ while being in Thing information page.
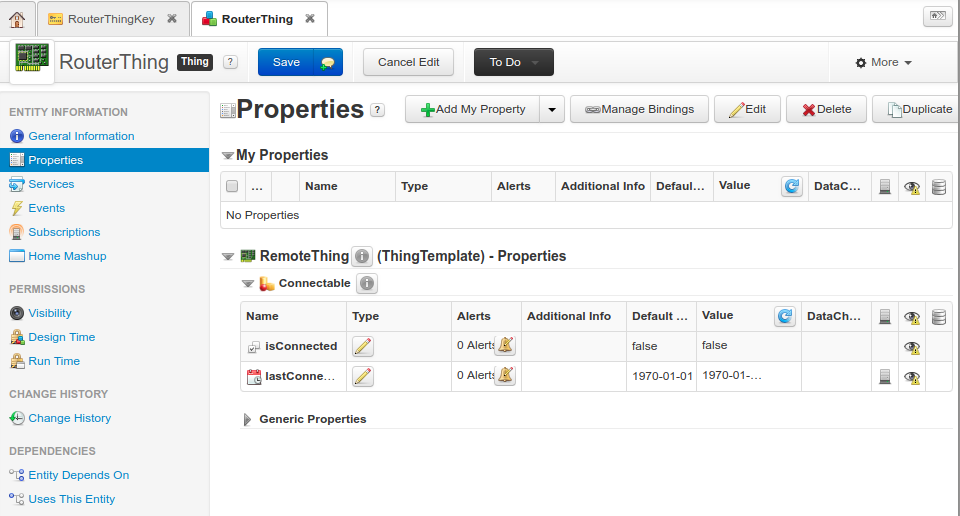
First, you need to enable edit mode, so press that orange „Edit“ button.
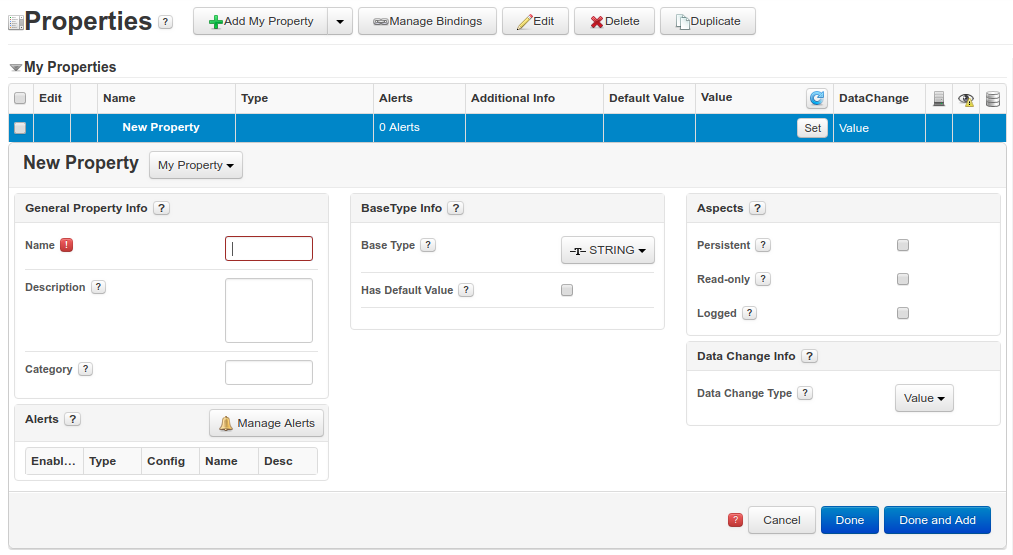
Now you can see that there are more options. To create a new property, click on the „Add My Property“ button with a green plus icon.
There are many additional fields, but only a few are required for our example: Name, Base Type and Aspects.
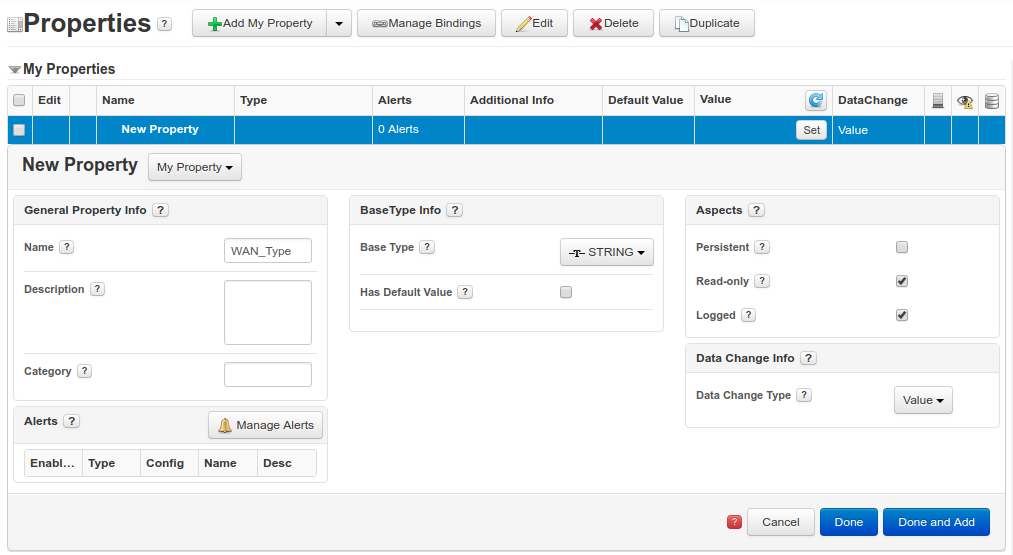
Below you can see table with these fields, so create each field with such info:
Main parameters:
- Persistent – if this option is used, once device is disconnected, property’s value will be set as default. If default value was not specified, value will be set as empty.
- Read-only – this property is read only.
- Logged – should be used when property’s value is updated from the device everytime, at some interval.
See below:
After required fields are set, click on “Done and Add” icon and repeat till all 5 properties are created.
Once all properties are created, press “Save” to save changes.
Installing example application
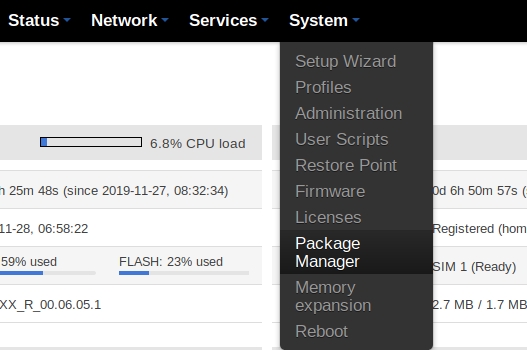
First, you need to install ThingWorx. Go to System -> Package manager:
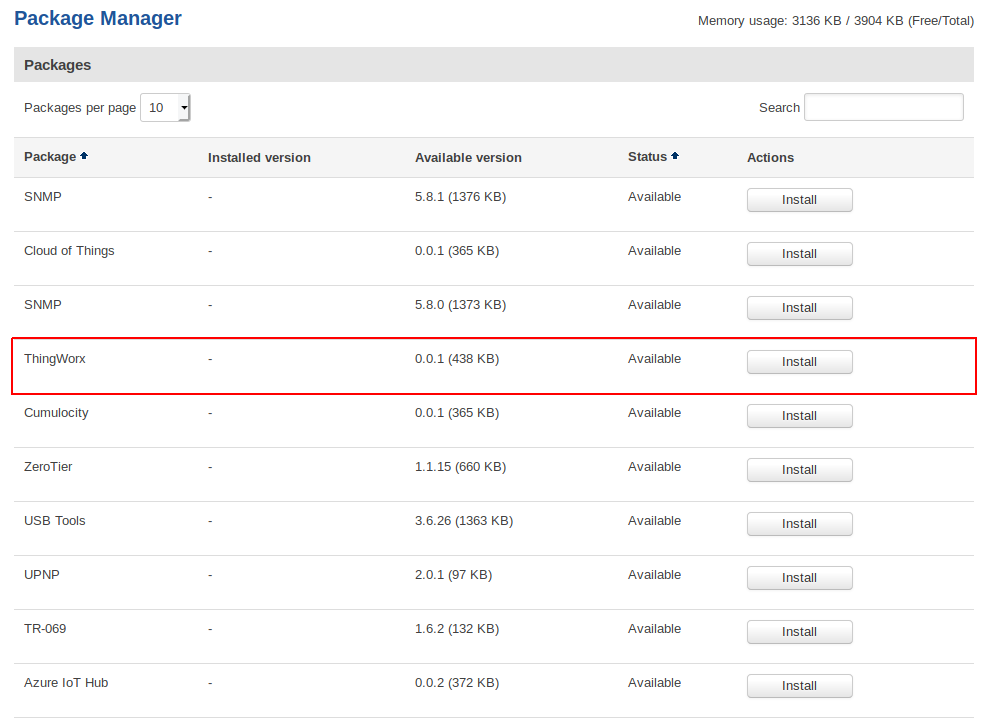
When you open package manager you will see a list of packages. You need click install on ThingWorx, see below:
Configuring and launching example application
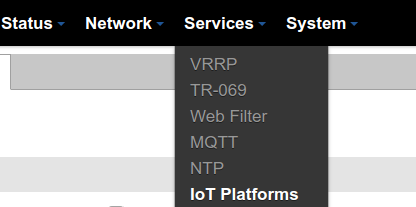
After you successfully installed ThingWorx, in „Services“ tab there should be an option called „IoT Platforms“.
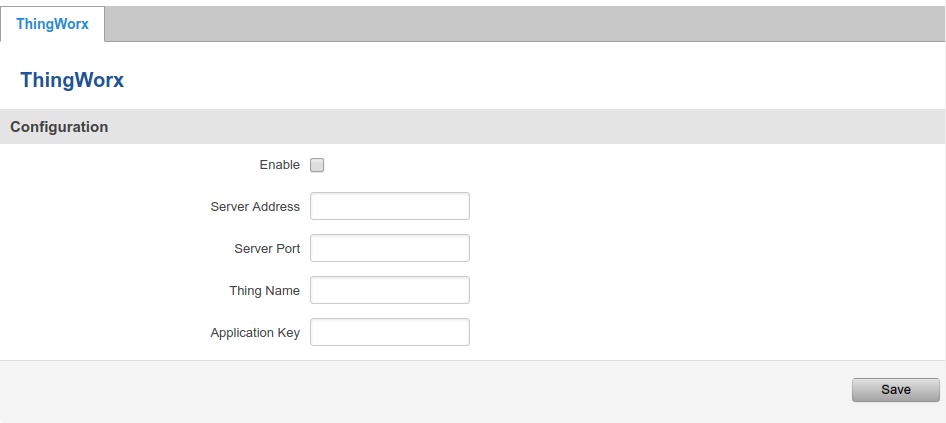
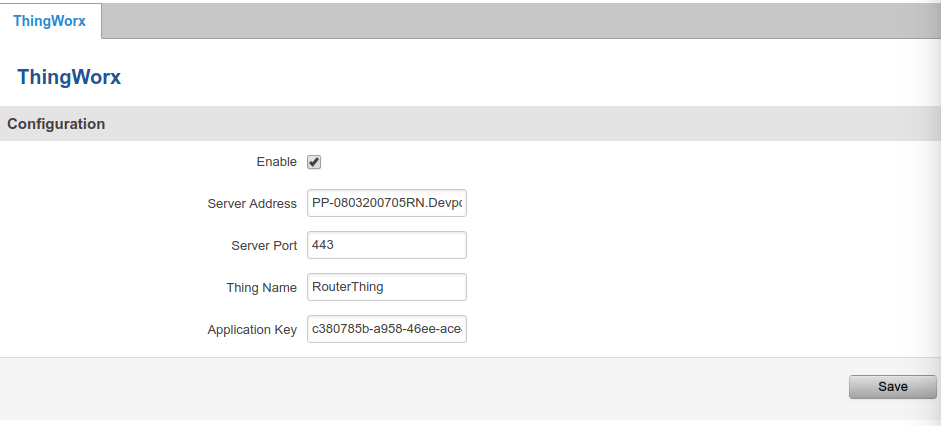
All of the shown fields are required. Explanation of each field:
- Server Address – ThingWorx main server IP address. For example: „PP-0803200705RN.Devportal.Ptc.Io“.
- Server Port – ThingWorx main server port. It is recommended to use SSL, which is automatically used with „443“ port.
- Thing Name – Thing name, which was created in ThingWorx Composer. In this example it is „RouterThing“.
- Application Key – Application key for this ThingWorx application. It was generated in step 2). so copy it from there.
Also click „Enable“ to enable example application.
See below:
Now click „Save“ and if everything is correct – example application will successfully connect to ThingWorx main server.
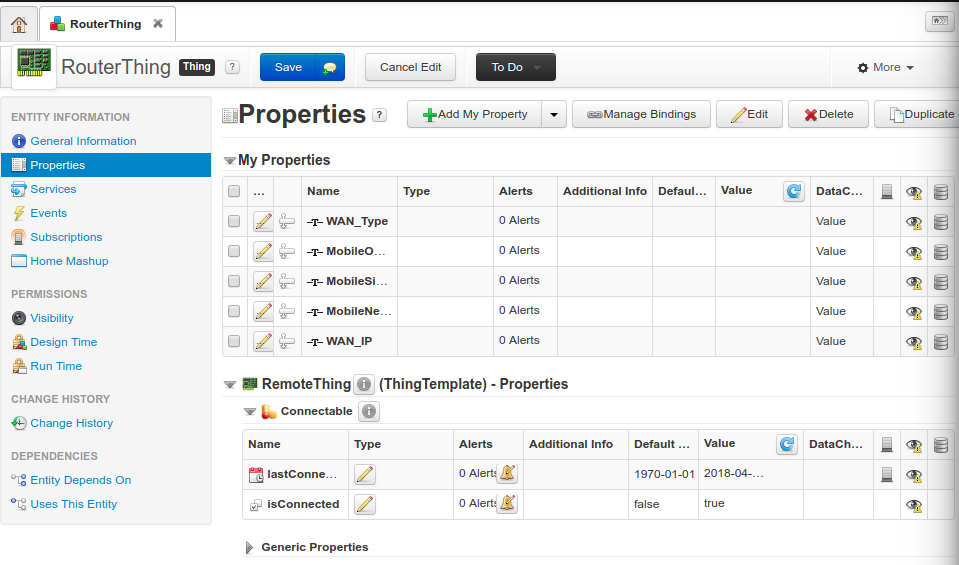
This is the last, but important step. You need to add bindings to Thing’s properties. Open ThingWorx Composer control panel and select a Thing (in example it is „RouterThing“) and navigate to „Properties“ page. Enable editing mode by clicking orange „Edit“ button.
Tip: If device is connected, in „Properties“ window, down below „RemoteThing“, property „isConnected“ will be set as true. This can be used to know if device is connected.
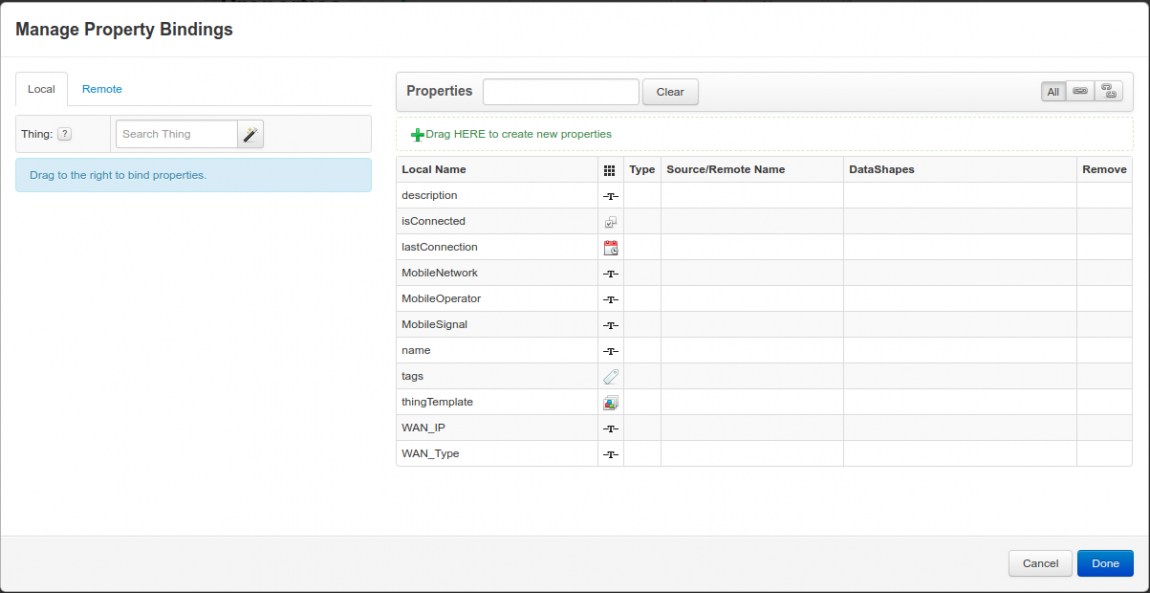
Now click on „Manage Bindings“ button. A new window should show up:
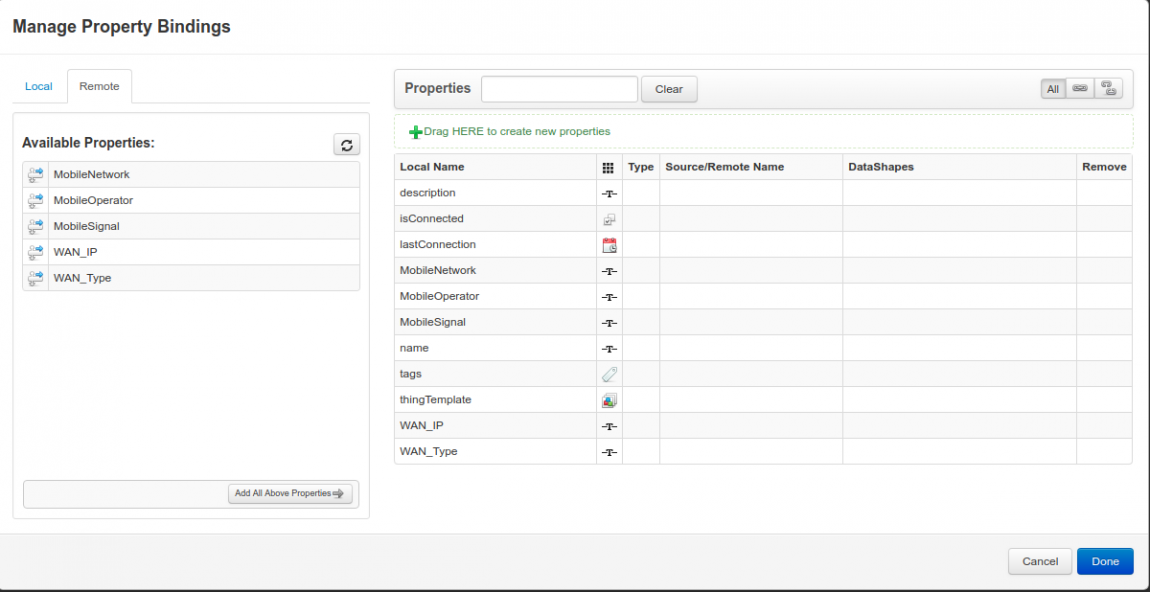
Now click on „Remote“ tab and you should be able to see all properties from your device:
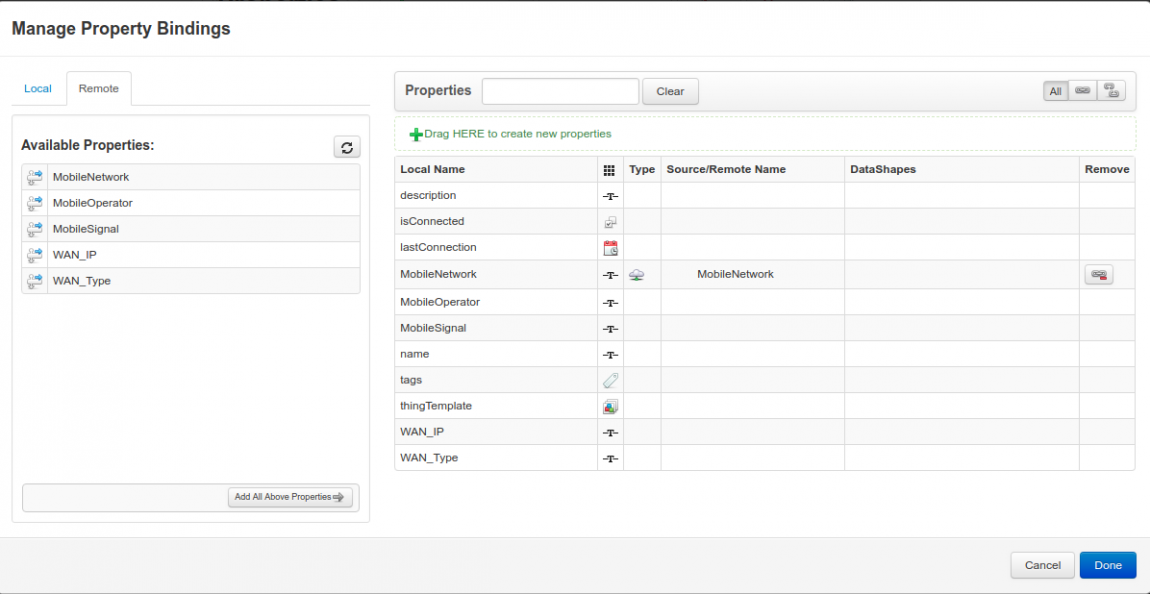
Now by using drag’n’drop principle, drag each remote property (left side) to the right side in the right one „Source/Remote Name“:
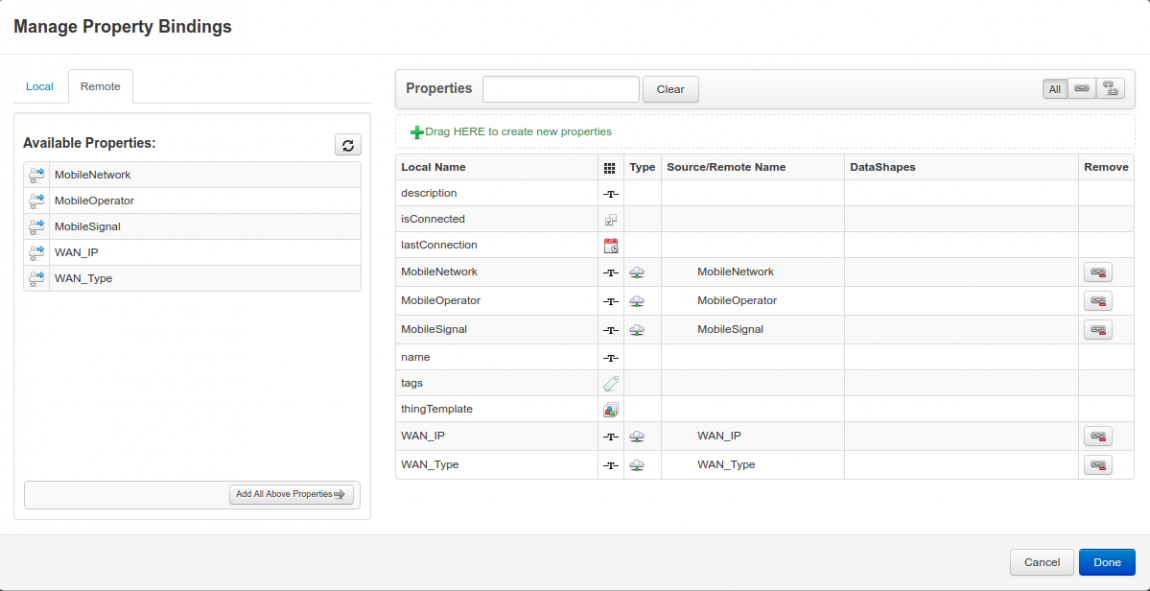
Now do this for every property:
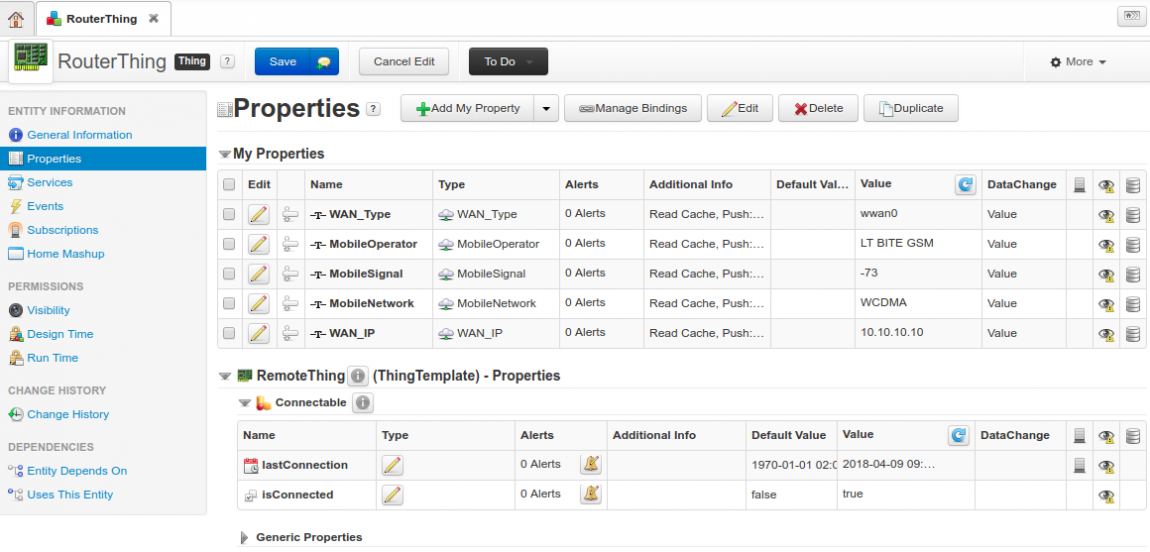
and click „Done“ and then „Save“. Everything should be ready, after a couple of seconds, data from the device should be updated. Click refresh button on „Value“ field to see the changes.
Explanation of example application's streaming methods
Example application is in „GPL/package/twStreamApp“ directory. Source code is inside „src“ directory.
The main logic happens in „StreamThing.c“ file. A few main methods:
CreateSteamSensorThing – Create a Thing destroySteamSensorThing – Destroy a Thing onSteamSensorProcessScanRequest – Update Thing properties at some interval
First of all, Thing must be created. This is done inside CreateSteamSensorThing method with a TW_MAKE_THING function:
TW_MAKE_THING(thingName, TW_THING_TEMPLATE_GENERIC);
Now each property must be defined below, with TW_PROPERTY function:
TW_PROPERTY("WAN_Type", TW_NO_DESCRIPTION, TW_STRING);
TW_STRING – can be TW_NUMBER, TW_BOOLEAN and etc.
If property includes aspects(persistent, readonly, logged) those are also needs to be defined. These aspects are defined with TW_ADD_BOOLEAN_ASPECT function:
TW_ADD_BOOLEAN_ASPECT("WAN_Type", TW_ASPECT_ISREADONLY, TRUE); TW_ADD_BOOLEAN_ASPECT("WAN_Type", TW_ASPECT_ISLOGGED, TRUE);
Complete property definition could look like:
TW_PROPERTY("WAN_Type", TW_NO_DESCRIPTION, TW_STRING); TW_ADD_BOOLEAN_ASPECT("WAN_Type", TW_ASPECT_ISREADONLY, TRUE); TW_ADD_BOOLEAN_ASPECT("WAN_Type", TW_ASPECT_ISLOGGED, TRUE);
Since properties are defined, now you need to update them. You can do this inside onSteamSensorProcessScanRequest function with TW_SET_PROPERTY method:
TW_SET_PROPERTY(thingName, "WAN_Type", TW_MAKE_STRING("someWANTypeName"));
Value should be used with TW_MAKE_STRING; TW_MAKE_NUMBER methods, depending on value’s data type.
However, if value should not be updated everytime, you can use TW_SET_PROPERTY in CreateSteamSensorThing function, right after defining properties.
As you can see, example application contains the same properties as our Thing in ThingWorx Composer.
External Links
https://developer.thingworx.com/resources/guides/c-sdk-reference
Disclaimer:
Any of the trademarks, service marks, collective marks, design rights or similar rights that are mentioned, used or cited in the articles are the property of their respective owners.

