RUT2xx Bootloader Upgrade: Difference between revisions
Created page with "==Summary== A Bootloader is a program that loads the operating system or some other system software for the router after completion of the power-on self-tests; it is the load..." |
No edit summary |
||
| (10 intermediate revisions by 6 users not shown) | |||
| Line 3: | Line 3: | ||
A Bootloader is a program that loads the operating system or some other system software for the router after completion of the power-on self-tests; it is the loader for the operating system itself. | A Bootloader is a program that loads the operating system or some other system software for the router after completion of the power-on self-tests; it is the loader for the operating system itself. | ||
This article is a guide on how to upgrade RUT2xx router's bootloader. | |||
==Checking your Bootloader version== | ==Checking your Bootloader version== | ||
| Line 10: | Line 10: | ||
[[Image:Configuration examples bootloader how to find rut2.PNG]] | [[Image:Configuration examples bootloader how to find rut2.PNG]] | ||
==Upgrade== | ==Upgrade== | ||
| Line 42: | Line 38: | ||
[[Image:Configuration examples bootloader windows network connections.PNG]] | [[Image:Configuration examples bootloader windows network connections new.PNG]] | ||
---- | ---- | ||
| Line 87: | Line 83: | ||
Replace '''eth0''' with the name of your Ethernet interface. | Replace '''eth0''' with the name of your Ethernet interface. | ||
====macOS==== | |||
---- | |||
To set up a Static IP on a macOS follow the steps, you must first press '''"Apple" logo''' button in the top left corner and select "'''System Preferences...'''". | |||
[[File:Static IP on mac OS settings button.png]] | |||
[[File:Static IP on mac OS system preferences button.png]] | |||
---- | |||
When in the '''System Preferences''' window, click '''Network''': | |||
[[File:Static IP on mac OS Network button.png]] | |||
---- | |||
Next, on the left side of Network settings window, right-click on the Network connection associated with your Ethernet adapter and on the right side of Network settings window select '''Manually''' in the '''"Configure IPv4:"''' option field: | |||
[[File:Static IP on mac OS system network settings.png]] | |||
---- | |||
Finally, enter a static IP for your PC (e.g., '''192.168.1.1''') and Subnet mask - '''255.255.255.0''' then press '''"Apply"''' for saving the changes: | |||
[[File:Static IP on mac OS IP set up.png]] | |||
===Bootloader menu=== | ===Bootloader menu=== | ||
---- | ---- | ||
Next, unplug the router's '''Power Supply Unit (PSU)''' and leave only the LAN Ethernet port plugged in (for your computer). The WAN Ethernet port has to remain unplugged | Next, unplug the router's '''Power Supply Unit (PSU)''' and leave only the LAN Ethernet port plugged in (for your computer). The WAN Ethernet port has to remain unplugged for the duration of the following procedure. | ||
Press and hold the '''Reset''' button. Plug the Power Supply back in while holding the '''Reset''' button. After plugging in the Power Supply, hold the '''Reset''' button for 3-4 sec. After this, all Ethernet port LEDs should start blinking. | |||
Now you can enter the Bootloader menu. Open your web browser and enter your router's IP address into the URl field and add '''/uboot.html''' at the end ('''192.168.1.1/uboot.html'''). This may not work if have connected to the router's WebUI at least once before, since the URL's path may be cached. To solve this problem you can clear the browser's cache or, more simply, open the browser in a mode that doesn't cache browsing information. On '''Google Chrome''' it's called '''Incognito''' and can be reached by pressing '''ctrl+shift+n'''; on '''Mozilla Firefox''' it's called '''Private Browsing''' and can be reached by pressing '''ctrl+shift+p'''; on '''Microsoft Edge''' and '''Internet Explorer''' it's '''InPrivate''', can be reached by pressing '''ctrl+shift+p'''. | Now you can enter the Bootloader menu. Open your web browser and enter your router's IP address into the URl field and add '''/uboot.html''' at the end ('''192.168.1.1/uboot.html'''). This may not work if have connected to the router's WebUI at least once before, since the URL's path may be cached. To solve this problem you can clear the browser's cache or, more simply, open the browser in a mode that doesn't cache browsing information. On '''Google Chrome''' it's called '''Incognito''' and can be reached by pressing '''ctrl+shift+n'''; on '''Mozilla Firefox''' it's called '''Private Browsing''' and can be reached by pressing '''ctrl+shift+p'''; on '''Microsoft Edge''' and '''Internet Explorer''' it's '''InPrivate''', can be reached by pressing '''ctrl+shift+p'''. | ||
| Line 114: | Line 135: | ||
===Firmware menu=== | ===Firmware menu=== | ||
---- | ---- | ||
You can also update the router's Firmware | You can also update the router's Firmware this way if needed. Instead of /uboot.html, the path for Firmware is /index.html. You will find a guide on how to upgrade your Firmware to a newer version via the Bootloader menu '''[[RUT2xx_Firmware_via_The_Bootloader_Menu|here]]'''. | ||
Latest revision as of 16:14, 19 January 2022
Summary
A Bootloader is a program that loads the operating system or some other system software for the router after completion of the power-on self-tests; it is the loader for the operating system itself.
This article is a guide on how to upgrade RUT2xx router's bootloader.
Checking your Bootloader version
You can find your Bootloader version in the Firmware section under the System tab; in short: System->Firmware. You'll find the Bootloader version under Current Firmware Information, just below Kernel version:
Upgrade
Set up a static IP address for your PC
Bootloader can be upgraded from the Bootloader menu. When the Bootloader menu becomes accessible, the router will not be working in its regular state, i.e., all regular services will be disabled, including DHCP, that is why you will first need to setup a Static IP address on your PC to be able to reach the router.
The router's default address is 192.168.1.1, therefore your PC's IP address should be in the first sub-net as well, for example: 192.168.1.2. The last number can be any number in the range of 2 - 254, i.e., 192.168.1.2 - 192.168.1.254. Your PC's IP can't be the same as the router's (192.168.1.1), it can't be 192.168.1.255 and 192.168.1.0 as well.
A short guide on how to set up a static IP address will be presented bellow.
Windows 10
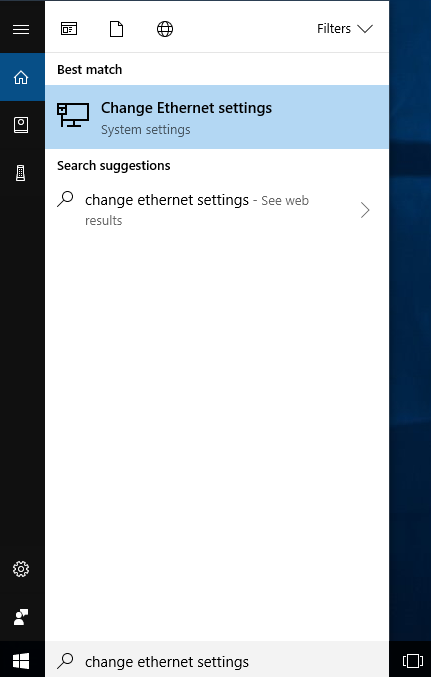
To set up a static IP address on your PC using Windows 10, you must first go to the Ethernet Settings menu. In order to reach the Ethernet Settings window, enter "change ethernet settings" in the Windows search field located next to Start in the bottom left corner of the screen and press Enter:
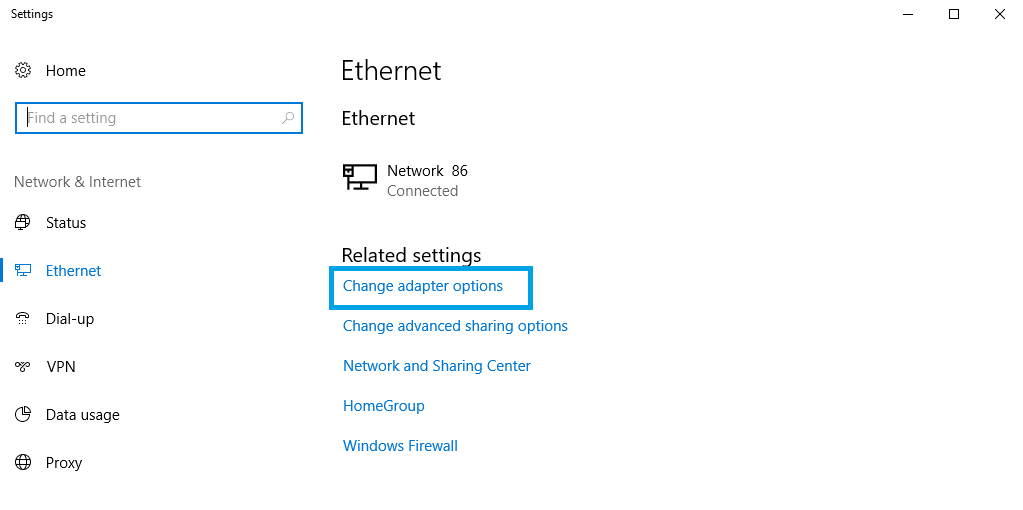
When in the Ethernet Settings window, click Change adapter options located under "Related settings":
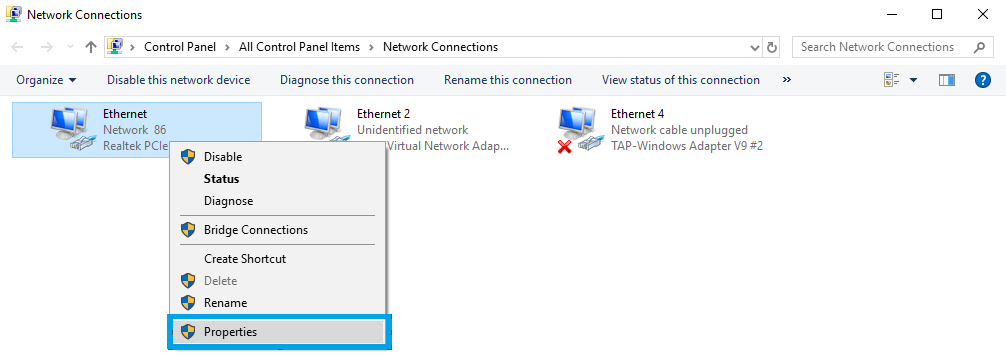
When in the Network connections window, right-click on the Network connection associated with your Ethernet adapter and click Properties:
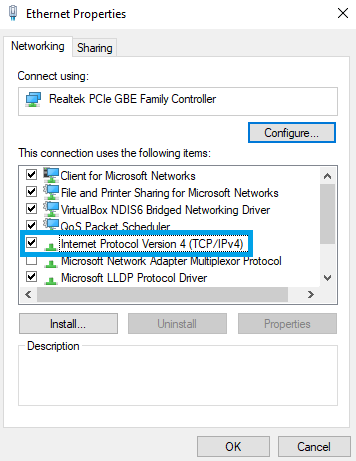
Next, click on Internet Protocol Version 4 (TCP/IPv4):
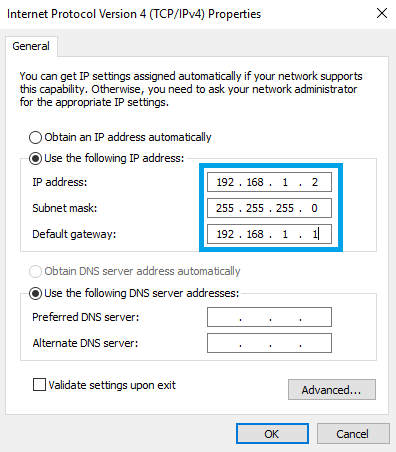
Check Use the following IP address and enter a static IP for your PC (e.g., 192.168.1.2); netmask - 255.255.255.0; gateway - 192.168.1.1:
To undo these changes, go back to the Internet Protocol Version 4 (TCP/IPv4) window a check Obtain an IP address automatically.
Linux
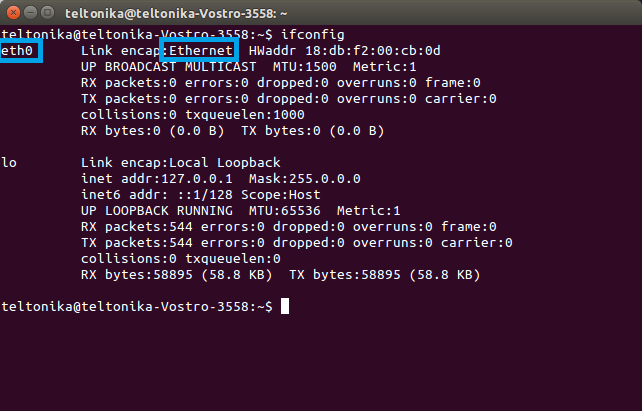
To set up a Static IP on a Linux OS, open the Terminal app and enter the ifconfig command. The ifconfig command provides information on network interfaces. Find the Ethernet interface and memorize its name, which should be located on the left side of the table:
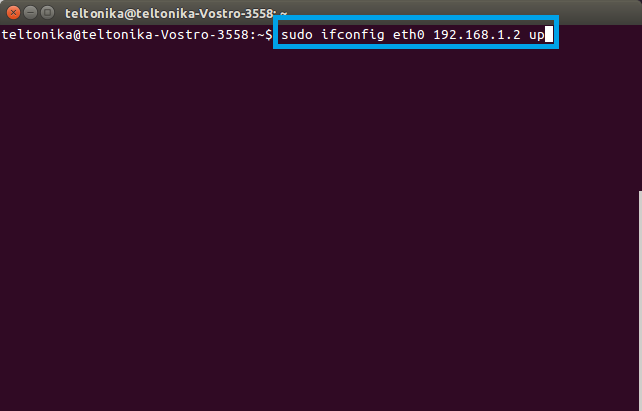
Next, enter this command into the terminal:
sudo ifconfig if_name ip_addr up
Replace if_name with the name of your Ethernet interface and ip_addr with the IP address that you want. Following from the example above the full command would look like this:
sudo ifconfig eth0 192.168.1.2 up
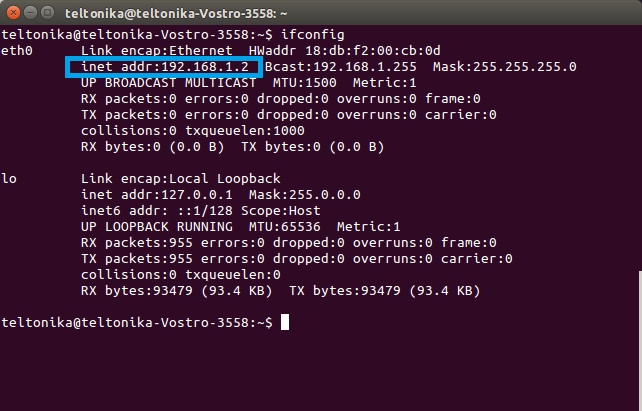
After this you PC's IP address should have been changed. To check, enter the ifconfig command again and check to see if the Ethernet interface has the IP that you assigned:
To undo the changes use these two commands one after the other:
sudo dhclient eth0 -r
sudo dhclient eth0
Replace eth0 with the name of your Ethernet interface.
macOS
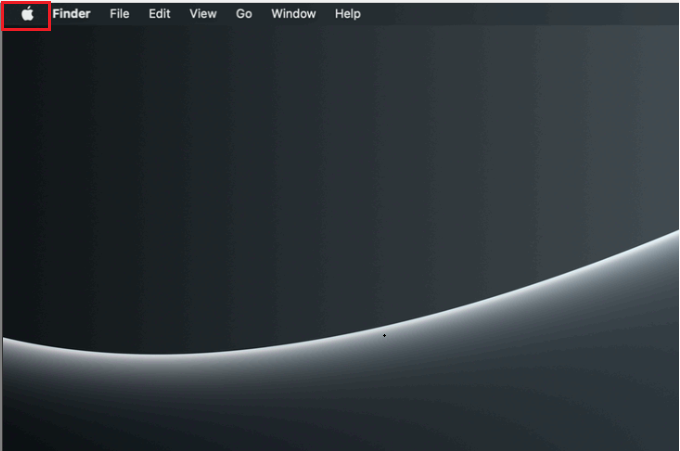
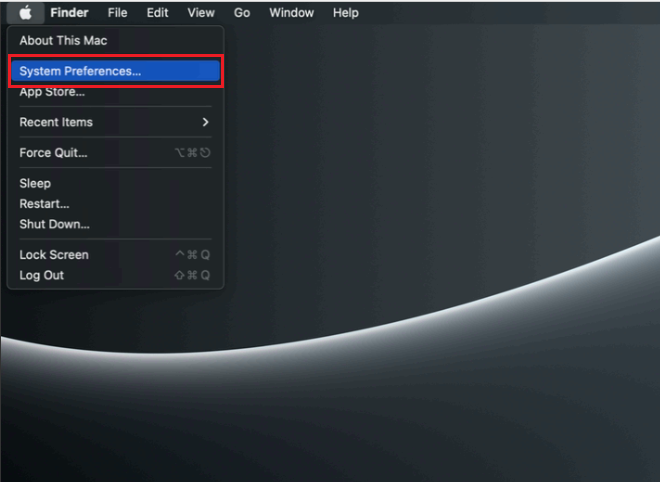
To set up a Static IP on a macOS follow the steps, you must first press "Apple" logo button in the top left corner and select "System Preferences...".
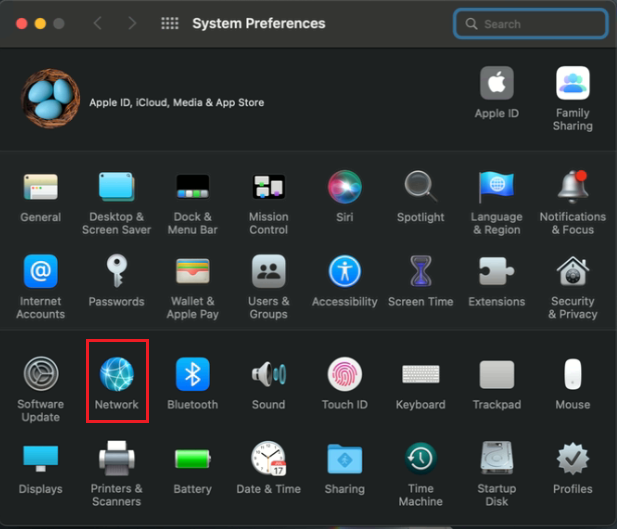
When in the System Preferences window, click Network:
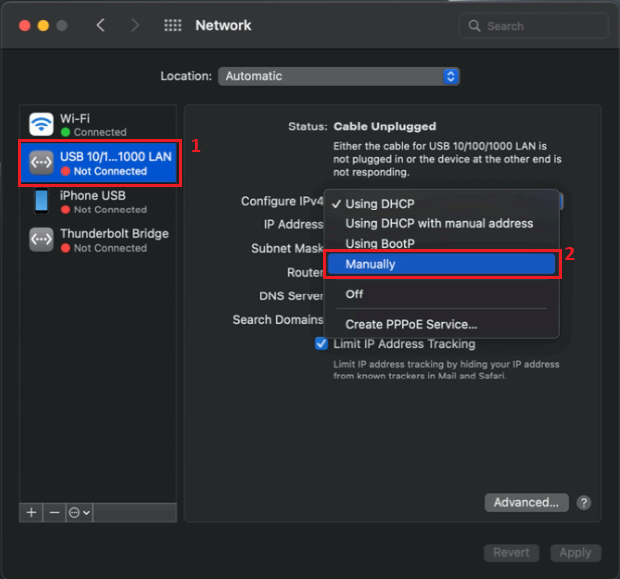
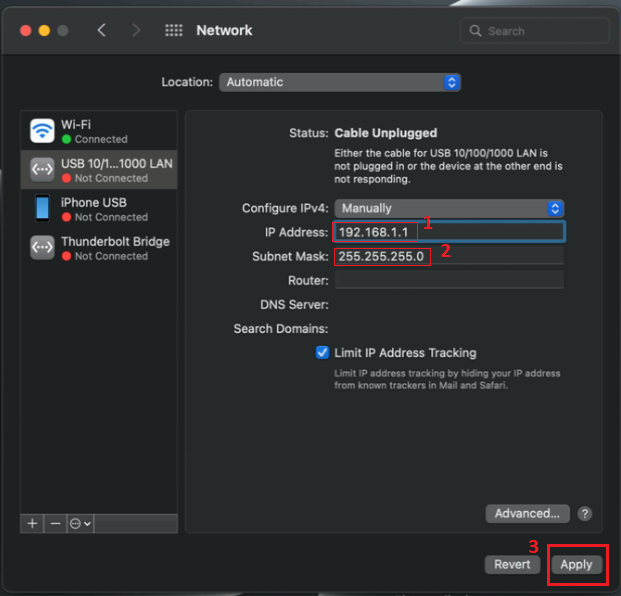
Next, on the left side of Network settings window, right-click on the Network connection associated with your Ethernet adapter and on the right side of Network settings window select Manually in the "Configure IPv4:" option field:
Finally, enter a static IP for your PC (e.g., 192.168.1.1) and Subnet mask - 255.255.255.0 then press "Apply" for saving the changes:
Next, unplug the router's Power Supply Unit (PSU) and leave only the LAN Ethernet port plugged in (for your computer). The WAN Ethernet port has to remain unplugged for the duration of the following procedure.
Press and hold the Reset button. Plug the Power Supply back in while holding the Reset button. After plugging in the Power Supply, hold the Reset button for 3-4 sec. After this, all Ethernet port LEDs should start blinking.
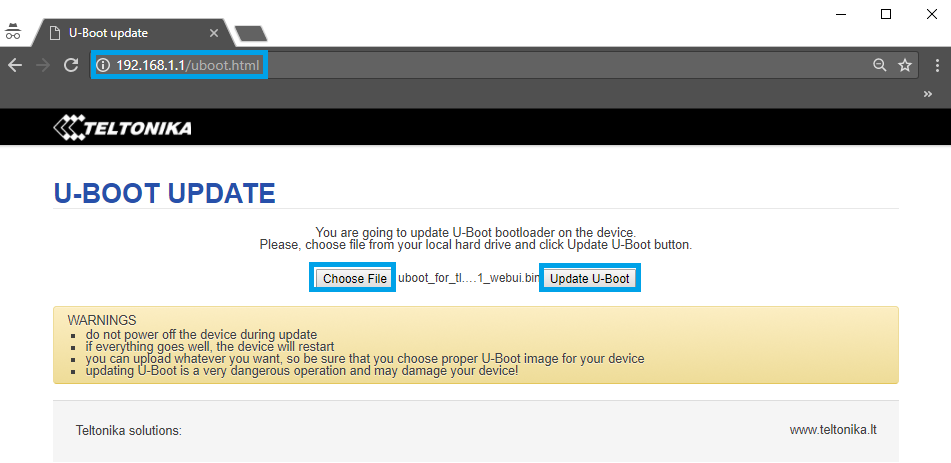
Now you can enter the Bootloader menu. Open your web browser and enter your router's IP address into the URl field and add /uboot.html at the end (192.168.1.1/uboot.html). This may not work if have connected to the router's WebUI at least once before, since the URL's path may be cached. To solve this problem you can clear the browser's cache or, more simply, open the browser in a mode that doesn't cache browsing information. On Google Chrome it's called Incognito and can be reached by pressing ctrl+shift+n; on Mozilla Firefox it's called Private Browsing and can be reached by pressing ctrl+shift+p; on Microsoft Edge and Internet Explorer it's InPrivate, can be reached by pressing ctrl+shift+p.
Upload the Bootloader image and click Update U-Boot:
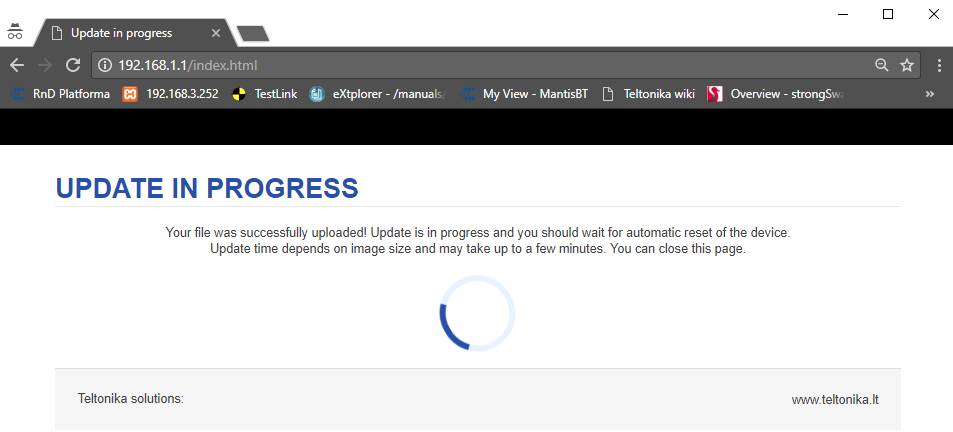
After this you should be greeted with a window such as this:
This means that the upgrade has started and you can close the browser window. The update itself takes only a few seconds but the router will restart afterwards. The entire process before the router becomes reachable again will take 2-3 minutes
IMPORTANT NOTE: don't forget to change back your PC's IP address because it might cause problems when connecting to other devices or no internet access if you haven't specified any DNS servers manually.
You can also update the router's Firmware this way if needed. Instead of /uboot.html, the path for Firmware is /index.html. You will find a guide on how to upgrade your Firmware to a newer version via the Bootloader menu here.


