Generate RMS Connect link API example: Difference between revisions
PauliusRug (talk | contribs) (First full draft, might be okay) |
PauliusRug (talk | contribs) mNo edit summary |
||
| (One intermediate revision by the same user not shown) | |||
| Line 1: | Line 1: | ||
__TOC__ | __TOC__ | ||
==Introduction== | ==Introduction== | ||
Using the RMS API allows users to automate tasks and integrate RMS into their | Using the RMS API allows users to automate tasks and integrate RMS into their solutions. In this guide, an example will be provided that step-by-step shows a way to apply the RMS API to create and fetch RMS Connect links. | ||
Such application could be used to integrate RMS connect link generation into your | Such an application could be used to integrate RMS connect link generation into your solution, which would allow you to access devices faster and from a native device control solution. | ||
All documentation of the RMS API can be found here - https://developers.rms.teltonika-networks.com/ | All documentation of the RMS API can be found here - https://developers.rms.teltonika-networks.com/ | ||
| Line 22: | Line 22: | ||
<br> | <br> | ||
===Add new access token=== | ===Add a new access token=== | ||
---- | ---- | ||
| Line 29: | Line 29: | ||
[[File:RMS_API_Add_new_access_token.png|alt=|border|frameless|1193x1193px]] | [[File:RMS_API_Add_new_access_token.png|alt=|border|frameless|1193x1193px]] | ||
Next, input a name for this access token and select the necessary Scopes. Scopes are permissions – what the access token will be capable of doing in your account. For this example, we will be selecting these scopes: | |||
Next, input a name for this access token and select the necessary Scopes. Scopes are | |||
*'''devices:read''' | *'''devices:read''' | ||
| Line 38: | Line 37: | ||
[[File:Networking rut configuration example RMS API generate link access token permissions v1.png|frameless|1193x1193px]]<br /> | [[File:Networking rut configuration example RMS API generate link access token permissions v1.png|frameless|1193x1193px]]<br /> | ||
This will give the specific RMS API token the rights to read information about devices, create and read information about RMS connect devices. After selecting the necessary scopes, press Save Personal Access Token – you will be shown a table containing your Personal Access Token. WARNING: This is the only time the created access token will be shown, make sure to copy it, as you will not be able to see it again. | This will give the specific RMS API token the rights to read information about devices, and create and read information about RMS connect devices. After selecting the necessary scopes, press Save Personal Access Token – you will be shown a table containing your Personal Access Token. WARNING: This is the only time the created access token will be shown, make sure to copy it, as you will not be able to see it again. | ||
[[File:RMS_API_Access_Token_Example.png|alt=|border|frameless|500x500px]] | [[File:RMS_API_Access_Token_Example.png|alt=|border|frameless|500x500px]] | ||
Now that we have the access token, we can now use the RMS API. All information about each API endpoint can be found in the '''API reference'''. | Now that we have the access token, we can now use the RMS API. All information about each API endpoint can be found in the '''API reference'''. | ||
| Line 50: | Line 48: | ||
==Setting up Postman== | ==Setting up Postman== | ||
To start using post efficiently you can download the [https://rms.teltonika-networks.com/api/openapi/compiled.yaml RMS API Reference YAML file] which you will be able to upload to your Postman desktop application by simply clicking the import button in the desktop app and then uploading the downloaded YAML file. | To start using post efficiently you can download the [https://rms.teltonika-networks.com/api/openapi/compiled.yaml RMS API Reference YAML file] which you will be able to upload to your Postman desktop application by simply clicking the import button in the desktop app and then uploading the downloaded YAML file. | ||
[[File:Networking rut configuration example RMS API upload YAML to postman v1.png|border|frameless|384x384px]] | [[File:Networking rut configuration example RMS API upload YAML to postman v1.png|border|frameless|384x384px]] | ||
=== Adding RMS API access token to Postman === | === Adding RMS API access token to Postman === | ||
After that, you will be able to set authorization for RMS API from Postman. To do this: | After that, you will be able to set authorization for RMS API from Postman. To do this: | ||
# Click on the API | # Click on the API button; | ||
# Select "RMS API" from the list; | # Select "RMS API" from the list; | ||
# Go to "Authorizations" tab; | # Go to the "Authorizations" tab; | ||
# Select '''Type''' as "Bearer Token"; | # Select '''Type''' as "Bearer Token"; | ||
# Enter your saved '''RMS API token''' to the '''Token''' field; | # Enter your saved '''RMS API token''' to the '''Token''' field; | ||
[[File:Networking rut configuration example RMS API entering bearer token v1.png|border|frameless|1121x1121px]] | [[File:Networking rut configuration example RMS API entering bearer token v1.png|border|frameless|1121x1121px]] | ||
=== Setting up authorization for API calls === | === Setting up authorization for API calls === | ||
This will allow us to copy in | This will allow us to copy in Bearer token in one place, which API calls will be able to inherit. To set this up, whenever you open a new API call, go to the '''Authorization''' tab and select the '''Type''' as "'''Inherit from parent'''". | ||
[[File:Networking rut configuration example RMS API authorization for calls v1.png|border|frameless|386x386px]] | [[File:Networking rut configuration example RMS API authorization for calls v1.png|border|frameless|386x386px]] | ||
=== Searching for API calls === | === Searching for API calls === | ||
To follow this configuration example more easily, you can search for all of the API calls in the list: | To follow this configuration example more easily, you can search for all of the API calls in the list: | ||
| Line 78: | Line 71: | ||
==Getting the device ID in RMS== | ==Getting the device ID in RMS== | ||
To get the ID of the device, for which we will want to generate RMS connect remote accesses and generate | To get the ID of the device, for which we will want to generate RMS connect remote accesses and generate links for them, we first need to execute '''GET /devices''' API call called '''Get all device''' in the "Postman" collection list. | ||
To get the RMS device ID we need to make this call with API call keys: '''fields''' and '''q'''. Fields will make it so that the response will only contain fields which we entered and q will make it so that only the serial number we entered is outputted. | To get the RMS device ID we need to make this call with API call keys: '''fields''' and '''q'''. '''Fields''' will make it so that the response will only contain fields which we entered and '''q''' will make it so that only the device with entered serial number we entered is outputted. | ||
The parameters and the response can be seen in the following image: | The parameters and the response can be seen in the following image: | ||
[[File:Networking rut configuration example RMS API get device id v1.png|border|frameless|687x687px]] | [[File:Networking rut configuration example RMS API get device id v1.png|border|frameless|687x687px]] | ||
Field "id" in the response string is the device ID in RMS. | Field "id" in the response string is the device ID in RMS. | ||
== Adding a new remote device == | == Adding a new remote device == | ||
This section will tell you how to a new remote device to RMS Connect. | This section will tell you how to a new remote device to RMS Connect. | ||
| Line 96: | Line 87: | ||
* Device ID of Teltonika Networks device in RMS; | * Device ID of Teltonika Networks device in RMS; | ||
* LAN IP address of the device we will be creating the remote to; | * LAN IP address of the device we will be creating the remote to; | ||
* | * The port that is used to reach that service; | ||
* Name of the protocol. The currently supported protocols are: | * Name of the protocol. The currently supported protocols are: | ||
** HTTPS | ** HTTPS | ||
| Line 105: | Line 96: | ||
** Telnet | ** Telnet | ||
The call needed to add a | The call needed to add a remote access device/service is '''Post /devices/remote/access''' and can be found by name '''Create a remote access configuration''' in the collection list. This API call only needs to have a quest body and no keys. An example request body to add remote access to the router WebUI and the response after sending the call: | ||
[[File:Networking rut configuration example RMS API create remote access v1.png|frameless|685x685px]] | |||
| Line 116: | Line 106: | ||
== Getting the remote access ID == | == Getting the remote access ID == | ||
After the creation of remote access configuration, it was assigned a unique | After the creation of the remote access configuration, it was assigned a unique ID, which we need to know, to be able to generate links to that specific remote access. | ||
For this process API call '''GET /devices/remote-access''' and in the API call collection it is called '''Get all device's remote access configurations'''. To get the remote access ID for the newly created remote access configuration, the best way would be to filter by the device ID and the name of your new remote access configuration. | For this process API call '''GET /devices/remote-access''' and in the API call collection it is called '''Get all device's remote access configurations'''. To get the remote access ID for the newly created remote access configuration, the best way would be to filter by the device ID and the name of your new remote access configuration. | ||
An example of the API call can be seen | An example of the API call can be seen below, the remote access id will be shown in the field called "id". | ||
[[File:Networking rut configuration example RMS API get remote access id v1.png|border|frameless|687x687px]] | [[File:Networking rut configuration example RMS API get remote access id v1.png|border|frameless|687x687px]] | ||
== Generation of RMS Connect link == | == Generation of RMS Connect link == | ||
When the remote access ID is known, we can generate the remote access link with the RMS API call '''POST /devices/connect''' that in the API collection is called '''Start | When the remote access ID is known, we can generate the remote access link with the RMS API call '''POST /devices/connect''' that in the API collection is called '''Start an RMS Connect session'''. This call will require both the variable keys and the request body. | ||
The only key required is '''access_id''' which will be used to identify for which remote access configuration the link will be created. | The only key required is '''access_id''' which will be used to identify for which remote access configuration the link will be created.[[File:Networking rut configuration example RMS API generate rms link keys v1.png|border|frameless|696x696px]] | ||
The request body needs to contain the '''duration''' in seconds for how long the link will be available. There is no limit to the maximum value but note, that the time standard has some limits. | |||
[[File:Networking rut configuration example RMS API generate rms link body response v1.png|border|frameless|698x698px]] | [[File:Networking rut configuration example RMS API generate rms link body response v1.png|border|frameless|698x698px]] | ||
| Line 142: | Line 129: | ||
== Getting the remote access link == | == Getting the remote access link == | ||
After the link has been created, we can use the RMS API call '''GET /devices/connect/:access_id/sessions''' which in the API collection is called '''Get RMS Connect sessions'''. This call will display all of the links that are generated the specified remote access ID. | After the link has been created, we can use the RMS API call '''GET /devices/connect/:access_id/sessions''' which in the API collection is called '''Get RMS Connect sessions'''. This call will display all of the links that are generated from the specified remote access ID. Field '''Active''' will make it so only active links are outputted for the '''access_id''' that is provided.[[File:Networking rut configuration example RMS API get rms connect link v1.png|border|frameless|773x773px]] | ||
[[File:Networking rut configuration example RMS API get rms connect link v1.png|border|frameless|773x773px]] | |||
Congratulations, you can | Congratulations, you can now access your remote device using the link you generated using RMS API. | ||
[[File:Networking rut configuration example RMS API successful connection v1.png|border|frameless|840x840px]] | [[File:Networking rut configuration example RMS API successful connection v1.png|border|frameless|840x840px]] | ||
Revision as of 10:02, 29 June 2022
Introduction
Using the RMS API allows users to automate tasks and integrate RMS into their solutions. In this guide, an example will be provided that step-by-step shows a way to apply the RMS API to create and fetch RMS Connect links.
Such an application could be used to integrate RMS connect link generation into your solution, which would allow you to access devices faster and from a native device control solution.
All documentation of the RMS API can be found here - https://developers.rms.teltonika-networks.com/
This example only includes using Personal Access Tokens to use the API. The RMS API also allows for Application Authentication, used specifically in applications that can use RMS as an OAuth provider.
Two-Factor Authentication
Firstly, to create a Personal Access Token, your account must have Two-Factor Authentication enabled.
This can be done by going to your RMS Account settings and then the Security page. Any Authentication type (other than None) is viable.
Once Two-Factor authentication is enabled, you can then head over to the API → Access tokens page of your Account settings to begin creating a Personal Access token.
Add a new access token
Once there, simply press Add new access token.
Next, input a name for this access token and select the necessary Scopes. Scopes are permissions – what the access token will be capable of doing in your account. For this example, we will be selecting these scopes:
- devices:read
- device_remoce_access:read
- device_remoce_access:write
This will give the specific RMS API token the rights to read information about devices, and create and read information about RMS connect devices. After selecting the necessary scopes, press Save Personal Access Token – you will be shown a table containing your Personal Access Token. WARNING: This is the only time the created access token will be shown, make sure to copy it, as you will not be able to see it again.
Now that we have the access token, we can now use the RMS API. All information about each API endpoint can be found in the API reference.
There are multiple ways to use an API, for this example, we will be using Postman.
Setting up Postman
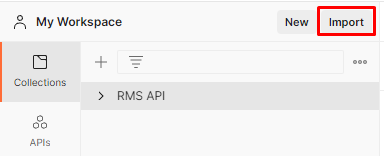
To start using post efficiently you can download the RMS API Reference YAML file which you will be able to upload to your Postman desktop application by simply clicking the import button in the desktop app and then uploading the downloaded YAML file.
Adding RMS API access token to Postman
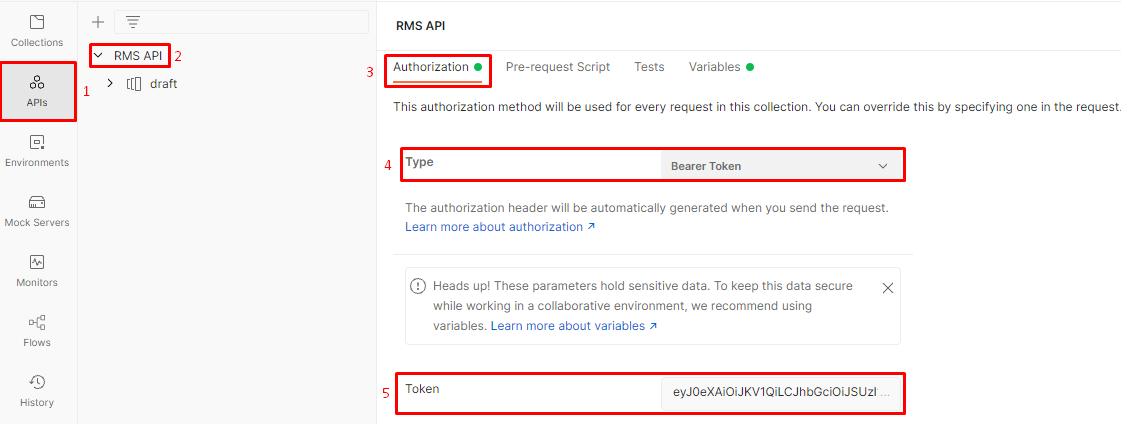
After that, you will be able to set authorization for RMS API from Postman. To do this:
- Click on the API button;
- Select "RMS API" from the list;
- Go to the "Authorizations" tab;
- Select Type as "Bearer Token";
- Enter your saved RMS API token to the Token field;
Setting up authorization for API calls
This will allow us to copy in Bearer token in one place, which API calls will be able to inherit. To set this up, whenever you open a new API call, go to the Authorization tab and select the Type as "Inherit from parent".
Searching for API calls
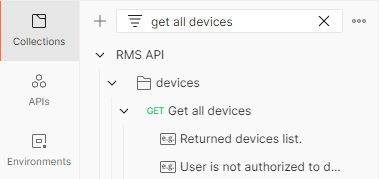
To follow this configuration example more easily, you can search for all of the API calls in the list:
Getting the device ID in RMS
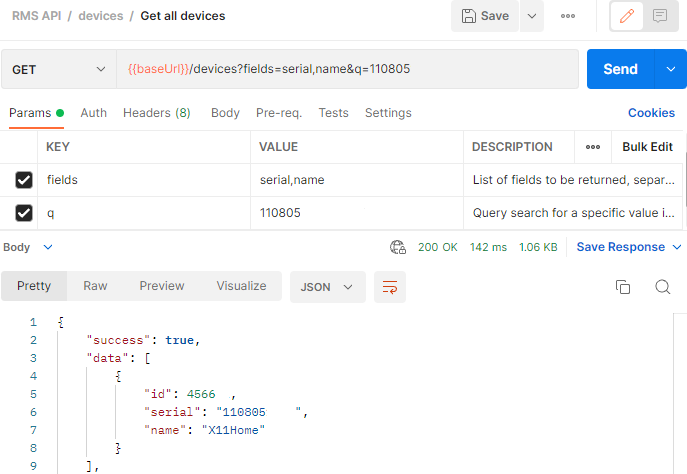
To get the ID of the device, for which we will want to generate RMS connect remote accesses and generate links for them, we first need to execute GET /devices API call called Get all device in the "Postman" collection list.
To get the RMS device ID we need to make this call with API call keys: fields and q. Fields will make it so that the response will only contain fields which we entered and q will make it so that only the device with entered serial number we entered is outputted.
The parameters and the response can be seen in the following image:
Field "id" in the response string is the device ID in RMS.
Adding a new remote device
This section will tell you how to a new remote device to RMS Connect.
To add a new remote device we will need:
- Device ID of Teltonika Networks device in RMS;
- LAN IP address of the device we will be creating the remote to;
- The port that is used to reach that service;
- Name of the protocol. The currently supported protocols are:
- HTTPS
- HTTP
- SFTP
- RDP
- SSH
- Telnet
The call needed to add a remote access device/service is Post /devices/remote/access and can be found by name Create a remote access configuration in the collection list. This API call only needs to have a quest body and no keys. An example request body to add remote access to the router WebUI and the response after sending the call:
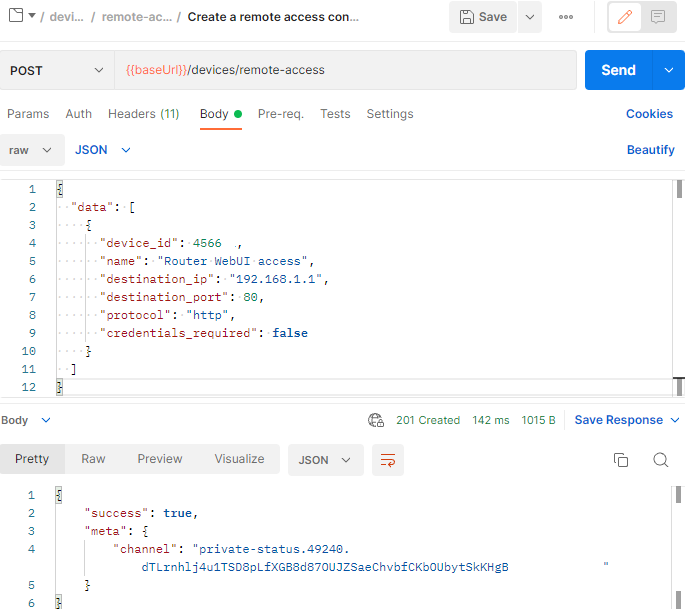
This will create a remote access configuration for which we will be able to generate RMS Connect links to access the devices and/or services remotely.
NOTE: It is recommended to use unique names for each remote access configuration within each router to allow for better management of remote access configurations.
Getting the remote access ID
After the creation of the remote access configuration, it was assigned a unique ID, which we need to know, to be able to generate links to that specific remote access.
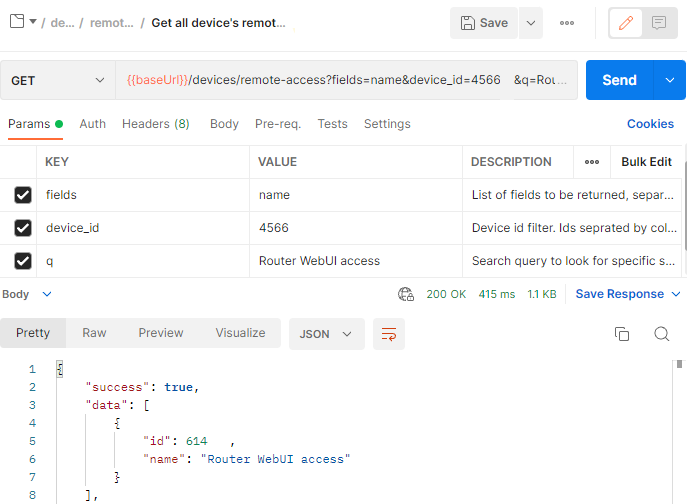
For this process API call GET /devices/remote-access and in the API call collection it is called Get all device's remote access configurations. To get the remote access ID for the newly created remote access configuration, the best way would be to filter by the device ID and the name of your new remote access configuration.
An example of the API call can be seen below, the remote access id will be shown in the field called "id".
Generation of RMS Connect link
When the remote access ID is known, we can generate the remote access link with the RMS API call POST /devices/connect that in the API collection is called Start an RMS Connect session. This call will require both the variable keys and the request body.
The only key required is access_id which will be used to identify for which remote access configuration the link will be created.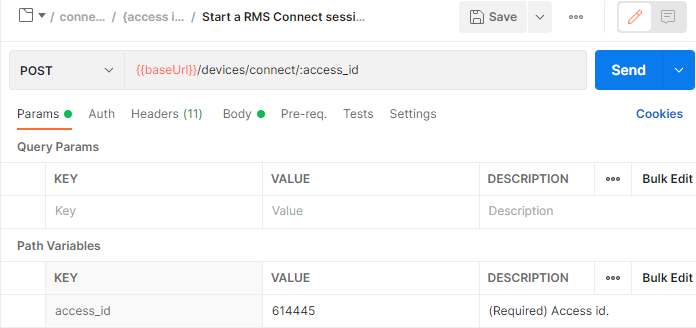
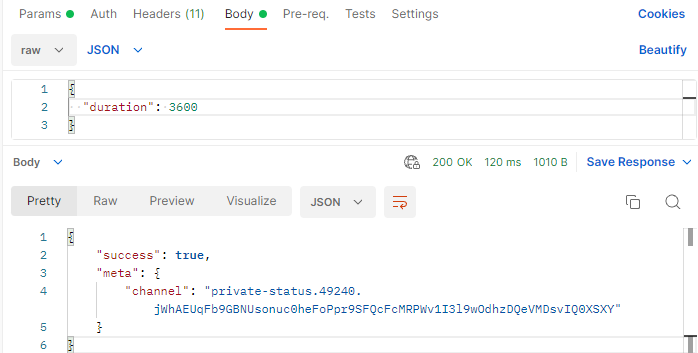
The request body needs to contain the duration in seconds for how long the link will be available. There is no limit to the maximum value but note, that the time standard has some limits.
After this call is completed the RMS connect link is now generated.
Getting the remote access link
After the link has been created, we can use the RMS API call GET /devices/connect/:access_id/sessions which in the API collection is called Get RMS Connect sessions. This call will display all of the links that are generated from the specified remote access ID. Field Active will make it so only active links are outputted for the access_id that is provided.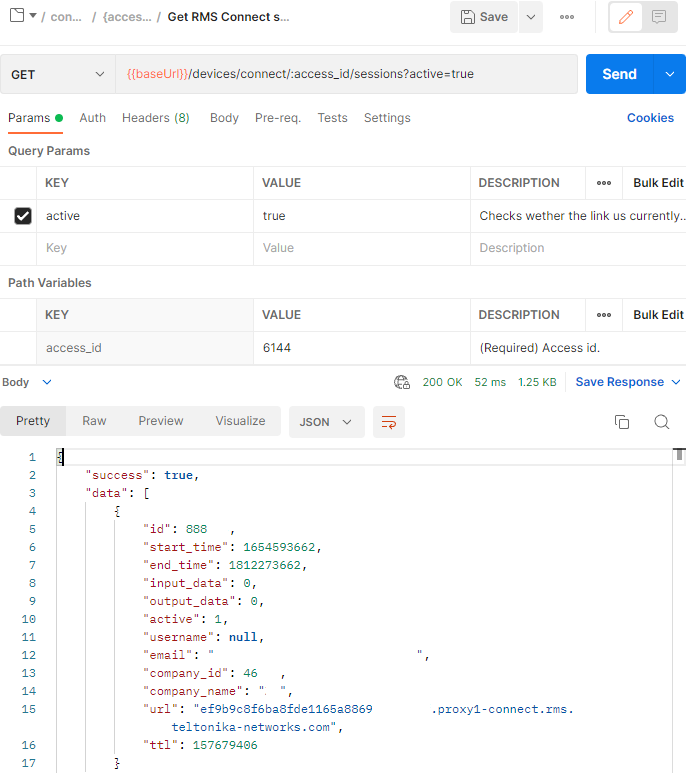
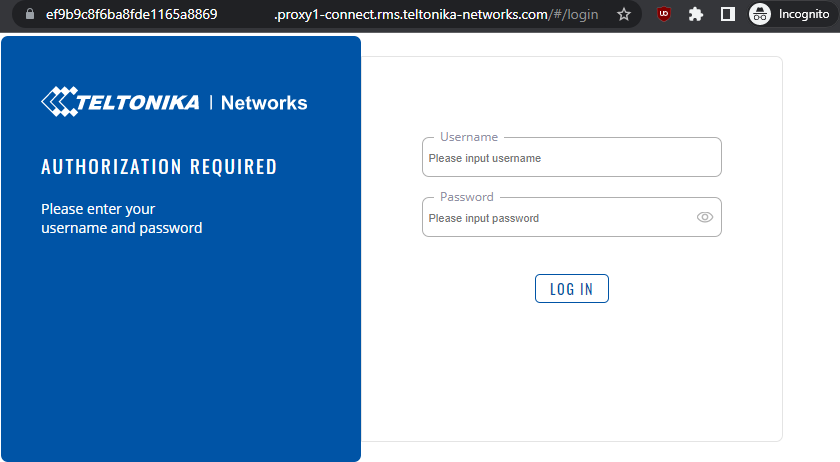
Congratulations, you can now access your remote device using the link you generated using RMS API.


