RMS Task Manager: Difference between revisions
mNo edit summary |
mNo edit summary |
||
| (6 intermediate revisions by the same user not shown) | |||
| Line 4: | Line 4: | ||
[[File:RMS manual task manager location v1.png]] | [[File:RMS manual task manager location v1.png]] | ||
===Introduction=== | ===Introduction=== | ||
| Line 11: | Line 12: | ||
This article will provide information on what is needed in order to start using '''RMS Task Manager''' as well as configuration examples with step-by-step instructions for different usage scenarios. | This article will provide information on what is needed in order to start using '''RMS Task Manager''' as well as configuration examples with step-by-step instructions for different usage scenarios. | ||
==Creating a new Task Group== | ==Creating a new Task Group== | ||
| Line 45: | Line 39: | ||
****'''Stop task group on failure''' - if the box is unchecked, next task will be executed even if the current one fails | ****'''Stop task group on failure''' - if the box is unchecked, next task will be executed even if the current one fails | ||
*'''Add additional task +''' - used to add another task to this specific task group | *'''Add additional task +''' - used to add another task to this specific task group | ||
==Executing | |||
==Executing Task Groups== | |||
Once task groups are created, they will appear inside Task Manager configuration window like so: | Once task groups are created, they will appear inside Task Manager configuration window like so: | ||
| Line 59: | Line 55: | ||
Once the task group finishes executing tasks, a status message will be shown whether the task group finished with all tasks completed. | Once the task group finishes executing tasks, a status message will be shown whether the task group finished with all tasks completed. | ||
==Editing Task Groups== | |||
Task groups can be edited by clicking '''"Edit group tasks"''' button, which is located in the Task manager configuration menu Actions column: | |||
[[File:RMS manual Task manager deleting tasks v1.png]] | |||
==Deleting Task Groups== | |||
Task groups can be deleted by clicking '''"Remove group"''' button, which is located in the Task manager configuration menu Actions column: | |||
[[File:RMS manual Task manager removing tasks v1.png]] | |||
==Configuration Examples== | ==Configuration Examples== | ||
===Setting Mobile Data Limit=== | |||
---- | |||
In this example, we will set mobile data limit on SIM1 interface. We will achieve this by creating new Task group in RMS Task Manager and using Command as a task type. | |||
*Create a new task group by clicking '<nowiki/>'''ADD NEW TASK GROUP'''' button inside Task Manager configuration window. | |||
*Define Task group name, select Command as a task type on the first task and insert the following text into Command field: | |||
''uci set quota_limit.mob1s1a1.enabled='1''' | |||
*Click '<nowiki/>'''ADD ADDITIONAL TASK'''' button at<nowiki/> the bottom of the window to add a second task, make settings identical to the first task and insert the following command into the Command field (this will set the mobile limit to 2GB or 2048MB): | |||
''uci set quota_limit.mob1s1a1.data_limit='2048''' | |||
*Add another task with identical setti<nowiki/>ngs and insert the following text into the Command field (this will set the period of the data limit to 1 day: | |||
''uci set quota_limit.mob1s1a1.period='1''' | |||
*Add another task with identical setti<nowiki/>ngs and insert the following text into the Command field (this will commit the changes and restart the mobile interface): | |||
''uci commit && ifdown mob1s1a1 && ifup mob1s1a1'' | |||
Here is a review of all 4 tasks in this task group: | |||
[[File:RMS manual Task manager configuration example data limit v1.png|border|523x523px]] | |||
===Installing Additional Packages=== | |||
---- | |||
In this example, we will install an additional package to the device using opkg commands as well as generate and download a log file to see if package was installed successfully. For this example, we will install DNP3 package. | |||
*Create a new task group by clicking '<nowiki/>'''ADD NEW TASK GROUP'''' button inside Task Manager configuration window. | |||
* Define Task group name, select Command as a task type on the first task and insert the following text into Command field: | |||
''opkg update'' | |||
*Set Timeout to 30 seconds, since updating package repository might take longer than the default 10 seconds. | |||
* Add "1" to acceptable codes, since while updating repositories, some links might be unavailable, this is done to avoid getting an error message while executing a task. Alternatively, you can uncheck "Stop task group on failure" box to achieve the same result. | |||
*Configuration of the first task should look like the following image: | |||
[[File:RMS manual Task manager configuration example package v1.png]] | |||
*Click '''ADD ADDITIONAL TASK''' button at the bottom of the window to add a second task, once again select Command as a task type and insert the following text into command field: | |||
''opkg install dnp3 >> /tmp/opkglog.log'' | |||
*This will install the package as well as save the installation logs to the defined log file. | |||
*Set the timeout to 30 seconds, since the installation process can take longer than the default 10 seconds. | |||
*Second task configuration should look like the following image: | |||
[[File:RMS manual Task manager configuration example package task2 v1.png]] | |||
*Now we will download the generated log file to read the logs of installation. | |||
*Click '''ADD ADDITIONAL TASK''' button at the bottom of the window to add a second task, this time, select Download file as a task type and inser the following path to the '''File path in device''' field: | |||
''/tmp/opkglog.log'' | |||
*Configuration of the third task should look like the following image: | |||
[[File:RMS manual Task manager configuration example package task3 v1.png]] | |||
'''Note:''' Downloaded files can be found by navigating to '''''Management → Files''''' | |||
Revision as of 10:08, 22 September 2022
Main Page > IoT Platforms > RMS > RMS Manual > RMS Management > RMS Task ManagerSummary
RMS Task Manager is a remote scripting tool with a user friendly graphics interface integrated into RMS platform. It is located in the Management top control menu found under Devices section.

Introduction
Using Task Manager allows users to create Task Groups which can be executed on demand and for as many devices simultaneously as required. Task groups allows us to automate the process of downloading/uploading/executing. Each task group can consist of a lot of smaller tasks with different types, timeout intervals and acceptable return code configurations.
This article will provide information on what is needed in order to start using RMS Task Manager as well as configuration examples with step-by-step instructions for different usage scenarios.
Creating a new Task Group
New task group can be created by clicking on the "ADD NEW TASK GROUP" button inside Task Manager configuration menu.

On a new task group window, settings of this task group and its tasks can be edited:
- Task group name - it is a name of your entire Task group
- Task name - this field names one of your tasks inside this specific task group
- Task type - select one type from the drop down menu for this specific task
- Command
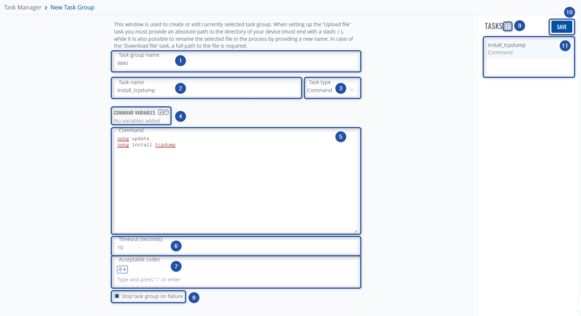
- Command variables - when set, value of the key can be changed during the execution of the task group. Press the "+" button to create a new variable
- Key - variable key to be written into the command
- Value - default value of the key
- Description - this is an optional field, can be used to clarify the purpose of the variable
- Command - command that needs to be executed on the device
- Timeout(seconds) - set a time limit of how long the task is allowed to take before timeout
- Acceptable codes - add return codes that are accepted as 'non failure', which means the task will count as completed without fail
- Stop task group on failure - if the box is unchecked, next task will be executed even if the current one fails
- Command variables - when set, value of the key can be changed during the execution of the task group. Press the "+" button to create a new variable
- Upload file
- File to upload - select file to be uploaded to the device
- Target file path - location of where this file should be uploaded
- Stop task group on failure - if the box is unchecked, next task will be executed even if the current one fails
- Download file
- File path in device - location of the file in the device to be downloaded
- Stop task group on failure - if the box is unchecked, next task will be executed even if the current one fails
- Command
- Add additional task + - used to add another task to this specific task group

Executing Task Groups
Once task groups are created, they will appear inside Task Manager configuration window like so:

To execute a task group, devices on which this task group needs to be executed on must be selected by checking the boxes in your device list.
Note: Only devices that are online at the moment can be selected.
Once devices are selected, access the task manager configuration menu shown in the image above (Devices → Management → Task Manager), once again check the boxes of the devices on which task group needs to be executed and press "Execute task group for selected devices" button in the Actions column. A new window will open where information of the task group can be reviewed before pressing "Execute Task Group" button.

Once the task group finishes executing tasks, a status message will be shown whether the task group finished with all tasks completed.
Editing Task Groups
Task groups can be edited by clicking "Edit group tasks" button, which is located in the Task manager configuration menu Actions column:

Deleting Task Groups
Task groups can be deleted by clicking "Remove group" button, which is located in the Task manager configuration menu Actions column:

Configuration Examples
Setting Mobile Data Limit
In this example, we will set mobile data limit on SIM1 interface. We will achieve this by creating new Task group in RMS Task Manager and using Command as a task type.
- Create a new task group by clicking 'ADD NEW TASK GROUP' button inside Task Manager configuration window.
- Define Task group name, select Command as a task type on the first task and insert the following text into Command field:
uci set quota_limit.mob1s1a1.enabled='1'
- Click 'ADD ADDITIONAL TASK' button at the bottom of the window to add a second task, make settings identical to the first task and insert the following command into the Command field (this will set the mobile limit to 2GB or 2048MB):
uci set quota_limit.mob1s1a1.data_limit='2048'
- Add another task with identical settings and insert the following text into the Command field (this will set the period of the data limit to 1 day:
uci set quota_limit.mob1s1a1.period='1'
- Add another task with identical settings and insert the following text into the Command field (this will commit the changes and restart the mobile interface):
uci commit && ifdown mob1s1a1 && ifup mob1s1a1
Here is a review of all 4 tasks in this task group:

Installing Additional Packages
In this example, we will install an additional package to the device using opkg commands as well as generate and download a log file to see if package was installed successfully. For this example, we will install DNP3 package.
- Create a new task group by clicking 'ADD NEW TASK GROUP' button inside Task Manager configuration window.
- Define Task group name, select Command as a task type on the first task and insert the following text into Command field:
opkg update
- Set Timeout to 30 seconds, since updating package repository might take longer than the default 10 seconds.
- Add "1" to acceptable codes, since while updating repositories, some links might be unavailable, this is done to avoid getting an error message while executing a task. Alternatively, you can uncheck "Stop task group on failure" box to achieve the same result.
- Configuration of the first task should look like the following image:

- Click ADD ADDITIONAL TASK button at the bottom of the window to add a second task, once again select Command as a task type and insert the following text into command field:
opkg install dnp3 >> /tmp/opkglog.log
- This will install the package as well as save the installation logs to the defined log file.
- Set the timeout to 30 seconds, since the installation process can take longer than the default 10 seconds.
- Second task configuration should look like the following image:

- Now we will download the generated log file to read the logs of installation.
- Click ADD ADDITIONAL TASK button at the bottom of the window to add a second task, this time, select Download file as a task type and inser the following path to the File path in device field:
/tmp/opkglog.log
- Configuration of the third task should look like the following image:

Note: Downloaded files can be found by navigating to Management → Files