RMS Files: Difference between revisions
m (JustasB moved page Draft:RMS Files to RMS Files) |
No edit summary |
||
| (One intermediate revision by the same user not shown) | |||
| Line 1: | Line 1: | ||
__TOC__ | __TOC__ | ||
==Summary== | ==Summary== | ||
The '''Files''' section is located in the [[ | The '''Files''' section is located in the [[RMS Administration|Administration]] section. This is where device files are uploaded, and exported files from the Export top menu section are stored. This Files section includes firmware, (periodic) backup, event logs, task manager and troubleshoot files. For management purposes, you can also set a description for files. | ||
==Overview== | ==Overview== | ||
[[File:Rmsfiles2.png|border|class=tlt-border|1100x700px]] | [[File:Rmsfiles2.png|border|class=tlt-border|1100x700px]] | ||
| Line 12: | Line 12: | ||
==Uploading files== | ==Uploading files== | ||
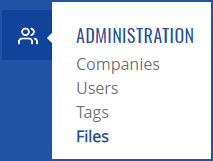
# To upload file(s) go to the [[ | # To upload file(s) go to the [[RMS Administration|Administration]], on the Left sidebar panel and click on '''Files'''. | ||
# Move your mouse cursor to the top menu, and click on '''<span style="color:#0455a4">+ ADD</span>''' | # Move your mouse cursor to the top menu, and click on <big>'''<span style="color:#0455a4">+ ADD</span>'''</big> | ||
# In the new dialog window, select the company from the drop-down list. | # In the new dialog window, select the company from the drop-down list. | ||
# (Optional) you can enter a short description for your file. | # (Optional) you can enter a short description for your file. | ||
| Line 32: | Line 32: | ||
[[File:Rms manual management files remove dialog v1.png]] | [[File:Rms manual management files remove dialog v1.png]] | ||
# To remove file(s) go to the [[ | # To remove file(s) go to the [[RMS Administration|Administration]], on the Left sidebar panel and click on '''Files'''. | ||
# Select which file(s) you'd like to remove. | # Select which file(s) you'd like to remove. | ||
# A Remove selected file(s) button will appear left of the search bar. | # A Remove selected file(s) button will appear left of the search bar. | ||
Latest revision as of 15:18, 11 January 2023
Main Page > IoT Platforms > RMS > RMS Manual > RMS Administration > RMS FilesSummary
The Files section is located in the Administration section. This is where device files are uploaded, and exported files from the Export top menu section are stored. This Files section includes firmware, (periodic) backup, event logs, task manager and troubleshoot files. For management purposes, you can also set a description for files.
Overview
- Upload new file
- Remove selected ones.
- Search and filter through existing ones by their name, description, filter by their type, company, and device model.
- Download the file from RMS.
- Additionally, you can configure your table view.
Uploading files
- To upload file(s) go to the Administration, on the Left sidebar panel and click on Files.
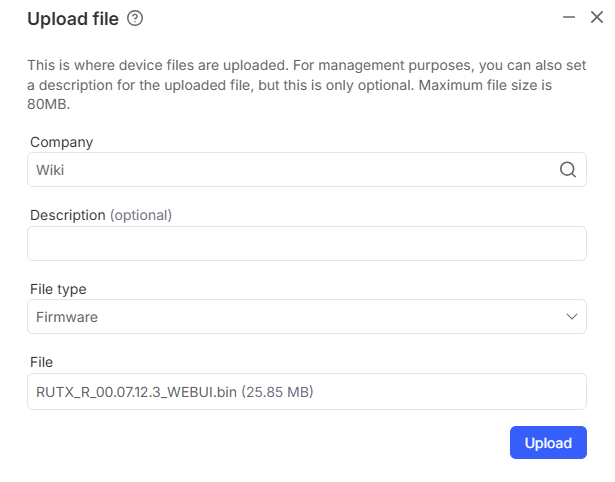
- Move your mouse cursor to the top menu, and click on + ADD
- In the new dialog window, select the company from the drop-down list.
- (Optional) you can enter a short description for your file.
- Select the file type.
- Then select the file that you wish to upload.
- Click the Upload button. Your file will appear at the top of the Files table.
You can upload these types of files:
- Firmware
- Configuration
- Task manager file
Removing files
- To remove file(s) go to the Administration, on the Left sidebar panel and click on Files.
- Select which file(s) you'd like to remove.
- A Remove selected file(s) button will appear left of the search bar.
- In the new dialog window, you must confirm the file(s) removal by clicking on the Confirm button.


