Sending emails via command line: Difference between revisions
(→SSH) |
No edit summary |
||
| (13 intermediate revisions by 5 users not shown) | |||
| Line 20: | Line 20: | ||
==Logging in to the router== | ==Logging in to the router== | ||
Once you have all the necessary email information, choose your | Once you have all the necessary email information, choose your favorite method of sending command line queries or the one that is currently available to you and log in to your router accordingly. The most common methods of doing so are '''[[CLI]]'''('''Command Line Interface''') and '''SSH'''. | ||
'''Note''': in further examples of this guide we will be demonstrating how to send email using SSH. Feel free to follow the guide step by step whichever method you choose, because the commands used are identical and the only thing that is different is the GUI (Graphical User Interface). | '''Note''': in further examples of this guide we will be demonstrating how to send email using SSH. Feel free to follow the guide step by step whichever method you choose, because the commands used are identical and the only thing that is different is the GUI (Graphical User Interface). | ||
===CLI=== | ===CLI=== | ||
---- | ---- | ||
CLI can be reached through the router's WebUI. To reach the router's WebUI, simply enter the router's LAN IP address ('''192.168.1.1''' by default) into your browser's URL bar and press "Enter". Next, type in the router's login information (user name: '''admin'''; password: '''admin01''' by default) and click "Login": | * CLI can be reached through the router's WebUI. To reach the router's WebUI, simply enter the router's LAN IP address ('''192.168.1.1''' by default) into your browser's URL bar and press "Enter". Next, type in the router's login information (user name: '''admin'''; password: '''admin01''' by default) and click "Login": | ||
[[File:Rut login page | [[File:Rut login page example.png|border|class=tlt-border]] | ||
---- | ---- | ||
Next, navigate to the ''' | *Next, navigate to the '''System''' → '''Maintenance''' → '''CLI''' option from the drop-down list: | ||
[[File: | [[File:Send_email_via_cli7.8.png|border|class=tlt-border]] | ||
---- | ---- | ||
In the next window, type in the user name '''root''' and press "Enter". Then type in the router's password (same one you used for logging in to the router), press "Enter" and you should be greeted with a window such as this: | * In the next window, type in the user name '''root''' and press "Enter". Then type in the router's password (same one you used for logging in to the router), press "Enter" and you should be greeted with a window such as this: | ||
[[File: | [[File:CLI rutos v4.png|border|class=tlt-border]] | ||
Once this is done, you will able to execute commands via CLI. | Once this is done, you will able to execute commands via CLI. | ||
| Line 43: | Line 43: | ||
===SSH=== | ===SSH=== | ||
---- | ---- | ||
If you are using a Windows OS, you can use the free '''PuTTY''' app to login to a RUTxxx router via SSH; if you're using a Linux based OS, just use the '''Terminal''' app. In both cases you will need to know three things: the router's LAN IP address, user name and password. The default LAN IP address for all RUTxxx routers is '''192.168.1.1'''; the default login information is user name: '''root'''; password: '''admin01''' (NOTE: the user name used for SSH connections (i.e., root) is not the same as the user name used to login to the router's WebUI (i.e., admin)). | |||
---- | |||
* '''Linux''': open PuTTY; enter the router's LAN IP address into the '''Host Name (or IP address)''' field, specify '''port 22''', select SSH Connection type and click '''Open''': | |||
[[File:Putty login 1 v2.PNG]] | [[File:Putty login 1 v2.PNG]] | ||
---- | ---- | ||
* In the next window type in the user name, press "Enter", type in the router's admin password and press "Enter" again. You should be greeted with a message such as this: | |||
[[File:Putty login v3.png|alt=]] | |||
Once this is done, you will able to execute commands via SSH. | |||
---- | |||
* '''Linux''': open a new Terminal window, type '''ssh [email protected]''' and press "Enter". If this is your first time logging in, you might be asked to clarify whether you really want to login. In that case, just type '''yes''' and press "Enter". Then type in the router's admin password and press "Enter" to finish the login process: | |||
[[File: | [[File:SSH linux login v3.png|alt=]] | ||
Once this is done, you will able to execute commands via SSH. | Once this is done, you will able to execute commands via SSH. | ||
| Line 71: | Line 71: | ||
This method is useful when sending short emails. As an example, lets send an email containing the message "'''Hello, JustTesting'''", from the hypothetical address '''[email protected]''' to '''[email protected]''' using Gmail's SMTP settings: | This method is useful when sending short emails. As an example, lets send an email containing the message "'''Hello, JustTesting'''", from the hypothetical address '''[email protected]''' to '''[email protected]''' using Gmail's SMTP settings: | ||
:~# echo -e "subject:Test\nfrom:[email protected]\nHello,\n\nJustTesting" | sendmail -v -H "exec openssl s_client -quiet -connect smtp.gmail.com:587 - | :~# echo -e "subject:Test\nfrom:[email protected]\nHello,\n\nJustTesting" | sendmail -v -H "exec openssl s_client -quiet -connect smtp.gmail.com:587 -tls1_3 -starttls smtp" -f [email protected] -au"[email protected]" -ap"senders.email.password" [email protected] | ||
Let's examine this command in detail. First, this part: | Let's examine this command in detail. First, this part: | ||
| Line 92: | Line 92: | ||
So in short, the part beginning with '''echo''' and ending just before the column ('''|''') represents the email's header and body of text. Now lets examine the next part (the one that begins after the column): | So in short, the part beginning with '''echo''' and ending just before the column ('''|''') represents the email's header and body of text. Now lets examine the next part (the one that begins after the column): | ||
'''sendmail <span style=color:green>-v -H</span> "<span style=color:blue>exec openssl s_client -quiet -connect smtp.gmail.com:587 - | '''sendmail <span style=color:green>-v -H</span> "<span style=color:blue>exec openssl s_client -quiet -connect smtp.gmail.com:587 -tls1_3 -starttls smtp</span>" <span style=color:red>-f [email protected]</span> <span style=color:purple>-au"[email protected]" -ap"senders.email.password"</span> <span style=color:brown> [email protected]</span>''' | ||
* <span style=color:green>'''-v'''</span> - verbose mode | * <span style=color:green>'''-v'''</span> - verbose mode | ||
* <span style=color:green>'''-H'''</span> - runs connection helper; connection helper allows you to specify additional commands regarding the email (in this case, OpenSSL connection information) | * <span style=color:green>'''-H'''</span> - runs connection helper; connection helper allows you to specify additional commands regarding the email (in this case, OpenSSL connection information) | ||
* <span style=color:blue>'''exec openssl s_client -quiet -connect smtp.gmail.com:587 - | * <span style=color:blue>'''exec openssl s_client -quiet -connect smtp.gmail.com:587 -tls1_3 -starttls smtp'''</span> - OpenSSL connection information; <span style=color:blue>'''smtp.gmail.com:587'''</span> specifies the SMTP server and port. Replace this with email service provider's SMTP settings | ||
* <span style=color:red>'''-f [email protected]'''</span> - sender's email address. This should correspond with the '''from:''' part in the echo command | * <span style=color:red>'''-f [email protected]'''</span> - sender's email address. This should correspond with the '''from:''' part in the echo command | ||
* <span style=color:purple>'''-au"[email protected]" -ap"senders.email.password"'''</span> - what follows after <span style=color:purple>'''-au'''</span> inside the quotation marks is the email service's login user name and by analogy <span style=color:purple>'''-ap'''</span> specifies the email service's login password (<span style=color:purple>'''[email protected]'''</span> and <span style=color:purple>'''senders.email.password'''</span>, in this case) | * <span style=color:purple>'''-au"[email protected]" -ap"senders.email.password"'''</span> - what follows after <span style=color:purple>'''-au'''</span> inside the quotation marks is the email service's login user name and by analogy <span style=color:purple>'''-ap'''</span> specifies the email service's login password (<span style=color:purple>'''[email protected]'''</span> and <span style=color:purple>'''senders.email.password'''</span>, in this case) | ||
| Line 109: | Line 109: | ||
This next method is superior when sending longer messages. Instead of using the echo command, we'll store our email header and body information into a text file. Just as in the example above, let's send an email from the hypothetical address '''[email protected]''' to '''[email protected]''' using Gmail's SMTP settings, but without using echo: | This next method is superior when sending longer messages. Instead of using the echo command, we'll store our email header and body information into a text file. Just as in the example above, let's send an email from the hypothetical address '''[email protected]''' to '''[email protected]''' using Gmail's SMTP settings, but without using echo: | ||
:~# sendmail -v -H "exec openssl s_client -quiet -connect smtp.gmail.com:587 - | :~# sendmail -v -H "exec openssl s_client -quiet -connect smtp.gmail.com:587 -tls1_3 -starttls smtp" <span style=color:red>'''</tmp/mail.txt'''</span> -f [email protected] -au"[email protected]" -ap"pass" [email protected] | ||
As you can see, instead of echo, we're using <span style=color:red>'''</tmp/mail.txt'''</span>, which is the path to the '''mail.txt''' file that stores the email's header and body. This file does not exist in the router, therefore, you should create it yourself. To create a file, use the '''touch''' command: | As you can see, instead of echo, we're using <span style=color:red>'''</tmp/mail.txt'''</span>, which is the path to the '''mail.txt''' file that stores the email's header and body. This file does not exist in the router, therefore, you should create it yourself. To create a file, use the '''touch''' command: | ||
| Line 135: | Line 135: | ||
==External links== | ==External links== | ||
'''https://www.putty.org/''' - PuTTY | * '''https://www.putty.org/''' - PuTTY downloads page | ||
* '''https://wiki.teltonika-networks.com/view/Sending_emails_via_command_line_RutOS''' - Guide for RutOS firmware | |||
[[Category:Email]] | |||
Latest revision as of 08:19, 22 August 2024
Main Page > General Information > Configuration Examples > Email > Sending emails via command lineIntroduction
RUTxxx routers support the possibility of sending emails via command line. While you can already configure automated sending of emails via the router's WebUI, these configurations are usually restricted to specific functions and services. Sending emails via command line provides you with the most flexible options in customization and automatization for email related tasks.
This chapter provides a guide on how to send emails via command line using RUTxxx routers.
Email service provider parameters
First off, you'll need to be aware of some information about your email service (the one you'll be using to send the emails). The parameters in question are: SMTP Server, SMTP Server port, whether it uses SSL/TLS, login username and password. You can find your email service provider's SMTP Server information online. For example, Gmail's SMTP settings are:
Gmail SMTP server address        smtp.gmail.com
Gmail SMTP username              Full Gmail address (e.g. [email protected])
Gmail SMTP password              Gmail password
Gmail SMTP port (TLS)            587
Gmail SMTP port (SSL)            465
Gmail SMTP TLS/SSL required      yes
You probably already know your username and password and you can find the rest of the settings with a quick Internet search. Just type "email_provider_name smtp settings" into the search field of your preferred search engine.
Logging in to the router
Once you have all the necessary email information, choose your favorite method of sending command line queries or the one that is currently available to you and log in to your router accordingly. The most common methods of doing so are CLI(Command Line Interface) and SSH.
Note: in further examples of this guide we will be demonstrating how to send email using SSH. Feel free to follow the guide step by step whichever method you choose, because the commands used are identical and the only thing that is different is the GUI (Graphical User Interface).
CLI
- CLI can be reached through the router's WebUI. To reach the router's WebUI, simply enter the router's LAN IP address (192.168.1.1 by default) into your browser's URL bar and press "Enter". Next, type in the router's login information (user name: admin; password: admin01 by default) and click "Login":
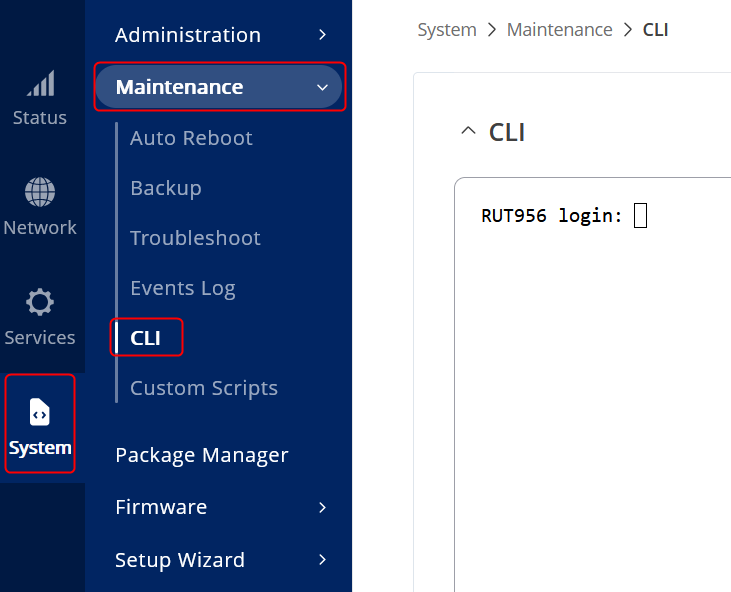
- Next, navigate to the System → Maintenance → CLI option from the drop-down list:
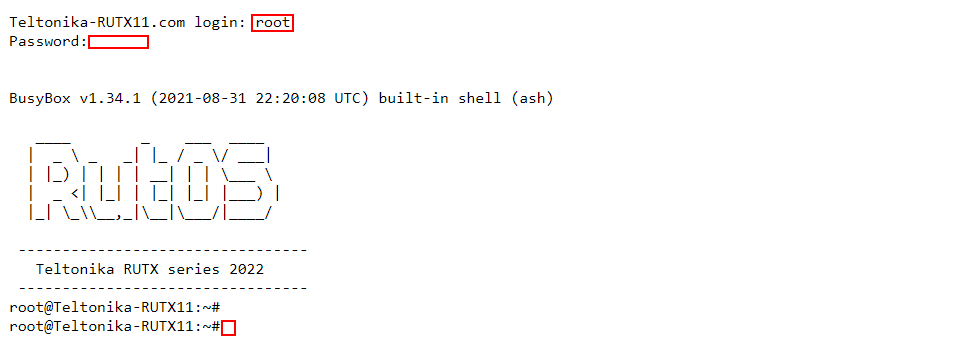
- In the next window, type in the user name root and press "Enter". Then type in the router's password (same one you used for logging in to the router), press "Enter" and you should be greeted with a window such as this:
Once this is done, you will able to execute commands via CLI.
SSH
If you are using a Windows OS, you can use the free PuTTY app to login to a RUTxxx router via SSH; if you're using a Linux based OS, just use the Terminal app. In both cases you will need to know three things: the router's LAN IP address, user name and password. The default LAN IP address for all RUTxxx routers is 192.168.1.1; the default login information is user name: root; password: admin01 (NOTE: the user name used for SSH connections (i.e., root) is not the same as the user name used to login to the router's WebUI (i.e., admin)).
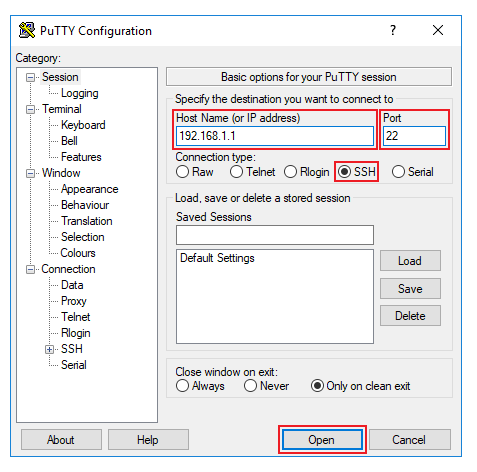
- Linux: open PuTTY; enter the router's LAN IP address into the Host Name (or IP address) field, specify port 22, select SSH Connection type and click Open:
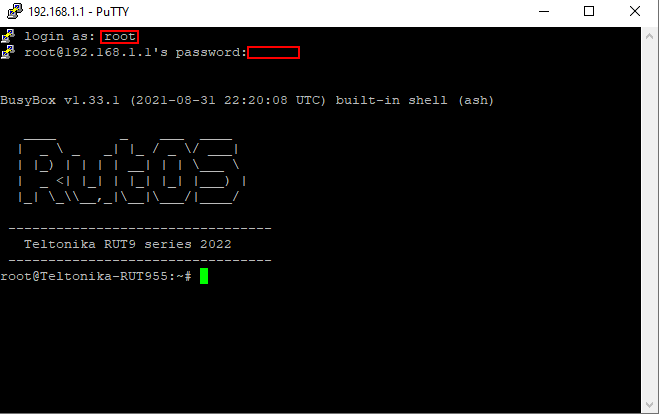
- In the next window type in the user name, press "Enter", type in the router's admin password and press "Enter" again. You should be greeted with a message such as this:
Once this is done, you will able to execute commands via SSH.
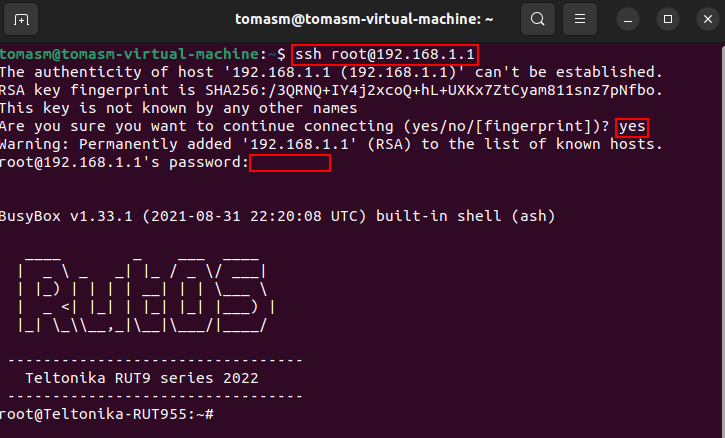
- Linux: open a new Terminal window, type ssh [email protected] and press "Enter". If this is your first time logging in, you might be asked to clarify whether you really want to login. In that case, just type yes and press "Enter". Then type in the router's admin password and press "Enter" to finish the login process:
Once this is done, you will able to execute commands via SSH.
Sending emails
RUTxxx routers use the sendmail program to send emails. sendmail is a very simple MTA (Mail Transfer Agent), which implements the SMTP (Simple Mail Transfer Protocol) amongst others and can be used to transmit emails, typically on Linux dedicated or virtual servers.
There is no need to install anything else, because RUTxxx routers have sendmail implemented in their Firmware. So, if you followed all the steps above, you should be ready to send emails via command line.
Method 1
This method is useful when sending short emails. As an example, lets send an email containing the message "Hello, JustTesting", from the hypothetical address [email protected] to [email protected] using Gmail's SMTP settings:
:~# echo -e "subject:Test\nfrom:[email protected]\nHello,\n\nJustTesting" | sendmail -v -H "exec openssl s_client -quiet -connect smtp.gmail.com:587 -tls1_3 -starttls smtp" -f [email protected] -au"[email protected]" -ap"senders.email.password" [email protected]
Let's examine this command in detail. First, this part:
echo -e "subject:Test\nfrom:[email protected]\nHello,\n\nJustTesting"
- echo - prints the specified arguments to stdout
- -e - makes the echo command interpret backslash escapes (\n in this case)
- \n - the end line symbol, i.e., it indicates that the following text begins in another line. The \n part itself is not interpreted as part of the text if the -e parameter is specified.
The text highlighted in blue specifies the email's header information (excluding the recipient's address) and body of text. In our case it represents this:
Subject: Test
From: [email protected]
Body of text:
Hello,

JustTesting
So in short, the part beginning with echo and ending just before the column (|) represents the email's header and body of text. Now lets examine the next part (the one that begins after the column):
sendmail -v -H "exec openssl s_client -quiet -connect smtp.gmail.com:587 -tls1_3 -starttls smtp" -f [email protected] -au"[email protected]" -ap"senders.email.password" [email protected]
- -v - verbose mode
- -H - runs connection helper; connection helper allows you to specify additional commands regarding the email (in this case, OpenSSL connection information)
- exec openssl s_client -quiet -connect smtp.gmail.com:587 -tls1_3 -starttls smtp - OpenSSL connection information; smtp.gmail.com:587 specifies the SMTP server and port. Replace this with email service provider's SMTP settings
- -f [email protected] - sender's email address. This should correspond with the from: part in the echo command
- -au"[email protected]" -ap"senders.email.password" - what follows after -au inside the quotation marks is the email service's login user name and by analogy -ap specifies the email service's login password ([email protected] and senders.email.password, in this case)
- [email protected] - specifies the recipient's email address
To sump up, this part executes the connection to the SMTP server and sends out an email to the specified recipient.
Note: don't forget switch out the given information with your own relevant data.
Method 2
This next method is superior when sending longer messages. Instead of using the echo command, we'll store our email header and body information into a text file. Just as in the example above, let's send an email from the hypothetical address [email protected] to [email protected] using Gmail's SMTP settings, but without using echo:
:~# sendmail -v -H "exec openssl s_client -quiet -connect smtp.gmail.com:587 -tls1_3 -starttls smtp" </tmp/mail.txt -f [email protected] -au"[email protected]" -ap"pass" [email protected]
As you can see, instead of echo, we're using </tmp/mail.txt, which is the path to the mail.txt file that stores the email's header and body. This file does not exist in the router, therefore, you should create it yourself. To create a file, use the touch command:
:~# touch /tmp/mail.txt
This will create and empty text file called mail.txt in the /tmp/ directory. Feel free to name this file whatever you like.
To edit the newly create file, use the vi command:
:~# vi /tmp/mail.txt
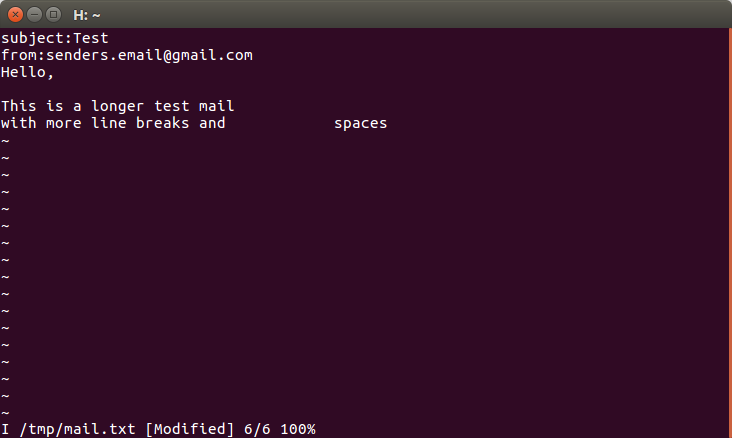
When using vi pres the i button on your keyboard to start editing. To finish editing and save changes press the "Escape" button, type :x and press "Enter":
Additional information and notes
The most important thing to remember when following this guide, is to replace the information in the given commands with data that is relevant to you.
Furthermore, a lot of email service providers will block sign-in attempts from programs like sendmail. To get around this, enable Access for less secure apps on your email account. Doing this will be different for different services. We suggest that you use an Internet search engine for information on how to enable Access for less secure apps on your email. In any case, it should be as simple as flipping an ON/OFF switch.
WARNING: enabling Access for less secure apps may leave your email vulnerable to attacks from other parties! Use it at your own risk.
External links
- https://www.putty.org/ - PuTTY downloads page
- https://wiki.teltonika-networks.com/view/Sending_emails_via_command_line_RutOS - Guide for RutOS firmware


