Template:Networking rutos manual package manager: Difference between revisions
Gytispieze (talk | contribs) m Text replacement - "\{\{Template: Networking_rutos_manual_fw_disclosure (.*) (.*) (.*) (.*) \}\}" to "{{Template: Networking_device_manual_fw_disclosure | series = {{{series}}} | name = {{{name}}} | fw_version ={{Template: Networking_device_manual_latest_fw | series = {{{series}}} | name = {{{name}}} }} }}" |
No edit summary |
||
| (3 intermediate revisions by 3 users not shown) | |||
| Line 7: | Line 7: | ||
}} | }} | ||
}} | }} | ||
{{#ifeq: {{{series}}} | RUT9 |<br><i><b>Note</b>: <b>[[{{{name}}} Package Manager (legacy WebUI)|click here]]</b> for the old style WebUI (FW version {{Template: | {{#ifeq: {{{series}}} | RUT9 |<br><i><b>Note</b>: <b>[[{{{name}}} Package Manager (legacy WebUI)|click here]]</b> for the old style WebUI (FW version {{Template: Networking_device_manual_latest_fw | series = RUT9XX}} and earlier) user manual page.</i>|}} | ||
{{#ifeq: {{{series}}} | RUT2 |<br><i><b>Note</b>: <b>[[{{{name}}} Package Manager (legacy WebUI)|click here]]</b> for the old style WebUI (FW version {{Template: | {{#ifeq: {{{series}}} | RUT2 |<br><i><b>Note</b>: <b>[[{{{name}}} Package Manager (legacy WebUI)|click here]]</b> for the old style WebUI (FW version {{Template: Networking_device_manual_latest_fw | series = RUT2XX}} and earlier) user manual page.</i>|}} | ||
==Summary== | ==Summary== | ||
The <b>Package Manager</b> is a service used to install additional software on the the device. | The <b>Package Manager</b> is a service used to install additional software on the the device. | ||
This page is an overview of the Package Manager section in {{{name}}} devices. | This page is an overview of the Package Manager section in {{{name}}} devices. | ||
==Packages== | ==Packages== | ||
| Line 23: | Line 19: | ||
The <b>Package Restore</b> section `Enable` or `Disable` automatic package installation function after firmware upgrade with keep settings. | The <b>Package Restore</b> section `Enable` or `Disable` automatic package installation function after firmware upgrade with keep settings. | ||
[[File: | [[File:Networking rutos manual package manager faq memory v2.png|border|class=tlt-border]] | ||
===Package Manager=== | ===Package Manager=== | ||
| Line 29: | Line 25: | ||
The <b>Package Manager</b> section provides the possibility to install additional software packages that are available for download from the FOTA server. To install a new service, locate the necessary package in the list, click the '+' button adjacent to it. | The <b>Package Manager</b> section provides the possibility to install additional software packages that are available for download from the FOTA server. To install a new service, locate the necessary package in the list, click the '+' button adjacent to it. | ||
<b>Note</b>: | <b>Note</b>: the picture below is just for demonstration: | ||
[[File:Networking_rutos_manual_package_manager_packages.png|border|class=tlt-border]] | [[File:Networking_rutos_manual_package_manager_packages v3.png|border|class=tlt-border]] | ||
==Upload== | ==Upload== | ||
| Line 41: | Line 37: | ||
in the [[{{{name}}} Package Downloads|Package Downloads]] page. Also it can be found by clicking on <b>''this repository''</b> link. | in the [[{{{name}}} Package Downloads|Package Downloads]] page. Also it can be found by clicking on <b>''this repository''</b> link. | ||
[[File: | [[File:Networking_rutos_manual_package_manager_upload_v3.png|border|class=tlt-border]] | ||
To install a package click the 'Browse' button and locate the package file on your computer. | To install a package click the 'Browse' button and locate the package file on your computer. | ||
| Line 59: | Line 55: | ||
Below are pictures representing <b>Authorized</b> and <b>Unauthorized</b> packages respectively. | Below are pictures representing <b>Authorized</b> and <b>Unauthorized</b> packages respectively. | ||
[[File: | [[File:Networking_rutos_manual_package_manager_authorized_package_v3.png|border|class=tlt-border]] | ||
[[File: | [[File:Networking_rutos_manual_package_manager_unauthorized_package_v3.png|border|class=tlt-border]] | ||
==FAQ== | ==FAQ== | ||
| Line 70: | Line 66: | ||
</ul> | </ul> | ||
[[File:Networking_rutos_manual_package_manager_faq_keep_settings.png|border|class=tlt-border]] | [[File:Networking_rutos_manual_package_manager_faq_keep_settings v2.png|border|class=tlt-border]] | ||
---- | ---- | ||
| Line 79: | Line 75: | ||
<li><b>A:</b> The size of each package is displayed next to its version in the package list. The current state of Flash memory is displayed in in the top-right corner of the list. Hover your mouse over it for more information.</li> | <li><b>A:</b> The size of each package is displayed next to its version in the package list. The current state of Flash memory is displayed in in the top-right corner of the list. Hover your mouse over it for more information.</li> | ||
</ul> | </ul> | ||
[[File:Networking_rutos_manual_package_manager_faq_memory.png|border|class=tlt-border]] | [[File:Networking_rutos_manual_package_manager_faq_memory v2.png|border|class=tlt-border]] | ||
---- | ---- | ||
Latest revision as of 14:00, 20 February 2025
The information in this page is updated in accordance with firmware version .
Summary
The Package Manager is a service used to install additional software on the the device. This page is an overview of the Package Manager section in {{{name}}} devices.
Packages
Package Restore
The Package Restore section `Enable` or `Disable` automatic package installation function after firmware upgrade with keep settings.
Package Manager
The Package Manager section provides the possibility to install additional software packages that are available for download from the FOTA server. To install a new service, locate the necessary package in the list, click the '+' button adjacent to it.
Note: the picture below is just for demonstration:
Upload
The Upload section provides the possibility for offline package installation. Only packages that are intended for this specific device and firmware version can be uploaded.
The list of available packages for {{{name}}} devices with latest firmware version can be found in the [[{{{name}}} Package Downloads|Package Downloads]] page. Also it can be found by clicking on this repository link.
To install a package click the 'Browse' button and locate the package file on your computer. Package should start uploading and a Verification windows should soon appear. If you proceed with installation and successfully install the package, you should see a pop-up containing a message of success in the top side of your screen:
Verification
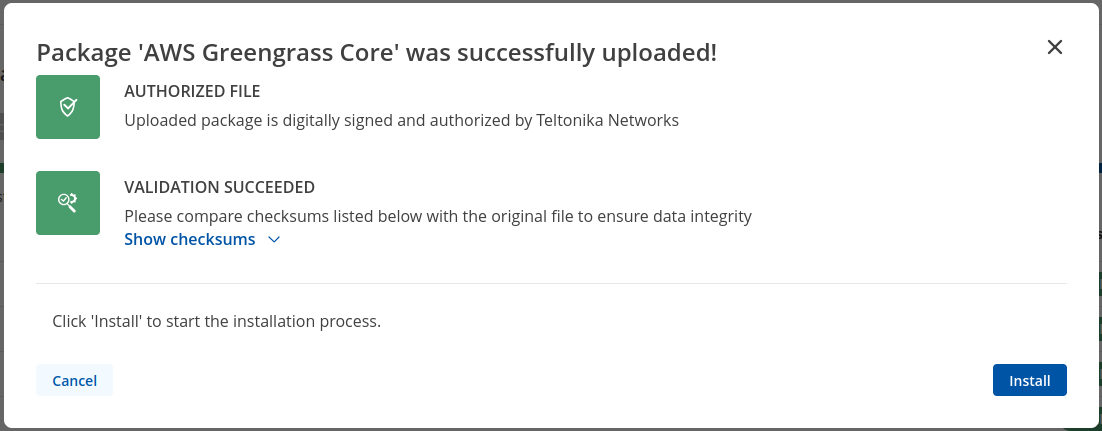
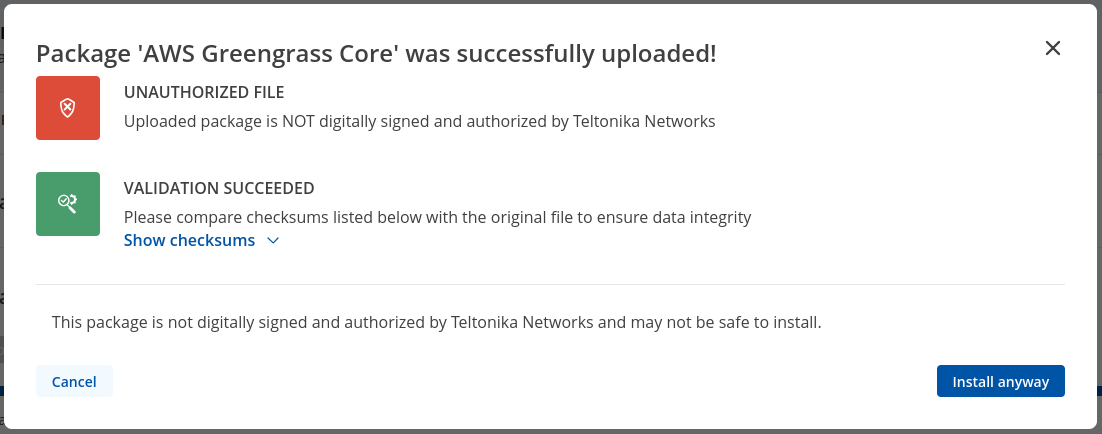
When trying to install a package by uploading it in Upload page you will be informed whether this package is Authorized - digitaly signed by Teltonika Networks, or Unauthorized - without digital signature. After that you will be able to proceed with installation or cancel it.
Below are pictures representing Authorized and Unauthorized packages respectively.
FAQ
- Q: How to keep installed packages after firmware upgrade?
- A: Before upgrading the device's firmware, make sure the 'Keep settings' option is checked in the [[{{{name}}} Firmware|Firmware]] page and `Package Restore` function is enabled in the [[{{{name}}} Package_Manager#Packages|Package Manager]]. This ensures that the device will install the necessary packages after FW upgrade and keep user configuration data.
- Q: Is there enough space for packages that I want to install?
- A: The size of each package is displayed next to its version in the package list. The current state of Flash memory is displayed in in the top-right corner of the list. Hover your mouse over it for more information.
- Q: I installed a software package, how do I configure it?
- A: After the installation of a package, a related configuration page is generated somewhere in the WebUI, depending on the packages purpose. You can find a redirect to the configuration page by locating your package in the [[{{{name}}}_Services|Services]].
- Q: The package that I want isn't on the list. Can I install it anyway?
- A: Depends on what you need specifically. More packages can be downloaded using the opkg package manager. It is a command-line utility used to download software from special online repositories.
Before using opkg you should first update the list of available packages by executing this command:opkg update
To see a list of available packages, use this command:opkg list
To install a package, use this syntax:opkg install <PACKAGE_NAME>
[[Category:{{{name}}} System section]]


