Template:Networking qsg main: Difference between revisions
No edit summary |
No edit summary |
||
| (29 intermediate revisions by the same user not shown) | |||
| Line 7: | Line 7: | ||
| {{#ifeq: {{{lang_jp|}}} | 1 | [[File:Flag_of_Japan.png|30px|link={{{name}}} クイック・スタート・ガイド]] [[{{{name}}} クイック・スタート・ガイド|日本]] }} | | {{#ifeq: {{{lang_jp|}}} | 1 | [[File:Flag_of_Japan.png|30px|link={{{name}}} クイック・スタート・ガイド]] [[{{{name}}} クイック・スタート・ガイド|日本]] }} | ||
|} | |} | ||
{{#ifeq: {{{ | |||
{{#ifeq: {{{eol_test}}} | 1 | <i><span style="color: red"><b>Notice:</b></span> This device has entered it's EOL (End of Life) cycle. For more information, visit our EOL policy [https://teltonika-networks.com/support/eol-products here].</i> | |||
---- | ---- | ||
|}} | |}} | ||
{{#ifeq: {{{desc_intro}}} | 1 | | {{#ifeq: {{{desc_intro}}} | 1 | | ||
This Wiki page contains the online version of the '''Quick Start Guide (QSG)''' for the '''{{{name}}} {{{category}}}'''. Here, you will find an overview of the various physical interfaces of a {{{name}}}, hardware installation instructions, device specifications, conformity, and general safety information. It is highly recommended that you acquaint yourself with the Quick Start Guide before using the device. You can also locate a printed short version of the Quick Start Guide in your device's packaging box. | This Wiki page contains the online version of the '''Quick Start Guide (QSG)''' for the '''{{{name}}} {{{category}}}'''. Here, you will find an overview of the various physical interfaces of a {{{name}}}, hardware installation instructions, device specifications, conformity, and general safety information. It is highly recommended that you acquaint yourself with the Quick Start Guide before using the device. You can also locate a printed short version of the Quick Start Guide in your device's packaging box. | ||
| Line 21: | Line 24: | ||
<td style="vertical-align: top; margin: 10px; padding-top: 25px; padding-right: 50px;">[[File:{{{name}}}_Black_D1.png|250px|link=Special:FilePath/{{{name}}}_Black_D1.png]]</td> | <td style="vertical-align: top; margin: 10px; padding-top: 25px; padding-right: 50px;">[[File:{{{name}}}_Black_D1.png|250px|link=Special:FilePath/{{{name}}}_Black_D1.png]]</td> | ||
<td style="vertical-align: top; margin: 10px; padding-top: 75px; padding-right: 50px;">[[File:{{{name}}}_Black_F1.png|250px|link=Special:FilePath/{{{name}}}_Black_F1]]</td> | <td style="vertical-align: top; margin: 10px; padding-top: 75px; padding-right: 50px;">[[File:{{{name}}}_Black_F1.png|250px|link=Special:FilePath/{{{name}}}_Black_F1]]</td> | ||
<td style="vertical-align: top; margin: 10px; padding-top: 75px; padding-right: 50px;">[[File:{{{name}}}_Black_B1.png| | <td style="vertical-align: top; margin: 10px; padding-top: 75px; padding-right: 50px;">[[File:{{{name}}}_Black_B1.png|250px|link=Special:FilePath/{{{name}}}_Black_B1.png]]</td> | ||
</tr> | </tr> | ||
| Line 27: | Line 30: | ||
|}} | |}} | ||
= Safety information = | =Safety information= | ||
Before starting operating the device, please review recommendations and precautions to minimize the possibility of accidents. Safety precautions presented are supplementary and subject to the local safety regulations. When various operations are executed on the device, the user must fully follow the safety instructions and recommendations provided with the device. | Before starting operating the device, please review recommendations and precautions to minimize the possibility of accidents. Safety precautions presented are supplementary and subject to the local safety regulations. When various operations are executed on the device, the user must fully follow the safety instructions and recommendations provided with the device. | ||
=== General === | === General === | ||
| Line 51: | Line 43: | ||
<tr> | <tr> | ||
<td>RF technologies</td> | <td>RF technologies</td> | ||
<td> | <td>{{{RF_technologies|}}}</td> | ||
</tr> | </tr> | ||
}} | }} | ||
| Line 58: | Line 50: | ||
<tr> | <tr> | ||
<td>Max RF power</td> | <td>Max RF power</td> | ||
<td> | <td>{{{Max_RF_power|}}}</td> | ||
</tr> | </tr> | ||
}} | }} | ||
| Line 69: | Line 61: | ||
<tr> | <tr> | ||
<td>Power adapter</td> | <td>Power adapter</td> | ||
<td> | <td>{{{Power_adapter|}}}</td> | ||
</tr> | </tr> | ||
}} | }} | ||
| Line 76: | Line 68: | ||
<tr> | <tr> | ||
<td>Mobile antenna</td> | <td>Mobile antenna</td> | ||
<td> | <td>{{{Mobile_antenna|}}}</td> | ||
</tr> | </tr> | ||
}} | }} | ||
| Line 83: | Line 75: | ||
<tr> | <tr> | ||
<td>GNSS antenna</td> | <td>GNSS antenna</td> | ||
<td> | <td>{{{GNSS_antenna|}}}</td> | ||
</tr> | </tr> | ||
}} | }} | ||
| Line 90: | Line 82: | ||
<tr> | <tr> | ||
<td>WiFi antenna</td> | <td>WiFi antenna</td> | ||
<td> | <td>{{{WiFi_antenna|}}}</td> | ||
</tr> | </tr> | ||
}} | }} | ||
</table> | </table> | ||
<small><nowiki>*</nowiki> Order code dependant.</small> | |||
<small><nowiki>**</nowiki> Higher gain antenna can be connected to compensate for cable attenuation when a cable is used. The user is responsible for the compliance with the legal regulations.</small> | |||
{{{name}}} {{{category}}} must be used in compliance with any and all applicable national and international laws and with any special restrictions regulating the utilization of the communication module in prescribed applications and environments. | |||
=Compliance= | |||
{{#ifeq: {{{With_RF_CE_Decl}}} | 1 | {{CE Declaration of conformity | name={{{name}}} }} | |||
|}} | |||
{{#ifeq: {{{With_RF_FCC_state}}} | 1 | {{Template: With_RF_FCC_statement_Class_B}} | |||
|}} | |||
{{#ifeq: {{{With_RF_ISED_Cana}}} | 1 | {{Template: With_RF_ISED_Canada_statement}} | |||
|}} | |||
{{#ifeq: {{{With_RF_Markings}}} | 1 | {{Template: With_RF_Markings| name={{{name}}} }} | |||
|}} | |||
=Product Safety and Use= | |||
{{#ifeq: {{{With_RF_Operating_Cond}}} | 1 | {{Template: With RF Operating Conditions}} | |||
|}} | |||
{{#ifeq: {{{With_RF_Exposure}}} | 1 | {{Template: With RF Exposure}} | |||
|}} | |||
{{#ifeq: {{{With_RF_Exposure_FCC_Radiation}}} | 1 | {{Template: With RF Exposure_FCC_Radiation}} | |||
|}} | |||
{{#ifeq: {{{With_RF_Exposure_ISED_Canada}}} | 1 | {{Template: With RF Exposure_ISED_Canada}} | |||
|}} | |||
=Quick Start Guide= | |||
{{#ifeq: {{{qsg_front_back}}} | 1 | | |||
==Front view== | |||
<br> | |||
[[File:{{{qsg_front_file}}}|center|800 px|link=Special:FilePath/{{{qsg_front_file}}}]] | |||
==Back view== | |||
<br> | |||
[[File:{{{qsg_back_file}}}|center|800 px|link=Special:FilePath/{{{qsg_back_file}}}]] | |||
<br> | |||
|}} | |||
{{#ifeq: {{{qsg_connectors}}} | 1 | | |||
==Connectors== | |||
<br> | |||
'''POWER SOCKET PINOUT''' | |||
<table> | |||
<tr> | |||
<td style="vertical-align: top; margin: 10px; padding-bottom: 25px;">[[File:{{{qsg_connectors_1}}}|left|400 px|link=Special:FilePath/{{{qsg_connectors_1}}}]]</td> | |||
<td style="vertical-align: center; margin: 0px; padding-left: 150px; padding-bottom: 25px;">[[File:{{{qsg_connectors_2}}}|right|200 px|link=Special:FilePath/{{{qsg_connectors_2}}}]]</td> | |||
</tr> | |||
</table> | |||
|}} | |||
{{#ifeq: {{{qsg_youtube}}} | 1 | | |||
== Video Quick Start Guide == | |||
Need some help setting up your new Teltonika Networks RUTX50 Industrial 5G Router? Watch our quick start guide video and follow the step by step instructions to easily set up your new router for operation. | |||
<youtube>{{{qsg_youtube_link}}}</youtube> | |||
<br> | |||
|}} | |||
== Hardware installation == | |||
< | <br> | ||
<table> | |||
<tr> | |||
<td style="vertical-align: top; margin: 10px; padding-bottom: 25px;">[[File:Hardware_installation_step_1.png|left]]</td> | |||
<td style="vertical-align: top; margin: 0px; padding-left: 25px; padding-bottom: 25px;">[[File:RUTX50_Hardware_installation_step_2.png|right]]</td> | |||
</tr> | |||
< | <tr> | ||
<td style="vertical-align: top; margin: 10px; padding-bottom: 25px;">[[File:RUTX50_Hardware_installation_step_3.png|left]]</td> | |||
<td style="vertical-align: top; margin: 0px; padding-left: 25px; padding-bottom: 25px;">[[File:RUTX50_Hardware_installation_step_4.png|right]]</td> | |||
</tr> | |||
<tr> | |||
<td style="vertical-align: top; margin: 10px; padding-bottom: 25px;">[[File:RUTX50_Hardware_installation_step_5.png|left]]</td> | |||
<td style="vertical-align: top; margin: 0px; padding-left: 25px; padding-bottom: 25px;">[[File:RUTX50_Hardware_installation_step_6.png|right]]</td> | |||
</tr> | |||
<tr> | |||
<td style="vertical-align: top; margin: 10px; padding-bottom: 25px;">[[File:RUTX50_Hardware_installation_step_7.png|left]]</td> | |||
<td style="vertical-align: top; margin: 0px; padding-left: 25px; padding-bottom: 25px;">[[File:RUTX50_Hardware_installation_step_8.png|right]]</td> | |||
</tr> | |||
<tr> | |||
<td style="vertical-align: top; margin: 10px; padding-bottom: 25px;">[[File:RUTX50 Hardware installation step 9.png|left]]</td> | |||
<td style="vertical-align: top; margin: 0px; padding-left: 25px; padding-bottom: 25px;"></td> | |||
</tr> | |||
</table> | |||
{{Template: Configure_your_computer_LAN_Windows | |||
<!------------------------DEVICE-----------------------> | |||
| name = RUTX50 | |||
}} | |||
{{ | {{Template: Configure_your_computer_WiFi_Windows | ||
<!------------------------DEVICE-----------------------> | |||
| name = RUTX50 | |||
}} | |||
Latest revision as of 09:39, 6 November 2024
Safety information
Before starting operating the device, please review recommendations and precautions to minimize the possibility of accidents. Safety precautions presented are supplementary and subject to the local safety regulations. When various operations are executed on the device, the user must fully follow the safety instructions and recommendations provided with the device.
General
| Radio specifications | |
|---|---|
| Bundled accessories specifications* |
* Order code dependant.
** Higher gain antenna can be connected to compensate for cable attenuation when a cable is used. The user is responsible for the compliance with the legal regulations.
{{{name}}} {{{category}}} must be used in compliance with any and all applicable national and international laws and with any special restrictions regulating the utilization of the communication module in prescribed applications and environments.
Compliance
Product Safety and Use
Quick Start Guide
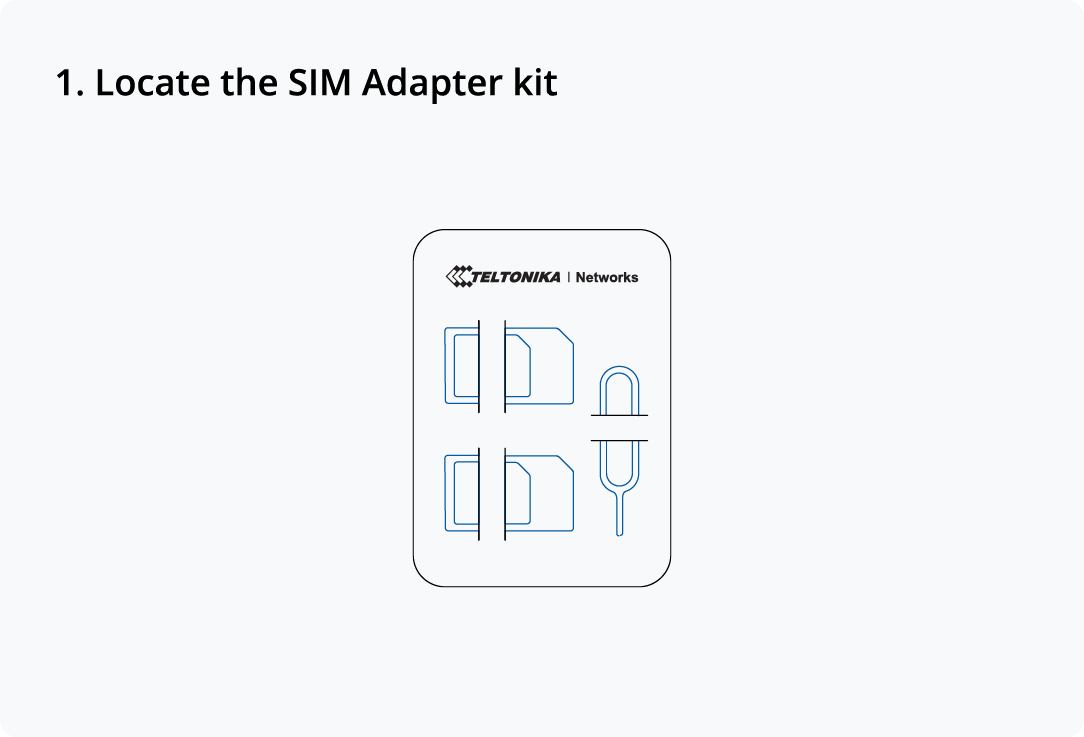
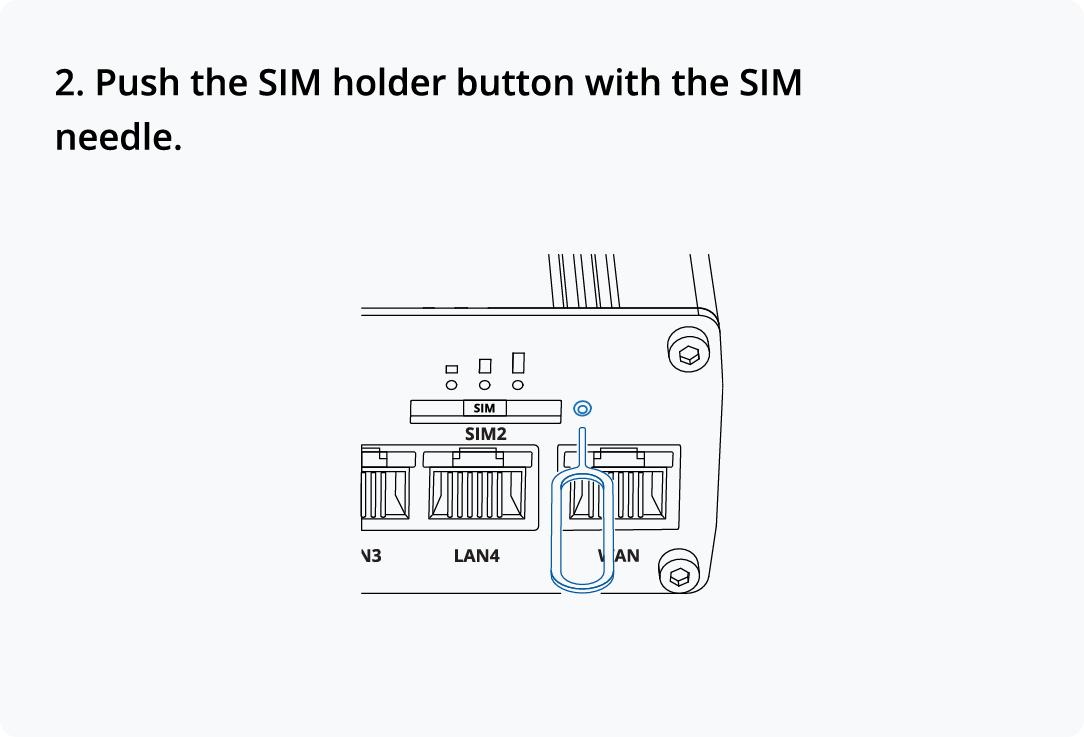
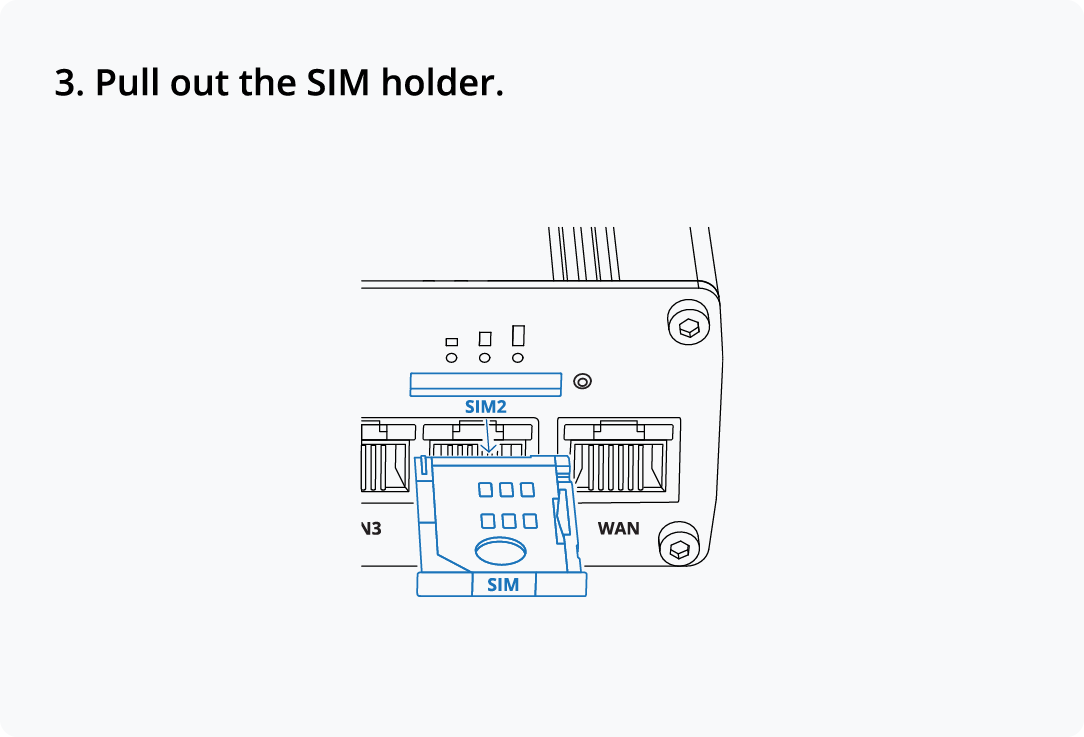
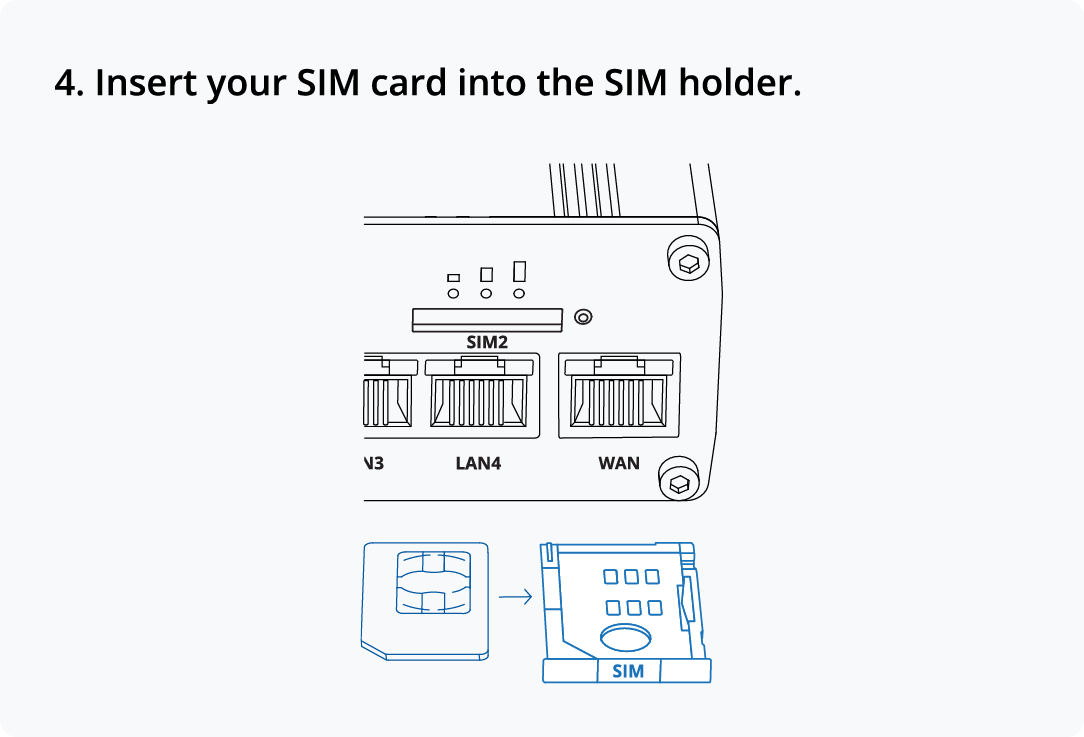
Hardware installation
 |
 |
 |
 |
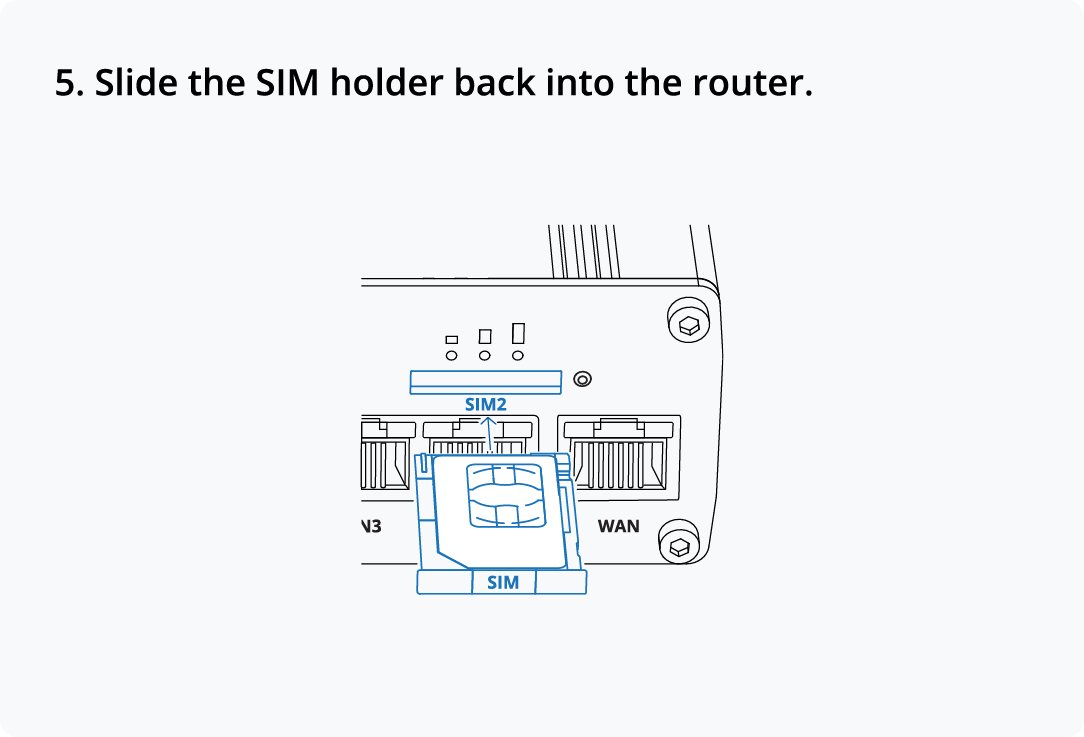 |
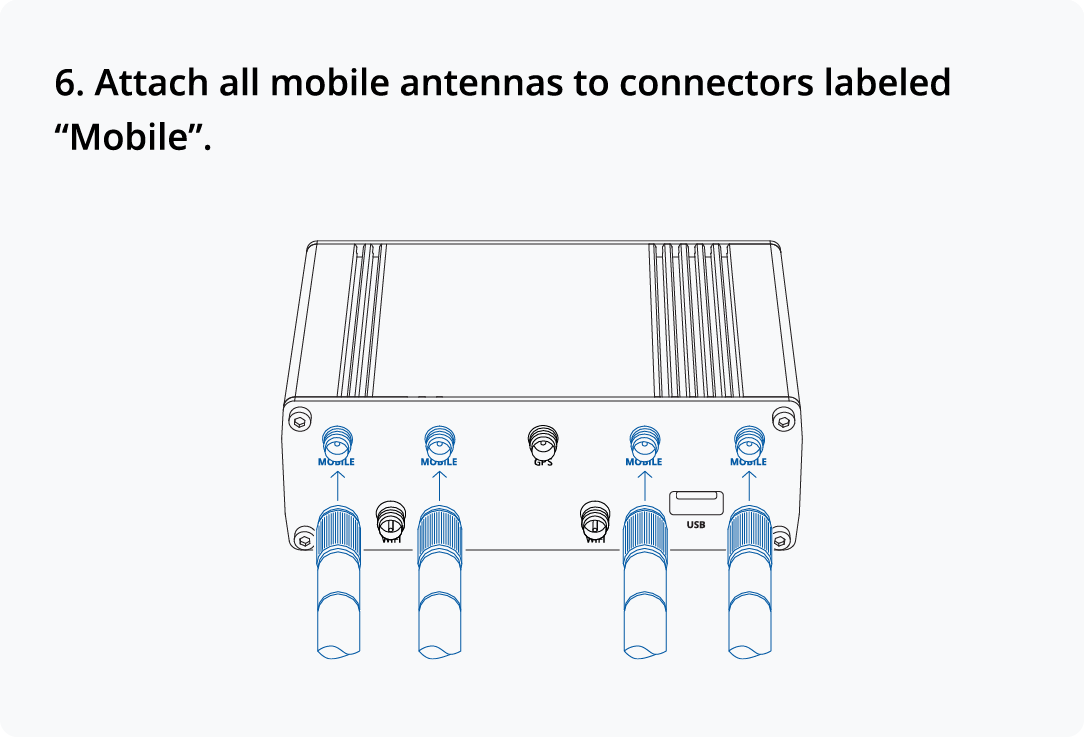 |
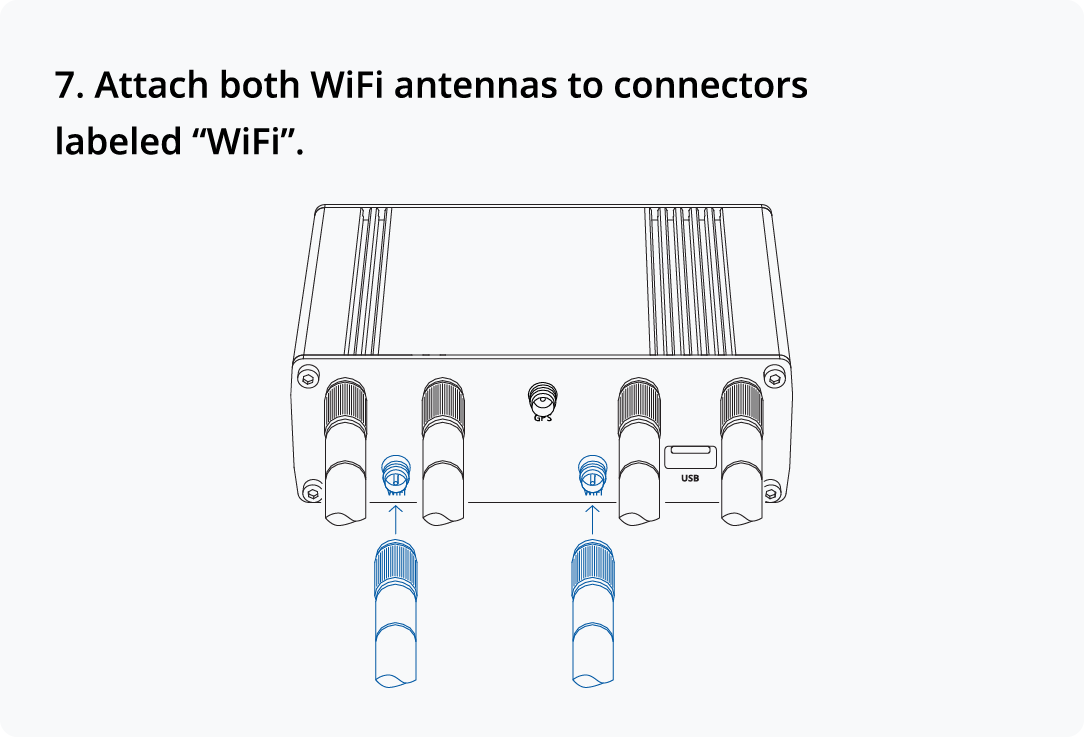 |
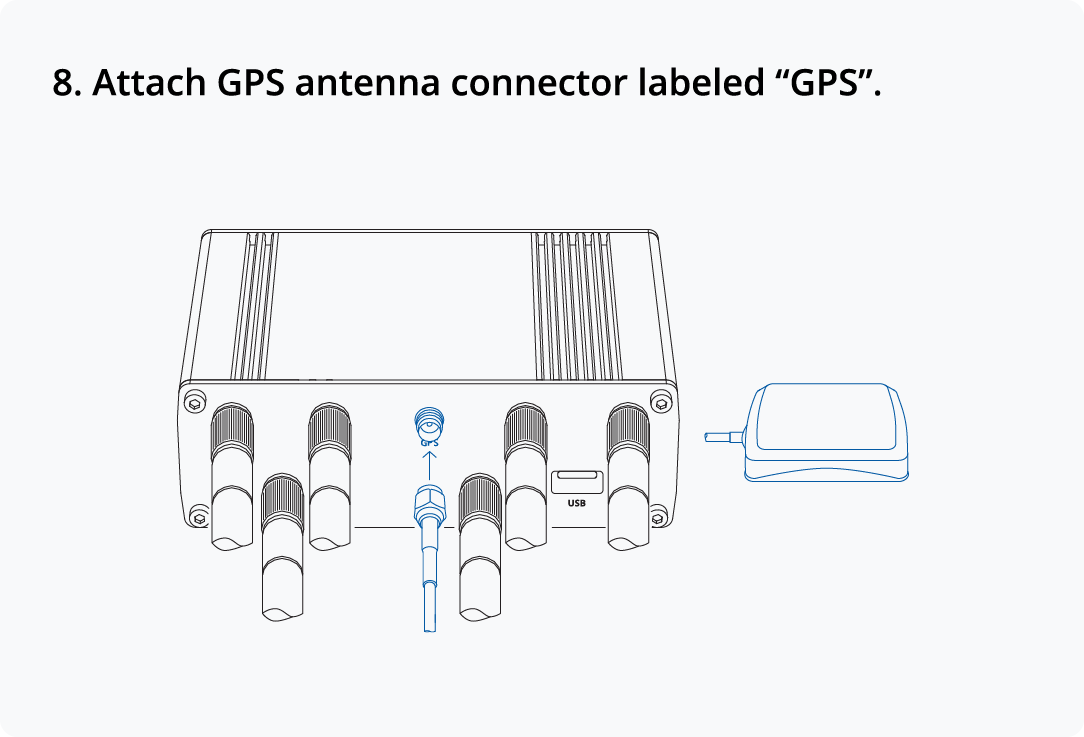 |
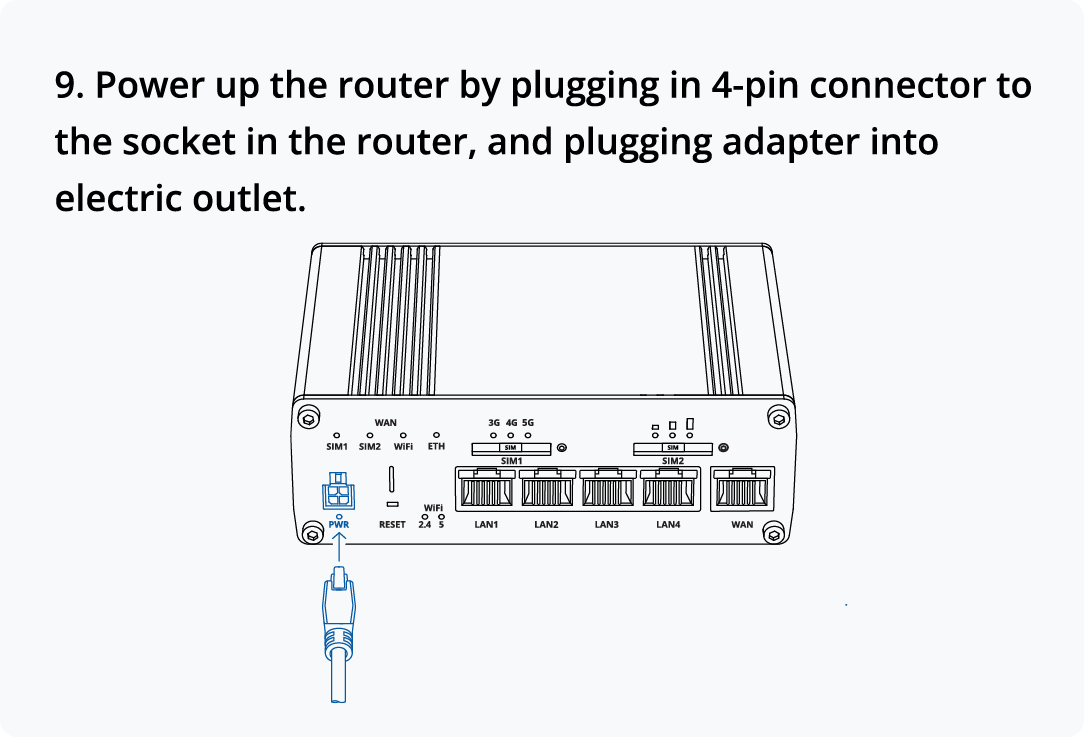 |
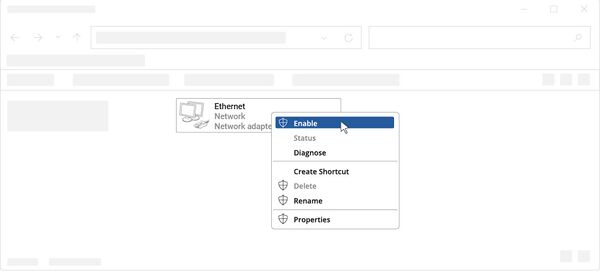
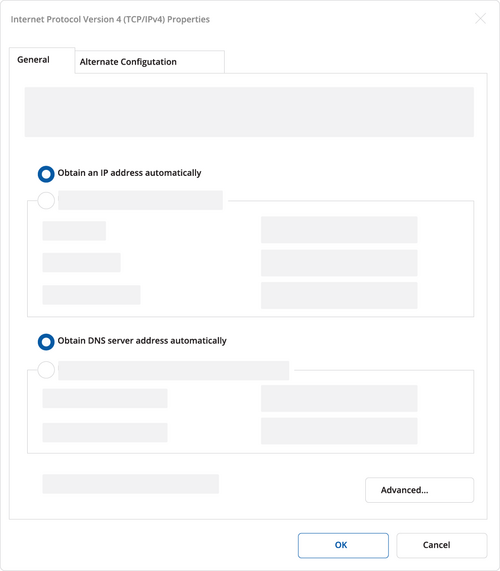
Configure your computer LAN (Windows)
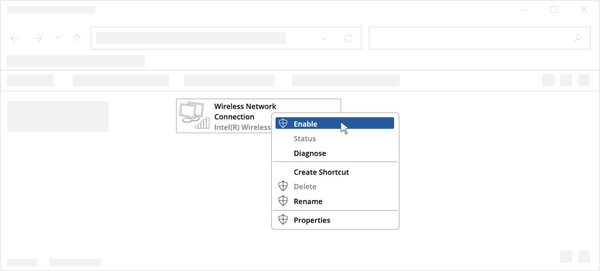
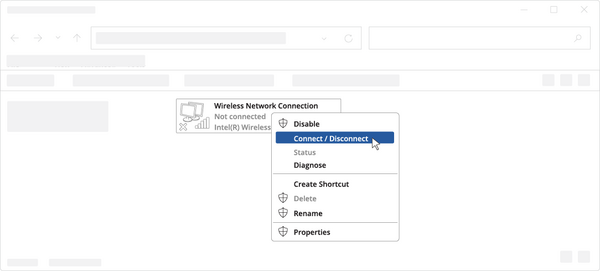
Configure your computer Wi-Fi (Windows)

