Template:Networking rutos manual profiles: Difference between revisions
No edit summary |
|||
| (26 intermediate revisions by 9 users not shown) | |||
| Line 1: | Line 1: | ||
===Summary=== | |||
== | |||
Configuration <b>profiles</b> provide a way to create multiple distinct device configuration sets and apply them to the device based on current user requirements. This chapter is an overview of the Profiles page in {{{name}}} devices. | Configuration <b>profiles</b> provide a way to create multiple distinct device configuration sets and apply them to the device based on current user requirements. This chapter is an overview of the Profiles page in {{{name}}} devices. | ||
==Profiles== | ===Configuration Profiles=== | ||
This section displays user defined <b>configuration profiles</b>: | This section displays user defined <b>configuration profiles</b>: | ||
[[File: | [[File:Networking_rutos_manual_profiles_configuration_profiles_v3.png]] | ||
---- | ---- | ||
To create a new profile, configure the device in accordance with your needs, go to this page, enter a custom name for the profile and click the 'Add' button. A new profile with the given name will appear in the "configuration profiles" list: | To create a new profile, configure the device in accordance with your needs, go to this page, enter a custom name for the profile and click the 'Add' button. You can also choose to create a profile without any previous configurations. A new profile with the given name will appear in the "configuration profiles" list: | ||
[[File: | [[File:Networking_rutos_manual_profiles_configuration_profiles_add_new_profile_v3.png|border|class=tlt-border]] | ||
The 'Apply' button applies the adjacent configuration on the device. | The 'Apply' button applies the adjacent configuration on the device. | ||
==Scheduler== | ===Scheduler=== | ||
The <b>Profile Scheduler</b> provides a possibility to set up a schedule of when the device should use one configuration or another | The <b>Profile Scheduler</b> provides a possibility to set up a schedule of when the device | ||
should use one profile configuration or another. | |||
[[File: | Check [[#Profile Scheduler Instance Example|Profile Scheduler Instance Example]] to get a better understanding at how Profile Scheduler Instances works. | ||
====General Configuration==== | |||
---- | |||
The <b>General Configuration</b> section is used to enable the Scheduler itself. Created instances won't work unless this option is turned on. | |||
[[File:Networking_rutos_manual_profiles_scheduler_general_configuration.png|border|class=tlt-border]] | |||
====Profile Scheduler Instances==== | |||
---- | |||
The <b>Profile Scheduler Instances</b> section allows you to create profile Instances | |||
to be enabled during specific time intervals. To add a new Instance click <b>Add</b> button. | |||
<b>Note:</b> new Instance can only be created if there is at least one custom [[#Profiles|profile]] created. | |||
[[File:Networking_rutos_manual_profiles_scheduler_profile_scheduler_instances_v2.png|border|class=tlt-border]] | |||
=====Profile Scheduler Instance Configuration===== | |||
---- | ---- | ||
This page is used to configure profile, time and day of selected scheduler instance. Refer to the figure and table below for information on the Profile Scheduler Instance Configuration fields: | |||
[[File:Networking_rutos_manual_profiles_scheduler_profile_scheduler_instance_configuration_v2.png|border|class=tlt-border]] | |||
<table class="nd-mantable"> | |||
<tr> | |||
<th>Field</th> | |||
<th>Value</th> | |||
<th>Description</th> | |||
</tr> | |||
<tr> | |||
<td>Enable</td> | |||
<td>off | on; default: <b>off</b></td> | |||
<td>Enable selected instance for scheduler.</td> | |||
</tr> | |||
<tr> | |||
<td>Profile</td> | |||
<td>profiles; default: <b>none</b></td> | |||
<td>Select profile which will be applied during specified time interval.</td> | |||
</tr> | |||
<tr> | |||
<td>Interval Type</td> | |||
<td>Weekdays | Month Days; default: <b>Weekdays</b></td> | |||
<td>Depending on your needs select whether you want to configure weekdays or specific month days.</td> | |||
</tr> | |||
<tr> | |||
<td>Start Time</td> | |||
<td>time; default: <b>12:00</b></td> | |||
<td>Enter time of the start of interval in which scheduler will switch profiles.</td> | |||
</tr> | |||
<tr> | |||
<td>End Time</td> | |||
<td>time; default: <b>12:00</b></td> | |||
<td>Enter time of the end of interval in which scheduler will switch profiles back.</td> | |||
</tr> | |||
<tr> | |||
<th>Interval Type: Weekdays</th> | |||
<th></th> | |||
<th></th> | |||
</tr> | |||
<tr> | |||
<td>Start Day</td> | |||
<td>Weekday [Monday..Sunday]; default: <b>Sunday</b></td> | |||
<td>Select a day of the start of interval in which scheduler will switch profiles.</td> | |||
</tr> | |||
<tr> | |||
<td>End Day</td> | |||
<td>Weekday [Monday..Sunday]; default: <b>Sunday</b></td> | |||
<td>Select a day of the end of interval in which scheduler will switch profiles back.</td> | |||
</tr> | |||
<tr> | |||
<th>Interval Type: Month Days</th> | |||
<th></th> | |||
<th></th> | |||
</tr> | |||
<tr> | |||
<td>Start Day</td> | |||
<td>Day of month [1..31]; default: <b>1</b></td> | |||
<td>Select a day of the start of interval in which scheduler will switch profiles.</td> | |||
</tr> | |||
<tr> | |||
<td>End Day</td> | |||
<td>Day of month [1..31]; default: <b>1</b></td> | |||
<td>Select a day of the end of interval in which scheduler will switch profiles back.</td> | |||
</tr> | |||
<tr> | |||
<td>Force last day</td> | |||
<td>off | on; default: <b>off</b></td> | |||
<td>Force intervals to accept last day of month as valid option if selected day doesn't exist in ongoing month.</td> | |||
</tr> | |||
</table> | |||
=====Profile Scheduler Instance Example===== | |||
---- | |||
Scheduler will use <i>profile instance</i> if it is enabled <b>and</b> it's time | |||
interval matches device's [[{{{name}}}_Administration#General_2|date]], otherwise <i>default</i> profile will be used. | |||
Example - we have 3 profiles in total: | |||
<ul> | |||
<li>default</li> | |||
<li>Profile A</li> | |||
<li>Profile B</li> | |||
</ul> | |||
We create profile instances for Profiles A and B: | |||
<ul> | |||
<li>Profile A: 08:00 - 11:00</li> | |||
<li>Profile B: 13:00 - 20:00</li> | |||
</ul> | |||
During 11:00 - 13:00 and 20:00 - 08:00 <i>default</i> profile will be used. | |||
Latest revision as of 11:46, 23 July 2024
Summary
Configuration profiles provide a way to create multiple distinct device configuration sets and apply them to the device based on current user requirements. This chapter is an overview of the Profiles page in {{{name}}} devices.
Configuration Profiles
This section displays user defined configuration profiles:
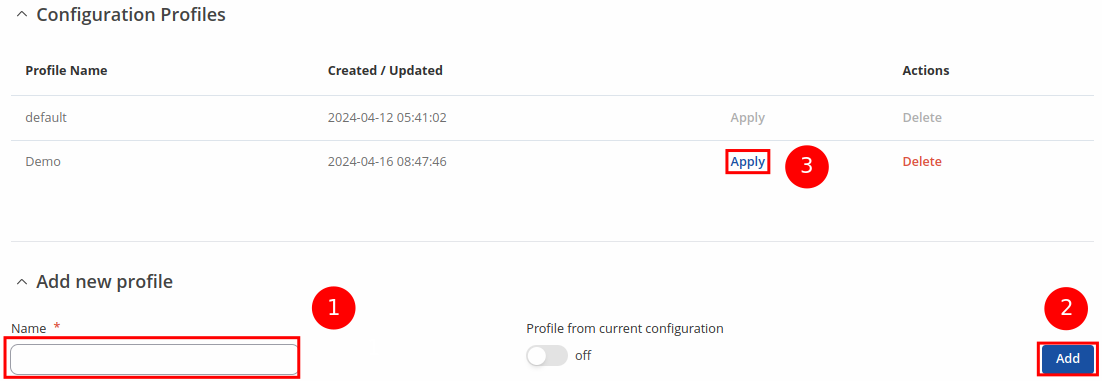
To create a new profile, configure the device in accordance with your needs, go to this page, enter a custom name for the profile and click the 'Add' button. You can also choose to create a profile without any previous configurations. A new profile with the given name will appear in the "configuration profiles" list:
The 'Apply' button applies the adjacent configuration on the device.
Scheduler
The Profile Scheduler provides a possibility to set up a schedule of when the device should use one profile configuration or another.
Check Profile Scheduler Instance Example to get a better understanding at how Profile Scheduler Instances works.
General Configuration
The General Configuration section is used to enable the Scheduler itself. Created instances won't work unless this option is turned on.
Profile Scheduler Instances
The Profile Scheduler Instances section allows you to create profile Instances to be enabled during specific time intervals. To add a new Instance click Add button.
Note: new Instance can only be created if there is at least one custom profile created.
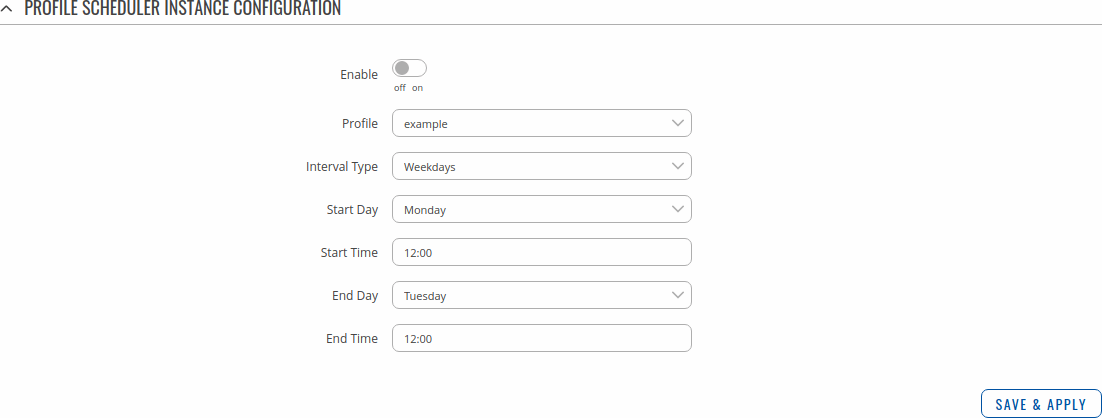
Profile Scheduler Instance Configuration
This page is used to configure profile, time and day of selected scheduler instance. Refer to the figure and table below for information on the Profile Scheduler Instance Configuration fields:
| Field | Value | Description |
|---|---|---|
| Enable | off | on; default: off | Enable selected instance for scheduler. |
| Profile | profiles; default: none | Select profile which will be applied during specified time interval. |
| Interval Type | Weekdays | Month Days; default: Weekdays | Depending on your needs select whether you want to configure weekdays or specific month days. |
| Start Time | time; default: 12:00 | Enter time of the start of interval in which scheduler will switch profiles. |
| End Time | time; default: 12:00 | Enter time of the end of interval in which scheduler will switch profiles back. |
| Interval Type: Weekdays | ||
| Start Day | Weekday [Monday..Sunday]; default: Sunday | Select a day of the start of interval in which scheduler will switch profiles. |
| End Day | Weekday [Monday..Sunday]; default: Sunday | Select a day of the end of interval in which scheduler will switch profiles back. |
| Interval Type: Month Days | ||
| Start Day | Day of month [1..31]; default: 1 | Select a day of the start of interval in which scheduler will switch profiles. |
| End Day | Day of month [1..31]; default: 1 | Select a day of the end of interval in which scheduler will switch profiles back. |
| Force last day | off | on; default: off | Force intervals to accept last day of month as valid option if selected day doesn't exist in ongoing month. |
Profile Scheduler Instance Example
Scheduler will use profile instance if it is enabled and it's time interval matches device's [[{{{name}}}_Administration#General_2|date]], otherwise default profile will be used.
Example - we have 3 profiles in total:
- default
- Profile A
- Profile B
We create profile instances for Profiles A and B:
- Profile A: 08:00 - 11:00
- Profile B: 13:00 - 20:00
During 11:00 - 13:00 and 20:00 - 08:00 default profile will be used.


