Template:Networking rutos manual interfaces: Difference between revisions
Gytispieze (talk | contribs) No edit summary |
m Reverted edit by Vainius.l (talk) to last revision by Gytispieze Tag: Rollback |
||
| (19 intermediate revisions by 6 users not shown) | |||
| Line 1: | Line 1: | ||
{{Template: | {{Template: Networking_device_manual_fw_disclosure | ||
| fw_version ={{Template: | | series = {{{series}}} | ||
| name = {{{name}}} | |||
| fw_version ={{Template: Networking_device_manual_latest_fw | |||
| series = {{{series}}} | | series = {{{series}}} | ||
| name = {{{name}}} | |||
}} | }} | ||
}} | }} | ||
| Line 20: | Line 23: | ||
{{#ifeq: {{{series}}} | TCR1 | [[File:Networking_rutos_manual_tcr1_interfaces_network_interfaces_v1.png|border|class=tlt-border]] | | {{#ifeq: {{{series}}} | TCR1 | [[File:Networking_rutos_manual_tcr1_interfaces_network_interfaces_v1.png|border|class=tlt-border]] | | ||
[[File:Networking_rutos_manual_interfaces_network_interfaces_lan_{{{lan}}}_mobile_{{{mobile}}}_dualsim_{{{dualsim}}}_dualmodem_{{{dualmodem}}}_wired_{{{wired}}}_v1.png|border|class=tlt-border]]|}} | [[File:Networking_rutos_manual_interfaces_network_interfaces_lan_{{{lan}}}_mobile_{{{mobile}}}_dualsim_{{{dualsim}}}_dualmodem_{{{dualmodem}}}_wired_{{{wired}}}_v1{{#ifeq:{{{series}}}|TRB5|_trb5|}}.png|border|class=tlt-border]]|}} | ||
==Add Interface== | ==Add Interface== | ||
| Line 83: | Line 86: | ||
To begin configuring an interface, click the 'Edit' button on the right side of the interface: | To begin configuring an interface, click the 'Edit' button on the right side of the interface: | ||
[[File:Networking_rutos_manual_interfaces_network_interfaces_edit_button_lan_{{{lan}}}.png]] | [[File:Networking_rutos_manual_interfaces_network_interfaces_edit_button_lan_{{{lan}}}{{#ifeq:{{{series}}}|TRB5|_trb5|}}.png]] | ||
===General Setup=== | ===General Setup=== | ||
| Line 103: | Line 106: | ||
<tr> | <tr> | ||
<td>IPv4 address</td> | <td>IPv4 address</td> | ||
<td>ip4; default[for LAN]: <b>192.168.1.1</b></td> | <td>ip4; default[for LAN]: <b>{{#switch:{{{series}}}|TRB1|TRB5=192.168.2.1|#default=192.168.1.1}}</b></td> | ||
<td>The IPv4 address interface of this interface. An IP address identifies a device on a network and allows it to communicate with other devices.</td> | <td>The IPv4 address interface of this interface. An IP address identifies a device on a network and allows it to communicate with other devices.</td> | ||
</tr> | </tr> | ||
| Line 275: | Line 278: | ||
=====Mode: Passthrough===== | =====Mode: Passthrough===== | ||
---- | ---- | ||
[[File: | [[File:Networking_rutos_manual_interfaces_interface_configuration_general_mobile_passthrough_dualsim_{{{dualsim}}}_dualmodem_{{{dualmodem}}}_v2.png|border|class=tlt-border]] | ||
<table class="nd-mantable"> | <table class="nd-mantable"> | ||
| Line 293: | Line 296: | ||
</ul> | </ul> | ||
</td> | </td> | ||
<tr> | |||
<td>Subnet selection</td> | |||
<td>Auto {{!}} P2P; default: <b>Auto</b></td> | |||
<td>Subnet selection method.</td> | |||
</tr> | |||
<tr> | <tr> | ||
<td>PDP Type</td> | <td>PDP Type</td> | ||
| Line 359: | Line 367: | ||
=====Mode: Bridge===== | =====Mode: Bridge===== | ||
---- | ---- | ||
[[File: | [[File:Networking_rutos_manual_interfaces_interface_configuration_general_mobile_bridge_dualsim_{{{dualsim}}}_dualmodem_{{{dualmodem}}}_v2.png|border|class=tlt-border]] | ||
<table class="nd-mantable"> | <table class="nd-mantable"> | ||
| Line 369: | Line 377: | ||
<tr> | <tr> | ||
<td>Mode</td> | <td>Mode</td> | ||
<td>NAT | <td>NAT {{!}} Bridge {{!}} Passthrough; default: <b>NAT</b></td> | ||
<td>Mobile connection operating mode. | <td>Mobile connection operating mode. | ||
<ul> | <ul> | ||
| Line 377: | Line 385: | ||
</ul> | </ul> | ||
</td> | </td> | ||
<tr> | |||
<td>Subnet selection</td> | |||
<td>Auto {{!}} P2P; default: <b>Auto</b></td> | |||
<td>Subnet selection method.</td> | |||
</tr> | |||
<tr> | <tr> | ||
<td>PDP Type</td> | <td>PDP Type</td> | ||
<td>IPv4 <nowiki>|</nowiki> IPv6 <nowiki>|</nowiki> IPv4/IPv6; default: <b>IPv4</b></td> | <td>IPv4 <nowiki>|</nowiki> IPv6 <nowiki>|</nowiki> IPv4/IPv6; default: <b>IPv4</b></td> | ||
<td>Specifies what of address will be requested from the operator.</td> | <td>Specifies what of address will be requested from the operator.</td> | ||
</tr>{{#ifeq: {{{dualsim}}} | 1 | {{#ifeq: {{{dualmodem}}} | 1 || | </tr>{{#ifeq: {{{dualsim}}} | 1 | {{#ifeq: {{{dualmodem}}} | 1 || | ||
<tr> | <tr> | ||
| Line 427: | Line 439: | ||
{{#switch: {{{series}}} | {{#switch: {{{series}}} | ||
| TRB1 | | TRB1|TRB5|RUT36X = | ||
| | |||
| RUT36X = | |||
| TRB2 = | | TRB2 = | ||
{{#ifeq: {{{name}}} | TRB245 | | {{#ifeq: {{{name}}} | TRB245 | | ||
| Line 452: | Line 462: | ||
<b>Advanced Settings</b> information for <b>Static</b> protocol is provided in the table below. | <b>Advanced Settings</b> information for <b>Static</b> protocol is provided in the table below. | ||
[[File: | [[File:Networking_rutos_manual_interfaces_interface_configuration_advanced_settings_static_v3.png|border|class=tlt-border]] | ||
<table class="nd-mantable"> | <table class="nd-mantable"> | ||
| Line 459: | Line 469: | ||
<th>Value</th> | <th>Value</th> | ||
<th>Description</th> | <th>Description</th> | ||
</tr> | </tr> | ||
<tr> | <tr> | ||
| Line 488: | Line 493: | ||
<td>Override MTU</td> | <td>Override MTU</td> | ||
<td>integer [1..9200]; default: <b>none</b></td> | <td>integer [1..9200]; default: <b>none</b></td> | ||
<td>Changes the interface's allowed maximum transmission unit (MTU) size. It is the largest size of a protocol data unit (PDU) that can be transmitted in a single network layer transaction.</td> | <td>Changes the interface's allowed maximum transmission unit (MTU) size. It is the largest size of a protocol data unit (PDU) that can be transmitted in a single network layer transaction.<br> | ||
<ul> | |||
<li>'''Note:''' Interface(s): lan have mtu lower than 1280 it will make all interfaces on same physical interface no longer support IPv4.</li> | |||
<li>'''Note:''' Interface(s): lan have mtu lower than 576 it will make all interfaces on same physical interface no longer support DHCP.</li> | |||
</ul> | |||
</td> | |||
</tr> | </tr> | ||
<tr> | <tr> | ||
| Line 532: | Line 542: | ||
<b>Advanced Settings</b> information for <i>DHCP</i> protocol is provided in the table below. | <b>Advanced Settings</b> information for <i>DHCP</i> protocol is provided in the table below. | ||
[[File: | [[File:Networking_rutos_manual_interfaces_interface_configuration_advanced_settings_dhcp_v4.png|border|class=tlt-border]] | ||
<table class="nd-mantable"> | <table class="nd-mantable"> | ||
| Line 539: | Line 549: | ||
<th>Value</th> | <th>Value</th> | ||
<th>Description</th> | <th>Description</th> | ||
</tr> | </tr> | ||
<tr> | <tr> | ||
| Line 593: | Line 598: | ||
<td>Override MTU</td> | <td>Override MTU</td> | ||
<td>integer [1..9200]; default: <b>none</b></td> | <td>integer [1..9200]; default: <b>none</b></td> | ||
<td>Changes the interfaces allowed maximum transmission unit (MTU) size. It is the largest size of a protocol data unit (PDU) that can be transmitted in a single network layer transaction.</td> | <td>Changes the interfaces allowed maximum transmission unit (MTU) size. It is the largest size of a protocol data unit (PDU) that can be transmitted in a single network layer transaction.<br> | ||
<ul> | |||
<li>'''Note:''' Interface(s): lan have mtu lower than 1280 it will make all interfaces on same physical interface no longer support IPv4.</li> | |||
<li>'''Note:''' Interface(s): lan have mtu lower than 576 it will make all interfaces on same physical interface no longer support DHCP.</li> | |||
</ul></td> | |||
</tr> | </tr> | ||
<tr> | <tr> | ||
| Line 606: | Line 615: | ||
<b>Advanced Settings</b> information for <i>DHCPv6</i> protocol is provided in the table below. | <b>Advanced Settings</b> information for <i>DHCPv6</i> protocol is provided in the table below. | ||
[[File: | [[File:Networking_rutos_manual_interfaces_interface_configuration_advanced_settings_dhcpv6_v4.png|border|class=tlt-border]] | ||
<table class="nd-mantable"> | <table class="nd-mantable"> | ||
| Line 613: | Line 622: | ||
<th>Value</th> | <th>Value</th> | ||
<th>Description</th> | <th>Description</th> | ||
</tr> | </tr> | ||
<tr> | <tr> | ||
| Line 657: | Line 661: | ||
<td>Override MTU</td> | <td>Override MTU</td> | ||
<td>integer [1..9200]; default: <b>none</b></td> | <td>integer [1..9200]; default: <b>none</b></td> | ||
<td>Changes the interface's allowed maximum transmission unit (MTU) size. It is the largest size of a protocol data unit (PDU) that can be transmitted in a single network layer transaction.</td> | <td>Changes the interface's allowed maximum transmission unit (MTU) size. It is the largest size of a protocol data unit (PDU) that can be transmitted in a single network layer transaction.<br> | ||
<ul> | |||
<li>'''Note:''' Interface(s): lan have mtu lower than 1280 it will make all interfaces on same physical interface no longer support IPv4.</li> | |||
<li>'''Note:''' Interface(s): lan have mtu lower than 576 it will make all interfaces on same physical interface no longer support DHCP.</li> | |||
</ul></td> | |||
<tr> | <tr> | ||
<tr> | <tr> | ||
| Line 670: | Line 678: | ||
<b>Advanced Settings</b> information for <i>PPPoE</i> protocol is provided in the table below. | <b>Advanced Settings</b> information for <i>PPPoE</i> protocol is provided in the table below. | ||
[[File: | [[File:Networking_rutos_manual_interfaces_interface_configuration_advanced_settings_pppoe_v5.png|border|class=tlt-border]] | ||
<table class="nd-mantable"> | <table class="nd-mantable"> | ||
| Line 677: | Line 685: | ||
<th>Value</th> | <th>Value</th> | ||
<th>Description</th> | <th>Description</th> | ||
</tr> | </tr> | ||
<tr> | <tr> | ||
| Line 759: | Line 762: | ||
<b>Advanced Settings</b> information for <i>Mobile</i> protocol is provided in the table below. | <b>Advanced Settings</b> information for <i>Mobile</i> protocol is provided in the table below. | ||
[[File:Networking_rutos_manual_interfaces_interface_configuration_advanced_settings_mobile_dualsim_{{{dualsim}}} | [[File:Networking_rutos_manual_interfaces_interface_configuration_advanced_settings_mobile_dualsim_{{{dualsim}}}_v5.png|border|class=tlt-border]] | ||
<table class="nd-mantable"> | <table class="nd-mantable"> | ||
| Line 766: | Line 769: | ||
<th>Value</th> | <th>Value</th> | ||
<th>Description</th> | <th>Description</th> | ||
</tr> | </tr> | ||
<tr> | <tr> | ||
| Line 786: | Line 784: | ||
<td>ip4; default: <b>none</b></td> | <td>ip4; default: <b>none</b></td> | ||
<td>Specifies custom DNS servers. If left empty, DNS servers advertised by peer are used. </td> | <td>Specifies custom DNS servers. If left empty, DNS servers advertised by peer are used. </td> | ||
</tr> | </tr> | ||
<tr> | <tr> | ||
<td>Use gateway metric</td> | <td>Use gateway metric</td> | ||
<td>integer; default: <b>none</b></td> | <td>integer; default: <b>none</b></td> | ||
<td>A metric specifies the priority of the gateway. The lower the metric, the higher the priority (0 for highest priority).</td> | <td>A metric specifies the priority of the gateway. The lower the metric, the higher the priority (0 for highest priority).</td> | ||
</tr> | </tr> | ||
<tr> | <tr> | ||
<td>Override MTU</td> | <td>Override MTU</td> | ||
| Line 803: | Line 801: | ||
</tr> | </tr> | ||
</table>|}} | </table>|}} | ||
===Physical Settings=== | ===Physical Settings=== | ||
---- | ---- | ||
The <b>Physical Settings</b> section is used to create associations with physical interfaces and bridge network interfaces. | The <b>Physical Settings</b> section is used to create associations with physical interfaces and bridge network interfaces. | ||
[[File: | [[File:Networking_rutos_manual_interfaces_interface_configuration_physical_settings_v2.png|border|class=tlt-border]] | ||
<table class="nd-mantable"> | <table class="nd-mantable"> | ||
| Line 821: | Line 820: | ||
</tr> | </tr> | ||
<tr> | <tr> | ||
<td | <td>Enable STP</td> | ||
<td>off | on; default: <b>off</b></td> | <td>off | on; default: <b>off</b></td> | ||
<td>Turns the use of Spanning Tree Protocol (STP) for this interface on or off.<br><b>Note:</b> this field becomes visible when 'Bridge interfaces' is set to <i>on</i>.</td> | <td>Turns the use of Spanning Tree Protocol (STP) for this interface on or off.<br><b>Note:</b> this field becomes visible when 'Bridge interfaces' is set to <i>on</i>.</td> | ||
</tr> | |||
<tr> | |||
<td>Enable IGMP</td> | |||
<td>off | on; default: <b>off</b></td> | |||
<td>Enabless IGMP snooping on this bridge.<br><b>Note:</b> this field becomes visible when 'Bridge interfaces' is set to <i>on</i> and 'Protocol' is set to <i>PPPoE</i>.</td> | |||
</tr> | </tr> | ||
<tr> | <tr> | ||
| Line 870: | Line 874: | ||
The <b>General Setup</b> section is used to set up the main operating parameters of the DHCP server. | The <b>General Setup</b> section is used to set up the main operating parameters of the DHCP server. | ||
[[File:Networking_rutos_manual_interfaces_interface_configuration_dhcp_server_general_setup_lan_{{{lan}}}.png|border|class=tlt-border]] | [[File:Networking_rutos_manual_interfaces_interface_configuration_dhcp_server_general_setup_lan_{{{lan}}}_v1.png|border|class=tlt-border]] | ||
<table class="nd-mantable"> | <table class="nd-mantable"> | ||
| Line 884: | Line 888: | ||
</tr> | </tr> | ||
<tr> | <tr> | ||
<td>Start</td> | <td>Start IP</td> | ||
<td> | <td>ip4; default: <b>{{#switch:{{{series}}}|TRB1|TRB5=192.168.2.100|#default=192.168.1.100}}</b></td> | ||
<td>The starting IP address | <td>The starting IP address of the DHCP server IP address range. E.g., if your device’s LAN IP is {{#switch:{{{series}}}|TRB1|TRB5=192.168.2.1|#default=192.168.1.1}} and your subnet mask is 255.255.255.0 that means that in your network a valid IP address has to be in the range of [{{#switch:{{{series}}}|TRB1|TRB5=192.168.2.0|#default=192.168.1.0}}..{{#switch:{{{series}}}|TRB1|TRB5=192.168.2.254|#default=192.168.1.254}}] ({{#switch:{{{series}}}|TRB1|TRB5=192.168.2.255|#default=192.168.1.255}} is a special unavailable address). If the subnet of your LAN IP address changes, this value needs to be changed accordingly.</td> | ||
</tr> | </tr> | ||
<tr> | <tr> | ||
<td> | <td>End IP</td> | ||
<td> | <td>ip4; default: <b>{{#switch:{{{series}}}|TRB1|TRB5=192.168.2.249|#default=192.168.1.249}}</b></td> | ||
<td> | <td>The ending IP address of the DHCP server IP address range. Continuing from the example above: if the start address is {{#switch:{{{series}}}|TRB1|TRB5=192.168.2.<b>100</b>|#default=192.168.1.<b>100</b>}} and the end address is {{#switch:{{{series}}}|TRB1|TRB5=192.168.2.<b>249</b>|#default=192.168.1.<b>249</b>}}, available addresses will be distributed from that range. If the subnet of your LAN IP address changes, this value needs to be changed accordingly.</td> | ||
</tr> | </tr> | ||
<tr> | <tr> | ||
<td>Lease time</td> | <td>Lease time</td> | ||
<td>integer [1..999999]; default: <b>12</b>< | <td>integer [1..999999]; default: <b>12</b><br>integer [2..999999]<span class="asterisk">*</span><br>integer [120..999999]<span class="asterisk">**</span></td> | ||
<td>A DHCP lease will expire after the amount of time specified in this field and the device that was using the lease will have to request a new one. However, if the device stays connected, its lease will be renewed after half of the specified amount of time passes (e.g., if lease time is 12 hours, then every 6 hours the device will ask the DHCP server to renew its lease).<br>The minimal amount of time that can be specified is 2 minutes.< | <td>A DHCP lease will expire after the amount of time specified in this field and the device that was using the lease will have to request a new one. However, if the device stays connected, its lease will be renewed after half of the specified amount of time passes (e.g., if lease time is 12 hours, then every 6 hours the device will ask the DHCP server to renew its lease).<br>The minimal amount of time that can be specified is 2 minutes.<br><span class="asterisk">*</span>If selected Units is Minutes.<br><span class="asterisk">**</span>If selected Units is seconds.</td> | ||
</tr> | </tr> | ||
<tr> | <tr> | ||
| Line 1,044: | Line 1,048: | ||
<u><b> | <u><b> | ||
Note:</b> Relay is additional software that can be installed from the <b> | Note:</b> Relay is additional software that can be installed from the <b>System → [[{{{name}}} Package Manager|Package Manager]]</b> page.</u> | ||
}} | }} | ||
| Line 1,071: | Line 1,075: | ||
The <b>UDP Broadcast Relay</b> will listen for broadcast traffic on the specified port and relay that traffic to the specified interface(s). | The <b>UDP Broadcast Relay</b> will listen for broadcast traffic on the specified port and relay that traffic to the specified interface(s). | ||
<i><b>Note:</b> UDP Broadcast Relay is additional software that can be installed from the <b> | <i><b>Note:</b> UDP Broadcast Relay is additional software that can be installed from the <b>System → [[{{{name}}} Package Manager|Package Manager]]</b> page.</i> | ||
[[File:Networking_rutos_manual_interfaces_interface_configuration_udp_broadcast_relay.png|border|class=tlt-border]] | [[File:Networking_rutos_manual_interfaces_interface_configuration_udp_broadcast_relay.png|border|class=tlt-border]] | ||
| Line 1,097: | Line 1,101: | ||
</tr> | </tr> | ||
</table> | </table> | ||
{{#ifeq: {{{mobile}}} | 1 | | {{#ifeq:{{{series}}}|TRB5||{{#ifeq: {{{mobile}}} | 1 | | ||
===Mobile Data Limit=== | ===Mobile Data Limit=== | ||
---- | ---- | ||
| Line 1,104: | Line 1,108: | ||
<i>In order to view the Mobile Data Limit section, the interface <b>protocol must be set to Mobile</b>.</i> | <i>In order to view the Mobile Data Limit section, the interface <b>protocol must be set to Mobile</b>.</i> | ||
[[File: | [[File:Networking_rutos_manual_interfaces_interface_configuration_mobile_mobile_data_limit_v2.png|border|class=tlt-border]] | ||
<table class="nd-mantable"> | <table class="nd-mantable"> | ||
| Line 1,145: | Line 1,149: | ||
<td>phone number; default: <b>none</b></td> | <td>phone number; default: <b>none</b></td> | ||
<td>Recipient's phone numbers.</td> | <td>Recipient's phone numbers.</td> | ||
</tr> | |||
<tr> | |||
<td>Data limit clear due</td> | |||
<td><b>none</b></td> | |||
<td>Display the date of the next automatic data limit clear.</td> | |||
</tr> | </tr> | ||
</table> | </table> | ||
<font size="-1"><i><span class="asterisk">*</span>Your carrier's data usage accounting may differ. Teltonika is not liable should any accounting discrepancies occur.</i></font>|}} | <font size="-1"><i><span class="asterisk">*</span>Your carrier's data usage accounting may differ. Teltonika is not liable should any accounting discrepancies occur.</i></font>|}}}} | ||
[[Category:{{{name}}} Network section]] | [[Category:{{{name}}} Network section]] | ||
Latest revision as of 13:55, 20 February 2025
The information in this page is updated in accordance with firmware version .
Summary
The Interfaces page is used to to set up network interfaces.
This manual page provides an overview of the Interfaces page in {{{name}}} devices.
If you're having trouble finding this page or some of the parameters described here on your device's WebUI, you should turn on "Advanced WebUI" mode. You can do that by clicking the "Advanced" button, located at the top of the WebUI.
Network Interfaces
The Network Interfaces section displays interfaces currently existing on this device.
[[File:Networking_rutos_manual_interfaces_network_interfaces_lan_{{{lan}}}_mobile_{{{mobile}}}_dualsim_{{{dualsim}}}_dualmodem_{{{dualmodem}}}_wired_{{{wired}}}_v1.png|border|class=tlt-border]]
Add Interface
The Add Interface section is used to create additional network interfaces. To create a new interface, simply enter a custom name for it and click the 'Add' button.
Interface configuration
This section provides information on network interface configuration. There are {{{no_of_if}}} main types of interfaces on the device:
- Ethernet LAN
Different types of interfaces can be configured under different protocols:
| Static | DHCP | DHCPv6 | PPPoE | |
|---|---|---|---|---|
| Ethernet LAN |
To begin configuring an interface, click the 'Edit' button on the right side of the interface:
[[File:Networking_rutos_manual_interfaces_network_interfaces_edit_button_lan_{{{lan}}}.png]]
General Setup
The General Setup section is used to configure the protocol of an interface and all the different parameters that go along with each protocol. If None protocol is chosen, all other interface settings will be ignored. The following sections are different for each protocol.
General Setup: Static
The static protocol uses a predefined manual configuration instead of obtaining parameters automatically via a DHCP lease.
[[File:Networking_rutos_manual_interfaces_interface_configuration_general_setup_static_ip_lan_{{{lan}}}.png|border|class=tlt-border]]
| Field | Value | Description |
|---|---|---|
| IPv4 address | ip4; default[for LAN]: 192.168.1.1 | The IPv4 address interface of this interface. An IP address identifies a device on a network and allows it to communicate with other devices. |
| IPv4 netmask | netmask; default[for LAN]: 255.255.255.0 | The IPv4 netmask of this interface. A netmask is used to define how "large" a network is by specifying which part of the IP address denotes the network and which part denotes a device. |
| IPv4 gateway | ip4; default: none | The IPv4 gateway address used by this interface. An interface's default gateway is the default address through which all outgoing traffic is directed. |
| IPv4 broadcast | ip4; default: none | The IPv4 broadcast address used by this interface. IP broadcasts are used by BOOTP and DHCP clients to find and send requests to their respective servers. |
| DNS servers | ip4; default: none | DNS server addresses that this interface will use. If left empty, DNS servers are assigned automatically. To see what DNS servers are currently used, you can check the contents of the /tmp/resolv.conf.auto file. |
General Setup: DHCP
The DHCP protocol is used to set up an interface which obtains its configuration parameters automatically via a DHCP lease.
| Field | Value | Description |
|---|---|---|
| Hostname to send when requesting DHCP | string; default: none | A hostname for this interface used to identify this machine on the DHCP server. |
General Setup: DHCPv6
The DHCPv6 protocol is used to set up an IPv6 interface which obtains its configuration parameters automatically via a DHCP lease.
| Field | Value | Description |
|---|---|---|
| Request IPv6-address | try | force | disabled; default: try | Defines the behaviour for requesting an address. |
| Request IPv6-prefix of length | integer [0..64] | Automatic | disabled ; default: Automatic | Defines how this will request a IPv6 ULA-Prefix length. If set to 'disabled' the interface will obtain a single IPv6 address without a subnet for routing. |
General Setup: PPPoE
The PPPoE protocol is used to set up a PPP (Point-to-Point Protocol) connection over the Ethernet port.
| Field | Value | Description |
|---|---|---|
| PAP/CHAP username | string; default: none | Username used in PAP/CHAP authentication. |
| PAP/CHAP password | string; default: none | Password used in PAP/CHAP authentication. |
| Access Concentrator | string; default: none | The Access Concentrator to connect to. ISPs used Access Concentrators to route their PPPoE connections. Usually, the settings are received automatically, however in some cases it is required to specify the name for an Access Concentrator. Leave empty to detect Access Concentrators automatically. |
| Service name | string; default: none | The Service Name to connect to. Leave empty to detect Service name automatically. |
Advanced Settings
The Advanced Settings section is used to set up some of the more specific and less frequently used interface parameters. This section is different for each protocol.
Advanced Settings: Static
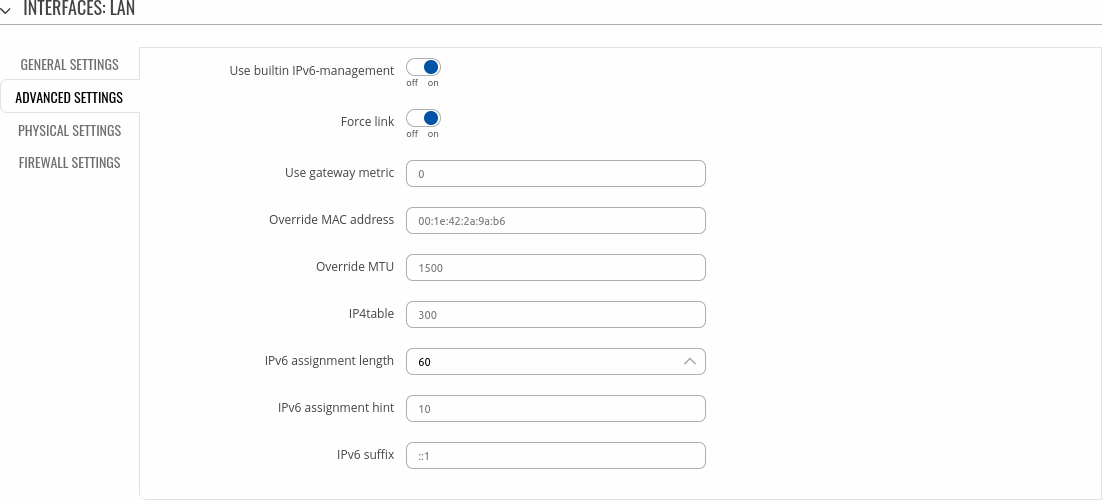
Advanced Settings information for Static protocol is provided in the table below.
| Field | Value | Description |
|---|---|---|
| Use built in IPv6-management | off | on; default: on | Specifies whether to enable prefix delegation. |
| Force link | off | on; default: on | Specifies whether interface settings (IP, route, gateway) are assigned to the interface regardless of the link being active or only after the link has become active. |
| Use gateway metric | integer; default: 3 | A metric specifies the priority of the gateway. The lower the metric, the higher the priority (0 for highest priority). |
| Override MAC address | mac; default: none | When set, uses a user-defined MAC address for the interface instead of the default one. |
| Override MTU | integer [1..9200]; default: none | Changes the interface's allowed maximum transmission unit (MTU) size. It is the largest size of a protocol data unit (PDU) that can be transmitted in a single network layer transaction.
|
| IP4table | integer [0..99999999]; default: none | ID of the routing table in [[{{{name}}}_Routing#Routing_Tables|Routing tables]] page. |
Advanced Settings: DHCP
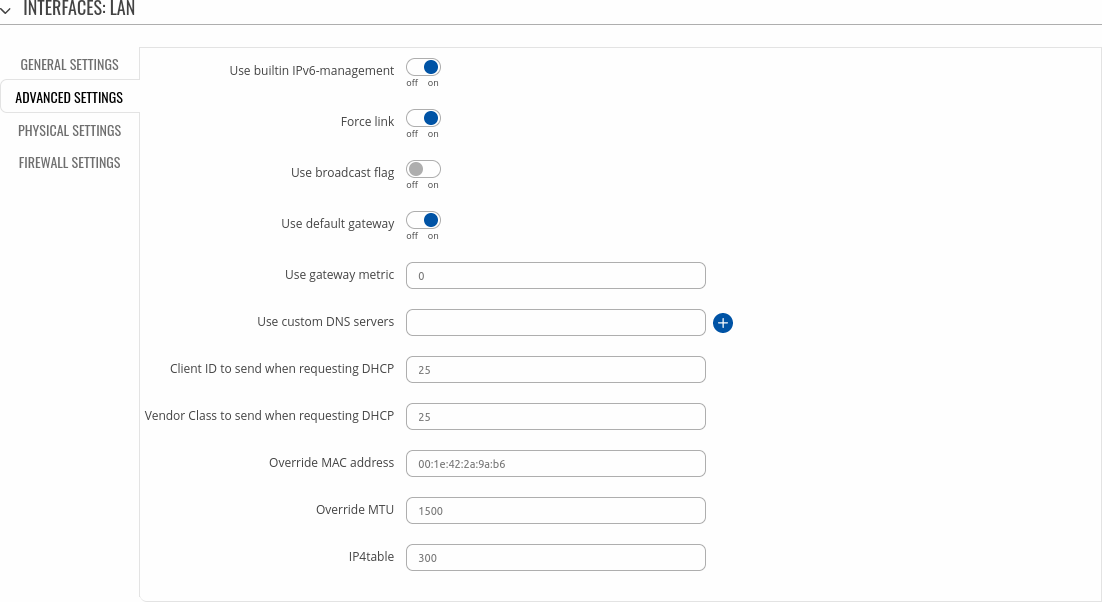
Advanced Settings information for DHCP protocol is provided in the table below.
| Field | Value | Description |
|---|---|---|
| Use built-in IPv6 management | off | on; default: on | Specifies whether to enable prefix delegation. |
| Force link | off | on; default: off | Specifies whether interface settings (IP, route, gateway) are assigned to the interface regardless of the link being active or only after the link has become active. |
| Use broadcast flag | off | on; default: off | Required for certain ISPs. For example, Charter with DOCSIS 3. |
| Use default gateway | off | on; default: on | When checked, creates a default route for the interface. |
| Use gateway metric | integer; default: none | A metric specifies the priority of the gateway. The lower the metric, the higher the priority (0 for highest priority). |
| Use custom DNS servers | ip4; default: none | Specifies custom DNS servers. If left empty, DNS servers advertised by peer are used. |
| Client ID to send when requesting DHCP | string; default: none | Client ID which will be sent when requesting a DHCP lease. |
| Vendor Class to send when requesting DHCP | string; default: none | Vendor class which will be sent when requesting a DHCP lease. |
| Override MAC address | mac; default: none | When set, uses a user-defined MAC address for the interface instead of the default one. |
| Override MTU | integer [1..9200]; default: none | Changes the interfaces allowed maximum transmission unit (MTU) size. It is the largest size of a protocol data unit (PDU) that can be transmitted in a single network layer transaction.
|
| IP4table | integer [0..99999999]; default: none | ID of the routing table in [[{{{name}}}_Routing#Routing_Tables|Routing tables]] page. |
Advanced Settings: DHCPv6
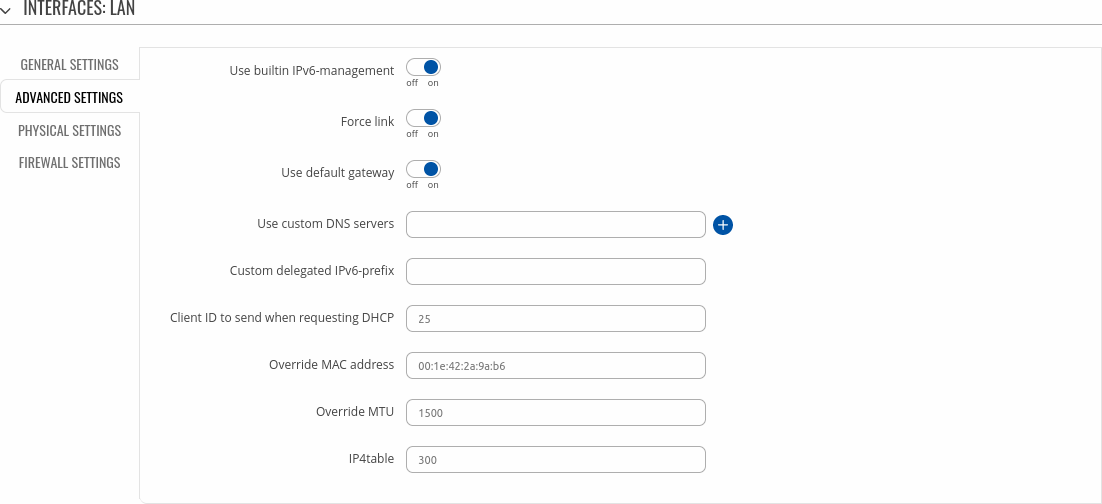
Advanced Settings information for DHCPv6 protocol is provided in the table below.
| Field | Value | Description |
|---|---|---|
| Use built in IPv6-management | off | on; default: on | Specifies whether to enable prefix delegation. |
| Force link | off | on; default: off | Specifies whether interface settings (IP, route, gateway) are assigned to the interface regardless of the link being active or only after the link has become active. |
| Use default gateway | off | on; default: on | When checked, creates a default route for the interface. |
| Use custom DNS servers | ip4; default: none | Specifies custom DNS servers. If left empty, DNS servers advertised by peer are used. |
| Custom delegated IPv6-prefix | ip6 prefix; default: none | Uses an (additional) user-provided IPv6 prefix for distribution to clients. |
| Client ID to send when requesting DHCP | string; default: none | Client ID which will be sent when requesting a DHCP lease. |
| Override MAC address | mac; default: none | When set, uses a user-defined MAC address for the interface instead of the default one. |
| Override MTU | integer [1..9200]; default: none | Changes the interface's allowed maximum transmission unit (MTU) size. It is the largest size of a protocol data unit (PDU) that can be transmitted in a single network layer transaction.
|
| IP4table | integer [0..99999999]; default: none | ID of the routing table in [[{{{name}}}_Routing#Routing_Tables|Routing tables]] page. |
Advanced Settings: PPPoE
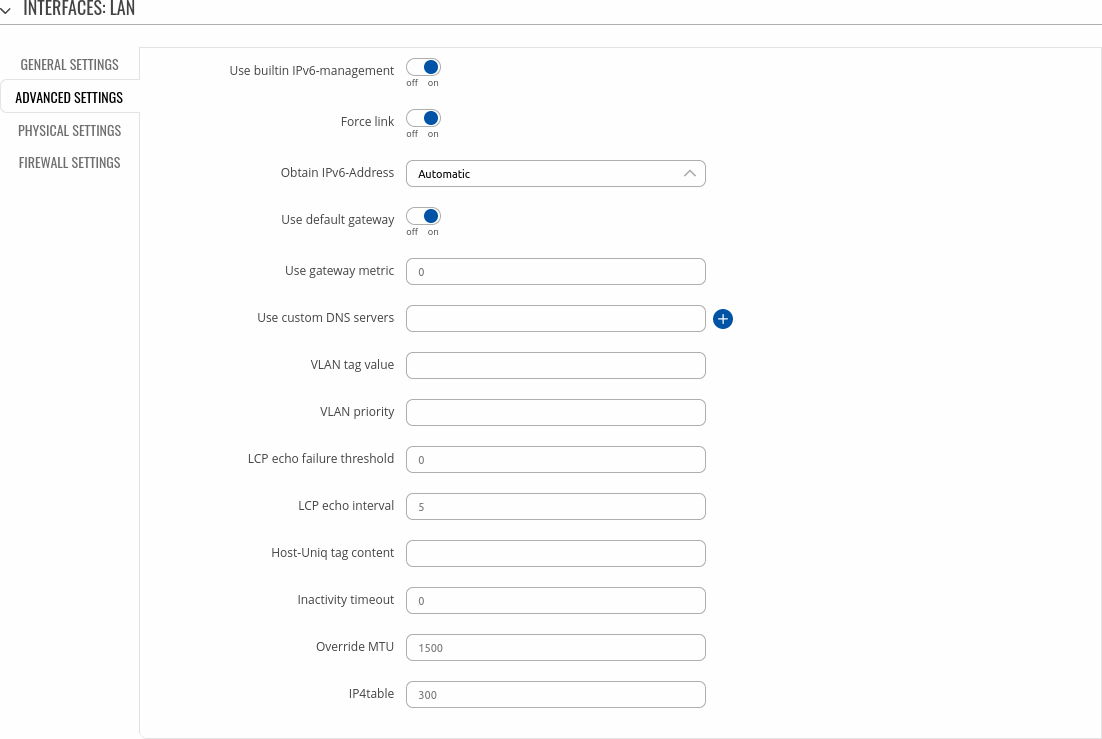
Advanced Settings information for PPPoE protocol is provided in the table below.
| Field | Value | Description |
|---|---|---|
| Use built-in IPv6 management | off | on; default: on | Specifies whether to enable prefix delegation. |
| Force link | off | on; default: off | Specifies whether interface settings (IP, route, gateway) are assigned to the interface regardless of the link being active or only after the link has become active. |
| Obtain IPv6 address | Automatic | Disabled | Manual; default: Automatic | Defines behaviour for obtaining an IPv6 address. |
| Use default gateway | off | on; default: on | When checked, creates a default route for the interface. |
| Use gateway metric | integer; default: none | A metric specifies the priority of the gateway. The lower the metric, the higher the priority (0 for highest priority). |
| Use custom DNS servers | ip4; default: none | Specifies custom DNS servers. If left empty, DNS servers advertised by peer are used. |
| VLAN tag value | integer [0..7]; default: none | VLAN tag value. |
| VLAN priority | integer [0..4095]; default: none | VLAN priority. |
| LCP echo failure threshold | integer; default: none | Presumes peer to be dead after given amount of LCP echo failures. Leave it at 0 to ignore failures. |
| LCP echo interval | integer; default: none | Sends LCP echo requests at the given interval in seconds. This function is only effective in conjunction with failure threshold. |
| Host-Uniq tag content | raw hex-encoded bytes; default: none | Leave empty unless your ISP require this. |
| Inactivity timeout | mac; default: none | Close inactive connection after the given amount of seconds. Leave it at 0 to persist connection. |
| Override MTU | integer [1..1500]; default: none | Maximum Transmission Unit (MTU) – specifies the largest possible size of a data packet. |
| IP4table | integer [0..99999999]; default: none | ID of the routing table in [[{{{name}}}_Routing#Routing_Tables|Routing tables]] page. |
Physical Settings
The Physical Settings section is used to create associations with physical interfaces and bridge network interfaces.
| Field | Value | Description |
|---|---|---|
| Bridge interfaces | off | on; default: on | Bridges physical interfaces specified in this configuration. |
| Enable STP | off | on; default: off | Turns the use of Spanning Tree Protocol (STP) for this interface on or off. Note: this field becomes visible when 'Bridge interfaces' is set to on. |
| Enable IGMP | off | on; default: off | Enabless IGMP snooping on this bridge. Note: this field becomes visible when 'Bridge interfaces' is set to on and 'Protocol' is set to PPPoE. |
| Interface | network interface(s); default: none | Ties this network interface to physical device interfaces such as Ethernet . |
Firewall Settings
The Firewall Settings section is used to specify to which firewall zone if any this interface belongs. Assigning an interface to a zone may provide easier configuration of firewall rules. For example, instead of configuring separate rules for each WAN interface, you can add all WAN interfaces into a single firewall zone and make the rule apply to that zone instead.
More firewall zone settings can be configured from the Network → Firewall → General Settings → [[{{{name}}}_Firewall#Zones|Zones]] section.
| Field | Value | Description |
|---|---|---|
| Create / Assign firewall-zone | firewall zone; default: none | Assigns this interface to the specified firewall zone. |
DHCP Server
A DHCP (Dynamic Host Configuration Protocol) server is a service that can automatically configure the TCP/IP settings of any device that requests such a service. If you connect a device that has been configured to obtain an IP address automatically, the DHCP server will lease out an IP address from the available IP pool and the device will be able to communicate within the private network.
To make the DHCP Server section visible, set interface protocol to Static.
DHCP Server: General Setup
The General Setup section is used to set up the main operating parameters of the DHCP server.
[[File:Networking_rutos_manual_interfaces_interface_configuration_dhcp_server_general_setup_lan_{{{lan}}}_v1.png|border|class=tlt-border]]
| Field | Value | Description |
|---|---|---|
| Enable DHCP | Enable | Disable | DHCP Relay*; default: Enable | Turns the DHCP server on or off or enables DHCP relay*. If DHCP Relay* is selected, you will be prompted to enter an IP address of another DHCP server in your LAN. In this case, whenever a new machine connects to this device, it will redirect any DHCP requests to the specified DHCP Server. |
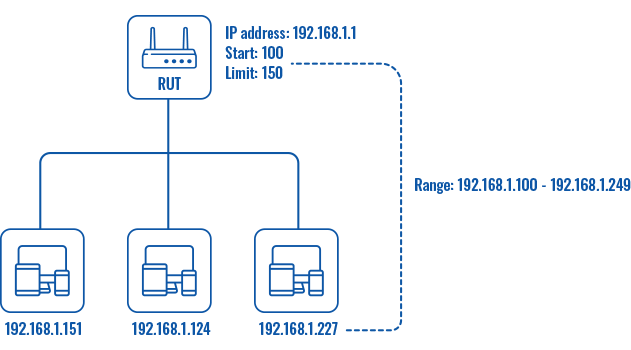
| Start IP | ip4; default: 192.168.1.100 | The starting IP address of the DHCP server IP address range. E.g., if your device’s LAN IP is 192.168.1.1 and your subnet mask is 255.255.255.0 that means that in your network a valid IP address has to be in the range of [192.168.1.0..192.168.1.254] (192.168.1.255 is a special unavailable address). If the subnet of your LAN IP address changes, this value needs to be changed accordingly. |
| End IP | ip4; default: 192.168.1.249 | The ending IP address of the DHCP server IP address range. Continuing from the example above: if the start address is 192.168.1.100 and the end address is 192.168.1.249, available addresses will be distributed from that range. If the subnet of your LAN IP address changes, this value needs to be changed accordingly. |
| Lease time | integer [1..999999]; default: 12 integer [2..999999]* integer [120..999999]** |
A DHCP lease will expire after the amount of time specified in this field and the device that was using the lease will have to request a new one. However, if the device stays connected, its lease will be renewed after half of the specified amount of time passes (e.g., if lease time is 12 hours, then every 6 hours the device will ask the DHCP server to renew its lease). The minimal amount of time that can be specified is 2 minutes. *If selected Units is Minutes. **If selected Units is seconds. |
| Units | Hours | Minutes | Seconds; default: Hours | Lease time units. |
* When an interface is set to act as a DHCP Relay, it redirects all received DHCP request messages to another specified DHCP server:
DHCP Server: Advanced Settings
Refer to the table below for information on the Advanced Settings section.
| Field | Value | Description |
|---|---|---|
| Dynamic DHCP | off | on; default: on | Enables dynamic allocation of client addresses. If this is disabled, only clients that have static IP leases will be served. |
| Force | off | on; default: off | The DHCP force function ensures that the device will always start it’s DHCP server, even if there is another DHCP server already running in the its network. By default the device’s DHCP server will not start when it is connected to a network segment that already has a working DHCP server. |
| IPv4 Netmask | netmask; default: none | Sends a different netmask than the LAN netmask to DHCP clients. |
| DHCP Options | dhcp options; default: none | Additional options to be added to the DHCP server. For example with '26,1470' or 'option:mtu, 1470' you can assign an MTU value per DHCP. You can find more information on DHCP Options here. |
| Force DHCP options | off | on; default: off | If enabled, DHCP options will be sent even if it's not requested. |
DHCP Server: IPv6 Settings
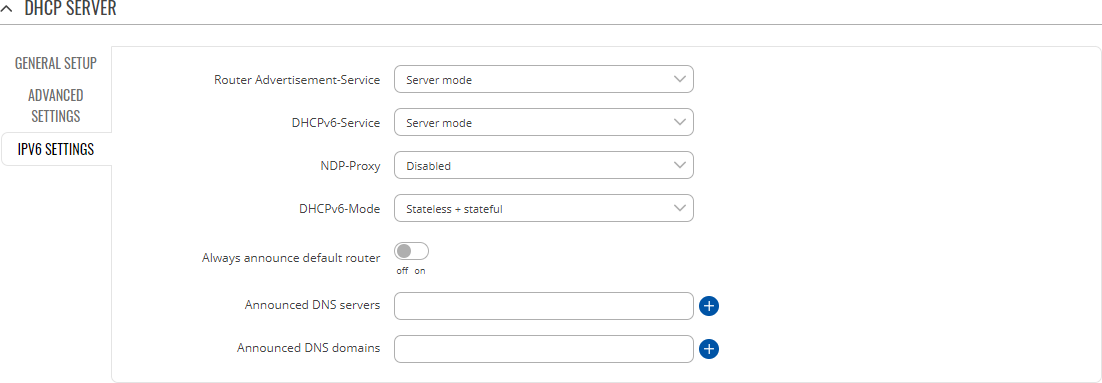
Refer to the table below for information on the IPv6 Settings section.
| Field | Value | Description |
|---|---|---|
| Router Advertisement Service | Disabled | Relay mode | Server mode | Hybrid mode; default: Disabled | Specifies whether router advertisements should be enabled (server mode), relayed or disabled. |
| DHCPv6 Service | Disabled | Relay mode | Server mode | Hybrid mode; default: Disabled | Specifies whether DHCPv6 server should be enabled (server), relayed (relay) or disabled (disabled). |
| NDP Proxy | Disabled | Relay mode | Hybrid mode; default: Disabled | Specifies whether NDP should be relayed or disabled. |
| DHCPv6 Mode | Stateless | Stateful-only | Stateless + stateful; default: Stateless + stateful | Router announcement (RA) mode. |
| Always announce default router | off | on; default: off | Default router lifetime in the the router announcement (RA) message will be set if default route is present and a global IPv6 address or if default route is present but no global IPv6 address or neither of both conditions. |
| Announced DNS server | ip; default: none | Supplements DHCP-assigned DNS server entries with ones specified in this field. |
| Announced DNS domains | ip; default: none | DNS domain handed out to DHCP clients. |
Static Lease
Static IP leases are used to reserve specific IP addresses for specific devices by binding them to their MAC address. This is useful when you have a stationary device connected to your network that you need to reach frequently, e.g., printer, IP phone, etc.
This section displays static IP leases currently existing on this device.
To make the Static Lease section visible, set interface protocol to Static.
The Static Lease list is empty by default. To add a new Static Lease look to the Add Lease section; enter a custom name for the lease and click the 'Add' button.
You should be redirected to the Settings page for that lease, which should look similar to this:
| Field | Value | Description |
|---|---|---|
| MAC address | mac; default: none | MAC address of a device that will connect to this network interface. |
| IP address | ip; default: none | The IP address that will be reserved for the specified device. |
After you click 'Save & Apply' you will be redirected back to the Network Interfaces page. If you wish to modify the lease later, you can find in the Static Lease list. Simply click the 'Edit' button next to it in order to enter the Settings page for the Static Lease.
UDP Broadcast Relay
The UDP Broadcast Relay will listen for broadcast traffic on the specified port and relay that traffic to the specified interface(s).
Note: UDP Broadcast Relay is additional software that can be installed from the System → [[{{{name}}} Package Manager|Package Manager]] page.
| Field | Value | Description |
|---|---|---|
| Enable | off | on; default: off | Turns UDP Broadcast Relay on or off. |
| Port | integer [0..655353]; default: none | UDP port to listen for broadcast traffic. |
| Interfaces | network interface(s); default: none | The interface(s) to which the traffic will be redirected to. |
[[Category:{{{name}}} Network section]]


