VLAN Inter-Zone accessibility control configuration example: Difference between revisions
Justas.Cip (talk | contribs) No edit summary |
Justas.Cip (talk | contribs) No edit summary |
||
| Line 9: | Line 9: | ||
In this example, we are assuming that the VLANs are already set up, we will configure the firewall accordingly. If you need information on how to create VLANs on your device please refer to this artice: [[VLAN_Set_Up|VLAN set up]]. For this article we have 3 separate VLANs created: | In this example, we are assuming that the VLANs are already set up, we will configure the firewall accordingly. If you need information on how to create VLANs on your device please refer to this artice: [[VLAN_Set_Up|VLAN set up]]. For this article we have 3 separate VLANs created: | ||
*lan | IP 192.168.1.1/24 | *lan | IP 192.168.1.1/24 | ||
*lan2 | IP 192.168.2.1/24 | *lan2 | IP 192.168.2.1/24 | ||
*lan3 | IP 192.168.3.1/24 | *lan3 | IP 192.168.3.1/24 | ||
| Line 23: | Line 23: | ||
[[File:Allowlan1tolan2pingoriginal.png|border|class=tlt-border|]] | [[File:Allowlan1tolan2pingoriginal.png|border|class=tlt-border|]] | ||
To disable VLAN to VLAN communication, navigate to '''Network -> Firewall -> General Settings'''. Press '''Edit''' on the '''LAN''' zone (lan -> wan), click on '''Forward''' and select '''Drop or Reject'''. Make sure that all created | To disable VLAN to VLAN communication, navigate to '''Network -> Firewall -> General Settings'''. Press '''Edit''' on the '''LAN''' zone (lan -> wan), click on '''Forward''' and select '''Drop or Reject'''. Make sure that all created VLANs are added in the Covered networks tab: | ||
[[File:Disablevlantovlandefault.png|border|class=tlt-border|]] | [[File:Disablevlantovlandefault.png|border|class=tlt-border|]] | ||
Now if we try to reach lan2 from lan, | Now if we try to reach lan2 from lan, the devices are not able to communicate: | ||
[[File:Hereswhathappens.png|border|class=tlt-border|]] | [[File:Hereswhathappens.png|border|class=tlt-border|]] | ||
==VLAN to VLAN communication with inter-zone forwarding== | |||
In order to get more control over VLANs, an '''inter-zone''' forwarding functionality should be used. To start with, we will need to create new firewall zones: LAN1, LAN2 and LAN3. To add new zones, navigate to '''Network -> Firewall -> General Settings'''. In the Zones section, press ADD button to add a new zone. | |||
[[File:Addnewfwzone1.png|border|1000px|class=tlt-border|]] | |||
A new window will open, there configure the settings according to the points below and press Save & Apply.: | |||
* Name: lan1 | |||
* Input: Accept | |||
* Output: Accept | |||
* Forward: Reject | |||
* Covered networks: lan | |||
[[File:Lan1zonesettings.png|border|class=tlt-border|]] | |||
---- | |||
Follow these steps to create Firewall Zones lan2 and lan3. Lan2 zone settings: | |||
* Name: lan2 | |||
* Input: Accept | |||
* Output: Accept | |||
* Forward: Reject | |||
* Covered networks: lan2 | |||
Lan3 zone settings: | |||
* Name: lan3 | |||
* Input: Accept | |||
* Output: Accept | |||
* Forward: Reject | |||
* Covered networks: lan3 | |||
Newly created firewall zones should look like this: | |||
[[File:Newlycreatedfirewallzones.png|border|1000px|class=tlt-border|]] | |||
Revision as of 11:57, 14 December 2022
Main Page > General Information > Configuration Examples > Router control and monitoring > VLAN Inter-Zone accessibility control configuration exampleIntroduction
In this example we will show how to manage VLAN to VLAN communication with either one firewall zone or multiple firewall zones.
If you're having trouble finding any page or some of the parameters described here on your device's WebUI, you should turn on "Advanced WebUI" mode. You can do that by clicking the "Basic" button under "Mode" which is located at the top-right corner of the WebUI.

Setting up VLANs
In this example, we are assuming that the VLANs are already set up, we will configure the firewall accordingly. If you need information on how to create VLANs on your device please refer to this artice: VLAN set up. For this article we have 3 separate VLANs created:
- lan | IP 192.168.1.1/24
- lan2 | IP 192.168.2.1/24
- lan3 | IP 192.168.3.1/24
Created VLANs in the WebUI should look similar to this:
VLAN to VLAN communication with one firewall zone
Initially, when we create VLAN interfaces, all VLANs are able to communicate with each other, for example pinging from lan to lan2:
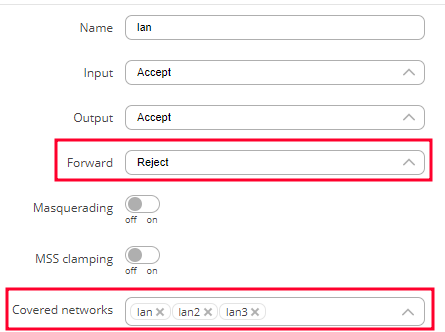
To disable VLAN to VLAN communication, navigate to Network -> Firewall -> General Settings. Press Edit on the LAN zone (lan -> wan), click on Forward and select Drop or Reject. Make sure that all created VLANs are added in the Covered networks tab:
Now if we try to reach lan2 from lan, the devices are not able to communicate:
VLAN to VLAN communication with inter-zone forwarding
In order to get more control over VLANs, an inter-zone forwarding functionality should be used. To start with, we will need to create new firewall zones: LAN1, LAN2 and LAN3. To add new zones, navigate to Network -> Firewall -> General Settings. In the Zones section, press ADD button to add a new zone.
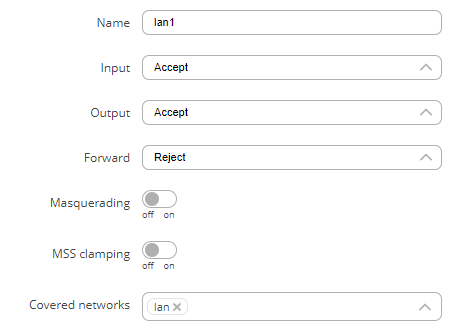
A new window will open, there configure the settings according to the points below and press Save & Apply.:
- Name: lan1
- Input: Accept
- Output: Accept
- Forward: Reject
- Covered networks: lan
Follow these steps to create Firewall Zones lan2 and lan3. Lan2 zone settings:
- Name: lan2
- Input: Accept
- Output: Accept
- Forward: Reject
- Covered networks: lan2
Lan3 zone settings:
- Name: lan3
- Input: Accept
- Output: Accept
- Forward: Reject
- Covered networks: lan3
Newly created firewall zones should look like this:


