RMS VPN App: Difference between revisions
No edit summary |
|||
| Line 3: | Line 3: | ||
==Get the app== | ==Get the app== | ||
The app is free and currently available for these platforms: | The app is free and currently available for these platforms: | ||
*[[File:Rmsvpnapp6.png|36px|link=https://downloads.rms.teltonika-networks.com/rms/vpn/ | *[[File:Rmsvpnapp6.png|36px|link=https://downloads.rms.teltonika-networks.com/rms/vpn/Teltonika_RMS_VPN_Setup_latest.exe]] Windows: Get the app [https://downloads.rms.teltonika-networks.com/rms/vpn/Teltonika_RMS_VPN_Setup_latest.exe here]. '''<span style="color:#ff0000">Important note: the app for windows is still in the BETA stage, and therefore minor bugs may be expected</span>''' | ||
*[[File:Rmsvpnapp7.png|36px|link=https://play.google.com/store/apps/details?id=com.teltonika.rms.vpn]] Android: Get the app from the Google Play store [https://play.google.com/store/apps/details?id=com.teltonika.rms.vpn here]. | *[[File:Rmsvpnapp7.png|36px|link=https://play.google.com/store/apps/details?id=com.teltonika.rms.vpn]] Android: Get the app from the Google Play store [https://play.google.com/store/apps/details?id=com.teltonika.rms.vpn here]. | ||
*[[File:Rmsvpnapp8.png|36px|link=https://apps.apple.com/us/app/teltonika-rms-vpn/id6445921937]] macOS: Get the app from the App store [https://apps.apple.com/us/app/teltonika-rms-vpn/id6445921937 here]. | *[[File:Rmsvpnapp8.png|36px|link=https://apps.apple.com/us/app/teltonika-rms-vpn/id6445921937]] macOS: Get the app from the App store [https://apps.apple.com/us/app/teltonika-rms-vpn/id6445921937 here]. | ||
==Overview== | ==Overview== | ||
Here in the overview, you can check all available '''VPN hubs''' and '''Quick connect''' connections and start them. | Here in the overview, you can check all available '''VPN hubs''' and '''Quick connect''' connections and start them. | ||
Revision as of 07:52, 13 February 2024
Summary
The RMS VPN App features a very simple and easy way of connecting to your device's VPN. Just launch your app, start your VPN hub or Quick connect and you're already in the VPN session. Managing (creating/configuring/deleting) VPN hubs / Quick Connect sessions can only be done on the website while using VPN sessions that have been already created can be done on the app too.
Get the app
The app is free and currently available for these platforms:
 Windows: Get the app here. Important note: the app for windows is still in the BETA stage, and therefore minor bugs may be expected
 Android: Get the app from the Google Play store here.
 macOS: Get the app from the App store here.
Overview
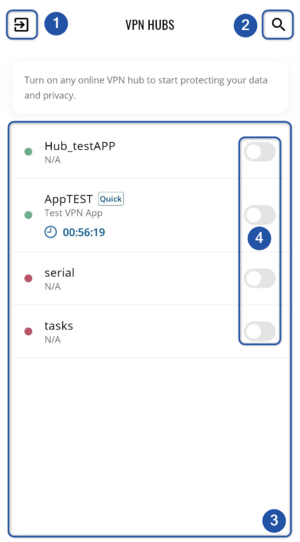
Here in the overview, you can check all available VPN hubs and Quick connect connections and start them.
- While in the overview window, this button will act as a logout from the app.
- Search button will open a search bar where you can search for the required connection.
- In this whole section all your VPN hubs and Quick connect sessions will be displayed.
- Here, you can enable the connection.
Connecting to your VPN
To connect to your VPN hub or Quick connect session:
- You must first enable it ((4) in Overview)
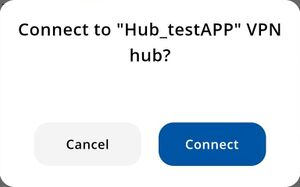
- Then confirm the connection
 ]
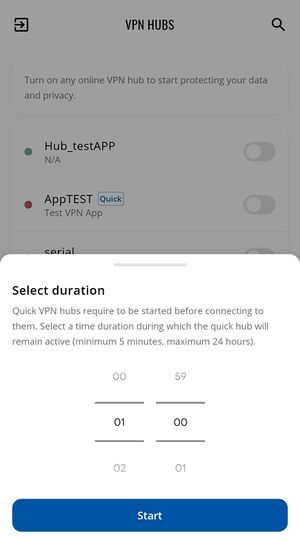
] - If you're connecting to Quick connect session, you'll additionally need to set a duration
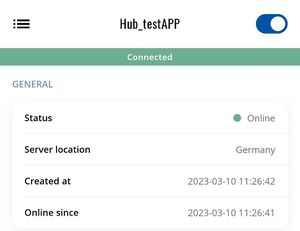
- After successful connection, you should see status Connected
VPN info
After a successful connection, you will be directed to this page. Here all information regarding the VPN connection will be displayed:
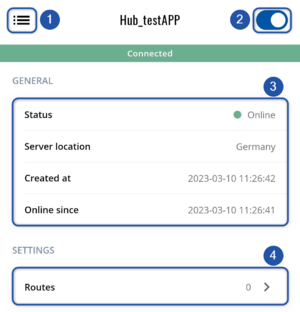
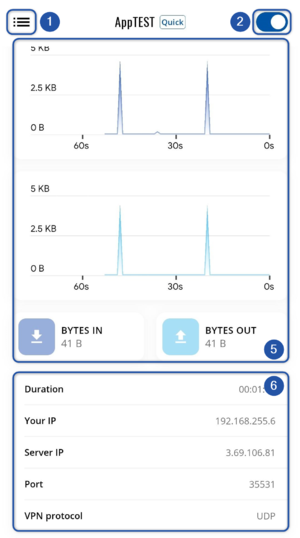
- Clicking on this button will direct you to the main menu, you will have to confirm this action, as this will terminate the current VPN connection.
- Here, you'll disconnect from this VPN.
- This shows you the general info about the current connection - is it online, the server's location that the VPN is using, when it was created, and when it was started.
- By clicking here, you'll see routes that are configured on this VPN, and by clicking on the small arrow icon near the IP address, you'll be directed to this IP address in your browser.
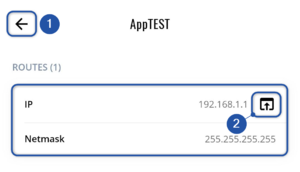
- Go back to the current connection's main page
- Open this IP address in your browser.
- Here, you'll see VPN's received/sent data usage graph.
- Other info about current connection: how long you've been connected, your virtual IP address in VPN, main server's IP address, port, and protocol.

