Wireguard Peer To Peer Configuration example: Difference between revisions
No edit summary |
No edit summary |
||
| Line 1: | Line 1: | ||
==Introduction== | |||
Introduction to a Peer-to-Peer WireGuard configuration example, this also covers LAN-TO-LAN connectivity aspect as well. | Introduction to a Peer-to-Peer WireGuard configuration example, this also covers LAN-TO-LAN connectivity aspect as well. | ||
'''WireGuard''' is simple, fast, lean, and modern VPN that utilizes secure and trusted cryptography. | |||
This page will show you an example on how to configure a basic tunnel between WireGuard interface and its peers. | This page will show you an example on how to configure a basic tunnel between WireGuard interface and its peers. | ||
<u><b>Note:</b> WireGuard is additional software that can be installed from the <b>Services → Package Manager</b> page</u> (in RUT9/RUT2 this page is located in <b>System → Package Manager</b>). | |||
==Prerequisites== | |||
For this example you need: | For this example you need: | ||
<ul> | |||
<li>Three RUTOS devices</li> | |||
<li>An end device to configure devices (PC, Laptop, Tablet or Smartphone) </li> | |||
<li>One end device must have '''Public''' IP address</li> | |||
<ul> | |||
==WireGuard Instances== | |||
To create Instance enter its name and click the <b>Add</b> button. | |||
< | Then click the <b>Edit</b>[[File:Networking_rutx_manual_edit_button_v1.png]] button to configure it. | ||
[[File: Wireguard.png]] | |||
[[File: Wireguard_Add.png]] | |||
==Server Configuration== | |||
===Peer to Peer Setup=== | |||
The following part of example applies to both devices. | The following part of example applies to both devices. | ||
Before editing any fields click | Before editing any fields click [[File:Networking_rutx_manual_generate_button_v1.png]] button to generate Public and Private keys. | ||
After that you need to Enable this instance and in the ''' | After that you need to Enable this instance and in the '''<b>Listen Port</b>''' field enter your desired port. WireGuard by default uses '''<b>51820</b>''' port which will be used in this example. | ||
Lastly you need to enter IP Address for instance. We will set the SERVER will have 10.0.0.1 and Clients will have 10.0.0.2 IP addresses and increasing. | Lastly you need to enter IP Address for instance. We will set the SERVER will have 10.0.0.1 and Clients will have 10.0.0.2 IP addresses and increasing. | ||
''' | '''<b>Note:</b>''' enter IP address '''<b>and</b>''' its mask e.g. '''<b>10.0.0.1/24</b>''' | ||
''' | '''<b>Note:</b>''' You will need to copy the Public and Private Keys for Peer instances between server and Clients | ||
<ul> | |||
<li>Please ensure that you save the Public key for later use</li> | |||
<li>Enter the IP address of the WireGuard Interface on the server (e.g. 10.0.0.1/24) </li> | |||
<ul> | |||
[[File:WireGuard_Server.png]] | |||
==Peers Configuration== | |||
=== ==Peer to Peer Setup== === | === ==Peer to Peer Setup== === | ||
In the | In the <b>'''General Setup<b>''' section you need to enter '''Public Key''' and '''Allowed IPs''' from the Remote instance you want to connect to. | ||
In this example a peer from Client1 needs to connect to RUTX11, which means '''SERVER''' will enter Public Key and Allowed IPs from Client1. | In this example a peer from Client1 needs to connect to RUTX11, which means '''SERVER''' will enter Public Key and Allowed IPs from Client1. | ||
| Line 81: | Line 80: | ||
You will need to create a new WireGuard instance and Peer connection, please ensure you copy the public Key that was generated via the creation of the instance, as this will be used on the Server side for the VPN. | You will need to create a new WireGuard instance and Peer connection, please ensure you copy the public Key that was generated via the creation of the instance, as this will be used on the Server side for the VPN. | ||
<ul> | |||
<li>Copy the Public Key and save it in a text file for later use, as it will be used on the Server Peer configuration</li> | |||
<li>Enter the IP address of the WireGuard interface e.g. 10.0.0.2/24</li> | |||
<li>Now we will Create a Peer connection</li> | |||
<li>Point 1 is the Server’s Public Key that was acquired when creating the instance on the Server/Main router side</li> | |||
<li>Allowed IPs are the IP ranges you want to have access to over the VPN (the remote side) </li> | |||
<li>Please ensure you enable “Route allowed IPs” </li> | |||
<li>Under “Advanced Settings” please ensure you enter the Server side Public IP address</li> | |||
<li>Save and Apply the settings</li> | |||
<ul> | |||
[[File:WireGuard_Client1.png]] | |||
[[File:WireGuard_Client1_IP_list.png]] | |||
[[File:WireGuard_Client1_HostEnd.png]] | |||
=== ==Peers Configuration Client 2== === | === ==Peers Configuration Client 2== === | ||
Client 2 is setup with the following details, WireGuard Interface IP is set as 10.0.0.3 with a LAN range of 192.168.10.0/24 | Client 2 is setup with the following details, WireGuard Interface IP is set as 10.0.0.3 with a LAN range of 192.168.10.0/24 | ||
| Line 111: | Line 110: | ||
You will need to create a new WireGuard instance and Peer connection, please ensure you copy the public Key that was generated via the creation of the instance, as this will be used on the Server side for the VPN. | You will need to create a new WireGuard instance and Peer connection, please ensure you copy the public Key that was generated via the creation of the instance, as this will be used on the Server side for the VPN. | ||
<ul> | |||
<li>Copy the Public Key and save it in a text file for later use, as it will be used on the Server Peer configuration</li> | |||
<li>Enter the IP address of the WireGuard interface e.g. 10.0.0.3/24</li> | |||
<li>Now we will Create a Peer connection</li> | |||
<li>Point 1 is the Server’s Public Key that was acquired when creating the instance on the Server/Main router side</li> | |||
<li>Allowed IPs are the IP ranges you want to have access to over the VPN (the remote side) </li> | |||
<li>Please ensure you enable “Route allowed IPs” </li> | |||
<li>Under “Advanced Settings” please ensure you enter the Server side Public IP address</li> | |||
<li>Save and Apply the settings</li> | |||
<ul> | |||
[[File:WireGuard_Client2.png]] | |||
[[File:WireGuard_Client2_IP_list.png]] | |||
[[File:WireGuard_Client2_HostEnd.png]] | |||
=== ==Peers Configuration Client 3== === | === ==Peers Configuration Client 3== === | ||
Please ensure you download WireGuard for your PC (Windows Client) | Please ensure you download WireGuard for your PC (Windows Client) | ||
Installation: | Installation: https://www.wireguard.com/install/ | ||
Once you have created a new Tunnel, you will need to add the below lines of code to finish the VPN setup, | Once you have created a new Tunnel, you will need to add the below lines of code to finish the VPN setup, | ||
<ul> | |||
<li>Address = 10.0.0.4/24</li> | |||
<li>DNS = 8.8.8.8</li> | |||
<li> [Peer] </li> | |||
<li>PublicKey = Which will be the Server’s Public Key</li> | |||
<li>AllowedIPs = IP ranges you want access to (Remote side) </li> | |||
<li>EndPoint = Server’s IP (our instance was 192.168.1.1 as it was part of the LAN) </li> | |||
<ul> | |||
[[File:WireGuard_PC_Client.png]] | |||
=== ==Peers Configuration Server== === | === ==Peers Configuration Server== === | ||
=== ==Server to Peer Setup== === | === ==Server to Peer Setup== === | ||
In the | In the <b>'''General Setup'''<b> section you need to enter <b>'''Public Key'''<b> and <b>'''Allowed IPs'''<b> from the Remote instance you want to connect to. | ||
We will be creating 3 instances, these will be the remote Peers we created above and will make use of their Public Keys to create them, such as below | We will be creating 3 instances, these will be the remote Peers we created above and will make use of their Public Keys to create them, such as below | ||
[[File:WireGuard_Server_Clients.png]] | |||
=== ==Server To Client 1== === | === ==Server To Client 1== === | ||
Create your 1<sup>st</sup> client peer under the server | Create your 1<sup>st</sup> client peer under the server | ||
<ul> | |||
<li>Enter the Public Key you created for Client 1</li> | |||
<li>Enter in the IP address you want to access on Client 1 side(LAN side and WireGuard Interface IP) </li> | |||
<li>Ensure you have enabled “Route allowed IPs” </li> | |||
<ul> | |||
[[File:WireGuard_Server_Client1.png]] | |||
=== ==Server To Client 2== === | === ==Server To Client 2== === | ||
Create your 2<sup>nd</sup> client peer under the server | Create your 2<sup>nd</sup> client peer under the server | ||
<ul> | |||
<li>Enter the Public Key you created for Client 2</li> | |||
<li>Enter in the IP address you want to access on Client 2 side(LAN side and WireGuard Interface IP) </li> | |||
<li>Ensure you have enabled “Route allowed IPs” </li> | |||
<ul> | |||
[[File:WireGuard_Server_Client2.png]] | |||
=== ==Server To Client 3 (PC)== === | === ==Server To Client 3 (PC)== === | ||
Create your 3<sup>rd</sup> client peer under the server | Create your 3<sup>rd</sup> client peer under the server | ||
<ul> | |||
<li>Enter the Public Key you created for Client 2</li> | |||
<li>Enter in the IP address you want to access on Client 3 side(LAN side and WireGuard Interface IP) </li> | |||
<li>Ensure you have enabled “Route allowed IPs” </li> | |||
<ul> | |||
[[File:WireGuard_Server_Client3.png]] | |||
=== ==Testing the Setup== === | === ==Testing the Setup== === | ||
| Line 225: | Line 224: | ||
A zone for WireGuard to WireGuard can be created as below to ensure traffic is not restricted from the server | A zone for WireGuard to WireGuard can be created as below to ensure traffic is not restricted from the server | ||
[[File:WireGuard_Firewall_Rules.png]] | |||
Once you have created your Peers and Host, via the CLI you will be able to see the new WireGuard interfaces and ping across the new VPN, below is an example | Once you have created your Peers and Host, via the CLI you will be able to see the new WireGuard interfaces and ping across the new VPN, below is an example | ||
| Line 231: | Line 230: | ||
Show peers and uptime of WireGuard instances with use of “wg” command in the CLI | Show peers and uptime of WireGuard instances with use of “wg” command in the CLI | ||
[[File:WireGuard_Test_interface_Server.png]] | |||
Ping LAN to LAN | Ping LAN to LAN | ||
[[File:WireGuard_Server_Test.png]] | |||
Ping PC Client to Client 1 | Ping PC Client to Client 1 | ||
[[File:Client_to_Client_Test.png]] | |||
Revision as of 14:18, 7 September 2023
Main Page > General Information > Configuration Examples > VPN > Wireguard Peer To Peer Configuration exampleIntroduction
Introduction to a Peer-to-Peer WireGuard configuration example, this also covers LAN-TO-LAN connectivity aspect as well.
WireGuard is simple, fast, lean, and modern VPN that utilizes secure and trusted cryptography.
This page will show you an example on how to configure a basic tunnel between WireGuard interface and its peers.
Note: WireGuard is additional software that can be installed from the Services → Package Manager page (in RUT9/RUT2 this page is located in System → Package Manager).
Prerequisites
For this example you need:
- Three RUTOS devices
- An end device to configure devices (PC, Laptop, Tablet or Smartphone)
- One end device must have Public IP address
- Please ensure that you save the Public key for later use
- Enter the IP address of the WireGuard Interface on the server (e.g. 10.0.0.1/24)
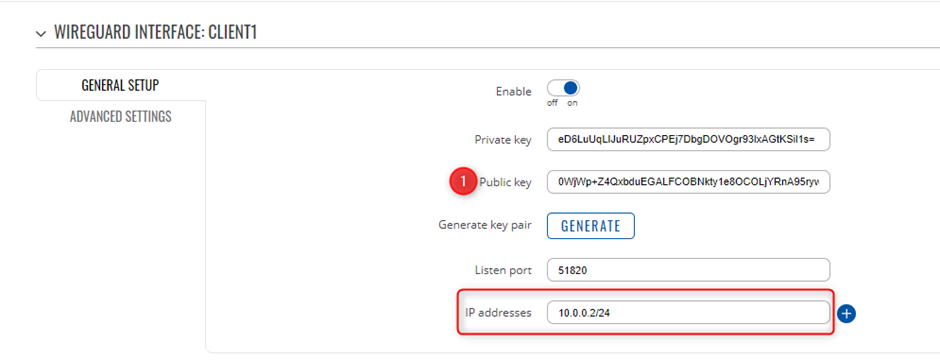
- Copy the Public Key and save it in a text file for later use, as it will be used on the Server Peer configuration
- Enter the IP address of the WireGuard interface e.g. 10.0.0.2/24
- Now we will Create a Peer connection
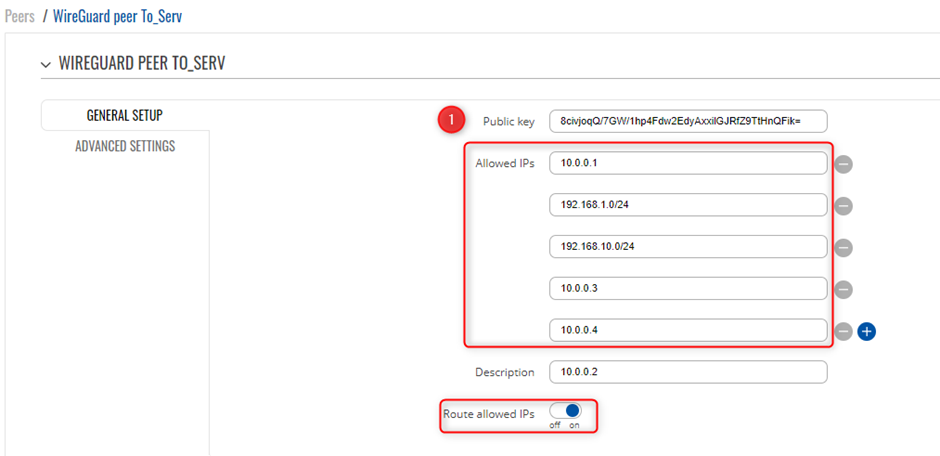
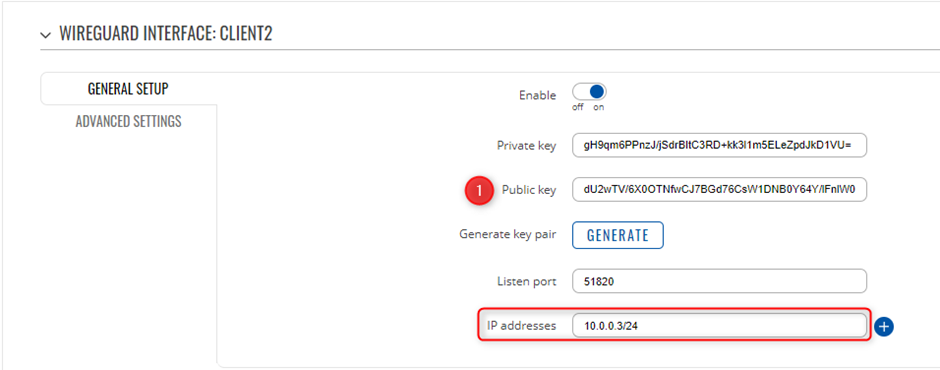
- Point 1 is the Server’s Public Key that was acquired when creating the instance on the Server/Main router side
- Allowed IPs are the IP ranges you want to have access to over the VPN (the remote side)
- Please ensure you enable “Route allowed IPs”
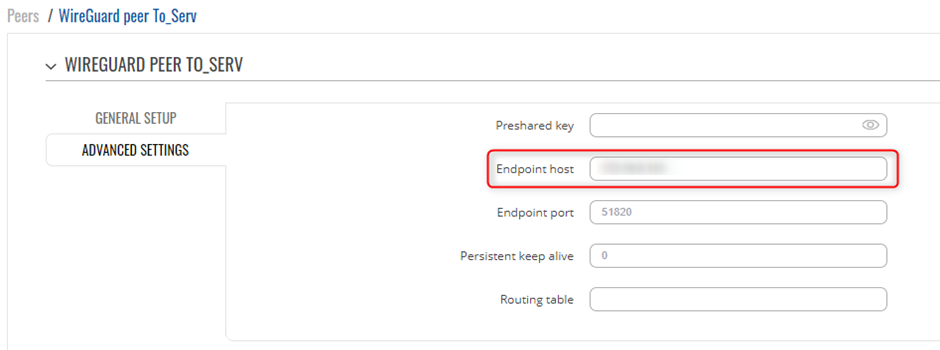
- Under “Advanced Settings” please ensure you enter the Server side Public IP address
- Save and Apply the settings
- Copy the Public Key and save it in a text file for later use, as it will be used on the Server Peer configuration
- Enter the IP address of the WireGuard interface e.g. 10.0.0.3/24
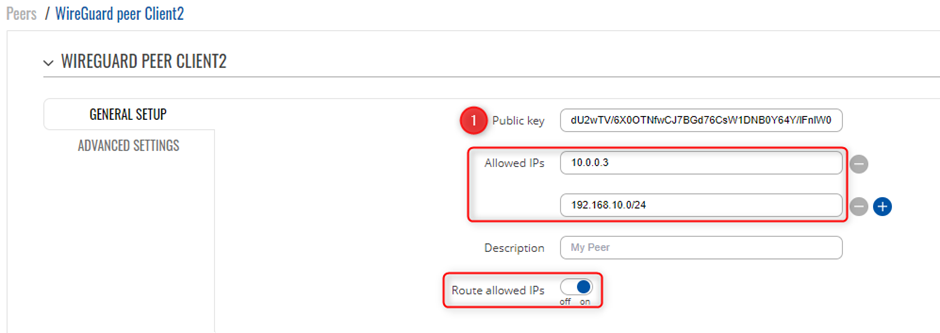
- Now we will Create a Peer connection
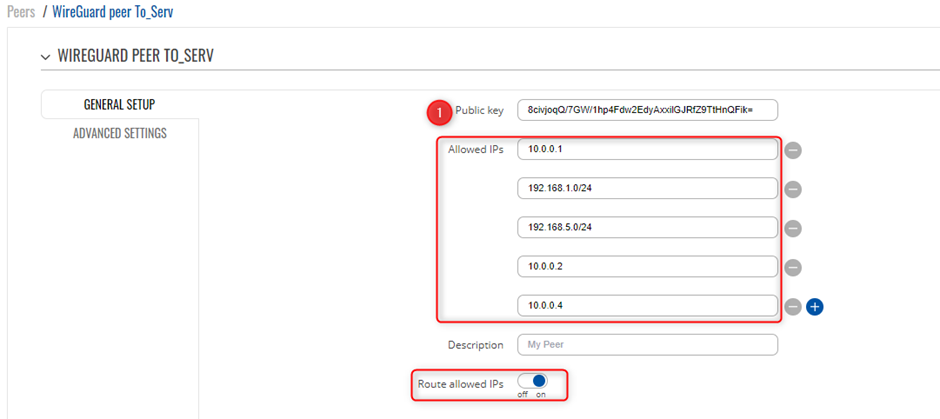
- Point 1 is the Server’s Public Key that was acquired when creating the instance on the Server/Main router side
- Allowed IPs are the IP ranges you want to have access to over the VPN (the remote side)
- Please ensure you enable “Route allowed IPs”
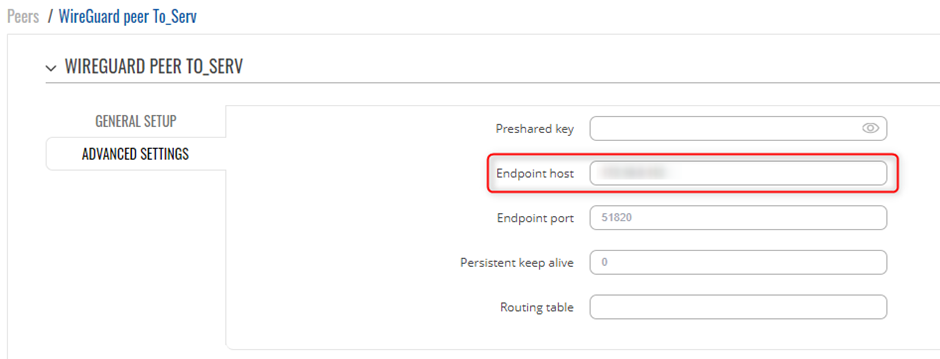
- Under “Advanced Settings” please ensure you enter the Server side Public IP address
- Save and Apply the settings
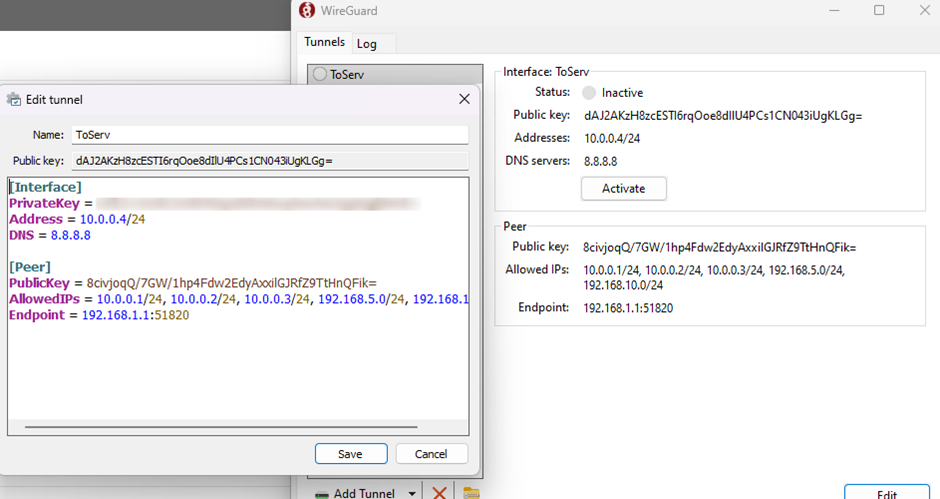
- Address = 10.0.0.4/24
- DNS = 8.8.8.8
- [Peer]
- PublicKey = Which will be the Server’s Public Key
- AllowedIPs = IP ranges you want access to (Remote side)
- EndPoint = Server’s IP (our instance was 192.168.1.1 as it was part of the LAN)
- Enter the Public Key you created for Client 1
- Enter in the IP address you want to access on Client 1 side(LAN side and WireGuard Interface IP)
- Ensure you have enabled “Route allowed IPs”
- Enter the Public Key you created for Client 2
- Enter in the IP address you want to access on Client 2 side(LAN side and WireGuard Interface IP)
- Ensure you have enabled “Route allowed IPs”
- Enter the Public Key you created for Client 2
- Enter in the IP address you want to access on Client 3 side(LAN side and WireGuard Interface IP)
- Ensure you have enabled “Route allowed IPs”
WireGuard Instances
To create Instance enter its name and click the Add button.
Then click the Edit![]() button to configure it.
button to configure it.
Server Configuration
Peer to Peer Setup
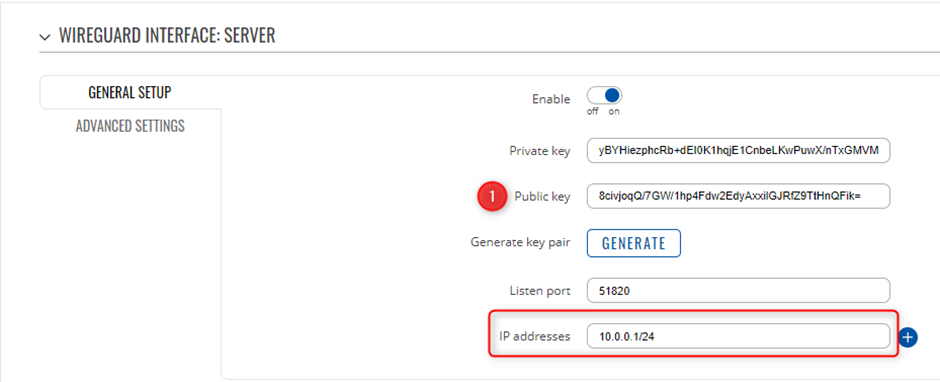
The following part of example applies to both devices.
Before editing any fields click ![]() button to generate Public and Private keys.
button to generate Public and Private keys.
After that you need to Enable this instance and in the Listen Port field enter your desired port. WireGuard by default uses 51820 port which will be used in this example.
Lastly you need to enter IP Address for instance. We will set the SERVER will have 10.0.0.1 and Clients will have 10.0.0.2 IP addresses and increasing.
Note: enter IP address and its mask e.g. 10.0.0.1/24
Note: You will need to copy the Public and Private Keys for Peer instances between server and Clients
Peers Configuration
==Peer to Peer Setup==
In the General Setup section you need to enter Public Key and Allowed IPs from the Remote instance you want to connect to.
In this example a peer from Client1 needs to connect to RUTX11, which means SERVER will enter Public Key and Allowed IPs from Client1.
You will need the Public Keys of the Client VPN users that you setup, so it is recommended to create the Instances to Generate the Keys for use of Peer instances
==Peers Configuration Client 1==
Client 1 is setup with the following details, WireGuard Interface IP is set as 10.0.0.2 with a LAN range of 192.168.5.0/24
You will need to create a new WireGuard instance and Peer connection, please ensure you copy the public Key that was generated via the creation of the instance, as this will be used on the Server side for the VPN.
==Peers Configuration Client 2==
Client 2 is setup with the following details, WireGuard Interface IP is set as 10.0.0.3 with a LAN range of 192.168.10.0/24
You will need to create a new WireGuard instance and Peer connection, please ensure you copy the public Key that was generated via the creation of the instance, as this will be used on the Server side for the VPN.
==Peers Configuration Client 3==
Please ensure you download WireGuard for your PC (Windows Client)
Installation: https://www.wireguard.com/install/
Once you have created a new Tunnel, you will need to add the below lines of code to finish the VPN setup,
==Peers Configuration Server==
==Server to Peer Setup==
In the General Setup section you need to enter Public Key and Allowed IPs from the Remote instance you want to connect to.
We will be creating 3 instances, these will be the remote Peers we created above and will make use of their Public Keys to create them, such as below
==Server To Client 1==
Create your 1st client peer under the server

==Server To Client 2==
Create your 2nd client peer under the server
==Server To Client 3 (PC)==
Create your 3rd client peer under the server

==Testing the Setup==
===Testing===
Once you have setup the WireGuard Server and Peer settings, you can test by making use of the below
Please ensure that on the Server side, that you allow the Firewall to accept traffic going through the Server router for Peer-to-Peer traffic to flow
This can be located in Network -> Firewall -> General settings
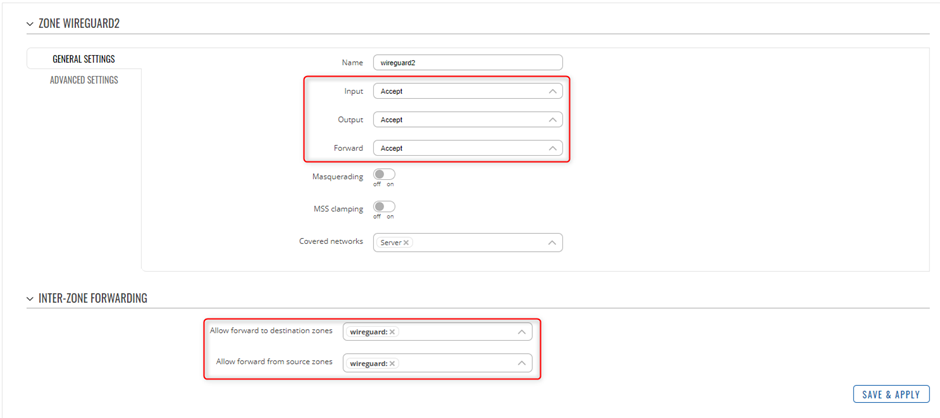
A zone for WireGuard to WireGuard can be created as below to ensure traffic is not restricted from the server
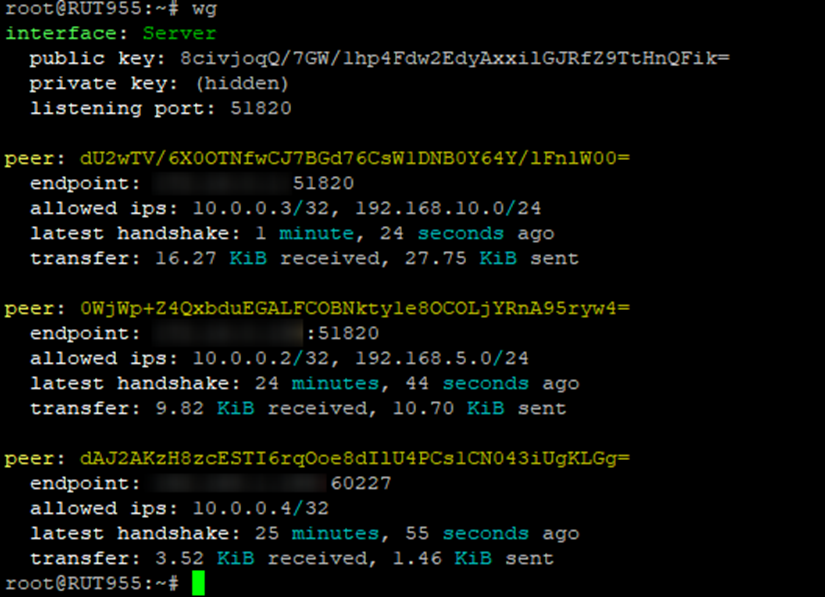
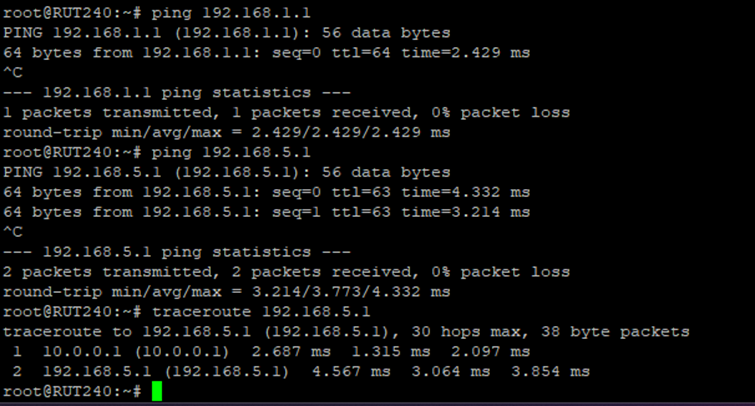
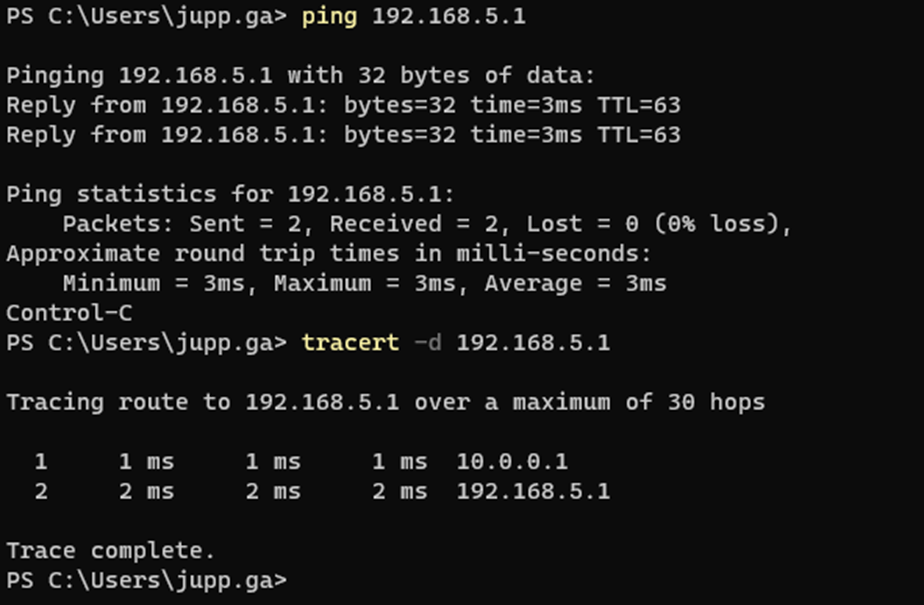
Once you have created your Peers and Host, via the CLI you will be able to see the new WireGuard interfaces and ping across the new VPN, below is an example
Show peers and uptime of WireGuard instances with use of “wg” command in the CLI
Ping LAN to LAN
Ping PC Client to Client 1


