Template:Networking rutos manual mbus: Difference between revisions
No edit summary |
No edit summary |
||
| Line 8: | Line 8: | ||
==Summary== | ==Summary== | ||
The <b>M-Bus (Meter Bus)</b> is a cost-effective fieldbus communication protocol for transmitting energy consumption data. A central | The <b>M-Bus (Meter Bus)</b> is a cost-effective fieldbus communication protocol for transmitting energy consumption data. A central client – in this case {{{name}}} – communicates via a two-wire bus (up to max. 250 servers per segment) with bus devices (e.g., heat meter, water meter, electric meter, gas meter). | ||
This manual page provides an overview of the M-Bus functionality in {{{name}}} devices. | This manual page provides an overview of the M-Bus functionality in {{{name}}} devices. | ||
| Line 31: | Line 31: | ||
<tr> | <tr> | ||
<td>Baud rate</td> | <td>Baud rate</td> | ||
<td>300 | 600 | 1200 | 2400 | 4800 | 9600 | <td>300 | 600 | 1200 | 2400 | 4800 | 9600 ; default: <b>2400</b></td> | ||
<td>Specifies the M-Bus | <td>Specifies the M-Bus server network baud rate.</td> | ||
</tr> | </tr> | ||
<tr> | <tr> | ||
| Line 51: | Line 51: | ||
The <b>M-Bus Record</b> section is used to configure the general record instance. The figure below is an example of the M-Bus Record and the table below provides information on the fields contained in that section: | The <b>M-Bus Record</b> section is used to configure the general record instance. The figure below is an example of the M-Bus Record and the table below provides information on the fields contained in that section: | ||
[[File: | [[File:Networking_rutos_manual_mbus_record_mbus_record_demo_v2.png|border|class=tlt-border]] | ||
<table class="nd-mantable"> | <table class="nd-mantable"> | ||
| Line 71: | Line 71: | ||
<tr> | <tr> | ||
<td>Period</td> | <td>Period</td> | ||
<td>integer [1..86400]; default: <b> | <td>integer [1..86400]; default: <b>60</b></td> | ||
<td>Specifies the period how often record data will be collected.</td> | <td>Specifies the period how often record data will be collected.</td> | ||
</tr> | </tr> | ||
| Line 91: | Line 91: | ||
<tr> | <tr> | ||
<td>Failure mode</td> | <td>Failure mode</td> | ||
<td>Never | Any requests failed | All requests failed; default: <b>Never</b></td> | <td>Never | <span style="color: red;">Any requests failed</span> | <span style="color: red;">All requests failed</span>; default: <b>Never</b></td> | ||
<td>Specifies when whole record is considered as failure.</td> | <td>Specifies when whole record is considered as failure.</td> | ||
</tr> | </tr> | ||
<tr> | <tr> | ||
<td>Store a failure message</td> | <td><span style="color: red;">Store a failure message</span></td> | ||
<td>off | on; default: <b>off</b></td> | <td>off | on; default: <b>off</b></td> | ||
<td>Select whether to store a failure message in the database or do nothing on failure.</td> | <td>Select whether to store a failure message in the database or do nothing on failure.</td> | ||
| Line 103: | Line 103: | ||
===Request Configuration=== | ===Request Configuration=== | ||
---- | ---- | ||
In this section, you can configure requests from | In this section, you can configure requests from servers. By default there are no instances created. To add a new instance and start configuring press the <b>Add</b> button. | ||
[[File: | [[File:Networking_rutos_manual_mbus_record_request_configuration_v2.png|border|class=tlt-border]] | ||
====Request Configuration Edit==== | ====Request Configuration Edit==== | ||
---- | ---- | ||
[[File:Networking rutos manual mbus record request configuration edit | [[File:Networking rutos manual mbus record request configuration edit v3.png|border|class=tlt-border]] | ||
<table class="nd-mantable"> | <table class="nd-mantable"> | ||
| Line 123: | Line 123: | ||
</tr> | </tr> | ||
<tr> | <tr> | ||
<td> | <td>Server address</td> | ||
<td>int | hexstring; default: <b>none</b></td> | <td>int | hexstring; default: <b>none</b></td> | ||
<td>Address of the | <td>Address of the server to be inquired.</td> | ||
</tr> | </tr> | ||
<tr> | <tr> | ||
<td>Data type</td> | <td>Data type</td> | ||
<td>XML | HEX | BIN; default: <b>XML</b></td> | <td>XML | HEX | BIN | JSON; default: <b>XML</b></td> | ||
<td>Data type to process the received data.</td> | <td>Data type to process the received data.</td> | ||
</tr> | </tr> | ||
Revision as of 14:51, 20 September 2023
Template:Networking rutos manual fw disclosure
Summary
The M-Bus (Meter Bus) is a cost-effective fieldbus communication protocol for transmitting energy consumption data. A central client – in this case {{{name}}} – communicates via a two-wire bus (up to max. 250 servers per segment) with bus devices (e.g., heat meter, water meter, electric meter, gas meter).
This manual page provides an overview of the M-Bus functionality in {{{name}}} devices.
M-Bus Settings
The M-Bus Settings section is used to configure the general service functionality. The figure below is an example of the M-Bus Settings and the table below provides information on the fields contained in that section:
| Field | Value | Description |
|---|---|---|
| Enable | off | on; default: off | Enables the service. |
| Baud rate | 300 | 600 | 1200 | 2400 | 4800 | 9600 ; default: 2400 | Specifies the M-Bus server network baud rate. |
| Database location | RAM memory | Flash memory; default: RAM memory | Specifies where the database will be stored.. |
Records
By default there are no Records instances created. To start configuring, add a new record using the Add New Instance section below.
M-Bus Record
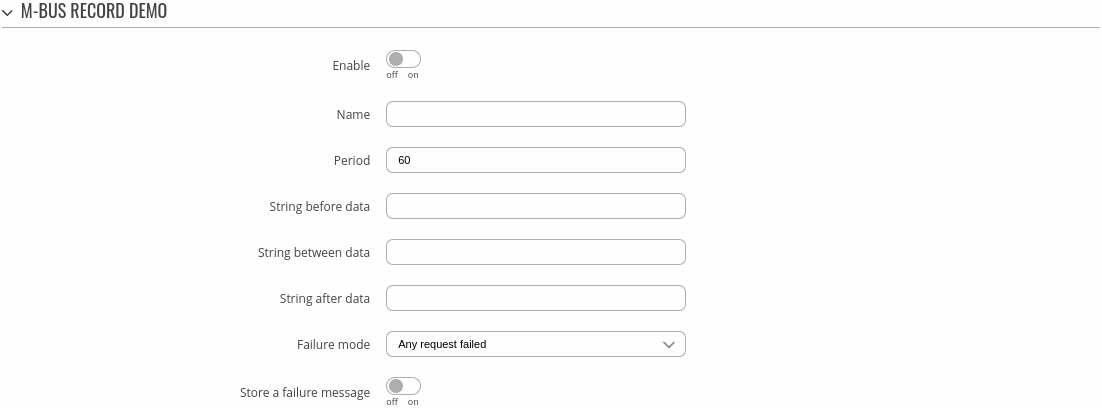
The M-Bus Record section is used to configure the general record instance. The figure below is an example of the M-Bus Record and the table below provides information on the fields contained in that section:
| Field | Value | Description |
|---|---|---|
| Enable | off | on; default: off | Enables the service. |
| Name | string; default: none | Name used for distinguishing purposes. |
| Period | integer [1..86400]; default: 60 | Specifies the period how often record data will be collected. |
| String before data | string; default: none | String that will be appended before request data. |
| String between data | string; default: none | String that will be appended between request data. |
| String after data | string; default: none | String that will be appended after request data. |
| Failure mode | Never | Any requests failed | All requests failed; default: Never | Specifies when whole record is considered as failure. |
| Store a failure message | off | on; default: off | Select whether to store a failure message in the database or do nothing on failure. |
Request Configuration
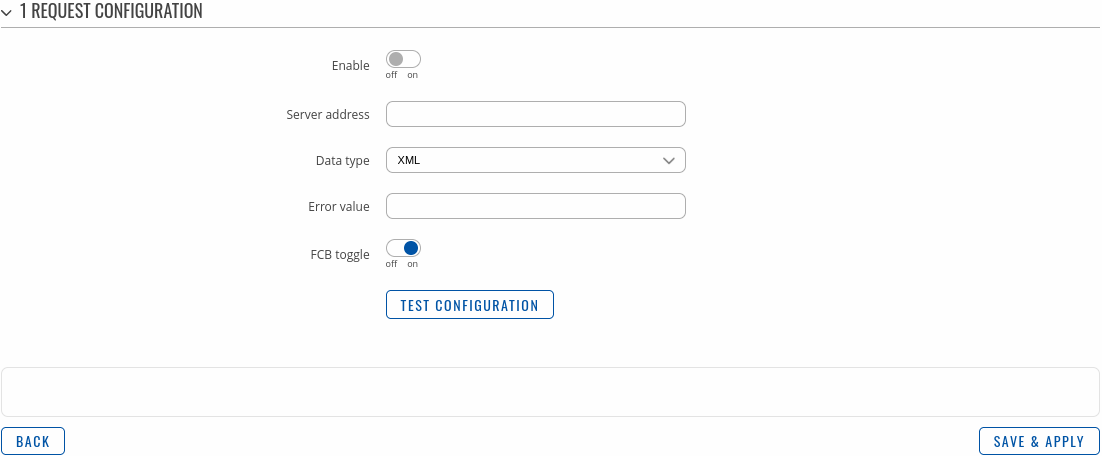
In this section, you can configure requests from servers. By default there are no instances created. To add a new instance and start configuring press the Add button.
Request Configuration Edit
| Field | Value | Description |
|---|---|---|
| Enable | off | on; default: off | Enables request processing. |
| Server address | int | hexstring; default: none | Address of the server to be inquired. |
| Data type | XML | HEX | BIN | JSON; default: XML | Data type to process the received data. |
| Error value | string; default: none | Changes request data to this value if request fails. |
| FCB toggle | off | on; default: on | FCB (Frame Count-Bit): One-bit counter for reliable server-client communication; some devices have special uses for it. |
| Test configuration | button; default: - | Tests the current configuration. |
Test Configuration
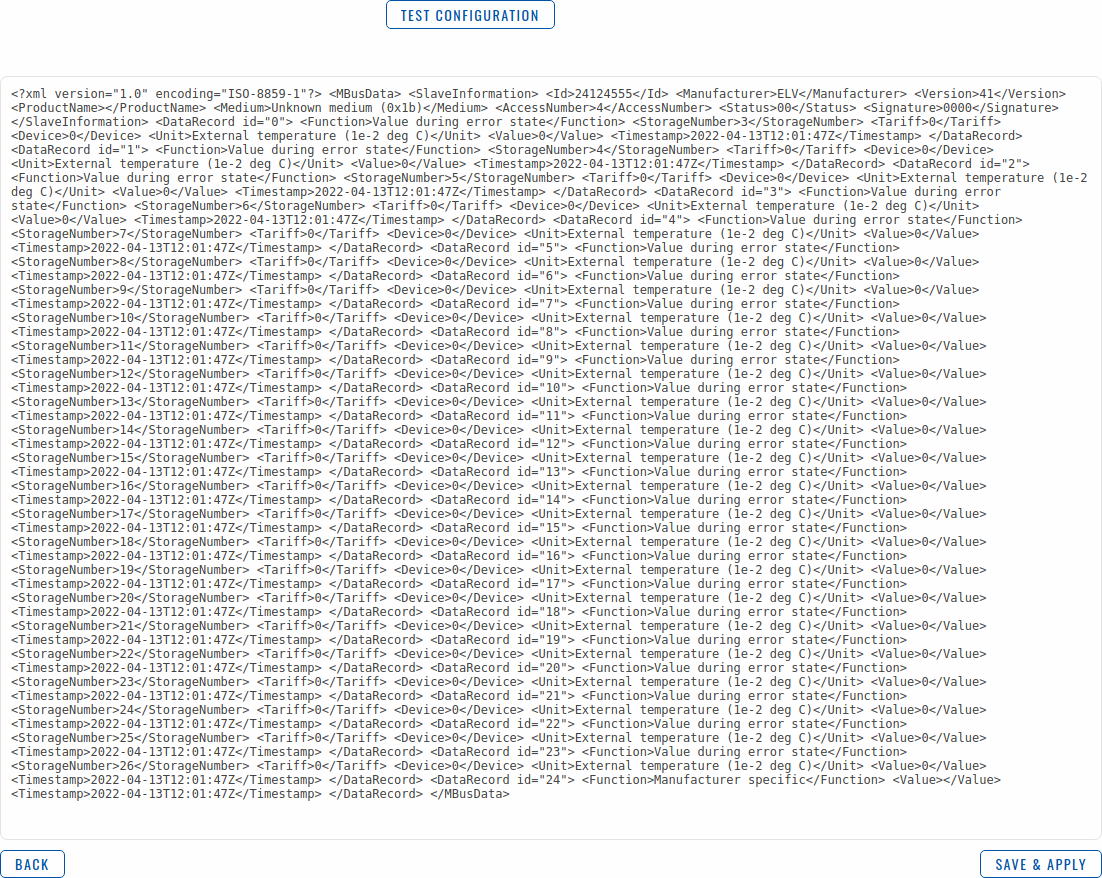
Before saving, you can check if your configuration works accordingly by pressing the Test Configuration button. You should see the data in a field below:
[[Category:{{{name}}} Services section]]


