RUT230 SMS Gateway: Difference between revisions
| Line 277: | Line 277: | ||
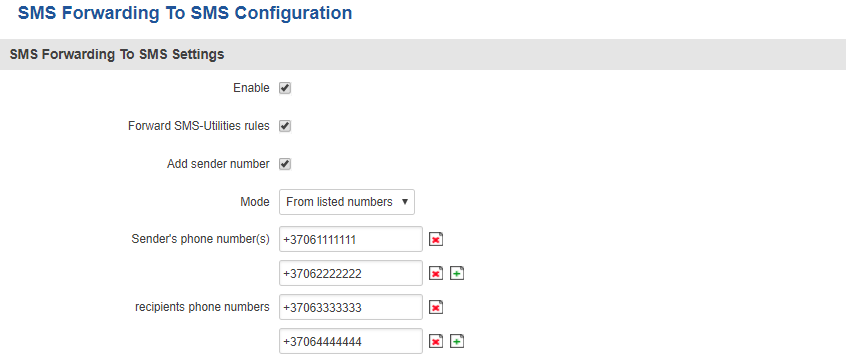
[[Image:Services sms gateway forwarding sms.PNG]] | [[Image:Services sms gateway forwarding sms.PNG]] | ||
<table class="nd-mantable"> | |||
<tr> | |||
<th>field name</th> | |||
<th>value</th> | |||
<th>description</th> | |||
</tr> | |||
<tr> | |||
<td>Enable</td> | |||
<td>yes {{!}} no; Default: '''no'''</td> | |||
<td>Toggles SMS Forwarding To SMS ON or OFF</td> | |||
</tr> | |||
<tr> | |||
<td>Forward SMS Utilities rules</td> | |||
<td>yes {{!}} no; Default: '''no'''</td> | |||
<td>If enabled, the router will also forward SMS Utilities rules to SMS</td> | |||
</tr> | |||
<tr> | |||
<td>Add sender number</td> | |||
<td>yes {{!}} no; Default: '''no'''</td> | |||
<td>Adds original sender’s number of the forwarded message</td> | |||
</tr> | |||
<tr> | |||
<td>Mode</td> | |||
<td>All messages {{!}} From listed numbers; Default: '''All messages'''</td> | |||
<td>Specifies which messages to forward</td> | |||
</tr> | |||
<tr> | |||
<td>Sender's phone number(s)</td> | |||
<td>phone number; Default: " "</td> | |||
<td>Phone number(s) that will qualify for forwarding. To add more numbers, click the [[Image:Services sms gateway auto reply plus symbol.PNG]] symbol. This field only becomes visible if the chosen Mode is '''From listed numbers'''</td> | |||
</tr> | |||
<tr> | |||
<td>Recipient's phone number(s)</td> | |||
<td>phone number; Default: " "</td> | |||
<td>Phone number(s) to which messages are going to be forwarded to. To add more numbers, click the [[Image:Services sms gateway auto reply plus symbol.PNG]] symbol</td> | |||
</tr> | |||
</table> | |||
===SMS Forwarding To Email Configuration=== | ===SMS Forwarding To Email Configuration=== | ||
Revision as of 10:43, 10 December 2018
Main Page > EOL Products > RUT230 > RUT230 Manual > RUT230 WebUI > RUT230 Services section > RUT230 SMS GatewaySummary
This chapter is a summary of the SMS Gateway function of RUT routers.
Post/Get Configuration
Post/Get Configuration allows you to perform action requests by writing them in the URL after your device’s IP address.
| field name | value | description |
|---|---|---|
| Enable* | yes | no; Default: no | Toggles Post/Get ON or OFF |
| Username | string; Default: " " | User name used for authorization |
| Password | tring; Default: " " | Password used for authorization |
*Do not forget to change parameters in the URL according to your POST/GET Configuration!
SMS by HTTP POST/GET
It is possible to read and send SMS messages by using a valid HTTP POST/GET syntax. Use a web browser or any other compatible software to submit HTTP POST/GET strings to the router. The router must be connected to a GSM network when using the Send SMS feature.
| View mobile messages list | http://youripaddress/cgi-bin/sms_list?username=admin&password=admin01 |
| Read mobile message | http://youripaddress/cgi-bin/sms_read?username=admin&password=admin01&number=1 |
| Send mobile message | http://youripaddress/cgi-bin/sms_send?username=admin&password=admin01&number=0037060000001&text=testmessage |
| View mobile messages total | http://youripaddress/cgi-bin/sms_total?username=admin&password=admin01 |
| Delete mobile message | http://youripaddress/cgi-bin/sms_delete?username=admin&password=admin01&number=1 |
youripaddress - router's LAN IP address; username - router's login admin user name; password - router's login password; number - SMS message index number or recipient's phone number (phone number must contain country code. Phone number format is: 00{COUNTRY_CODE} {RECEIVER_NUMBER}, e.g., 0037062312345 (370 is country code and 62312345 is receiver's phone number)); text - SMS message text
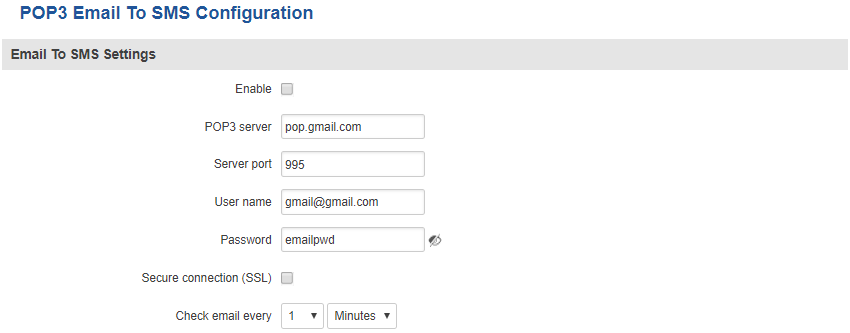
Email to SMS
Email to SMS is a function that checks your email’s inbox at the specified frequency and, if it finds any new received emails with a specific subject, it converts them to SMS messages.
NOTE: all POP3 server email messages from inbox will be deleted.
| field name | value | description |
|---|---|---|
| Enable | yes | no; Default: no | Toggles Email to SMS ON or OFF |
| POP3 server | host | ip; Default: " " | Your email service provider's POP3 server address. If you don't know this address, simply look it up online |
| Server port | integer [0..65535]; Default: " " | Server authentication port. As with POP3 server, your email service provider's POP3 port can be looked up online |
| User name | string; Default: " " | Your email account’s user name |
| Password | string; Default: " " | Your email account’s password |
| Secure connection (SSL) | yes | no; Default: no | SSL is a protocol for transmitting private documents via the Internet. SSL uses a cryptographic system that uses two keys to encrypt data − a public key known to everyone and a private or secret key known only to the recipient of the message |
| Check email every | time; Default: 1 minute | Time interval to check email inbox |
You may have noticed that there is no option where you can specify recipient's phone number. The reason for that is that Email to SMS doesn't forward all emails, only the ones that are meant to be forwarded. Only emails with the recipient's phone number in the subject will be forwarded (to the number specified in the subject). Phone number must contain country code. Phone number format is: 00{COUNTRY_CODE} {RECEIVER_NUMBER}, e.g., 0037062312345 (370 is country code and 62312345 is receiver's phone number)
Scheduled SMS
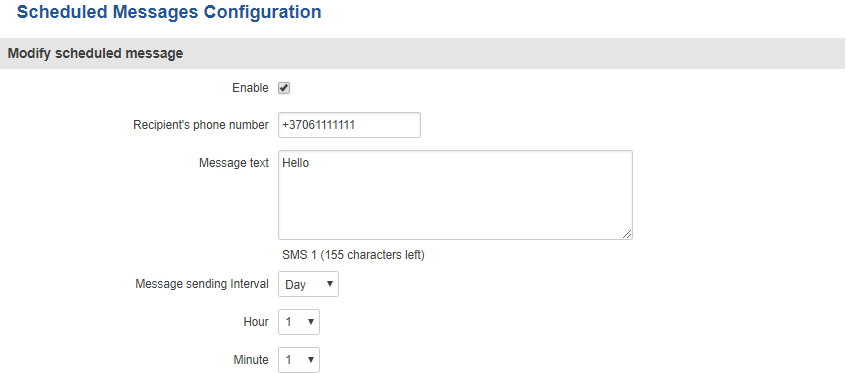
Scheduled SMS allows you to periodically send automated SMS messages to a specified number. Scheduled messages are managed in rule form, i.e., similar to SMS Utilities. Therefore, to configure a new Scheduled Message, we must first create a rule. To create a new rule, type in a phone number in the Phone number field located in the Scheduled Messages Configuration section and press the Add button located next to it.
After this you will be redirected to the Scheduled Messages Configuration window.
Scheduled Messages Configuration
Scheduled messages provides you with the possibility to set up a rule that sends SMS messages to specified recipients periodically. To create a new rule, enter the recipient's Phone number and Message sending interval and click the "Add" button. The new rule will appear in the "Messages to send" table, but will be disabled and unconfigured. To configure your rule, simply click the "Edit" button located next to it.
| field name | value | description |
|---|---|---|
| Enable | yes | no; Default: no | Toggles the rule ON or OFF |
| Recipient's phone number | phone number; Default: " " | Phone number that will receive the scheduled messages |
| Message text | string; Default: " " | The message that will be sent |
| Message sending interval | time; Default: Day, hour 1, minute 1 | The frequency at which scheduled messages will be sent |
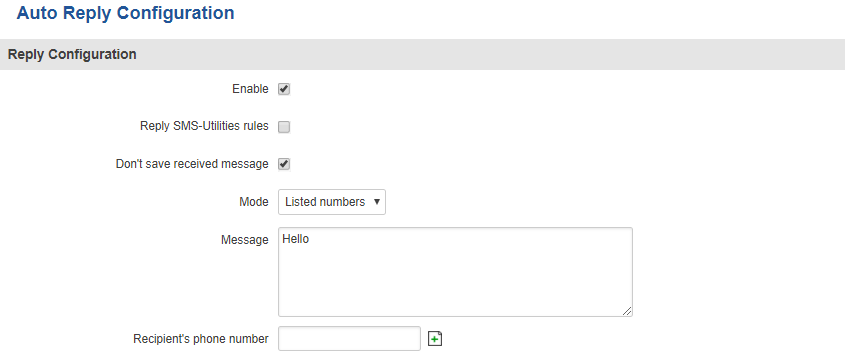
Auto Reply
Auto reply allows you to configure automatic replying to SMS messages that the router receives from everyone or from listed numbers only.
SMS Forwarding
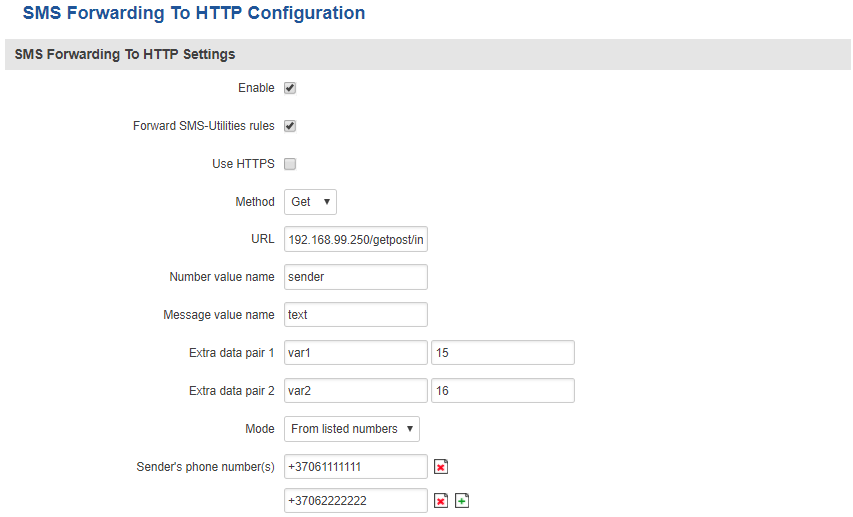
SMS Forwarding To HTTP
The SMS Forwarding To HTTP functionality forwards SMS messages to HTTP, using either POST or GET methods.
SMS Forwarding To SMS Configuration
The SMS Forwarding To SMS function forwards SMS messages to one or several recipients.
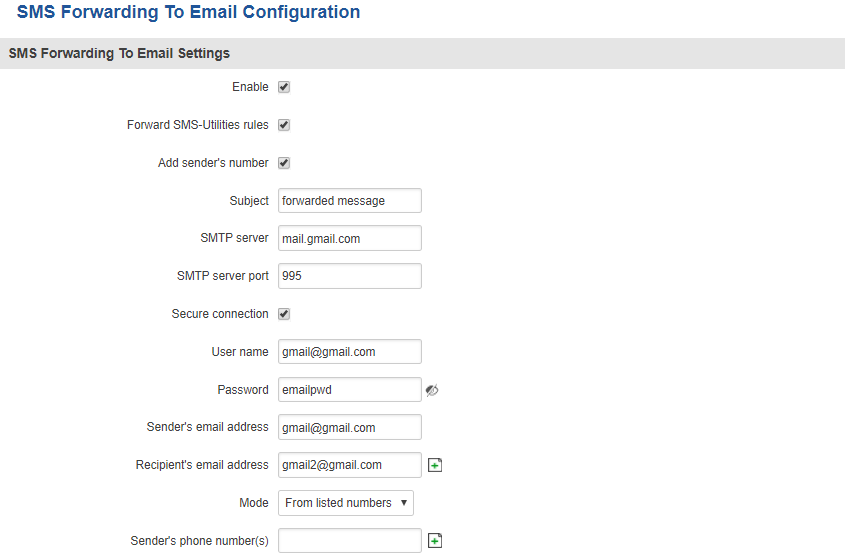
SMS Forwarding To Email Configuration
The SMS Forwarding To Email function forwards SMS messages to email.
SMPP
The Short Message Peer-to-Peer (SMPP) is a protocol used for exchanging SMS messages between Short Message Service Centers (SMSC) and/or External Short Messaging Entities (ESME).
| FIELD NAME | VALUE | DESCRIPTION |
|---|---|---|
| Enable | yes | no; Default: no | Toggles SMPP ON or OFF |
| User name | yes | no; Default: no | User name used for authentication on the SMPP server |
| Password | string; Default: " " | Password used for authentication on the SMPP server |
| Server port | integer [0..65535]; Default: " " | SMPP server's port |


