Stunnel configuration example using Telnet: Difference between revisions
No edit summary |
No edit summary |
||
| Line 6: | Line 6: | ||
[[File:Networking rutx manual webui basic advanced mode.gif]] | [[File:Networking rutx manual webui basic advanced mode.gif | border]] | ||
| Line 24: | Line 24: | ||
* Atleast one end device to configure the router | * Atleast one end device to configure the router | ||
* Wireshark in your end device | * Wireshark in your end device | ||
* Stunnel application installation in your laptop: https://www.stunnel.org/downloads.html | * Stunnel application installation in your laptop: [https://www.stunnel.org/downloads.html stunnel Download] | ||
(add image) | (add image) | ||
| Line 34: | Line 34: | ||
Firstly, enable local telnet access at port 23, Go to '''System → Administration → Access Control''' | Firstly, enable local telnet access at port 23, Go to '''System → Administration → Access Control''' | ||
[[File: | [[File:Networking Rut955 WebUI system-access control telnet v1.bmp|border]] | ||
Then, navigate to '''Services → VPN → Stunnel''', and configure the router, | Then, navigate to '''Services → VPN → Stunnel''', and configure the router, | ||
* Enable Stunnel global settings, | * Enable Stunnel global settings, | ||
[[File: | [[File:Networking Rut955 WebUI VPN stunnel settings v1.bmp|border]] | ||
* Add new instance, give any new configuration name, | * Add new instance, give any new configuration name, | ||
[[File: | [[File:Networking Rut955 WebUI VPN stunnel instance v1.bmp|border]] | ||
* You will be directed to stunnel configuration, | * You will be directed to stunnel configuration, | ||
| Line 55: | Line 55: | ||
Insert Certificate File : server.cert.pem and server.key.pem | Insert Certificate File : server.cert.pem and server.key.pem | ||
[[File: | [[File:Networking Rut955 WebUI VPN stunnel config v1.bmp|border]] | ||
Note: You can download the certificate file from '''System → administration → Certificates'''. | Note: You can download the certificate file from '''System → administration → Certificates'''. | ||
| Line 63: | Line 63: | ||
* Then, navigate to the menu '''Network → Firewall → Traffic Rules''' and add new instance or edit telnet instance. | * Then, navigate to the menu '''Network → Firewall → Traffic Rules''' and add new instance or edit telnet instance. | ||
[[File: | [[File:Networking Rut955 WebUI Firewall traffic rules v1.bmp|border]] | ||
You will be navigated to the configuration page, enable it and ''save and apply'' the rule. | You will be navigated to the configuration page, enable it and ''save and apply'' the rule. | ||
| Line 75: | Line 75: | ||
Choose the latest win64 installer.exe and install. | Choose the latest win64 installer.exe and install. | ||
[[File: | [[File:Networking Rut955 manual VPN stunnel install v1.png|border]] | ||
* Install only Stunnel.exe deamon, you can skip openssl.exe. | * Install only Stunnel.exe deamon, you can skip openssl.exe. | ||
| Line 93: | Line 93: | ||
* For example: | * For example: | ||
[[File: | [[File:Networking Rut955 manual stunnel clientcert v1.png|border]] | ||
Once saved, go back to stunnel > configuration, and reload configuration. | Once saved, go back to stunnel > configuration, and reload configuration. | ||
[[File: | [[File:Networking Rut955 manual stunnel configuration v1.png|border]] | ||
If everything is working as expected, you should be able to see the log as above with successful configuration. Now you can try to telnet router. | If everything is working as expected, you should be able to see the log as above with successful configuration. Now you can try to telnet router. | ||
Revision as of 02:22, 18 November 2022
Introduction
This article provides a guide on how to configure stunnel and use telnet protocol for devices to interact with each other securely. These configurations can be implemented on RUT9xx and RUTX series.
- First you want to make sure that you have ADVANCED mode enabled. This will allow you to choose from a larger variety of settings.
Stunnel is an open-source proxy service that adds TLS encryption to clients and Servers already existing on a VPN network. TLS encryption provided by Stunnel can be used as an additional layer of encryption for data sent by OpenVPN. This procedure increases the security of the established connection and provides higher chances of passing a Deep packet inspection (DPI) check.
Telnet is an application protocol used on the internet or LAN to provide a bidirectional interactive text-oriented communication using virtual terminal connection like Putty. However, due to serious security concerns of using Telnet over an open network, SSH became favorable.
This article provides an extensive configuration example with details on how to create a tunnel connection using stunnel instances and then connect them using telnet protocol, with the data encrypted
Configuration Overview and Prerequisites
Before we begin, let’s overview the configuration that we are attempting to achieve and the prerequisites that will make it possible. Prerequisites:
- One RUTxxx router of any type with public IP.
- Atleast one end device to configure the router
- Wireshark in your end device
- Stunnel application installation in your laptop: stunnel Download
(add image)
As mentioned earlier, here, in this configuration since telnet does not provide security, we are going to develop a Stunnel in between the router and the client, and then connect them using telnet protocol, so that there is encryption provided to the data. For this we will use Wireshark to capture the packets and verify if the data has been encrypted or not.
Router Configuration
Firstly, enable local telnet access at port 23, Go to System → Administration → Access Control
Then, navigate to Services → VPN → Stunnel, and configure the router,
- Enable Stunnel global settings,
- Add new instance, give any new configuration name,
- You will be directed to stunnel configuration,
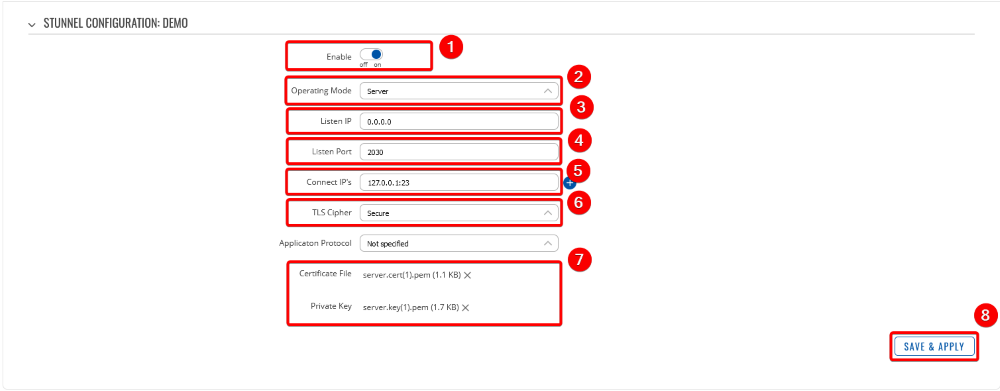
 Do following configuration:
 Enable Stunnel
 Operating mode           : Server
 Listen IP                : 0.0.0.0
 Listen Port              : 2030
 Connect IP'S             : 127.0.0.1:23
 TLS Cipher               : Secure
 Insert Certificate File  : server.cert.pem and server.key.pem
Note: You can download the certificate file from System → administration → Certificates.
- Then, navigate to the menu Network → Firewall → Traffic Rules and add new instance or edit telnet instance.
You will be navigated to the configuration page, enable it and save and apply the rule.
Stunnel Configuration
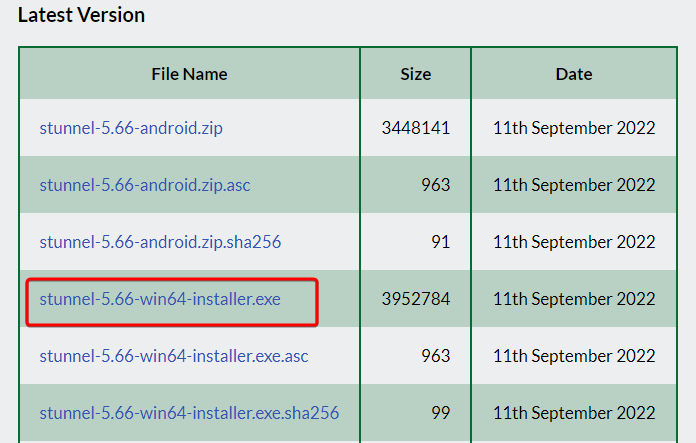
For Windows: Download Stunnel from https://www.stunnel.org/downloads.html. Choose the latest win64 installer.exe and install.
- Install only Stunnel.exe deamon, you can skip openssl.exe.
Once the application is installed, open stunnel, go to configuration and select edit configuration. Remove all the content and paste as below:
- Example TLS client mode services
[my-stunnel-conf] Client = yes Accept = 127.0.0.1:23 Connect =84.15.X.X:2030 Cert = ca-cert1.pem
Connect IP depends on your configuration and write them accordingly. Here in this example, it is as above.
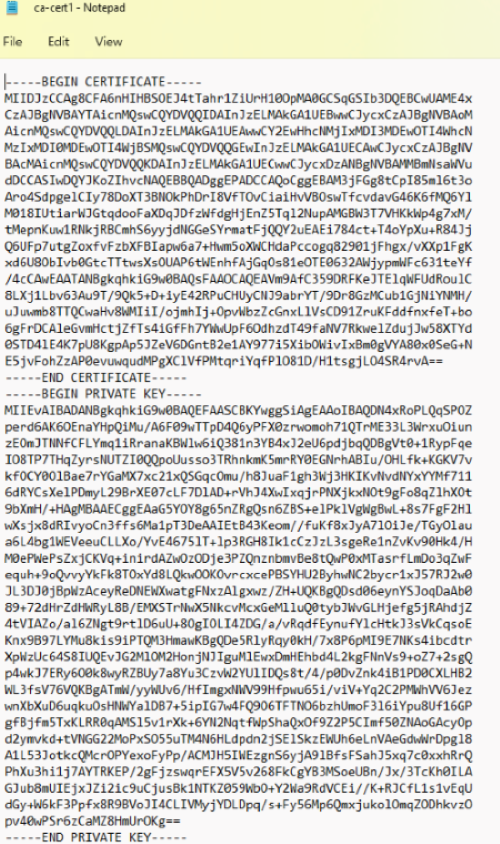
- Navigate to C:\Program files (x86)\Stunnel\config and create new file ca-cert1.pem.
- Copy and paste client.cert.pem and client.key.pem to it and save the file. (Note: Download the client certificate from your Web-UI, System → Administration → certificate)
- For example:
Once saved, go back to stunnel > configuration, and reload configuration.
File:Networking Rut955 manual stunnel configuration v1.png
If everything is working as expected, you should be able to see the log as above with successful configuration. Now you can try to telnet router.
For Linux:


