Domnev: Difference between revisions
No edit summary |
|||
| Line 18: | Line 18: | ||
==Node-RED installation and setup== | ==Node-RED installation and setup== | ||
We are going to set up Node-RED in Linux virtual machine. For Node-RED to work, you would need to install Node.js version 14.00 or higher | We are going to set up Node-RED in a Linux virtual machine. For Node-RED to work, you would need to install Node.js version 14.00 or higher. If you already have Node.js installed, verify the Node.js version using this command: | ||
<pre> | <pre> | ||
node -v | node -v | ||
| Line 32: | Line 32: | ||
sudo npm install -g –unsafe-perm node-red | sudo npm install -g –unsafe-perm node-red | ||
</pre> | </pre> | ||
Use the command ''node-red'' to start a local server. Here is how the terminal should look like if the server starts correctly: | Use the command '''''node-red''''' to start a local server. Here is how the terminal should look like if the server starts correctly: | ||
[[File:Server is running node red terminal.png|border|600px|class=tlt-border]] | [[File:Server is running node red terminal.png|border|600px|class=tlt-border]] | ||
---- | ---- | ||
| Line 38: | Line 38: | ||
[[File:Use server address in web browser.png|border|500px|class=tlt-border]] | [[File:Use server address in web browser.png|border|500px|class=tlt-border]] | ||
For MQTT usage, we are going to need MQTT-specific nodes. Use the side menu to navigate to Manage Palette section and install these nodes: | For MQTT usage, we are going to need MQTT-specific nodes. Use the side menu to navigate to the Manage Palette section and install these nodes: | ||
*node-red-contrib-aedes | *node-red-contrib-aedes | ||
*node-red-contrib-mqtt-broker | *node-red-contrib-mqtt-broker | ||
| Line 48: | Line 48: | ||
===M-Bus Data to Server via MQTT=== | ===M-Bus Data to Server via MQTT=== | ||
---- | ---- | ||
This | This section contains information on how to send M-Bus data to the server on Node-RED using the MQTT protocol. | ||
====Data to Server configuration==== | ====Data to Server configuration==== | ||
---- | ---- | ||
| Line 54: | Line 54: | ||
# '''Enable''' instance; | # '''Enable''' instance; | ||
# '''Name:''' enter desired instance name; | # '''Name:''' enter '''desired''' '''instance name'''; | ||
# '''Data source:''' M-bus; | # '''Data source:''' M-bus; | ||
# '''Protocol:''' MQTT; | # '''Protocol:''' MQTT; | ||
# '''JSON format:''' enter what data you would like to send; | # '''JSON format:''' enter what '''data''' you would like '''to send'''; | ||
# '''URL/Host/Connection string:''' enter address of server; | # '''URL/Host/Connection string:''' enter '''address of server'''; | ||
# '''Port:''' enter server port; | # '''Port:''' enter '''server port'''; | ||
# '''Topic''': enter desired topic name; | # '''Topic''': enter '''desired''' '''topic name'''; | ||
====M-Bus configuration==== | ====M-Bus configuration==== | ||
---- | ---- | ||
| Line 66: | Line 66: | ||
# '''Enable''' M-Bus; | # '''Enable''' M-Bus; | ||
# Enter desired '''instance name'''; | # '''ID''': Enter desired '''instance name'''; | ||
# '''Add'''; | # '''Add'''; | ||
| Line 72: | Line 72: | ||
# '''Enable''' instance; | # '''Enable''' instance; | ||
# '''Period''': | # '''Name''': Enter your '''desired name'''; | ||
#'''Period''': Enter '''desired period'''; | |||
[[File:HEX data type.png|border|class=tlt-border|904x904px]] | [[File:HEX data type.png|border|class=tlt-border|904x904px]] | ||
# '''Enable''' request configuration; | # '''Enable''' request configuration; | ||
# '''Slave address:''' | # '''Slave address:''' Enter '''desired slave address'''; | ||
# '''Data type:''' | # '''Data type:''' Select desired data type (this time we will be using '''HEX'''); | ||
# '''Save & apply''' changes. | # '''Save & apply''' changes. | ||
====Node-RED configuration==== | ====Node-RED configuration==== | ||
---- | ---- | ||
Below you can see Node-Red block diagram that is used to receive data: | Below you can see the Node-Red block diagram that is used to receive data: | ||
* aedes broker | * '''aedes broker block''' - Broker; | ||
* MQTT in | * '''MQTT in block''' - mbus; | ||
* Debug | * '''Debug''' - debug 2; | ||
[[File:Node-rs-topology.png|border|center|class=tlt-border|654x654px]] | [[File:Node-rs-topology.png|border|center|class=tlt-border|654x654px]] | ||
---- | ---- | ||
| Line 113: | Line 113: | ||
[[File:Node-red-subscriber-configuration.png|border|class=tlt-border|1094x1094px]] | [[File:Node-red-subscriber-configuration.png|border|class=tlt-border|1094x1094px]] | ||
# '''Edit: | # '''Edit:''' Configure MQTT-Broker node; | ||
# '''Name''': Enter desired MQTT-Broker nodes name | # '''Name''': Enter '''desired MQTT-Broker nodes name;''' | ||
# '''Server''': 127.0.0.1 as we will be using Node-RED as MQTT-Broker; | # '''Server''': '''127.0.0.1''' as we will be using '''Node-RED as MQTT-Broker'''; | ||
# '''Port''': 1883; | # '''Port''': 1883; | ||
# '''Update''': Save the changes; | # '''Update''': Save the changes; | ||
# '''Server''': Select MQTT-Broker that you have just created; | # '''Server''': Select '''MQTT-Broker''' that you have '''just created'''; | ||
# '''Action''': Subscribe to single topic; | # '''Action''': Subscribe to single topic; | ||
# '''Topic''': Enter the topic that you have set in Data to Server configuration; | # '''Topic''': Enter the '''topic''' that you have '''set in Data to Server configuration'''; | ||
# '''Qos''': 0; | # '''Qos''': 0; | ||
# '''Output''': Auto-Detect; | # '''Output''': Auto-Detect; | ||
| Line 126: | Line 126: | ||
====Results==== | ====Results==== | ||
---- | ---- | ||
If you have taken all of the steps described above, the configuration is | If you have taken all of the steps described above, the configuration is complete. Below you can see M-Bus data output in HEX format. | ||
[[File:MQTT broker HEX data.png|border|class=tlt-border|404x404px]] | [[File:MQTT broker HEX data.png|border|class=tlt-border|404x404px]] | ||
===M-Bus Data to Server Via HTTP=== | ===M-Bus Data to Server Via HTTP=== | ||
---- | ---- | ||
This | This section contains information on how to send M-Bus data to the server on Node-RED using the HTTP protocol. | ||
====Data to Server configuration==== | ====Data to Server configuration==== | ||
---- | ---- | ||
| Line 141: | Line 141: | ||
# '''Enable''' request configuration; | # '''Enable''' request configuration; | ||
# '''Slave address:''' | # '''Slave address:''' Enter '''desired slave address;''' | ||
# '''Data type:''' | # '''Data type:''' Select desired data type (this time we will be using '''XML'''); | ||
# '''Save & apply''' changes. | # '''Save & apply''' changes. | ||
| Line 172: | Line 172: | ||
====Results==== | ====Results==== | ||
---- | ---- | ||
If you have taken all of the steps described above, the configuration is | If you have taken all of the steps described above, the configuration is complete. Below you can see M-Bus data output in XML format. | ||
[[File:XML data Mbus.png|border|class=tlt-border|304x304px]] | [[File:XML data Mbus.png|border|class=tlt-border|304x304px]] | ||
===MQTT broker=== | ===MQTT broker=== | ||
This | This section contains information on how to send M-Bus data to the server on Node-RED using a Teltonika router as a MQTT broker. | ||
---- | ---- | ||
====Data to Server configuration==== | ====Data to Server configuration==== | ||
| Line 181: | Line 181: | ||
[[File:MQTT broker data to server config.png|border|class=tlt-border|1094x1094px]] | [[File:MQTT broker data to server config.png|border|class=tlt-border|1094x1094px]] | ||
# '''Enable''' instance; | # '''Enable''' instance; | ||
# '''Name:''' | # '''Name:''' Enter '''desired instance name'''; | ||
# '''Data source:''' M-bus; | # '''Data source:''' M-bus; | ||
# '''Protocol:''' MQTT; | # '''Protocol:''' MQTT; | ||
# '''JSON format:''' | # '''JSON format:''' Enter what '''data''' you would like '''to send'''; | ||
# '''URL/Host/Connection string:''' Localhost IP; | # '''URL/Host/Connection string:''' Localhost IP; | ||
# '''Port:''' enter server port; | # '''Port:''' enter '''server port'''; | ||
# '''Topic''': enter desired topic name; | # '''Topic''': enter '''desired topic name'''; | ||
====MQTT broker configuration==== | ====MQTT broker configuration==== | ||
---- | ---- | ||
| Line 197: | Line 197: | ||
[[File:Mbus BIN data type.png|border|class=tlt-border|854x854px]] | [[File:Mbus BIN data type.png|border|class=tlt-border|854x854px]] | ||
# '''Enable''' request configuration; | # '''Enable''' request configuration; | ||
# '''Slave address''': | # '''Slave address''': Enter '''desired slave address'''; | ||
# '''Data type''': | # '''Data type''': Select desired data type (this time we will be using '''BIN'''); | ||
# '''Save & apply''' changes. | # '''Save & apply''' changes. | ||
====Node-RED configuration==== | ====Node-RED configuration==== | ||
| Line 204: | Line 204: | ||
====Results==== | ====Results==== | ||
---- | ---- | ||
If you have taken all of the steps described above, the configuration is | If you have taken all of the steps described above, the configuration is complete. Below you can see M-Bus data output in BIN format. | ||
[[File:MQTT BIN data.png|border|class=tlt-border|304x304px]] | [[File:MQTT BIN data.png|border|class=tlt-border|304x304px]] | ||
==See Also== | ==See Also== | ||
Revision as of 10:25, 31 January 2023
The information in this page is updated in accordance with 00.07.03.1 firmware version .
Introduction
This article contains instructions on how to send M-Bus data to the server using various protocols.
Configuration overview and prerequisites
Before we begin, let's take a look at the configuration that we are attempting to achieve and the prerequisites that make it possible.
Prerequisites:
- TRB143;
- M-Bus device;
- Server;
- An end device (PC, Laptop, Tablet, Smartphone) for configuration;
If you're having trouble finding any page or some of the parameters described here on your device's WebUI, you should turn on "Advanced WebUI" mode. You can do that by clicking the "Basic" button under "Mode," which is located at the top-right corner of the WebUI.

Node-RED installation and setup
We are going to set up Node-RED in a Linux virtual machine. For Node-RED to work, you would need to install Node.js version 14.00 or higher. If you already have Node.js installed, verify the Node.js version using this command:
node -v
If you do not have Node.js installed, run these commands to install it:
sudo apt install curl
curl -fsSL https://deb.nodesource.com/setup_14.x | sudo -E bash –
sudo apt-get install -y nodejs
Once we have Node.js installed, we can install Node-RED. Use this command to install:
sudo npm install -g –unsafe-perm node-red
Use the command node-red to start a local server. Here is how the terminal should look like if the server starts correctly:
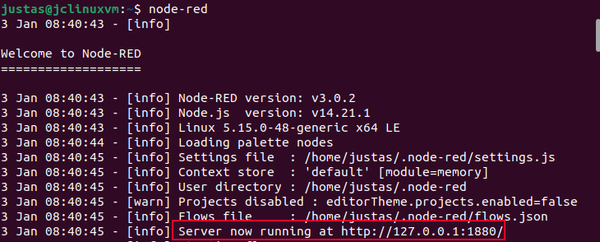
Once you have the local server running, use the local IP and port number in your internet browser. In this case, we are using 127.0.0.1:1880:

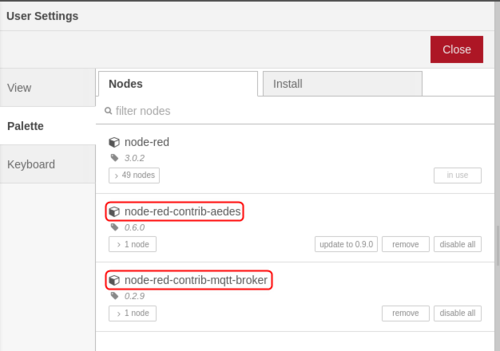
For MQTT usage, we are going to need MQTT-specific nodes. Use the side menu to navigate to the Manage Palette section and install these nodes:
- node-red-contrib-aedes
- node-red-contrib-mqtt-broker
Configuration
M-Bus Data to Server via MQTT
This section contains information on how to send M-Bus data to the server on Node-RED using the MQTT protocol.
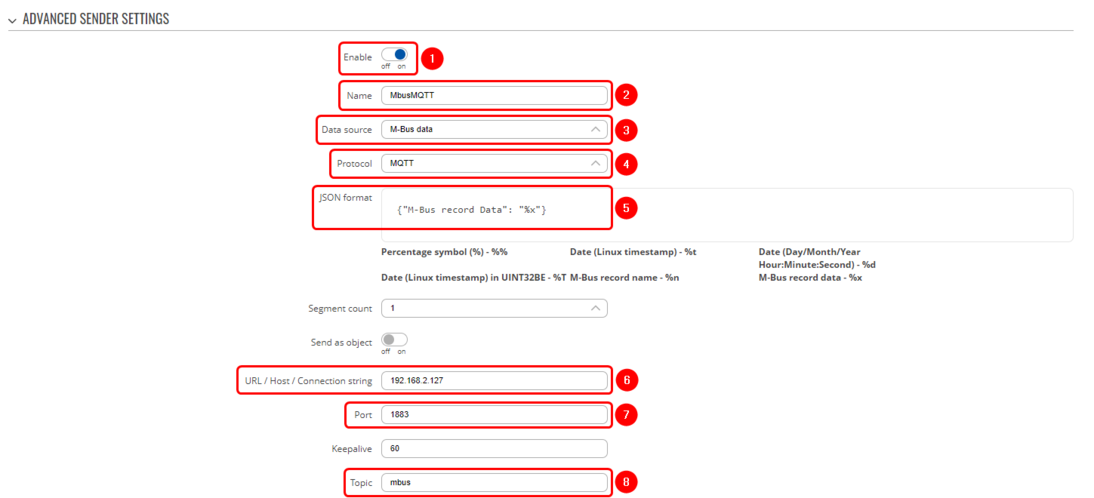
Data to Server configuration
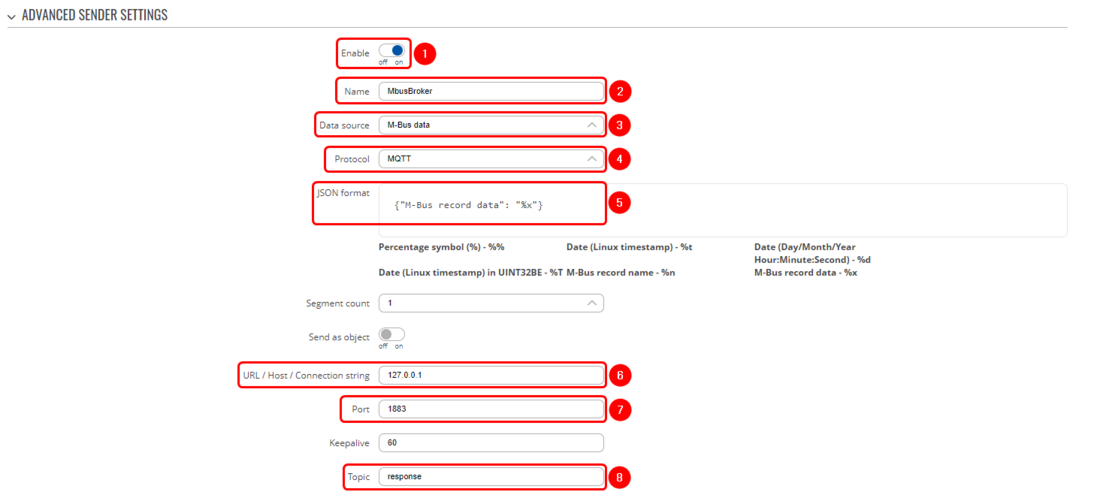
- Enable instance;
- Name: enter desired instance name;
- Data source: M-bus;
- Protocol: MQTT;
- JSON format: enter what data you would like to send;
- URL/Host/Connection string: enter address of server;
- Port: enter server port;
- Topic: enter desired topic name;
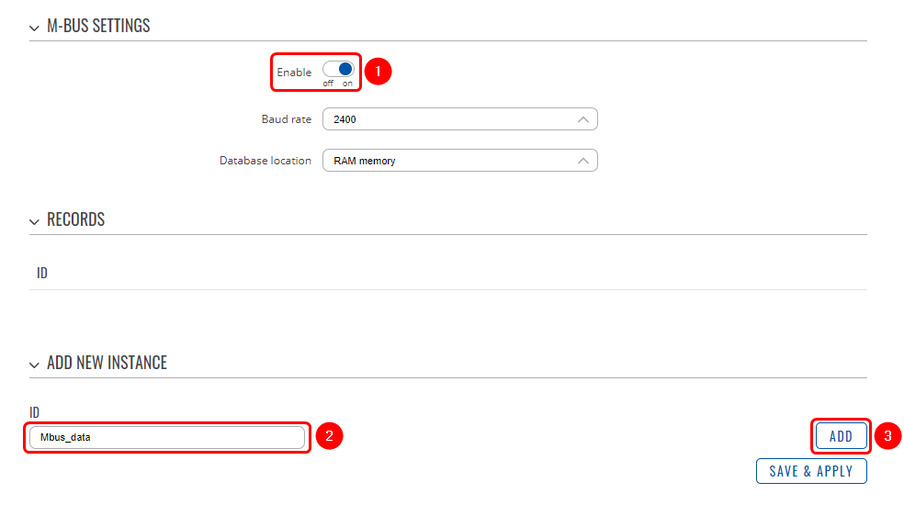
M-Bus configuration
- Enable M-Bus;
- ID: Enter desired instance name;
- Add;
- Enable instance;
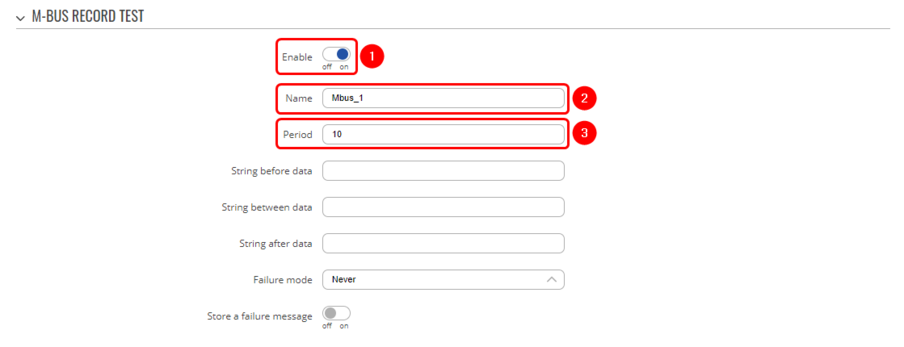
- Name: Enter your desired name;
- Period: Enter desired period;
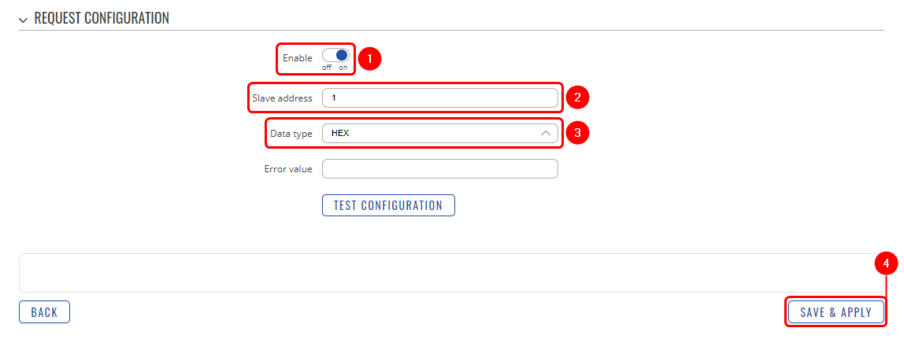
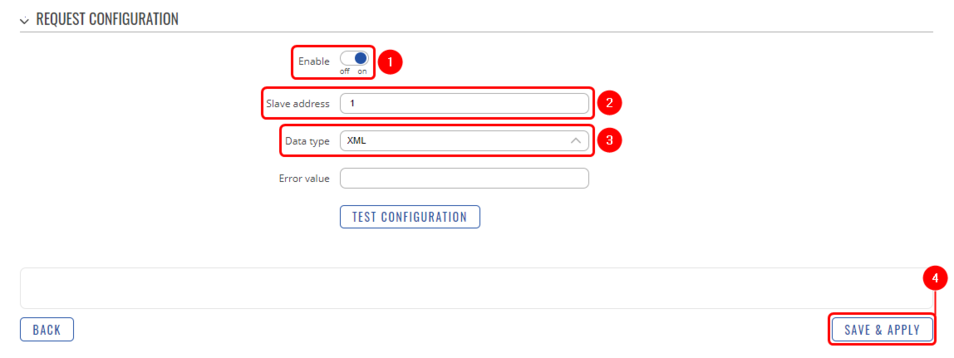
- Enable request configuration;
- Slave address: Enter desired slave address;
- Data type: Select desired data type (this time we will be using HEX);
- Save & apply changes.
Node-RED configuration
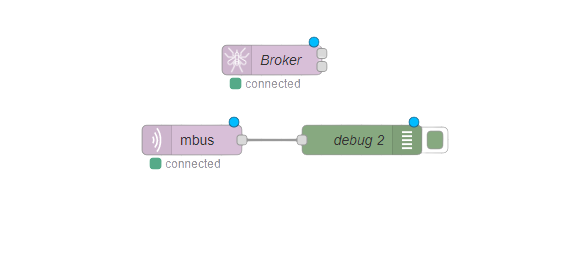
Below you can see the Node-Red block diagram that is used to receive data:
- aedes broker block - Broker;
- MQTT in block - mbus;
- Debug - debug 2;
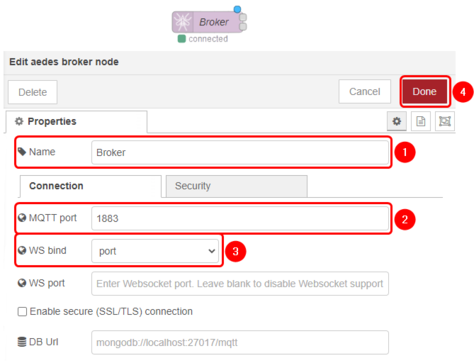
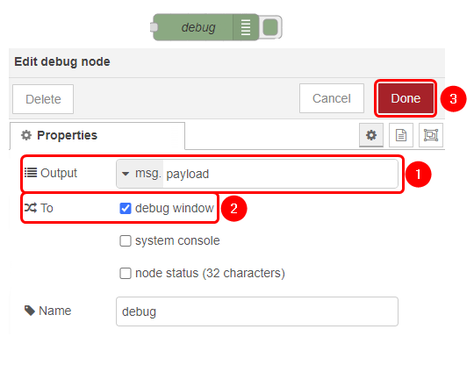
Everything else can be left as default. |
Everything else can be left as default. |
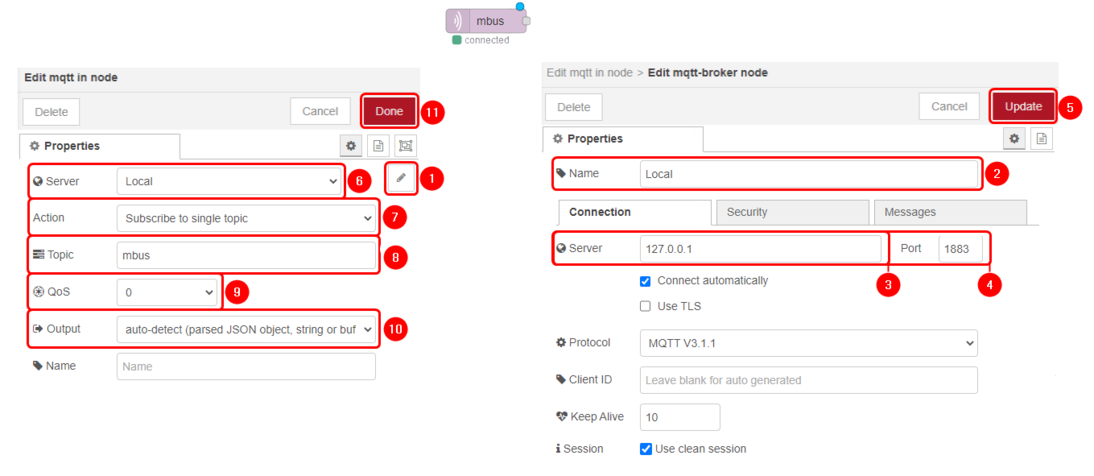
- Edit: Configure MQTT-Broker node;
- Name: Enter desired MQTT-Broker nodes name;
- Server: 127.0.0.1 as we will be using Node-RED as MQTT-Broker;
- Port: 1883;
- Update: Save the changes;
- Server: Select MQTT-Broker that you have just created;
- Action: Subscribe to single topic;
- Topic: Enter the topic that you have set in Data to Server configuration;
- Qos: 0;
- Output: Auto-Detect;
Results
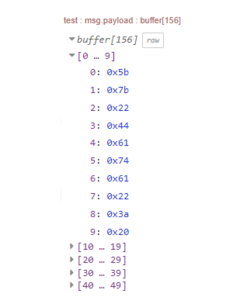
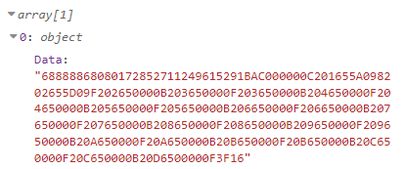
If you have taken all of the steps described above, the configuration is complete. Below you can see M-Bus data output in HEX format.
M-Bus Data to Server Via HTTP
This section contains information on how to send M-Bus data to the server on Node-RED using the HTTP protocol.
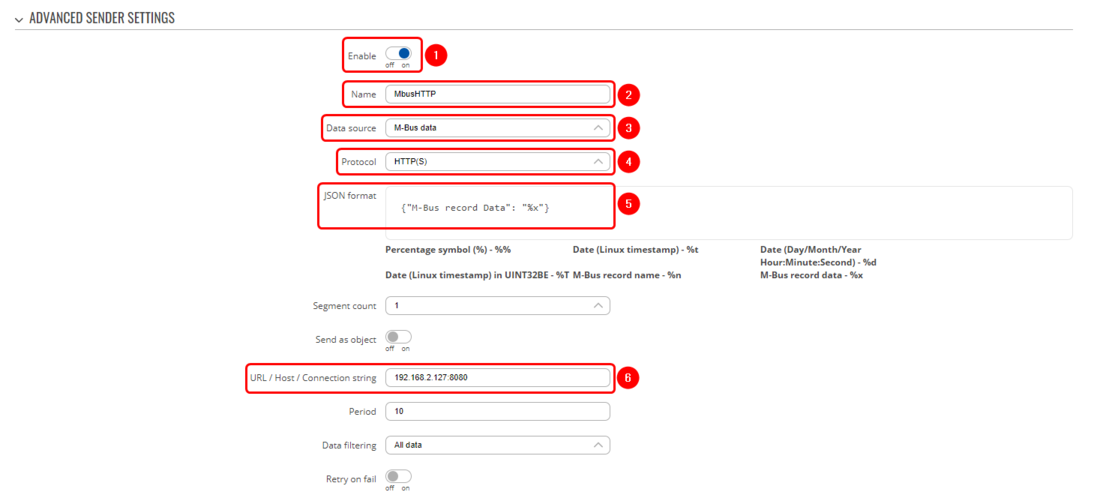
Data to Server configuration
M-Bus configuration
- Enable request configuration;
- Slave address: Enter desired slave address;
- Data type: Select desired data type (this time we will be using XML);
- Save & apply changes.
Node-RED configuration

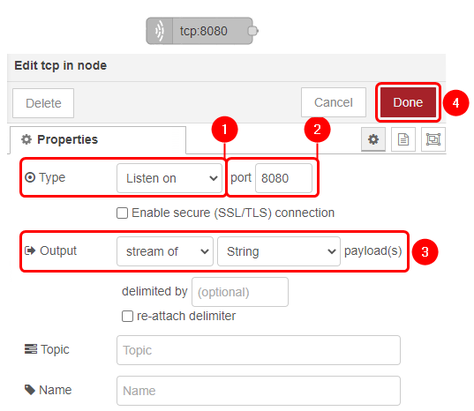
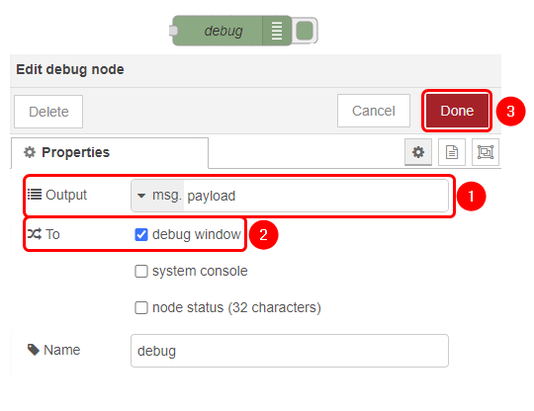
Everything else can be left as default. |
|
Results
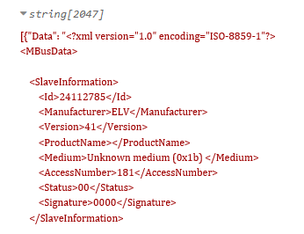
If you have taken all of the steps described above, the configuration is complete. Below you can see M-Bus data output in XML format.
MQTT broker
This section contains information on how to send M-Bus data to the server on Node-RED using a Teltonika router as a MQTT broker.
Data to Server configuration
- Enable instance;
- Name: Enter desired instance name;
- Data source: M-bus;
- Protocol: MQTT;
- JSON format: Enter what data you would like to send;
- URL/Host/Connection string: Localhost IP;
- Port: enter server port;
- Topic: enter desired topic name;
MQTT broker configuration
- MQTT broker: On;
- Local port: 1883;
M-Bus configuration
- Enable request configuration;
- Slave address: Enter desired slave address;
- Data type: Select desired data type (this time we will be using BIN);
- Save & apply changes.
Node-RED configuration
Results
If you have taken all of the steps described above, the configuration is complete. Below you can see M-Bus data output in BIN format.
