OnboardingTest: Difference between revisions
No edit summary |
No edit summary |
||
| Line 7: | Line 7: | ||
<ol> | <ol> | ||
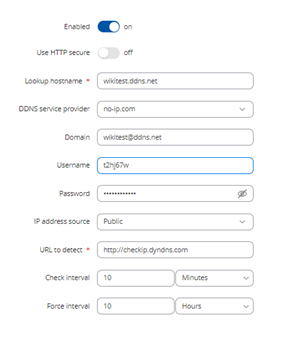
<li>Go to the device <I> '''WebUI''' → '''System''' → '''Dynamic DNS'''</i> and set up your own parameters.<br>[[File:Picture102.png|border|class=tlt-border]] | <li>Go to the device <I> '''WebUI''' → '''System''' → '''Dynamic DNS'''</i> and set up your own parameters.<br>[[File:Picture102.png|border|class=tlt-border]] | ||
You will see that the status of this instance will be '''Running'''.<br>[[File:Picture104.png|border|class=tlt-border]] | |||
Revision as of 13:08, 25 July 2024
Introduction
In this configuration example, you will be able to follow the steps to set up devices with RUTOS using Dynamic DNS, OpenVPN, and port forwarding. The purpose is to combine these features to manage a remote device, as shown in the image below.
RUTX08 configration
Dynamic DNS configuration on no-ip.com
Go to the website [1], log in or create an account, and create a Hostname with the public IP that has been assigned to us. 
Dynamic DNS configuration on RUTX08
- Go to the device WebUI → System → Dynamic DNS and set up your own parameters.
 You will see that the status of this instance will be Running.

