Template:TRMXXX Device Startup: Difference between revisions
No edit summary |
|||
| Line 1: | Line 1: | ||
==Windows== | ==Windows== | ||
= Device Startup = | === Device Startup === | ||
Make sure that you have the below listed drivers installed before proceeding further.<br> | Make sure that you have the below listed drivers installed before proceeding further.<br> | ||
Revision as of 11:46, 2 December 2024
Windows
Device Startup
Make sure that you have the below listed drivers installed before proceeding further.
Drivers link:
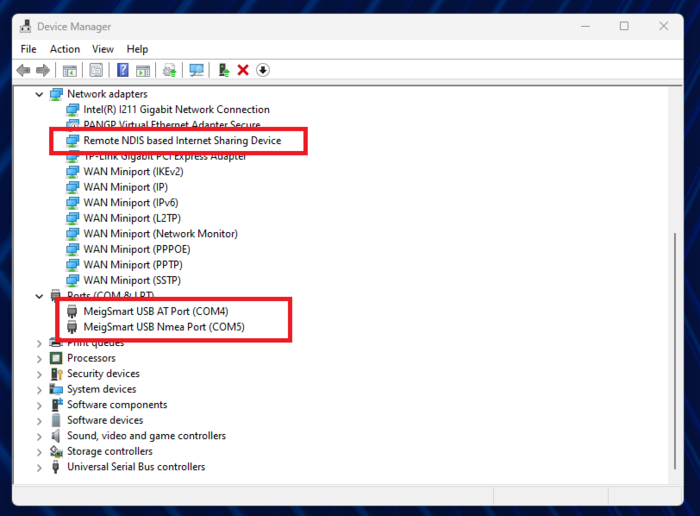
When the device is connected, open Device Manager on the end device and verify that three(the number may differ depending on the end device) USB ports and an RNDIS control device appear under the device list.
Step 1: Accessing the AT Port
1. Identify the AT Port for the modem; in this example, it’s COM4.
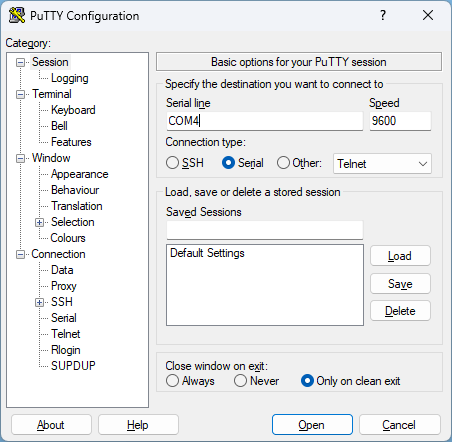
2. Open Putty on your computer to access the AT command interface.
3. In Putty add the following information as shown below:
Step 2: Check and Unlock the SIM Card
1. In the Putty window, send the following AT command to check SIM status:
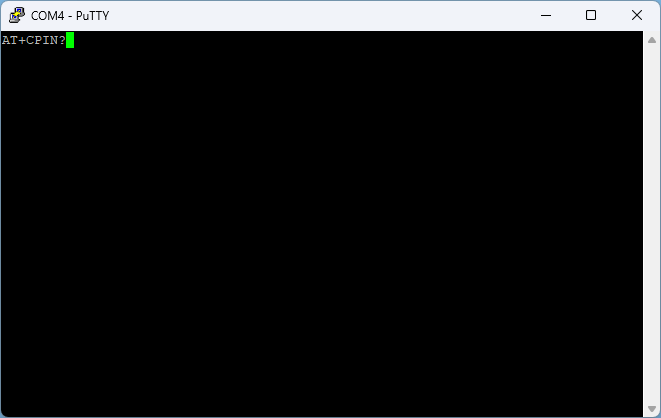 |
- If the response shows: +CPIN: SIM PIN, the SIM card is locked.
- If response shows+CME ERROR: 10 make sure SIM card is correctly inserted and NET led is blinking. If not, powercycle the device.
2. To unlock the SIM, send the command with the PIN code (replace 0000 with the actual PIN)
AT+CPIN=0000
3. Verify that the SIM is unlocked by running the command again:
AT+CPIN?
- The response should display +CPIN: READY.
Step 3: Check and Configure APN
1. Verify the current APN configuration by sending:
AT+CGDCONT?
Response:
 AT+CGDCONT?
 +CGDCONT: 1,"IPV4V6","","",0,0,0,0,0,0
 +CGDCONT: 8,"IPV4V6","IMS","",0,0,0,1,0,1
- Look for an entry with an empty APN, which indicates that configuration is required.
2. Configure the APN for Tele2 with the following command (enter your mobile providers APN):
AT+CGDCONT=1,"IP","internet.tele2.lt"
Response:
+CGDCONT: 1,"IP","internet.tele2.lt","",0,0,0,0,0,0
+CGDCONT: 8,"IPV4V6","IMS","",0,0,0,1,0,1
3. Confirm the new APN is set by running:
AT+CGDCONT?
- The response should now display internet.tele2.lt as the APN.
Step 4: Restart the Module
1. Restart the module with the following commands:
AT+CFUN=4
- Wait for the module to shut down.
AT+CFUN=1
2. Verify the module has restarted by observing status messages in Putty.
Step 5: Verify Connection to Operator
1. Check if the modem has connected to the operator by running this command:
AT+COPS?
- The response should show the operator’s code (e.g., 24603 for Tele2).
Step 6: Verify Connection to Operator
Make sure your current Internet connection is disabled (Ethernet or Wi-Fi).
1. Open Command Prompt on your computer.
2. Run a ping test to verify connectivity:
ping google.com
- Successful replies indicate the internet connection is active.
The setup for TRM200 is now complete, and the device should be connected to the internet through the configured APN.
Linux
GUI Guide
Step 1: Connect the Device
Start by plugging the USB cable into the TRM200 and then into a USB port on the end device. Once connected, the system will detect the USB device, and you can verify this using the dmesg command. The output should look similar to the following:
[30920.977007] usb 3-1: new high-speed USB device number 21 using xhci_hcd
[30921.103326] usb 3-1: New USB device found, idVendor=2dee, idProduct=4d57, bcdDevice= 1.00
[30921.103331] usb 3-1: New USB device strings: Mfr=1, Product=2, SerialNumber=3
[30921.103332] usb 3-1: Product: Mobile Composite Device Bus
[30921.103333] usb 3-1: Manufacturer: Marvell
[30921.103334] usb 3-1: SerialNumber: XXXXXXXXXXXXXXX
[30921.113133] rndis_host 3-1:1.0 usb0: register 'rndis\_host' at usb-0000:00:14.0-1, RNDIS device, XX:XX:XX:XX:XX:XX
[30921.136291] rndis_host 3-1:1.0 enx0e1083300cc0: renamed from usb0
Step 2: Enable USB Ports
By default, the USB ports of the TRM200 are not enabled. To configure the device (e.g., SIM unlock, APN change), you must manually associate the USB device with the usbserial driver. This requires the following steps:
a. Identify the idVendor and idProduct values from the dmesg output. In this example, the values are idVendor=2dee and idProduct=4d57. b. Inform the Linux kernel to associate the device with the option driver. Run the following command, replacing <VENDOR_ID> and <PRODUCT_ID> with the actual values:
echo <VENDOR_ID> <PRODUCT_ID> | sudo tee /sys/bus/usb-serial/drivers/option1/new_id
If the path /sys/bus/usb-serial/drivers/option1/new_id is not available, follow these additional steps:
- Unplug the USB cable from the end device.
- Execute sudo modprobe option to load the option driver.
- Run the echo command again and then reconnect the USB cable.
Step 3: Verify USB Ports
After executing the command, the USB ports should be visible in the dmesg output. For example:
[94749.055742] option 3-1:1.2: GSM modem (1-port) converter detected
[94749.055805] usb 3-1: GSM modem (1-port) converter now attached to  ttyUSB0
[94749.055920] option 3-1:1.3: GSM modem (1-port) converter detected
[94749.055982] usb 3-1: GSM modem (1-port) converter now attached to ttyUSB1
[94749.056550] option 3-1:1.4: GSM modem (1-port) converter detected
[94749.056621] usb 3-1: GSM modem (1-port) converter now attached to ttyUSB2
[94749.056797] option 3-1:1.5: GSM modem (1-port) converter detected
[94749.056952] usb 3-1: GSM modem (1-port) converter now attached to ttyUSB3
Once the ports are enabled and detected, the TRM200 is ready for configuration.
Step 4: Access Mobile Network Settings
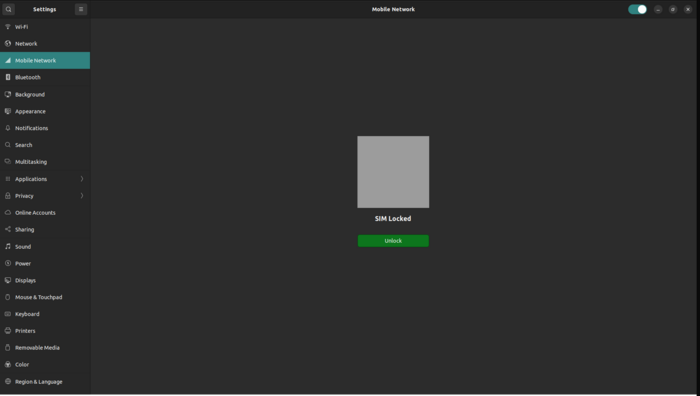
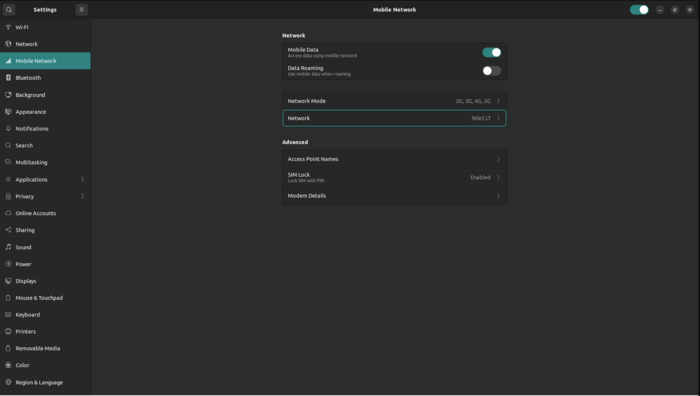
After preparing the TRM200, navigate to the device settings. You should see a Mobile Network tab, which is dedicated to controlling the module. Picture. If the SIM card is locked with a PIN code, you will be prompted to unlock it. The interface will display a window for entering the PIN.
 |
Step 5: Adjust Network Settings
Once the SIM is unlocked, additional settings will become available. These include:
- Roaming Settings: Enable or disable roaming.
- Mobile Data Accessibility: Configure data usage preferences.
- Network Mode and Selection: Choose the preferred network mode (e.g., LTE, 3G) and network operator.
- APN Settings: Define or modify access point settings based on your SIM provider.
- Modem Details: View detailed information about the modem.
 |
Step 6: Configure the Access Point Name (APN)
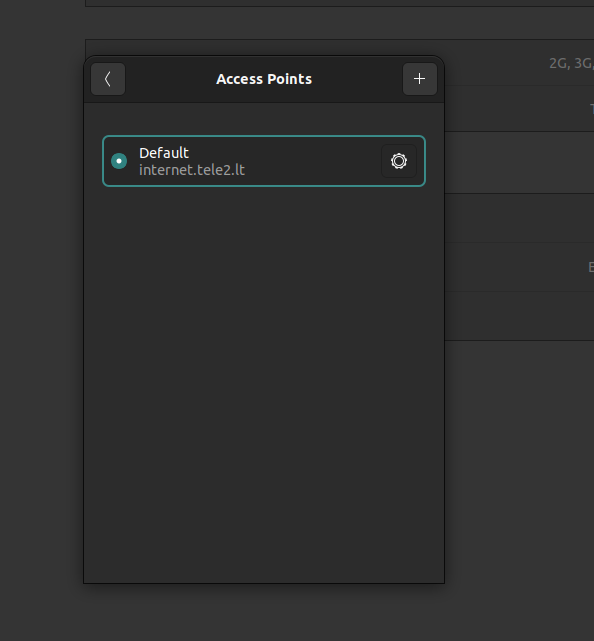
To establish a data connection, ensure the correct APN is configured. It can be configured in Access Point Names page. By default, the APN should be automatically selected by the SIM card. If the default APN is incorrect, navigate to the Access Point Names page. Edit the configuration with the APN details provided by your SIM card provider. Once configured, select the updated APN as the active profile.
 |
When all settings are applied, you can verify connection status by sending PING to some server to verify connection:
kutaviciusti@kutaviciusti:~$ ping google.com
PING google.com (142.250.74.142) 56(84) bytes of data.
64 bytes from arn11s11-in-f14.1e100.net (142.250.74.142): icmp_seq=1 ttl=107 time=58.3 ms
64 bytes from arn11s11-in-f14.1e100.net (142.250.74.142): icmp_seq=2 ttl=107 time=58.2 ms
64 bytes from arn11s11-in-f14.1e100.net (142.250.74.142): icmp_seq=3 ttl=107 time=60.1 ms
64 bytes from arn11s11-in-f14.1e100.net (142.250.74.142): icmp_seq=4 ttl=107 time=59.0 ms
^C
--- google.com ping statistics ---
4 packets transmitted, 4 received, 0% packet loss, time 3001ms
rtt min/avg/max/mdev = 58.173/58.884/60.067/0.761 ms
CLI Guide
The modem can also be configured directly using the USB port. This method requires a terminal application, such as microcom or minicom, to establish communication with the modem over a serial connection.
In this example, microcom will be used:
1. Identify the appropriate USB port for the modem. For this setup, use /dev/ttyUSB1.
2. Open a terminal and use the following command to connect:
sudo microcom -p /dev/ttyUSB1
3. Once connected, the modem can be managed using AT commands. These commands allow you to configure settings such as network preferences, APN, and other advanced options.
Step 1: Check and Unlock the SIM Card
1. In the Command window, send the following AT command to check SIM status:
AT+CPIN?
- If the response shows: +CPIN: SIM PIN, the SIM card is locked.
- If response shows+CME ERROR: 10 make sure SIM card is correctly inserted and NET led is blinking. If not, powercycle the device.
2. To unlock the SIM, send the command with the PIN code (replace 0000 with the actual PIN)
AT+CPIN=0000
3. Verify that the SIM is unlocked by running the command again:
AT+CPIN?
- The response should display +CPIN: READY.
Step 2: Check and Configure APN
1. Verify the current APN configuration by sending:
AT+CGDCONT?
Response:
 AT+CGDCONT?
 +CGDCONT: 1,"IPV4V6","","",0,0,0,0,0,0
 +CGDCONT: 8,"IPV4V6","IMS","",0,0,0,1,0,1
- Look for an entry with an empty APN, which indicates that configuration is required.
2. Configure the APN for Tele2 with the following command (enter your mobile providers APN):
AT+CGDCONT=1,"IP","internet.tele2.lt"
Response:
+CGDCONT: 1,"IP","internet.tele2.lt","",0,0,0,0,0,0
+CGDCONT: 8,"IPV4V6","IMS","",0,0,0,1,0,1
3. Confirm the new APN is set by running:
AT+CGDCONT?
- The response should now display internet.tele2.lt as the APN.
Step 4: Restart the Module
1. Restart the module with the following commands:
AT+CFUN=4
- Wait for the module to shut down.
AT+CFUN=1
2. Verify the module has restarted by observing status messages in Putty.
Step 5: Verify Connection to Operator
1. Check if the modem has connected to the operator by running this command:
AT+COPS?
- The response should show the operator’s code (e.g., 24603 for Tele2).
Then you can close application and verify connection with same way as before.
