OpenVPN client on Windows: Difference between revisions
| Line 31: | Line 31: | ||
* When you have the certificates in order, you can start configuring the client. To do so, simply open the configuration file with any text editor. | * When you have the certificates in order, you can start configuring the client. To do so, simply open the configuration file with any text editor. | ||
[[File:Ovpn config file windows part 1.PNG]] | [[File:Ovpn config file windows part 1 v1.PNG]] | ||
---- | ---- | ||
* Save the file with an '''.ovpn''' extension. | * Save the file with an '''.ovpn''' extension. | ||
Revision as of 06:34, 28 June 2018
Main Page > General Information > Configuration Examples > PC > Windows > OpenVPN client on WindowsIntroduction
OpenVPN is an open-source software application that implements virtual private network (VPN) techniques for creating secure point-to-point or site-to-site connections in routed or bridged configurations and remote access facilities.
This article provides a guide on how to configure an OpenVPN Tunnel connection between an OpenVPN client on a Windows 10 PC/Laptop and any OpenVPN server using TLS certificates as the authentication method. The examples in this article only apply to Windows 7 and later versions.
Configuration overview and prerequisites
Before we begin, let's overview the configuration that we are attempting to achieve and the prerequisites that make it possible.
Prerequisites:
- A PC or Laptop running on Windows 7 or later version
- An active Internet connection
Configuration scheme:
The scheme itself is very simple - an OpenVPN client connects to an OpenVPN server. The client is configured on a Windows 10 PC or Laptop, while the server is undefined in this example, i.e., we will be focusing mainly on the client configuration method, since the server could belong to any OpenVPN service provider.
OpenVPN client installation
To create an OpenVPN client we'll need to download and install the OpenVPN Windows application. You can find the download link for the newest OpenVPN version here. The file in question should be named something like this: openvpn-install-2.4.6-I602.exe (actual name depends on the current OpenVPN version). Download and run this file. For examples in this guide you can just use default settings in the installation, unless your own configuration requires otherwise.
OpenVPN client configuration
If you have familiarized yourself with the configuration scheme, installed the necessary software and have all of the devices in order, we can start configuring the OpenVPN client using instructions provided in this section.
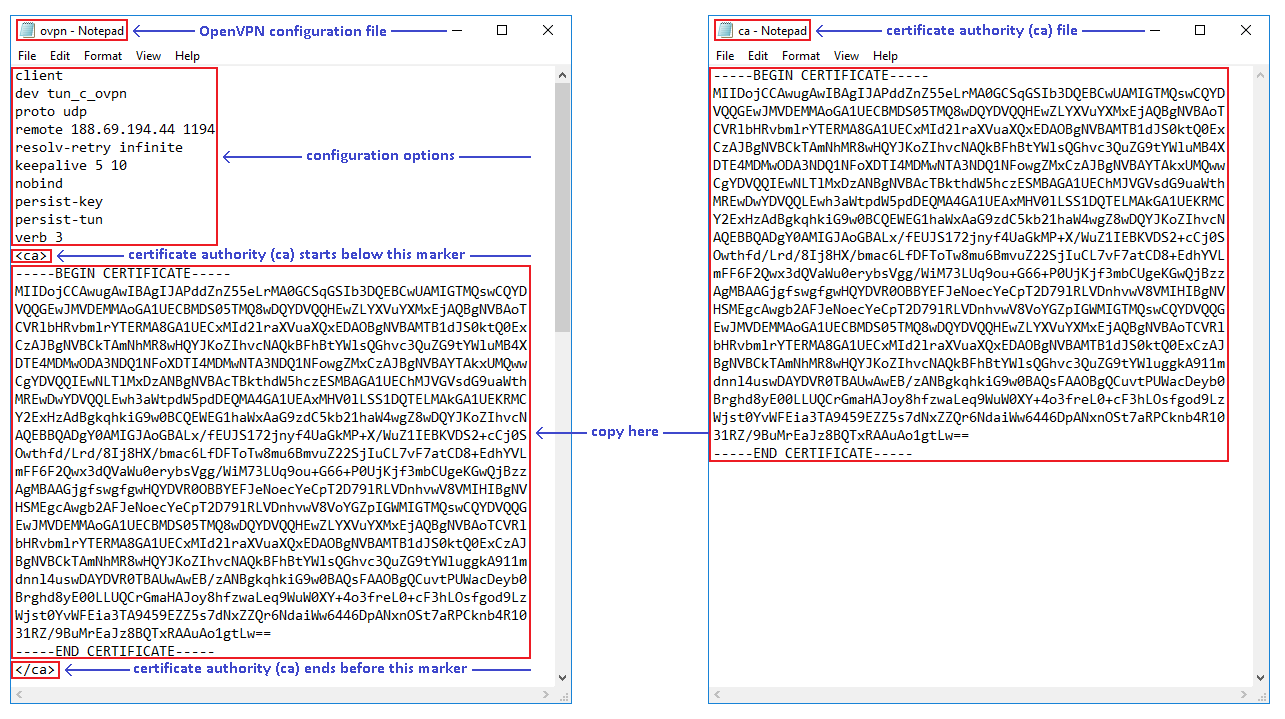
The client configuration is stored in a single text file. You can either download an example file from the Internet or use our configuration, which you can download from here. The file stores standard OpenVPN options, which depend on the server type and user preferences, and authentication certificates or file paths to the certificates. Since we'll be using TLS authentication for this example, we'll need to generate TLS certificates for our configuration to work. The process on how to do that is described here in detail.
- When you have the certificates in order, you can start configuring the client. To do so, simply open the configuration file with any text editor.
- Save the file with an .ovpn extension.
External links
- https://openvpn.net/index.php/open-source/downloads.html - OpenVPN client download.


