Template:Netoworking rutx configuration example mikrotik pppoe: Difference between revisions
No edit summary |
|||
| Line 17: | Line 17: | ||
==Mikrotik (server) configuration== | ==Mikrotik (server) configuration== | ||
Connect to MikroTik by using '''WinBox''' application and follow all the further steps to create PPPoE server | |||
on LAN port 5. | |||
[[File:Networking_rutx_configuration_example_mikrotik_pppoe_1_v1.png|border|class=tlt-border]] | [[File:Networking_rutx_configuration_example_mikrotik_pppoe_1_v1.png|border|class=tlt-border]] | ||
# Open '''Bridge''' settings. | |||
# Navigate to '''Ports''' section. | |||
# Select '''ether5'''. | |||
# Press '''Delete'''. | |||
[[File:Networking_rutx_configuration_example_mikrotik_pppoe_2_v1.png|border|class=tlt-border]] | [[File:Networking_rutx_configuration_example_mikrotik_pppoe_2_v1.png|border|class=tlt-border]] | ||
# Open '''IP''' settings. | |||
# Select '''Pool''' settings. | |||
# Press '''Add''' button. | |||
# Create a '''Name''' (anything you want). | |||
# Write '''Addresses''', it is an address range which will be used for PPPoE clients (in this tutorial I used | |||
192.168.5.10-192.168.5.20). | |||
# Press '''Apply'''. | |||
# Press '''Ok'''. | |||
[[File:Networking_rutx_configuration_example_mikrotik_pppoe_3_v1.png|border|class=tlt-border]] | [[File:Networking_rutx_configuration_example_mikrotik_pppoe_3_v1.png|border|class=tlt-border]] | ||
Revision as of 17:45, 5 March 2020
Introduction
This article provides a guide on how to configure PPPoE server on Mikrotik and how to connect RUTX router, Windows computer to it.
Prerequisites
- Any RUTXxx device.
- One MikroTik router (this guide was created by using MikroTik RB750Gr3).
- Windows 10 computer.
- WinBox application (it is used to access the MikroTik router).
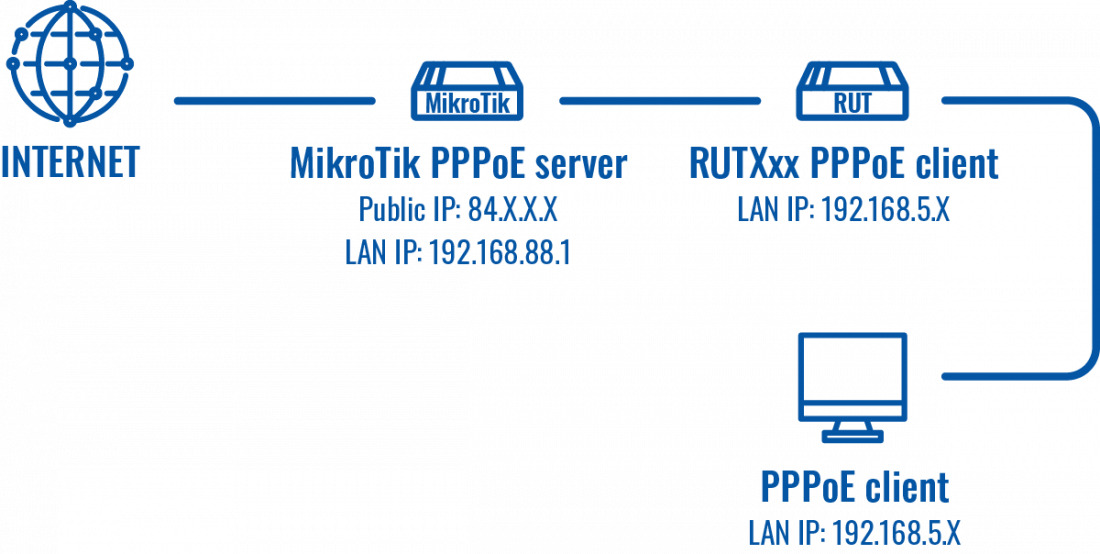
Topology
Mikrotik (server) configuration
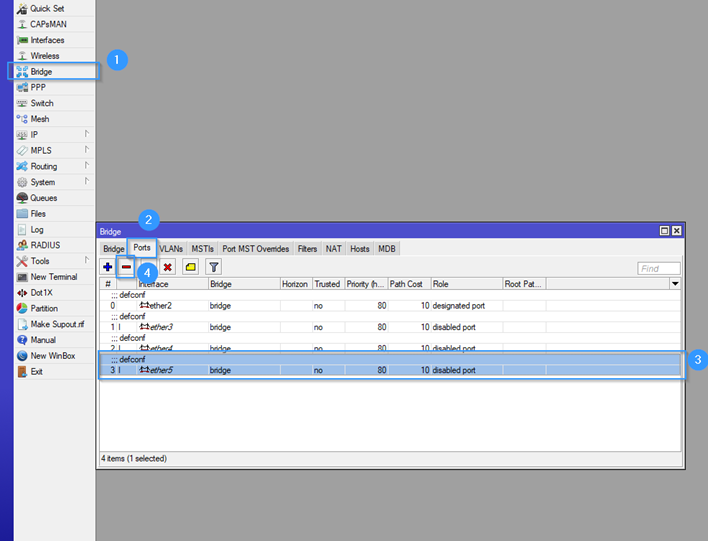
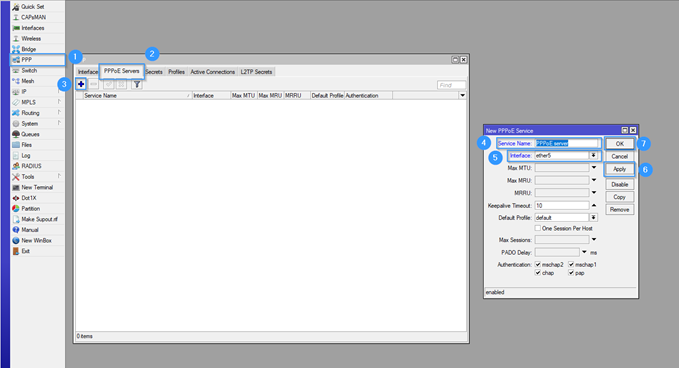
Connect to MikroTik by using WinBox application and follow all the further steps to create PPPoE server on LAN port 5.
- Open Bridge settings.
- Navigate to Ports section.
- Select ether5.
- Press Delete.
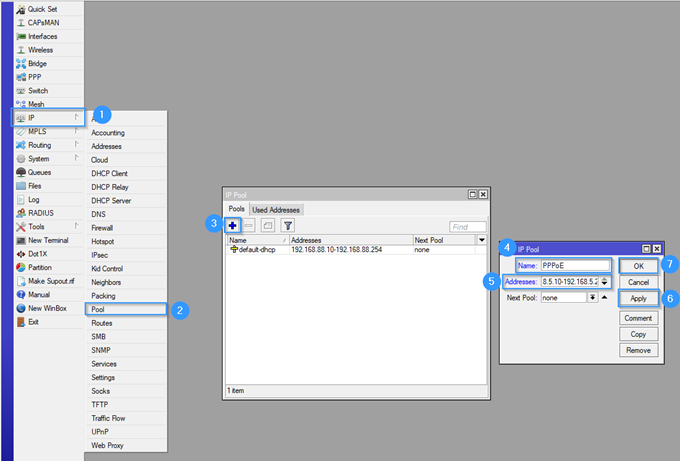
- Open IP settings.
- Select Pool settings.
- Press Add button.
- Create a Name (anything you want).
- Write Addresses, it is an address range which will be used for PPPoE clients (in this tutorial I used
192.168.5.10-192.168.5.20).
- Press Apply.
- Press Ok.

