Setting up WAN as LAN: Difference between revisions
Appearance
No edit summary |
No edit summary |
||
| Line 1: | Line 1: | ||
==Introduction== | ==Introduction== | ||
This article provides a guide on how to configure WAN port as LAN. These configurations are specifically made for | This article provides a guide on how to configure WAN port as LAN. These configurations are specifically made for RutX devices. | ||
===Configuring WAN as LAN=== | ===Configuring WAN as LAN=== | ||
* First you want to make sure that you have '''ADVANCED mode''' enabled. This will allow you to choose from a larger variety of settings. | * First you want to make sure that you have '''ADVANCED mode''' enabled. This will allow you to choose from a larger variety of settings. | ||
[[File: | [[File:Networking rutx manual webui basic advanced mode v1.gif|border|class=tlt-border]] | ||
---- | ---- | ||
* After that navigate to Network > Interfaces | * After that navigate to Network > Interfaces | ||
[[File:Network_interface_settings.png|200px|border|class=tlt-border]] | [[File:Network_interface_settings.png|200px|border|class=tlt-border]] | ||
[[File:Interfaces disable wan.png|border|class=tlt-border| | |||
* Disable WAN interface | |||
[[File:Interfaces disable wan.png|border|class=tlt-border|1100px]] | |||
---- | ---- | ||
* Next we will '''edit''' our LAN interface and navigate to '''Physical settings''' where we will add Interface item from the dropdown menu. | * Next we will '''edit''' our LAN interface and navigate to '''Physical settings''' where we will add Interface item from the dropdown menu. | ||
[[File:Physical settings of interface lan.png|border| | [[File:Physical settings of interface lan.png|border|1100px|class=tlt-border]] | ||
---- | ---- | ||
* Select Ethernet Adapter item, by default it's '''eth1''' | * Select Ethernet Adapter item, by default it's '''eth1''' | ||
| Line 17: | Line 19: | ||
---- | ---- | ||
* It should result in something like this. | * It should result in something like this. | ||
[[File:Eth1 appears in lan interface.png|border|class=tlt-border| | [[File:Eth1 appears in lan interface.png|border|class=tlt-border|1100px]] | ||
---- | ---- | ||
* Once you're done with configurations above just '''save any changes you made'''. Now head to VLAN settings and check if WAN VLAN ID 1 is disabled, and ID 2 is untagged. | * Once you're done with configurations above just '''save any changes you made'''. Now head to VLAN settings and check if WAN VLAN ID 1 is disabled, and ID 2 is untagged. | ||
[[File:Vlan settings for wan as lan.png|border|class=tlt-border| | [[File:Vlan settings for wan as lan.png|border|class=tlt-border|1100px]] | ||
---- | ---- | ||
At this point, WAN port should work as LAN. Go ahead and try to swap from your to current port to WAN, you should be able to ping the router. | At this point, WAN port should work as LAN. Go ahead and try to swap from your to current port to WAN, you should be able to ping the router. | ||
Revision as of 11:01, 3 June 2020
Main Page > General Information > Configuration Examples > LAN > Setting up WAN as LANIntroduction
This article provides a guide on how to configure WAN port as LAN. These configurations are specifically made for RutX devices.
Configuring WAN as LAN
- First you want to make sure that you have ADVANCED mode enabled. This will allow you to choose from a larger variety of settings.
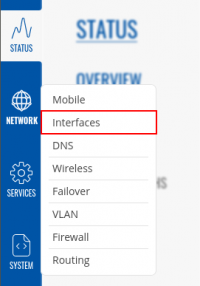
- After that navigate to Network > Interfaces
- Disable WAN interface
- Next we will edit our LAN interface and navigate to Physical settings where we will add Interface item from the dropdown menu.
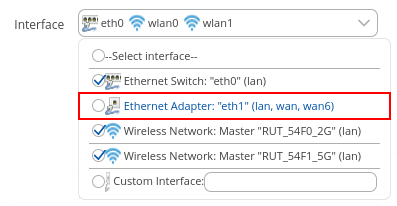
- Select Ethernet Adapter item, by default it's eth1
- It should result in something like this.
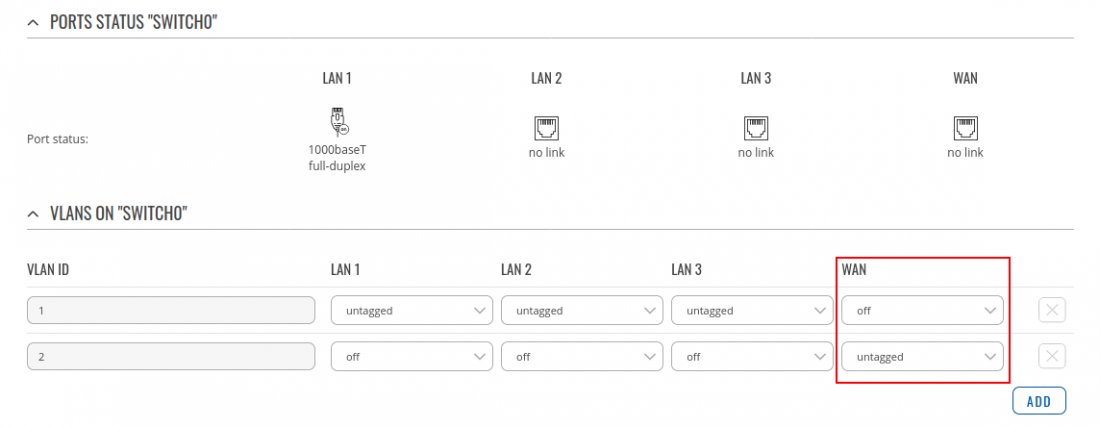
- Once you're done with configurations above just save any changes you made. Now head to VLAN settings and check if WAN VLAN ID 1 is disabled, and ID 2 is untagged.
At this point, WAN port should work as LAN. Go ahead and try to swap from your to current port to WAN, you should be able to ping the router.


