Template:Networking rut manual wireless: Difference between revisions
No edit summary |
No edit summary |
||
| Line 3: | Line 3: | ||
| RUT2XX = {{{series}}}_R_00.01.13 | | RUT2XX = {{{series}}}_R_00.01.13 | ||
| RUT850 = {{{series}}}_R_00.01.04 | | RUT850 = {{{series}}}_R_00.01.04 | ||
| RUT9XX = {{{series}}}_R_00.06.08. | | RUT9XX = {{{series}}}_R_00.06.08.1}} | ||
| series = {{{series}}} | | series = {{{series}}} | ||
}} | }} | ||
Revision as of 14:32, 3 June 2021
The information in this page is updated in accordance with the [[Media:_WEBUI.bin|]] firmware version.
Summary
The Wireless page is used to configure and manage WiFi Access Points (AP) and WiFi Stations (STA). {{{name}}} devices support 2.4 GHz IEEE 802.11b/g/n and 802.11e_WMM wireless technologies.
This user manual page provides an overview of the Wireless page in {{{name}}} devices.
Wireless Access Points
The Wireless Access Points section displays existing WiFi access point (AP) configurations. By default there is one active WiFi AP.
[[File:Networking_{{{name}}}_manual_wireless_wireless_access_points.png|border|class=tlt-border]]
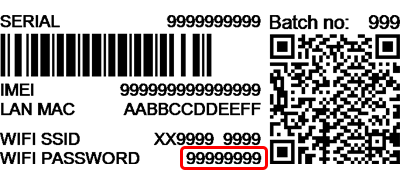
Its SSID consists of a combination of the device's name and the last 4 symbols of the WiFi MAC address (for example, {{{name}}}_ABCD). which is enabled by default. The default password is unique to each device and can be found on the bottom engraving:
You can create more WiFi APs from this section with the 'Add' button or you can make modifications to the existing AP by clicking the 'Edit' button next to it:
[[File:Networking_{{{name}}}_manual_wireless_wireless_access_points_edit_button.png|border|class=tlt-border]]
After clicking 'Edit' you will be redirected to the configuration page of the wireless AP.
Device Configuration
The Device Configuration section is used to configure hardware related parameters of the WiFi radio.
General Setup
The General Setup section is used to turn an Access Point on or off and to select the wireless channel used by the WiFi radio.
In some cases choosing a WiFi channel manually can improve overall WiFi performance. You can download a free WiFi analyzer app on your phone, laptop or other WiFi device and scan the surrounding WiFi networks to see which channels are most and least populated. Choose a WiFi channel that overlaps with the lowest number of other channels. Choosing WiFi channels that are far apart from each other may also prove to increase performance when using more than one AP on the device.
Alternatively, leave channel selection set as 'Auto'. This way your device will pick the WiFi channel automatically.
Advanced Settings
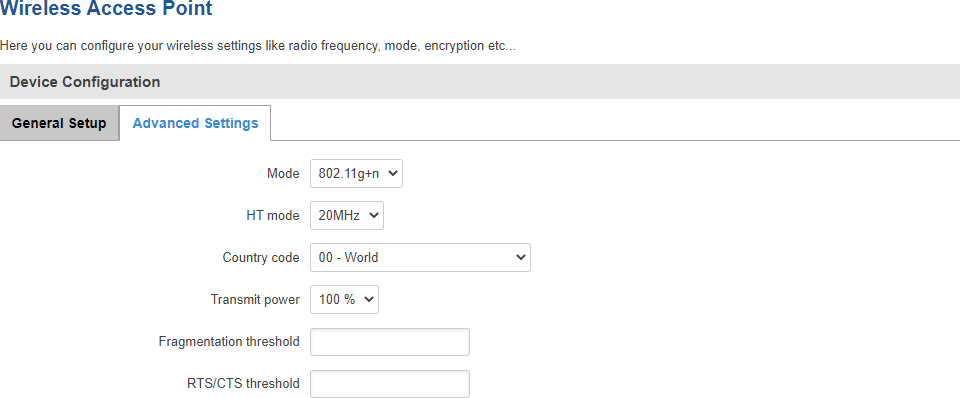
The Advanced Settings section is used to configure the hardware operating settings of the WiFi radio. The settings available in this section are mostly used to find the best WiFi performance conditions.
| Field | Value | Description |
|---|---|---|
| Mode | Auto | 802.11b | 802.11g | 802.11g+n; default: 802.11g+n | Selects the wireless protocol. Different modes provide different wireless standard support which directly impacts the radio's throughput performance. |
| HT mode | 20MHz | 40MHz 2nd channel below | 40MHz 2nd channel above; default: 20MHz | HT (High Throughput) mode specifies WiFi channel bandwidth. 40 MHz bandwidth provides better performance but it overlaps with 4 adjacent channels on each side. Therefore, it might overlap with many other Access Points operating at similar frequencies. If that is the case, the router will switch back to 20 MHz mode automatically to reduce interference. 40 MHz is only available when the WiFi Channel is selected manually in the General Setup section. |
| Country code | country code; default: 00 - World | SO/IEC 3166 alpha2 country codes as defined in the ISO 3166-1 standard. |
| Transmit power | 100 % | 80 % | 60 % | 40 % | 20 %; default: 100 % | WiFi signal power. Use lower power to reduce the device's CPU usage, but lower wireless performance. |
| Fragmentation threshold | integer [256..2346]; default: none | The smallest packet size that can be fragmented and transmitted in multiple frames. In areas were interference is a problem, setting a lower fragment threshold might help reduce the probability of unsuccessful packet transfers, thus increasing speed. |
| RTS/CTS threshold | integer [0..2347]; default: none | RTS/CTS (Request to Send/Clear to Send) are mechanisms used to reduce frame collisions introduced by the hidden node problem. It can help resolve issues arising when several access points are in the same area, contending. |
Interface Configuration
The Interface Configuration section is used to configuring software related parameters of the WiFi AP.
General Setup
The General Setup section is used to set SSID related settings. An SSID is the name of a WiFi AP. When other WiFi capable computers or devices scan the area for WiFi networks they will see your network with this name.
The 'Hide SSID' option is used to make your Access Point invisible to other devices. To use a hidden WiFi Access Point, first un-hide it, connect your device to it, then hide it again.
[[File:Networking_{{{name}}}_manual_wireless_wireless_access_points_interface_configuration_general_setup.png|border|class=tlt-border]]
Wireless Security
The Wireless Security section is used to set the authentication settings for the WiFi AP.
| Field | Value | Description |
|---|---|---|
| Encryption | No encryption | WPA-PSK | WPA2-PSK | WPA-PSK/WPA2-PSK mixed mode | WPA-EAP* | WPA2-EAP*; default: WPA2-PSK | The type of WiFi encryption used. PSK uses a pre-shared key for authentication while EAP uses a RADIUS server. |
| Cipher | Auto | Force CCMP (AES) | Force TKIP | Force TKIP and CCMP (AES); default: Force TKIP and CCMP (AES) | Selects an algorithm for performing encryption and decryption. |
| Key | string; default: none | Pre-shared key, a custom passphrase used for user authentication (at least 8 characters long). |
* The "EAP" (Extensible Authentication Protocol) are for using a RADIUS server for authentication instead of a pre-shared key. The configuration layout for these selections is distinct from PSK.
| Field | Value | Description |
|---|---|---|
| Encryption | No encryption | WPA-PSK | WPA2-PSK | WPA-PSK/WPA2-PSK mixed mode | WPA-EAP* | WPA2-EAP*; default: WPA2-PSK | The type of WiFi encryption used. PSK uses a pre-shared key for authentication while EAP uses a RADIUS server. |
| Cipher | Auto | Force CCMP (AES) | Force TKIP | Force TKIP and CCMP (AES); default: Force TKIP and CCMP (AES) | Selects an algorithm for performing encryption and decryption. |
| Radius Server IP | host | ip; default: none | RADIUS server's IP address or hostname. |
| Radius Server Port | integer [0..65535]; default: none | The port number used for connection to the RADIUS server. |
| Radius Server Secret | string; default: none | A case-sensitive shared secret used for authentication on both RADIUS devices. |
MAC Filter
The MAC Filter section is used for setting up rules that allow or exclude listed devices (based on MAC address) from connecting to your WiFi network.
| Field | Value | Description |
|---|---|---|
| MAC address filter | Disable | Allow listed only | Allow all except listed; default: Disable | Defines how MAC filtering is done.
|
| MAC | mac; default: none | List of MAC addresses to be included or excluded from connecting to your WiFi network. |
Advanced Settings
The Advanced Settings section can be used to set the following parameters:
| Field | Value | Description |
|---|---|---|
| Separate clients | yes | no; default: no | Prevents WiFi clients from communicating with each other on the WiFi network. |
| Increase TTL packet size | yes | no; default: no | Increases TTL packet size for incoming packets. |
Wireless Station
The {{{name}}} device can also operate as a WiFi Station (client) to obtain an Internet connection from another WiFi AP.
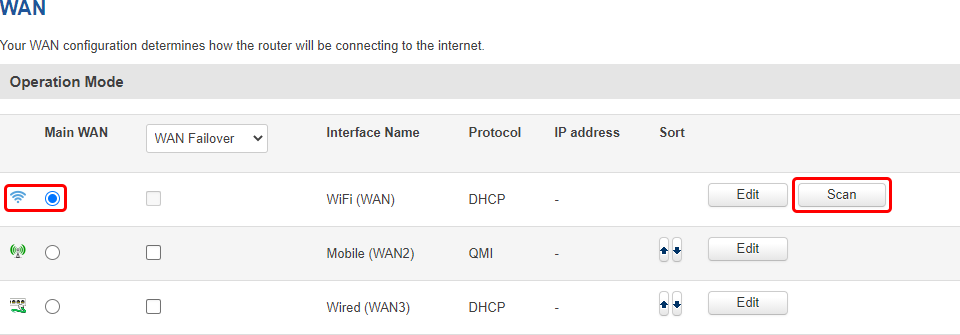
In order to configure the device as a Wireless Station, go to the Network → [[{{{name}}} WAN|WAN]] page and set WiFi to either Main WAN or WAN Failover. Then click the 'Scan' button to initiate a scan for available nearby WiFi access points.
The scan should take up to 10 seconds and display a list of available WiFi access points at the end of the process. Pick an access point to connect to and click 'Join Network'.
If the selected access point is secured, enter the password (WPA passphrase) in the next window and click 'Save' to finish the process.
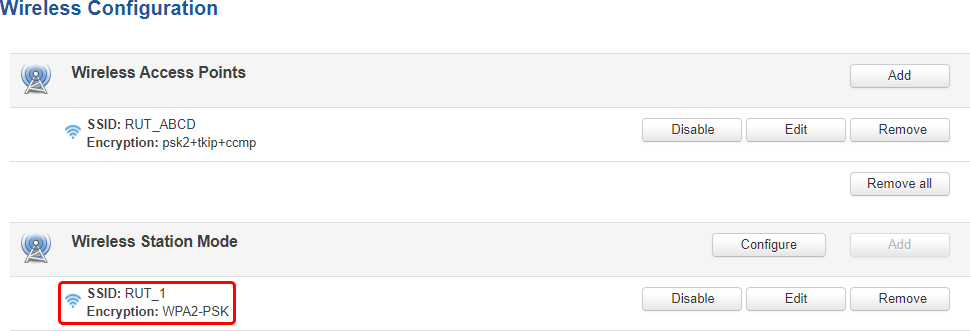
The newly connected access points should be displayed in the Network → Wireless page.
Multiple Access Points
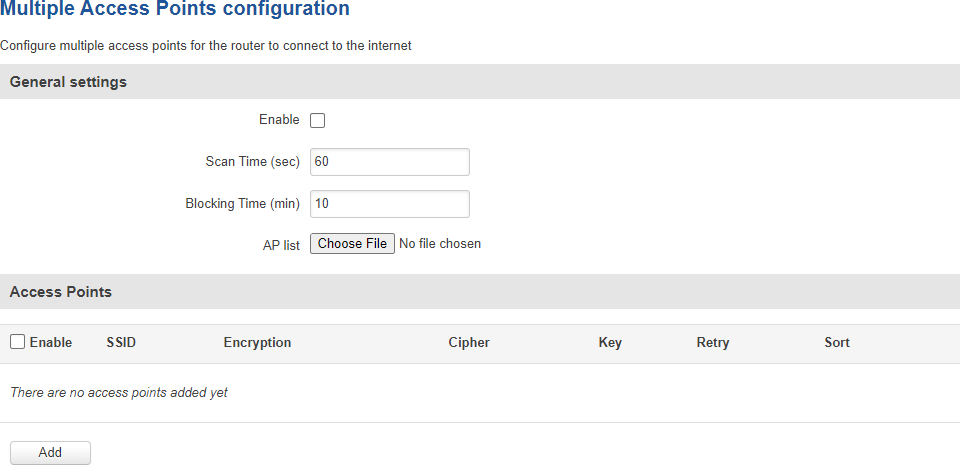
You can also configure access to multiple wireless access points from one page. To enter multiple access point configuration, click the 'Configure' button next to Wireless Station Mode.
After this you should be redirected to a page that looks like this:
| Field | Value | Description |
|---|---|---|
| Enable | yes | no; default: no | Turns multiple access point configuration on or off. |
| Scan Time (sec) | integer (30+); default: 60 | Frequency (in seconds) of scans for WiFi access point availability. |
| Blocking Time (min) | integer (1+); default: 10 | The amount time (in minutes) after which the device will no longer attempt to connect to an access point after the number of unsuccessful retries is exceeded. |
| AP list | - (interactive button) | Uploads a list of access point configurations. |
You can either configure multiple access points from this page of the WebUI or you can upload a file with a list of access point configurations. The file should contains WIFi access point configuration options and values, which should be defined as option: value (for example, ssid: home_wifi). The SSID is mandatory, while other optional options are:
| Field | Value | Description |
|---|---|---|
| Enable | 1 | 0 | State of an access point configuration.
|
| SSID | string | SSID of an access point. |
| Encryption | none | psk | psk2 | psk-mixed | The type of WiFi encryption used by an access point. |
| Cipher | auto | ccmp | tkip | ccmp+tkip | Algorithm for performing encryption and decryption. |
| Key | string | Pre-shared key, a custom passphrase used for user authentication (at least 8 characters long). |
| Retry | integer [1..10] | Defines the number of times this device will attempt to connect to an access point before moving to another configuration in the list. |
Option names in the file should be provided in lower case letters. AP list file example:
ssid: RUT_1
enable: 1
encryption: psk2
cipher: tkip+ccmp
key: 12345678
retry: 3
ssid: RUT_2
enable: 1
encryption: psk2
cipher: tkip+ccmp
key: 12345678
retry: 3
ssid: RUT_3
enable: 1
encryption: psk2
cipher: tkip+ccmp
key: 12345678
retry: 3
Once uploaded, the contents of the file should become visible in the Access Points list:
[[Category:{{{name}}} Network section]]

