Modbus TCP Master MQTT Gateway: Difference between revisions
Final v1 |
mNo edit summary |
||
| Line 105: | Line 105: | ||
If function is 16 - from '''1''' to '''123''' (first register + registry value can not go out of range), Registry values separated by commas without spaces. Example.: '''1,2,3,654,21,789'''. There has to be as many values, as specified number of registers, and each value must be between '''0''' and '''65535'''. If number of registries is 0, there should be '''no registry values''' | If function is 16 - from '''1''' to '''123''' (first register + registry value can not go out of range), Registry values separated by commas without spaces. Example.: '''1,2,3,654,21,789'''. There has to be as many values, as specified number of registers, and each value must be between '''0''' and '''65535'''. If number of registries is 0, there should be '''no registry values''' | ||
|} | |} | ||
[[File:Networking MQTT modbus message format publisher v1.png | [[File:Networking MQTT modbus message format publisher v1.png]] | ||
====Examples==== | ====Examples==== | ||
Revision as of 14:03, 12 July 2022
Summary
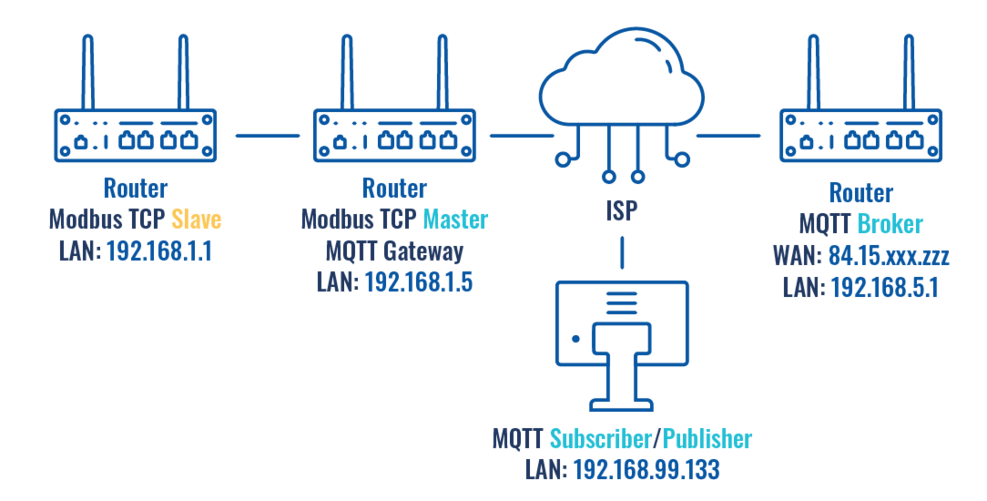
In this guide Modbus TCP master MQTT Gateway function will be configured with two different types of MQTT Brokers. First using third party MQTT Broker services (in this example Flespi.io). Second using RUT240 router as MQTT Broker. Two RUT955 routers will be used as Modbus TCP Master and Slave, and PC acts as MQTT Publisher and Subscriber.
Using flespi.io as Broker

Configuring RUT955 Modbus TCP Slave
Go to Services > Modbus > Modbus TCP Slave:
- Check Enable
- Enter port that will be used, in this example 502 will be used
- Enter device ID
- Press Save & Apply
*In this config LAN port is used so “Allow Remote Access” is not needed
Modbus TCP Slave RUT955 is now configured.
Configuring RUT955 Modbus TCP Master
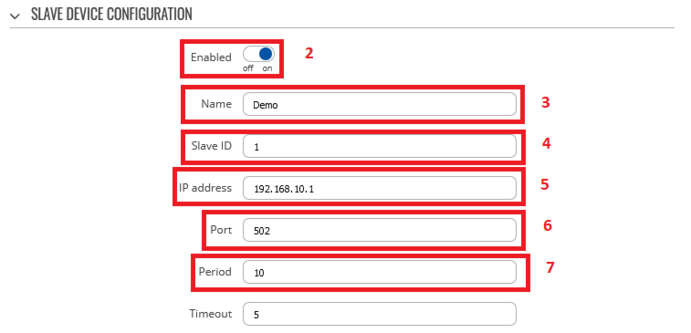
Go to Services > Modbus > Modbus TCP Master
- Press Add
- Check Enable
- Enter name for slave device
- Slave ID must match with previously configured Slave device ID
- Enter IP address of Modbus TCP Slave device
- Chose same Port as in Slave device - 502
- Enter Period in seconds, how often requests will be sent to Slave device
- Enter new request name and press Add in Requests configurations
- Choose Data type and Function, enter First register/coil/input to be read or written and Register count. You can name each individual configuration, and then select enable on configurations that you want to use. In this example, register to get WAN IP address of the slave device is used.
- Press Test button in Request Configuration Testing to see if Slave device respond to requests, response similar to image below should be shown.
- Press Save & Apply
Configuring Flespi.io MQTT Broker
Login or create an account on https://flespi.io
Once logged in:
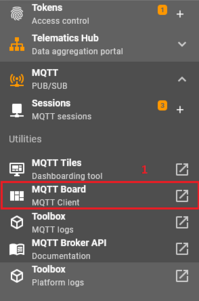
- Navigate to MQTT Board on the left side of the screen and press it.
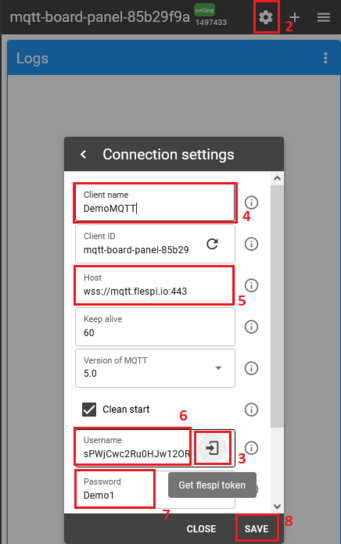
- On the right hand panel, top right corner, next to the name of the MQTT board, press the cogwheel looking icon to open Connection Settings
- In the opened window, press "Get flespi token" to generate an username
- Enter Client name
- Copy Host address
- Copy Username
- Create a password
- Press Save
Configuring MQTT Gateway on RUT955 Modbus TCP Master
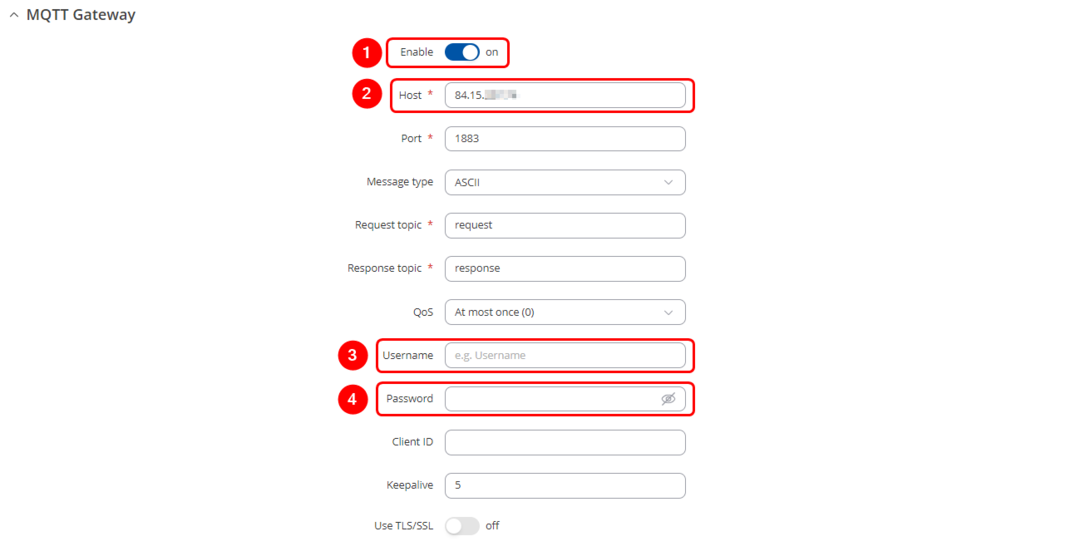
Open routers WebUI and navigate to Services > Modbus > MQTT Gateway
- Select Enable
- Enter Host (copied from flespi connection settings without 'wss://' and port)
- Enter Username (Copied from flespi Connection settings generated token)
- Enter Password
You can change Request and Response topics that you will have to publish and subscribe to get information from Modbus TCP Master through MQTT Gateway, but for this example they are left on default topics
Message format for MQTT publisher
Format is in text - heavier and slower, but less difficult to edit.
| 1. Format version | 0 |
| 2. Cookie | from 0 to 264 -1 |
| 3. IP Type | 0 - IPv4; 1 - IPv6; 2 - hostname |
| 4. IP | IPv6 must be in full format (for example: 2001:0db8:0000:0000:0000:8a2e:0370:7334) |
| 5. Port | Port number (for example: 502) |
| 6. Timeout in seconds (time to wait for response) | from 1 to 999 |
| 7. Slave ID - Indicates to which slave request is sent | from 1 to 255 |
| 8. Function | 3 - read registers; 6 - write single register; 16 - write multiple registers |
| 9. Number of first register from which information will be read or written | from 1 to 65535 |
| 10. Registry value | If function is 3 - from 1 to 123 (first register + registry value can not go out of range);
If function is 6 - from 0 to 65535 If function is 16 - from 1 to 123 (first register + registry value can not go out of range), Registry values separated by commas without spaces. Example.: 1,2,3,654,21,789. There has to be as many values, as specified number of registers, and each value must be between 0 and 65535. If number of registries is 0, there should be no registry values |
Examples
| Setting relay (on) (Relay address is 202, which means 'Number of first register will be 203) | 0 65432 0 192.168.1.1 502 5 1 6 203 1 |
| Getting uptime | 0 65432 0 192.168.1.1 502 5 1 3 2 2 |
Testing MQTT Publisher and Subscriber on flespi.io
Login and navigate to MQTT Board on https://flespi.io
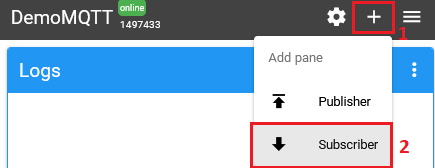
Add a subscriber:
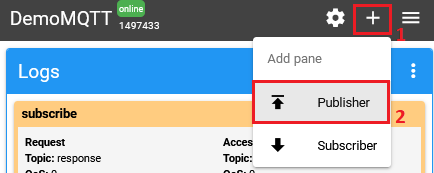
- Press '+' button on the top right corner
- Select 'Subscriber'
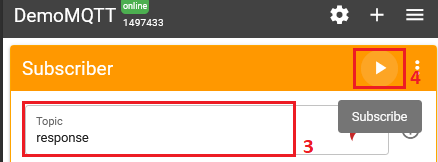
- In the topic field enter 'response'
- Press 'Subscribe' button
Add a Publisher:
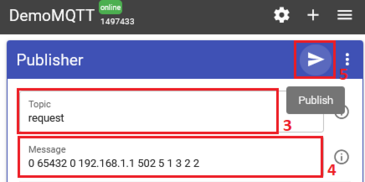
- Press '+' button on the top right corner
- Select 'Publisher'
- In the topic field enter 'request'
- In the message field enter message, for this example 'Getting uptime' is used
- Press 'Publish' button
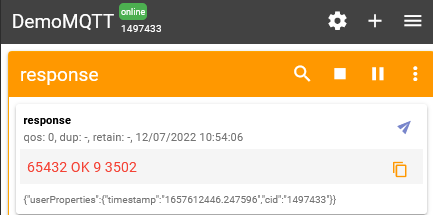
Check the response in the 'Subscriber' tab, you should receive a message similar to the one below.
This Means that MQTT Gateway on Modbus TCP Master router is working correctly and Modbus TCP Slave receives requests.
Using RUT240 router as broker
Configuring Modbus TCP Master, MQTT Gateway MQTT Broker on RUT240 and MQTT Publisher/Subscriber on PC
Same configuration will be used for Modbus TCP Master and Slave RUT955 routers as in previous example, only settings in Modbus TCP Master router RUT955 will be changed to match MQTT Broker on RUT240 router
Navigate to Services > Modbus > MQTT Gateway
- Enable
- Host: Enter Public IP address of MQTT Broker (RUT240)
- Username: N/A
- Password: N/A
- Press Save & Apply
Configuring RUT240 MQTT Broker
Navigate to Services > MQTT > Broker
- Select Enable
- Check Enable Remote Access
- Press Save & Apply
Testing MQTT Gateway
For testing purposes, two terminal windows will be used on the same PC.
To get Ubuntu terminal on Windows 10/11, refer to the following link for instructions: https://tutorials.ubuntu.com/tutorial/tutorial-ubuntu-on-windows#0
- Open first terminal, which will act as Subscriber. Type in:
mosquito_sub -h [Host_address] -p [Port] -t [Topic]
- Open second terminal, which will act as Publisher. Type in:
mosquito_pub -h [Host] -h [Host_address] -p [Port] -m [‘Message’] -t [Topic]
- On the first window - Subscriber, a response should appear


