TACACS+: Difference between revisions
Created page with "__TOC__ ==Introduction== This article contains instructions on configuring a RUTX router to start using the TACACS+ function. The TACACS+ will work on our newest firmware vers..." |
No edit summary |
||
| Line 19: | Line 19: | ||
*In console: | *In console: | ||
[[File:Networking rutx manual tacacs docker container in console v1.png.png | [[File:Networking rutx manual tacacs docker container in console v1.png.png|border|class=tlt-border|link=Special:FilePath/Networking_rutx_manual_tacacs_docker_container_in_console_v1.png.png]] | ||
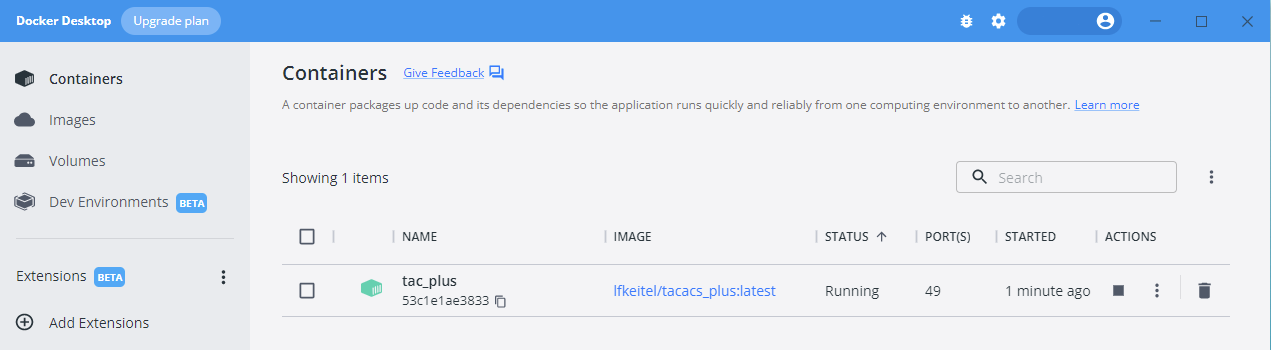
*In Docker Desktop: | *In Docker Desktop: | ||
[[File:Networking rutx manual tacacs docker container v1.png.png | [[File:Networking rutx manual tacacs docker container v1.png.png|border|class=tlt-border|900px|link=Special:FilePath/Networking_rutx_manual_tacacs_docker_container_v1.png.png]] | ||
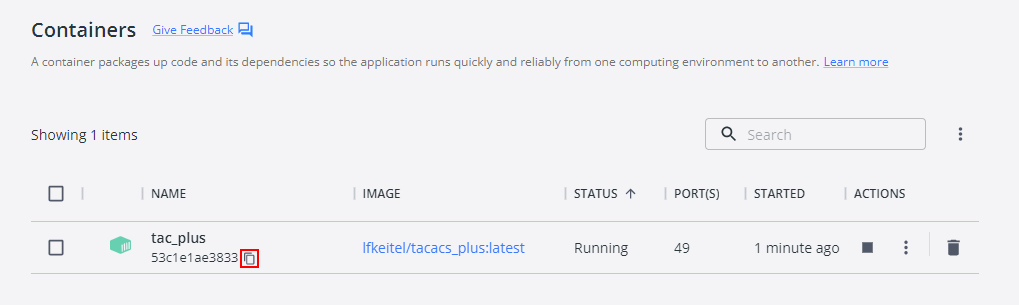
*After successfully creating a container, copy the '''CONTAINER ID''' from the Docker Desktop application or console terminal. | *After successfully creating a container, copy the '''CONTAINER ID''' from the Docker Desktop application or console terminal. | ||
[[File:Networking rutx manual tacacs docker container copy v1.png.png | [[File:Networking rutx manual tacacs docker container copy v1.png.png|border|class=tlt-border|link=Special:FilePath/Networking_rutx_manual_tacacs_docker_container_copy_v1.png.png]] | ||
==Configuring the Docker container== | ==Configuring the Docker container== | ||
| Line 33: | Line 33: | ||
The result should look similar to this: | The result should look similar to this: | ||
[[File:Networking rutx manual tacacs docker container loggedin v1.png | [[File:Networking rutx manual tacacs docker container loggedin v1.png|border|class=tlt-border|link=Special:FilePath/Networking_rutx_manual_tacacs_docker_container_loggedin_v1.png]] | ||
| Line 44: | Line 44: | ||
Edit the original '''user = admin''' to '''user = root''' and change the password, the password will override the original router password for the configured root user. Please '''do not''' delete the word "'''clear'''" (underlined in green in the example below) in front of the password. You can also edit the secret key in the '''host = world''' section, this variable is called a key, and by default, it’s set to '''tac_plus_key'''. After you finish the editing to save the configuration file click CTRL+X, then choose YES (Y button on the keyboard) and ENTER. | Edit the original '''user = admin''' to '''user = root''' and change the password, the password will override the original router password for the configured root user. Please '''do not''' delete the word "'''clear'''" (underlined in green in the example below) in front of the password. You can also edit the secret key in the '''host = world''' section, this variable is called a key, and by default, it’s set to '''tac_plus_key'''. After you finish the editing to save the configuration file click CTRL+X, then choose YES (Y button on the keyboard) and ENTER. | ||
[[File:Networking rutx manual tacacs docker container configuration v2.png | [[File:Networking rutx manual tacacs docker container configuration v2.png|border|class=tlt-border|link=Special:FilePath/Networking_rutx_manual_tacacs_docker_container_configuration_v2.png]] [[File:Networking_rutx_manual_tacacs_docker_container_configuration_v3.png|border|class=tlt-border|link=Special:FilePath/Networking_rutx_manual_tacacs_docker_container_configuration_v3.png]] | ||
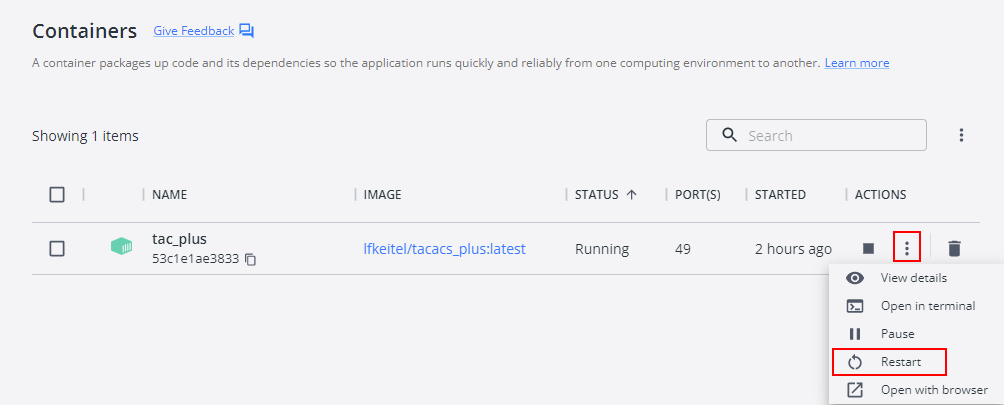
* Make sure that '''port number 49''' (TACACS) is accessible. Depending on your operating system make the required adjustments to the firewall. Restart the Docker container to start it with the new configuration settings. [[File:Networking rutx manual tacacs docker container restart v1.png | * Make sure that '''port number 49''' (TACACS) is accessible. Depending on your operating system make the required adjustments to the firewall. Restart the Docker container to start it with the new configuration settings. [[File:Networking rutx manual tacacs docker container restart v1.png|border|class=tlt-border|900px|link=Special:FilePath/Networking_rutx_manual_tacacs_docker_container_restart_v1.png]] | ||
==Router configuration== | ==Router configuration== | ||
* Install the PAM package from the package manager or you can find it and download it at the following link: https://wiki.teltonika-networks.com/view/RUTX11_Package_Downloads | * Install the PAM package from the package manager or you can find it and download it at the following link: https://wiki.teltonika-networks.com/view/RUTX11_Package_Downloads | ||
* Navigate to WebUI | * Navigate to WebUI → Administration → Access control → General | ||
* Switch '''Enable PAM support''' to '''ON''' in the '''SSH''' section, click save and apply. | * Switch '''Enable PAM support''' to '''ON''' in the '''SSH''' section, click save and apply. | ||
* Switch from General to the PAM tab. | * Switch from General to the PAM tab. | ||
| Line 58: | Line 58: | ||
* Change the settings: | * Change the settings: | ||
[[File:Networking rutx manual tacacs pam settings in router v1.png | [[File:Networking rutx manual tacacs pam settings in router v1.png|border|class=tlt-border|link=Special:FilePath/Networking_rutx_manual_tacacs_pam_settings_in_router_v1.png]] | ||
==Testing the configuration== | ==Testing the configuration== | ||
| Line 67: | Line 67: | ||
* If you check the logs (logread command), you should see something like this: | * If you check the logs (logread command), you should see something like this: | ||
[[File:Networking rutx manual tacacs docker logs v1.png.png | [[File:Networking rutx manual tacacs docker logs v1.png.png|border|class=tlt-border|link=Special:FilePath/Networking_rutx_manual_tacacs_docker_logs_v1.png.png]] | ||
* Keep in mind that you '''wouldn't be able to access the router''' via SSH using the '''default router password''' unless you turn off the PAM authentication in the router's WEBUI. | * Keep in mind that you '''wouldn't be able to access the router''' via SSH using the '''default router password''' unless you turn off the PAM authentication in the router's WEBUI. | ||
Revision as of 12:40, 20 October 2022
Main Page > General Information > Configuration Examples > Router control and monitoring > TACACS+Introduction
This article contains instructions on configuring a RUTX router to start using the TACACS+ function. The TACACS+ will work on our newest firmware version which currently is 7.3, unfortunately, older firmware versions does not support this function.
Prerequisites
- Docker Desktop
- RUTX router
- Firmware version that is not older than 7.3
Docker Desktop instructions
Visit https://www.docker.com/products/docker-desktop/ and choose an appropriate version of the Docker Desktop for your operating system. Create yourself a free account to start with.
Creating Docker Containers
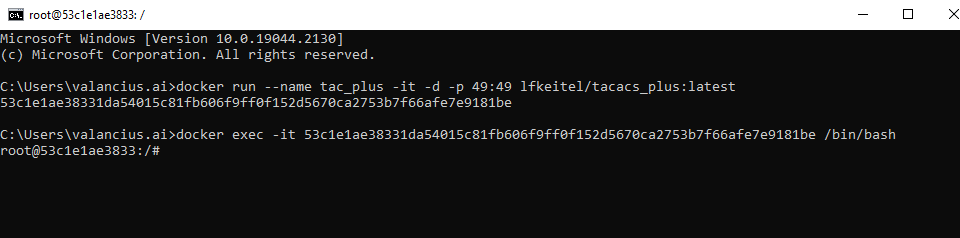
After completing the installation, and creating a new account, open up the terminal supported by your operating system and run the following command:
docker run --name tac_plus -it -d -p 49:49 lfkeitel/tacacs_plus:latest
The result should be:
- In console:

- In Docker Desktop:
- After successfully creating a container, copy the CONTAINER ID from the Docker Desktop application or console terminal.
Configuring the Docker container
- Let's execute a command using a console terminal that will log in us into the Docker Container.
docker exec -it <CONTAINER ID> /bin/bash
The result should look similar to this:
Now we need to make some adjustments to the configuration file of our container. To be able to edit the files, let's install a new application by using the following command in our console terminal:
apt install nano
After installing the nano editor, enter the following command to edit the container configuration file:
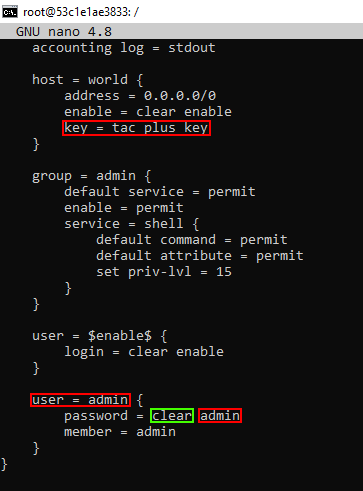
nano etc/tac_plus/tac_plus.cfg
Edit the original user = admin to user = root and change the password, the password will override the original router password for the configured root user. Please do not delete the word "clear" (underlined in green in the example below) in front of the password. You can also edit the secret key in the host = world section, this variable is called a key, and by default, it’s set to tac_plus_key. After you finish the editing to save the configuration file click CTRL+X, then choose YES (Y button on the keyboard) and ENTER.

- Make sure that port number 49 (TACACS) is accessible. Depending on your operating system make the required adjustments to the firewall. Restart the Docker container to start it with the new configuration settings.

Router configuration
- Install the PAM package from the package manager or you can find it and download it at the following link: https://wiki.teltonika-networks.com/view/RUTX11_Package_Downloads
- Navigate to WebUI → Administration → Access control → General
- Switch Enable PAM support to ON in the SSH section, click save and apply.
- Switch from General to the PAM tab.
- Click edit on SSH service.
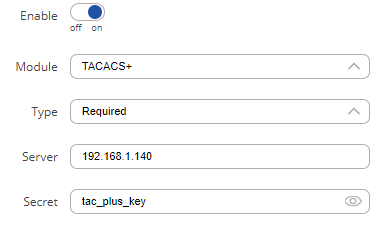
- Change the settings:
Testing the configuration
- Open the SSH client you are using.
- Connect to the router via SSH as usual.
- Enter the password you set in the tac_plus.cfg configuration file.
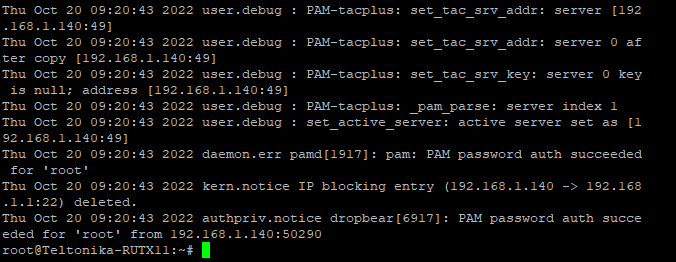
- If you check the logs (logread command), you should see something like this:
- Keep in mind that you wouldn't be able to access the router via SSH using the default router password unless you turn off the PAM authentication in the router's WEBUI.