RUT260 Dynamic DNS
The information in this page is updated in accordance with firmware version RUT2M_R_00.07.10.4.
Summary
Dynamic DNS (DDNS or DynDNS) is a method of automatically updating a name server in the Domain Name System (DNS). This is most often utilized when the end user has a dynamic IP address and wants to bind it to a static hostname.
The device is compatible with many different third party DNS services that provide the possibility to create a custom hostname and bind it to an IP address. The DDNS service periodically updates the IP address information of the hostname, making sure that the device remains reachable via the same hostname even in cases when its IP address has changed.
This chapter is an overview of the Dynamic DNS section for RUT260 devices.
Note: Dynamic DNS is additional software that can be installed from the System → Package Manager page.
Dynamic DNS Overview
By default, an unconfigured DDNS instance will be present in the Dynamic DNS Overview page (the figure below is an example of this). You can create more DDNS instances by entering a name and clicking the "Add" button or you can edit the existing instance since it is not operational by default.
Editing a DDNS instance
To configure a DDNS instance, click the "Edit" button located next to it.
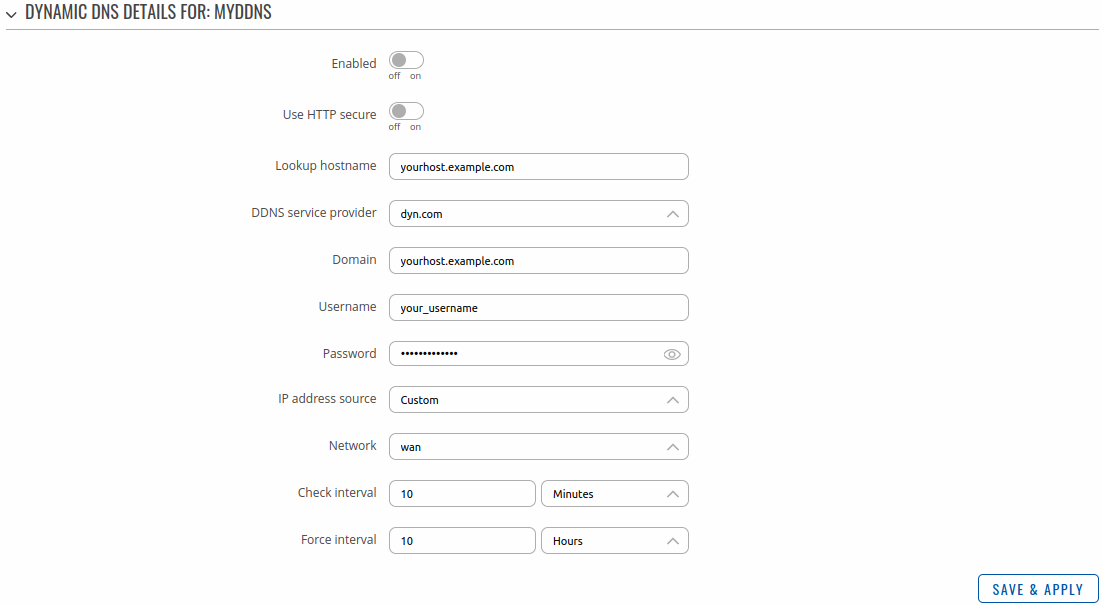
The figure below is an example of the edit page of the default DDNS instance called "MyDDNS" (already present in the device by default) and the table below provides information on the configuration fields contained in that page:
| Field | Value | Description |
|---|---|---|
| Enabled | off | on; Default: off | Turns the DDNS instance on or off. |
| Lookup hostname | host; Default: yourhost.example.com | Fully qualified domain name (FQDN) of your defined host. This is required to verify what the hostname's current IP address at DNS is (using nslookup/host command). |
| DDNS service provider | third party DNS service (chosen from list*) | -- custom --; Default: dyn.com | Third party DNS service provider. |
| Domain | host; Default: yourhost.example.com | Hostname that will be linked with the device IP address. |
| Username | string; Default: your_username | User name required to login to the third party DNS service; used to periodically login to your DNS service account and make necessary updates. |
| Password | string; Default: your_password | Password required to login to the third party DNS service; used to periodically login to your DNS service account and make necessary updates. |
| IP address source | Custom | Public | Private | Script; Default: Custom | Defines the source to read the system's IPv4-Address from, that will be sent to the DNS provider. For example, if your device has a Private IP (i.e., 10.140.56.57) on its WAN interface, then you can send this exact IP to DDNS server by selecting Private. |
| Network | network interface; Default: lan | Specifies which interface's IP address should be bound to the hostname |
| Check Interval | integer [5..3600]; Default: 10 integer [300..3600]* integer [1..3600]** |
Frequency at which the device will check whether it's IP address has changed. The minimal amount of time that can be specified is 5 minutes or 300 seconds. *If selected interval is Seconds. **If selected interval is Hours. |
| Force Interval | integer [5..3600]; Default: 10 integer [1..3600]* |
Frequency at which IP update requests are sent to the DNS provider. The minimal amount of time that can be specified is 5 minutes and not less than Check Interval. *If selected interval is Hours or Days. |
| * Supported DNS services | |||||||||||
|---|---|---|---|---|---|---|---|---|---|---|---|
| 3322.org | able.or.kr | afraid.org-basicauth | afraid.org-keyauth | afraid.org-v2-basic | afraid.org-v2-token | all-inkl.com | bind-nsupdate | ||||
| binero.se | changeip.com | cloudflare.com-v4 | core-networks.de | ddns.com.br | ddnss.de | ddo.jp | desec.io | ||||
| dhis.org | dnsdynamic.org | dnsever.com | dnsexit.com | dnshome.de | dnsmadeeasy.com | dnsmax.com | dnsomatic.com | ||||
| dnspark.com | do.de | domopoli.de | dtdns.com | duckdns.org | duiadns.net | dy.fi | dyn.com | ||||
| dyndns.it | dyndns.org | dyndnss.net | dyns.net | dynsip.org | dynu.com | dynv6.com | easydns.com | ||||
| editdns.net | goip.de | google.com | he.net | joker.com | loopia.se | mydns.jp | myip.com.ua | ||||
| myonlineportal.net | mythic-beasts.com | namecheap.com | nettica.com | noip.com | no-ip.pl | now-dns.com | nsupdate.info | ||||
| nubem.com | opendns.com | oray.com | ovh.com | regfish.de | schokokeks.org | secure.camera | selfhost.de | ||||
| sitelutions.com | spdns.de | spdyn.de | strato.com | system-ns.com | thatip.com | twodns.de | umedia.de | ||||
| variomedia.de | xlhost.de | zerigo.com | zoneedit.com | zzzz.io | |||||||
cloudflare.com
Note: To use subdomains with Cloudfare services, you must use the @ symbol.
service_name	cloudflare.com-v4
domain		[Your domain, here: example.com]
username	Bearer
password	[Your API token]
To use subdomains (CNAME or A records), use the format below when filling your credentials:
domain {subdomain}@[zone]
Examples:
If the hostname is “sample.example.com”, the “domain” field would be “[email protected]”
If the hostname is “dev1.sample.example.com”, the “domain” field would be “[email protected]”
If using Cloudflare's “Subdomain Support”, your zone may already be “foo.example.com”, so if the DDNS hostname is “bar.foo.example.com” the domain field would be “[email protected]”
See also
- Dynamic DNS configuration examples for specific providers:


