Monitoring via MQTT
Router monitoring via MQTT Linux guide applies to TRB145 gateway and to RUT9xx, RUTx routers.
Introduction
MQTT (MQ Telemetry Transport or Message Queue Telemetry Transport) is an ISO standard (ISO/IEC PRF 20922) publish-subscribe-based messaging protocol. It works on top of the TCP/IP protocol. It is designed for connections with remote locations where a "small code footprint" is required or the network bandwidth is limited. The publish-subscribe messaging pattern requires a message broker.
This article provides a guide on how to configure and use a basic MQTT setup on TRB145 gateway and on RUT9xx, RUTx routers.
How MQTT works
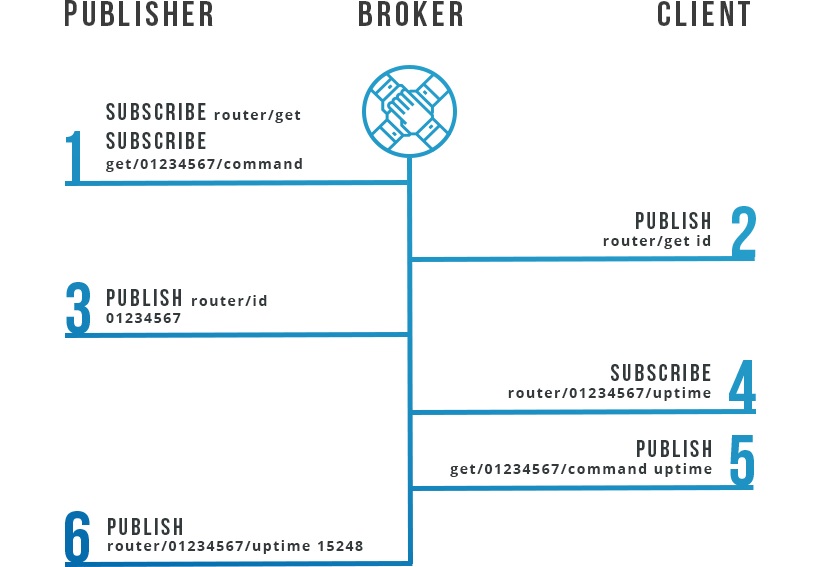
In general an MQTT connection takes place between two Clients and a Broker. A TRB14x gateways and RUT routers can be Broker, Client or both. The MQTT Publisher(Client) present in TRB14x and RUT routers subscribes to two topics by default: <TYPE>/get and get/<SERIAL>/command. Where <TYPE> is device type, for RUT routers type is router and for TRB14x gateways type is device. Parameter <SERIAL> is the router's serial number. When a third party client connects to the Broker, it sends the message id to the the topic <TYPE>/get. The publisher then sends a response containing its serial number to the topic <TYPE>/id. Now that the Client knows the router's or gateway's serial number it can ask for values of various parameters by sending requests to the topic <TYPE>/<SERIAL>/parameter_name. The MQTT Publisher can send responses containing values of these system parameters, if device supports that parameter:
| Parameter name | Parameter description | Supported devices |
|---|---|---|
| temperature | Temperature of the module in 0.1 degrees Celsius | RUT9xx and RUTx11 |
| operator | Current operator’s name | RUT9xx, RUTx11 and TRB145 |
| signal | Signal strength in dBm | RUT9xx, RUTx11 and TRB145 |
| network | Network state | RUT9xx, RUTx11 and TRB145 |
| connection | Current connection type (2G, 3G, 4G) | RUT9xx, RUTx11 and TRB145 |
| wan | WAN IP address | RUT9xx, RUTx11 and TRB145 |
| uptime | System uptime in seconds | RUT9xx, RUTxx and TRB145 |
| name | Router’s device code | RUT9xx, RUTxx and TRB145 |
| digital1 | Value of digital input no. 1 | RUT9xx |
| digital2 | Value of digital input no. 2 | RUT9xx |
| analog | Value of analog | RUT9xx |
After the client sends a message containing of these parameters, the Publisher will send a response message containing the value of the requested parameter to the topic <TYPE>/<SERIAL>/parameter_name, where parameter_name is the name of the requested parameter. The scheme below shows example of how to get parameters on RUT routers.
It should also be noted that, according to the MQTT protocol, topic names are case-sensitive. For instance, topic router is not the same as topic RoUtEr.
Configuring the router
This section will provide an explanation on how to configure an MQTT Broker and MQTT Publisher on a RUT9xx router.
Broker
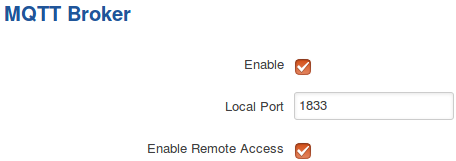
Basic (not counting Security, Bridge and Miscellaneous Broker settings) Broker configuration only contains three fields. Make sure to Enable the Broker and specify a Port for connection to the Broker. Enable Remote Access if you wish to connect to your router remotely (via WAN). Although in this case your router would need to have a Public IP address.
Publisher
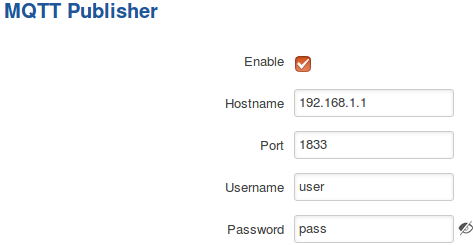
Publisher configuration is similar in its simplicity to the Broker configuration. Make sure to Enable the Publisher and specify a Port for connection to a Broker. If you plan on using the router's Broker, specify the same port as the one in the Broker Settings section. Hostname is the Broker's host name or IP address. If you're using the router's Broker, specify your router's LAN IP address. Username and Password are optional and depend on the type of security (if any) that the Broker uses.
Configuring the PC
Once the Broker is up, you'll need to install Mosquitto and Mosquitto Clients on your PC. To do so, open the Linux Terminal app and enter this command:
$ sudo apt-get install mosquitto mosquitto-clients
NOTE: this software was chosen because it suits the needs of this example and is easily accessible to most users. It is not the only application compatible with RUT MQTT, so if you're using your own software for your solution, it is not mandatory to install this.
Subscribing and Publishing
Now you can use set up Brokers and Clients on your PC. In order to Publish commands and Subscribe to topics on a RUT router, you'll need to know the router's Serial Number. You can find your router's serial number in the Status → Device section of the router's WebUI. Or you can subscribe to the topic router/id and publish the message id to the topic router/get. To do so, enter these commands in separate Terminal windows:
Subscribe:
$ mosquitto_sub -h 192.168.1.1 -p 1833 -u user -P pass -t router/id
Publish:
$ mosquitto_pub -h 192.168.1.1 -p 1833 -u user -P pass -t router/get -m id
File:Configuration examples mqtt router id v7.png
mosquitto_sub command is used to subscribe to a certain topic(s) and mosquitto_pub command is used to publish messages to specified topics. -m defines the message that you're publishing
-h indicates the host (the Broker's IP address) which, continuing from the example above, is 192.168.1.1. Replace this value with your router's LAN IP address or, if you're using MQTT remotely, your WAN IP address.
-p indicates the port used for connection to the Broker. Replace it with the port number that you specified in the Broker configuration.
-u and -P specify the username and password. If the Broker doesn't require authentication, these values aren't mandatory. Else replace them with the log in information of your Broker.
-t specifies the topics that you subscribe or publish to.
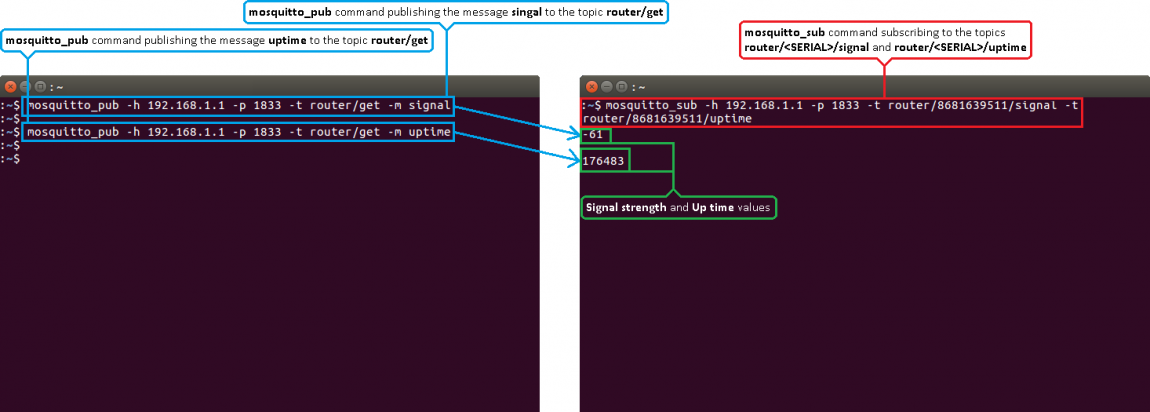
Now that we have the router's serial number we can start publishing messages and receiving responses containing the router's system parameter values. Lets say we want to monitor the router's signal strength and up time values. In order to do that we'll need to subscribe to the topics router/<SERIAL>/signal and router/<SERIAL>/uptime using the mosquitto_sub command. Again, replace the values given in the commands below with the ones in your configuration:
Subscribe:
$ mosquitto_sub -h 192.168.1.1 -p 1833 -u user -P pass -t router/<SERIAL>/signal -t router/<SERIAL>/uptime
Publish:
$ mosquitto_pub -h 192.168.1.1 -p 1833 -u user -P pass -t router/get -m signal
$ mosquitto_pub -h 192.168.1.1 -p 1833 -u user -P pass -t router/get -m uptime


