RUTM51 LEDs
This page contains information the different types of LEDs and their behaviour on a RUTM51 device.
Power LED
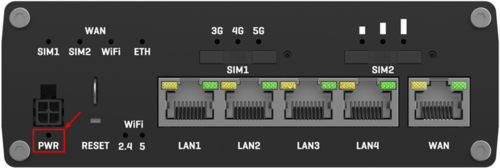
The power LED is located on the bottom left corner of the front panel, just under the power connector.
It indicates whether the device is powered on or not.
| State | Description |
|---|---|
| LED turned on | Device is powered on. |
| LED turned off | Device is not powered on. |
WiFi band LEDs
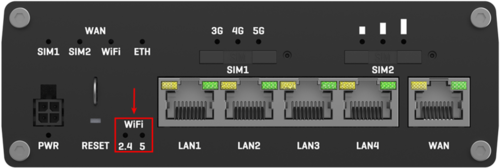
The WiFi band LEDs are located at the bottom of the front panel of the device, to the left of the Ethernet ports.
They display whether a WiFi Access Point (AP) is active on a specific band.
| State | Description |
|---|---|
| 2.4 LED turned on. | At least one 2.4 GHz Access Point is running. |
| 2.4 LED turned off | No 2.4 GHz Access Points are running. |
| 5 LED turned on | At least one 5 GHz Access Point is running. |
| 5 LED turned off | No 5 GHz Access Points are running. |
WAN type LEDs
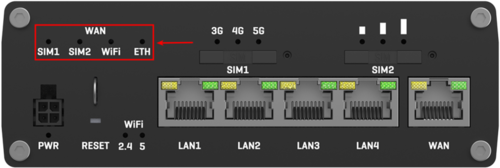
The WAN type LEDs are located at the top-right of the front panel.
They indicate which type of Internet connection is currently active.
| State | Description |
|---|---|
| SIM1 LED on | A mobile data connection on SIM1 is active. |
| SIM1 LED off | A mobile data connection on SIM1 is inactive. |
| SIM2 LED on | A mobile data connection on SIM2 is active. |
| SIM2 LED off | A mobile data connection on SIM2 is inactive. |
| WiFi LED on | A WiFi data connection (WiFi WAN) is active. |
| WiFi LED off | A WiFi data connection (WiFi WAN) is inactive. |
| ETH LED on | An Ethernet data connection (wired WAN) is active. |
| ETH LED off | An Ethernet data connection (wired WAN) is inactive. |
Ethernet port LEDs
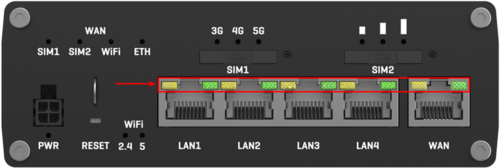
There are two LEDs located at the top of each Ethernet port.
They provide information on the current states of the Ethernet ports. Each port has two LEDs:
- Orange - 10/100 Mbps connection
- Green - 1000 Mbps connection
Below is an explanation on the behaviours of green and orange LEDs.
| State | Description |
|---|---|
| LED on | A data connection on the port is operational (cable plugged in, end device visible, no data is being transferred). |
| LED off | No data connection on the port is operational (no cable, bad cable or end device not visible for some other reason (such as damaged network card). |
| LED blinking | Connection established and data is being transferred over this port. |
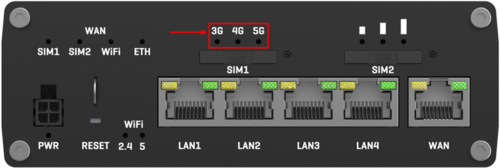
Mobile network type LEDs
The mobile network type LEDs are located near the SIM card slot.
They display which type of Internet connection is currently active.
| Action | Description |
|---|---|
| 3G LED turned on | Device is connected to a 3G network. |
| 4G LED turned on | Device is connected to a 4G network. |
| 5G LED turned on | Device is connected to a 5G network using 5G SA. |
| 4G and 5G LEDs turned on | Device is connected using 5G NSA. |
| 3G blinking | Device is connected to a 3G network but hasn't received an IP address. |
| 3G blinking rapidly | Device is connected to a 3G network and data is being transferred. |
| 4G blinking | Device is connected to a 4G network but hasn't received an IP address. |
| 4G blinking rapidly | Device is connected to a 4G network and data is being transferred. |
| 5G blinking | Device is connected to a 5G SA network but hasn't received an IP address. |
| 5G blinking rapidly | Device is connected to a 5G SA network and data is being transferred. |
| 4G and 5G blinking | Device is connected to a 5G NSA network but hasn't received an IP address. |
| 4G and 5G blinking rapidly | Device is connected to a 5G NSA network and data is being transferred. |
| All LEDs blinking at the same time every 500 ms | No SIM card or incorrect PIN. |
| All LEDs turn on and off in a sequence one after the other | The device is attempting to connect to a mobile network operator. |
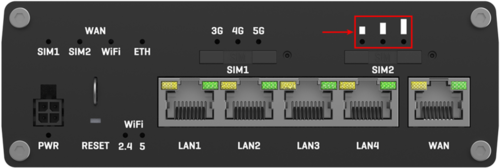
Mobile signal strength indication LEDs
The mobile signal strength indication LEDs are located near the SIM card slot.
The number of lit up LEDs represents a different mobile signal strength (RSSI) value in dBm.
| No. of lit up LEDs | Signal strength value |
|---|---|
| 0 | ≤ -111 dBm |
| 1 | -110 dBm to -82 dBm |
| 2 | -81 dBm to -52 dBm |
| 3 | ≥ -51 dBm |
The Mobile signal strength LEDs can also be used as a time indicator for holding the reset button. When you press and hold the reset button, if there is a User's default configuration configured on the device, you have to hold it pressed for 6 seconds (by default) to initiate a User's default configuration reset and 12 seconds (by default) to initiate a Factory reset. Otherwise, it is only necessary to hold the reset button for 6 seconds to trigger a Factory reset. If the button was held down longer than 20 seconds (by default) no action will be taken.
While holding the reset button each lit up signal strength LED indicate that a period of two seconds has passed. In case with RUTM51, when all 3 Mobile signal strength LEDs are lit up, they represent that 6 (LED number multiplied by 2) seconds have passed since you pressed down on the reset button.
After releasing the button at one of the reset periods, all 3 LEDs will start blinking every 1 second. This signifies that the router has begun the reset.

