Providing connectivity for Helium miners using the RUT240 (legacy WebUI)
Note: this article and all of its configuration examples given here have been configured using the legacy web UI RUT240 firmware RUT2XX_R_00.01.14.4. A configuration example with the new RUTOS WebUI can be found here: Providing connectivity for Helium miners using the RUT240
For more information about firmware versions, please refer to RUT240 firmware wiki page.
Introduction

Due to the Helium miners gaining significant traction, it's rather necessary to understand how to make the miner work as efficiently as possible. To accomplish this task, it's highly recommended, according to the official Helium documentation, to create a port forward rule for incoming traffic to port 44158 (TCP) and redirect it to the Helium miner. In this article, 3 different methods are shown to accomplish this task, depending on available resources. Please note that before starting with the procedure, the following prerequisites must be met:
- RUT240 or any other Teltonika Networks router running legacy firmware
- Ability to login and configure the router
- Pre-configured router using the initial setup wizard
- Mobile internet connectivity
In this article all examples are provided using the RUT240 router.
Prerequisites
Before getting started with any further configuration, the router must be prepared using the setup wizard. This wizard is used to configure basic settings on the router.
Additionally, it's highly recommended to understand the difference and recognize the distinction between public and private IP addresses. A short article regarding this can be found on our wiki FAQ: Private and Public IP Addresses.
Initial router configuration
To begin, power on the router and wait for it to boot up. Once it’s up and running, open up your internet browser and enter the following address in the browser:
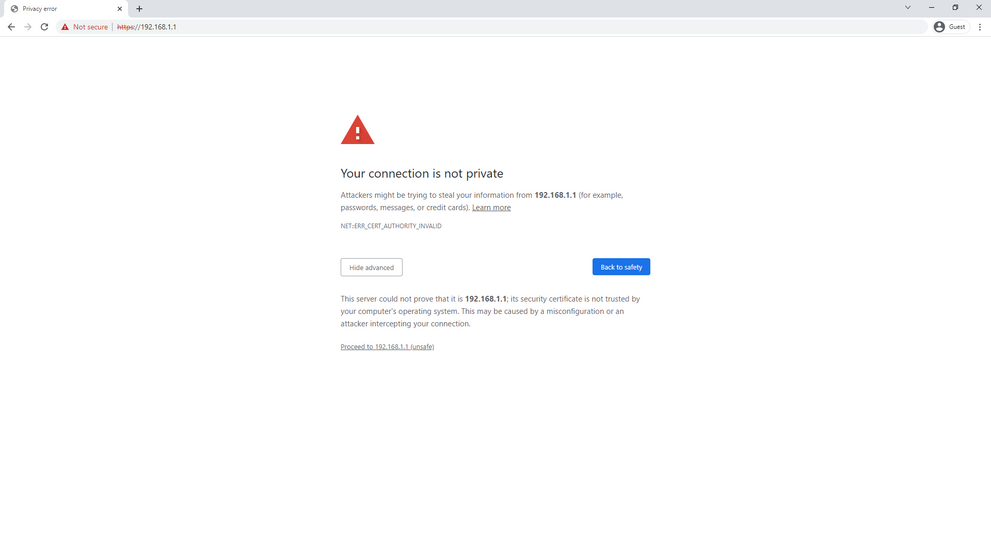
https://192.168.1.1
If you get a warning about an insecure connection, click on “Advanced” and “Proceed to 192.168.1.1 (unsafe)”.
This warning occurs due to browser not trusting the internal router web server certificate, generated by the router itself.
Note: If it’s a brand-new router, or if the router’s configuration has been reset, then the device will always have an IP address of 192.168.1.1.
Next, enter the following details into username and password fields, then click “Login”:
Username – admin
Password – admin01
Once logged in, a prompt to change the password will be shown. Change password to meet the requirements, then proceed by clicking “Save”:
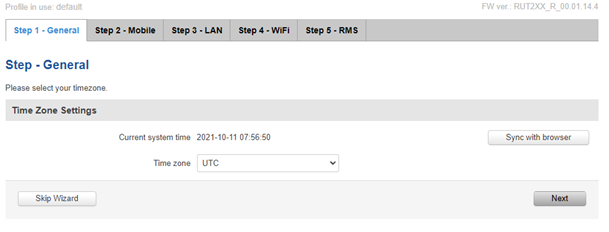
Next, we need to configure basic settings to prepare our router. In Step 1 – General, choose your desired time zone and click on “Sync with browser” option. Once done, click on “Next”.
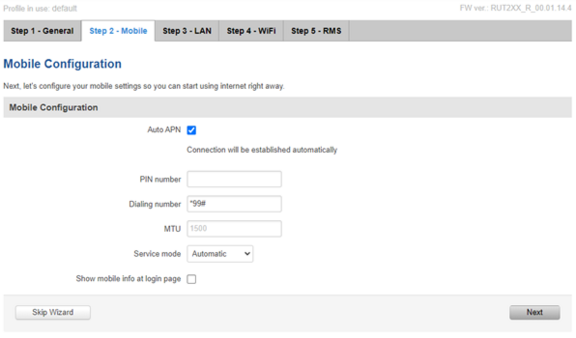
In Step 2 – Mobile, you can configure a mobile internet connection. These settings will depend on your mobile operator and your mobile internet plan. Once all the necessary settings have been entered, click on “Next”.
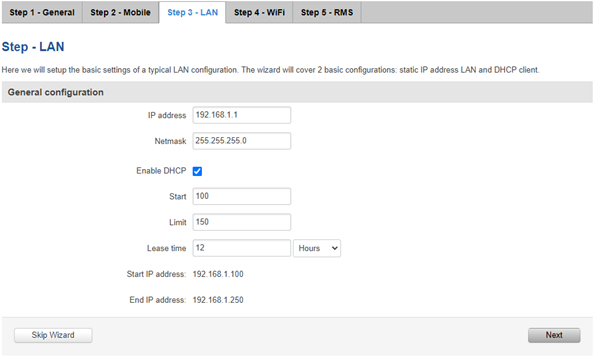
In Step 3 – LAN, we can change our local area network configuration, but it is unnecessary. For now, it’s recommended to leave it as-is. Click on “Next” to proceed.
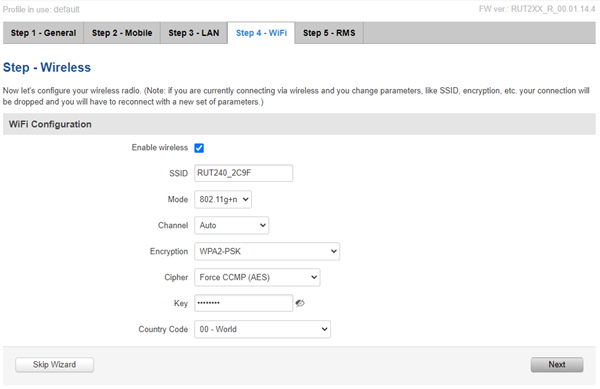
In Step 4 – WiFi it’s possible to change the name of WiFi along with a passphrase or other operation settings. After the changes have been made, proceed to the next step by clicking “Next”.
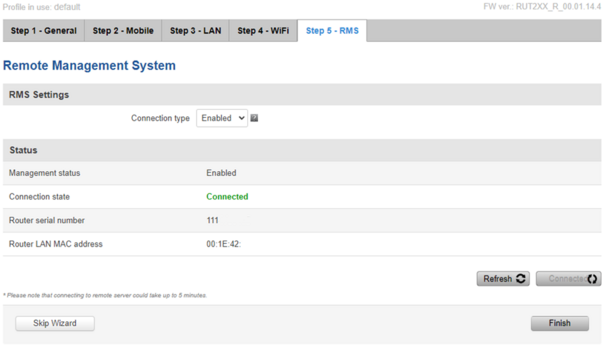
In Step 5 – RMS, we can connect our router to Teltonika’s Remote Management System. More information about the RMS system can be found here.
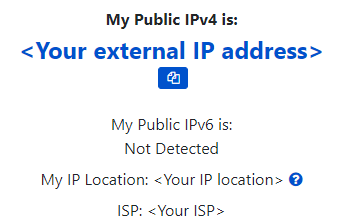
To finish the setup wizard, click on “Finish”. The overview page will open. At this point it is recommended to confirm whether there is internet connectivity by going to any internet website which shows your external public IP address (for example https://www.whatismyip.com/):
For extensive details about the initial configuration of the router, please refer to our wiki page here.
Scenario #1: Port forwarding with public IP address
Extra prerequisites for scenario #1
For the Helium miner to be reachable by any device on the internet, it’s necessary to allow and forward any incoming internet traffic via port 44158 (TCP) to the Helium miner. In this specific configuration scenario, an example with the Teltonika RUT240 router, running the new legacy firmware, will be provided.
For this configuration example to work, the following general criteria must be met:
- Router must be online with public external WAN IP address on its mobile interface using a mobile SIM card
- Helium miner must be connected to the router
Configuring static LAN IP lease for the Helium miner
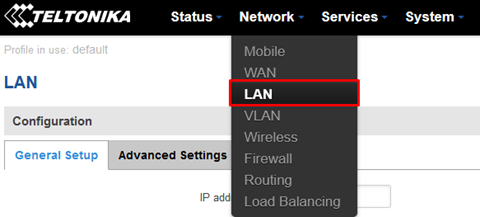
While not mandatory, it is highly recommended to add a LAN IP reservation for the Helium miner to make sure port forward rule, which will be defined later, always points to the correct device. In order to do this, navigate to LAN "Network>LAN":
Once there, scroll down to the static lease section and click “Add”:
Enter a desired hostname (can be name of the device) in order to name the reservation, then click on “MAC address” field and select the Helium miner. Finally, in “IP address” field keep currently assigned IP address or, if desired, enter a custom IP address.

When done, scroll down to the bottom of the page and click “Save” to apply changes.
Configuring the port forward rule
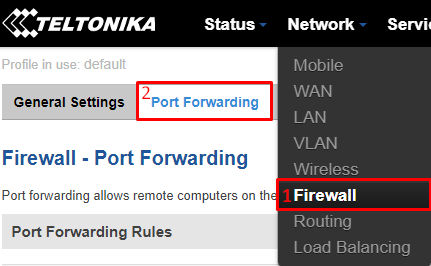
If the internet is up and running, proceed to the port forward configuration page by navigating to "Network>Firewall>Port Forwarding":
Once there, scroll down to the bottom and enter the following settings in specified fields:
“Name” - name the port forward rule. In this configuration example, we’ll be using Helium as the name of this rule
“Protocol” - select TCP
“External ports” - enter 44158
“Internal IP” - select your Helium miner LAN IP address (starts with 192.168.1.X).
“Internal ports” - enter 44158
Once every field has been filled in, click on “Add”.
Important! After adding the rule, don’t forget to click “Save” to apply changes
If every configuration field is correct and the rule has been applied, the port forward rule should appear in the table:
Verifying the port forward rule
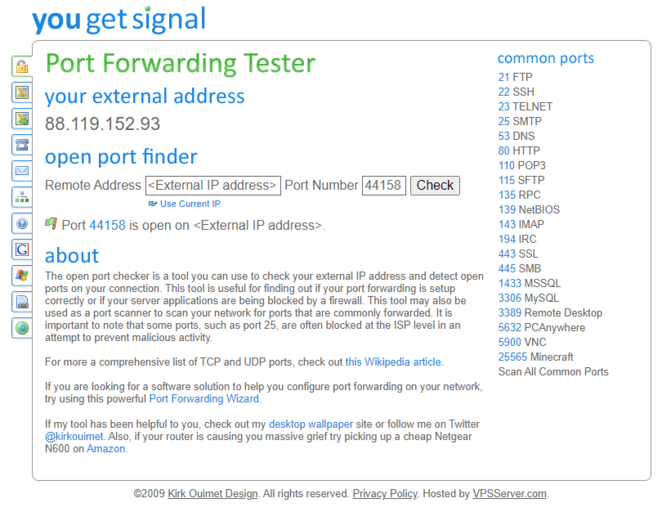
It’s highly recommended to check and verify whether the Helium port (44158, TCP) is open from the internet side. To do this, go to any website that can verify port forwarding (for example: https://www.yougetsignal.com/tools/open-ports/). Once there, enter the current public external WAN IP address or the remote address of VPS (public IP of your VPS) and port number 44158 when checking for port forward. If it’s working, the port should be open:
Scenario #2: Configuring the passthrough mode
Extra prerequisites for scenario #2
For the Helium miner to be reachable by any device on the internet, it’s necessary to allow and forward any incoming internet traffic via port 44158 (TCP) to the Helium miner. In this specific configuration scenario, an example with the Teltonika RUT240 router passing its external public WAN IP address to the Helium miner directly will be provided.
For this configuration example to work, the following general criteria must be met:
- Router must be online with public external WAN IP address on its mobile interface using a mobile SIM card
- Helium miner must be connected to the router
Setting mobile WAN as main interface
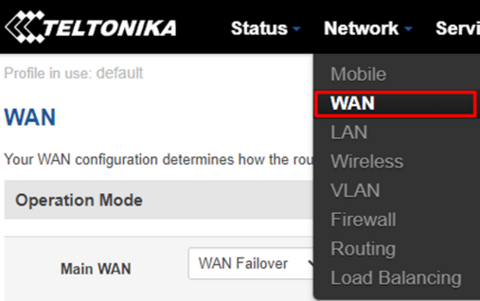
Important! Pass-through and Bridge modes are disabled when multi-wan is enabled. To resolve this, navigate to "Network>WAN" before doing any additional configuration:
Once there, select interface with name “Mobile (WAN)” as your primary internet connection by selecting the circular button. Concurrently, make sure to deselect any other square box and then click on “Save” to apply configuration. The following image shows correct configuration: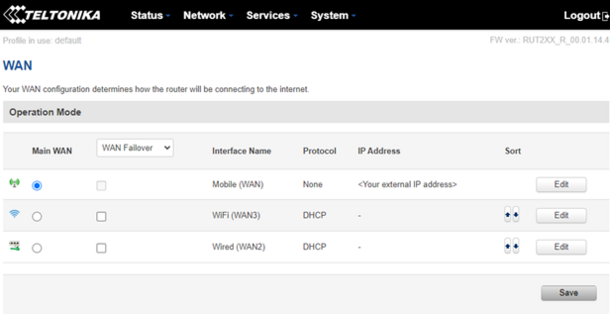
Configuring the passthrough mode on the RUT240
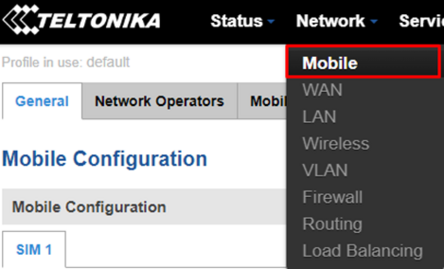
To proceed with further router configuration by navigating to "Network>Mobile" configuration page. Here, it will be possible to set passthrough mode to make our router forward all incoming traffic directly to the Helium miner.
In this configuration page make sure to modify the following settings:
“Mode” - change from NAT to Passthrough
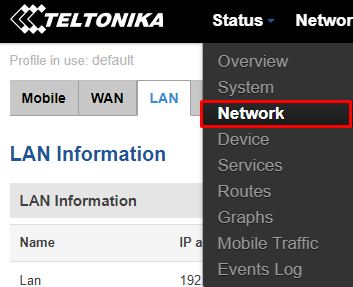
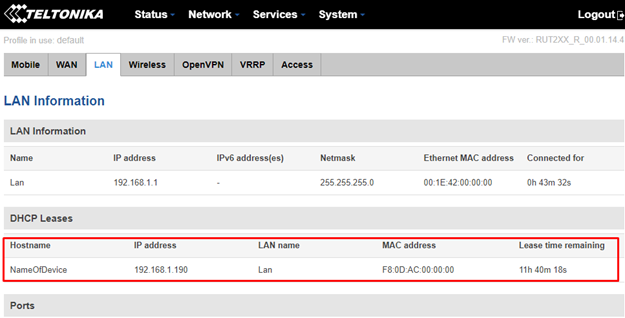
“MAC address” - enter your Helium miner MAC address. If the MAC address of Helium miner isn’t known, you can check it by navigating to “Status>Network>LAN” page. There, MAC address of Helium miner as well as its current LAN IP address should be visible:
After the noted fields been configured in a correct manner, make sure to apply configuration by scrolling down to the bottom of page and click “Save”. Eventually, the Helium miner should get an external IP address.
Optional configuration: set WAN port as LAN
Once the passthrough mode is enabled, the router can still serve local IP addresses to any other device connected to the router. If needed, the WAN interface can be setup as a LAN interface to provide connectivity to any additional device or a switch. To accomplish this, follow these steps:
Login to the router's WebUI and navigate to the LAN section (Network>LAN):
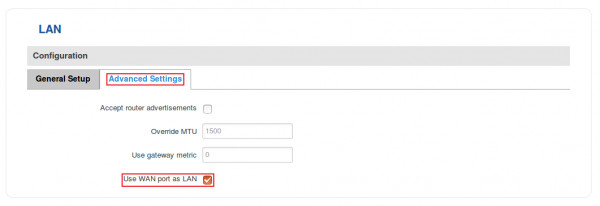
Under the configuration section, click "Advanced Settings" and place a check mark next to the "Use WAN port as LAN" field and don't forget to save your settings:
Scenario #3: Private WAN IP solution
Extra prerequisites for scenario #3
Port Forwarding with a private WAN IP is generally an impossible task without the interference of internet service provider. This is because private (RFC1918) IP addresses cannot be routed on the internet as well as some other issues like CGNAT. Therefore, it is necessary to apply a different method that will allow the router and, concurrently, the Helium miner, to be reachable by the outside world via specified external port.
As for the Helium miner, the principle for incoming connectivity is relatively simple - it's necessary to permit any incoming internet traffic through the router via port 44158 (TCP) and forward any such traffic to the Helium miner. Due to private IPs not being reachable from the outside world for any sort of incoming connections, a different method must be employed to make this scenario work.
In order to get started with this procedure, the following requirements must be met:
- Router must be online with internet connection
- Virtual Private Server (VPS) with a public IP address
- Ability to create and install a Virtual Machine (VM) in the VPS with possibility to setup WireGuard
- Helium miner must be connected to the router
In this specific example the Teltonika Networks RUT240 router running legacy firmware is used as an example. For VM hosting, Linode is used as a VPS provider to create and manage VM deployments. Debian 11 is used as an operating system on the VM.
Preparing and setting up VM on VPS
In this example Linode cloud environment is used for instructions. Begin the procedure by creating a VM on VPS. Once signed-in, click on "Create" and then choose "Linode":
 Next, from "Choose a distribution field" select "Debian 11" as the desired image.
Alongside that, make sure to select the preferred region from a given list. In this example "Frankfurt, DE" is selected as the preferred region.
For the "Linode plan" section it is enough to select a "Shared CPU" with "Nanode 1 GB" plan for this specific use-case. It may be necessary to adapt and select a different plan, depending on the usage of VM resources.

It is also highly recommended to use a secure root password as well as deny incoming traffic to VM via a public IP address in order to protect VM from being accessed by unknown actors. To configure a root password for Linode VM, set it up before creating the VM:
To finish with this section, select "Create Linode" field on the right-hand side of the website. It is always possible to adjust certain settings but the basic configuration is now complete.
Warning! Before starting with configuration of the VM it is highly recommended to deny any incoming traffic by adding a firewall rule to drop all incoming traffic from every external public IP (except your own). Additionally, allow any incoming traffic only from trusted external IP addresses. Lastly, permit any incoming traffic via port 44158 (TCP) to the VM.
Configuring VM and setting up WireGuard tunnel
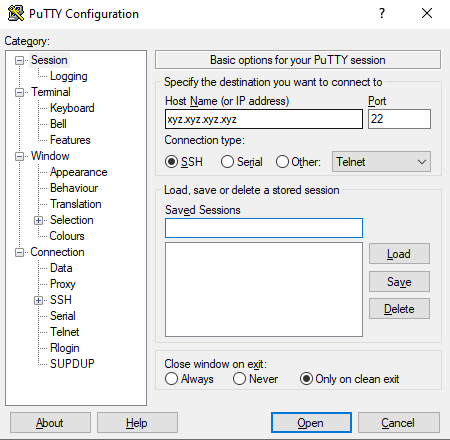
Once the VM comes online it will be possible to connect to it via VPS provider's client. Alternatively, it is possible to use a third-party SSH client in order to connect to our VM. In this example a third-party SSH client (PuTTY) is used to establish connectivity to the VM. In order to connect to the VM it is necessary to enter the following information into PuTTY client and click "Open":
Note: The IP address in this example has been redacted. Instead of xyz.xyz.xyz.xyz enter the external IP address that's been assigned to a newly created VM.
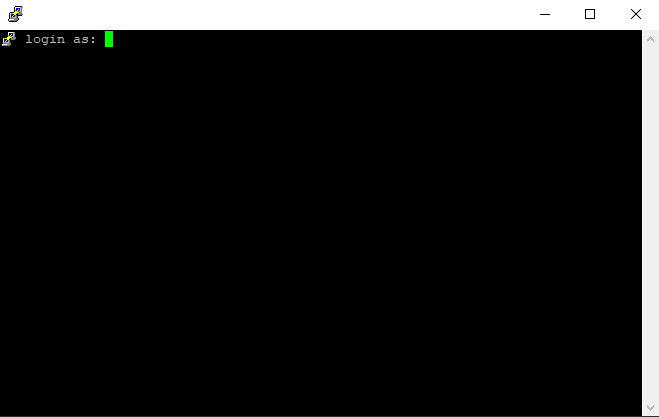
If everything worked correctly then the following window will pop up with a prompt to login:
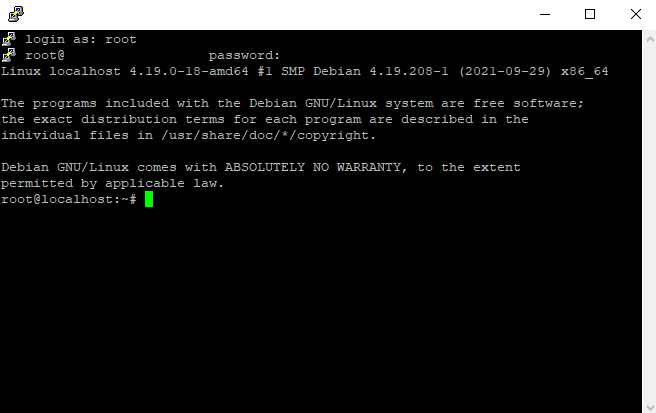
To login, enter username "root" and the password that was entered before creating the VM. If the login is successful, the following information will be displayed in the SSH client window:
Important! If the VM is running older Debian version (Debian 10 or lower), when trying to install WireGuard package, an error will occur “E: Unable to locate package wireguard”. Below is an example of the error in question:
It’s necessary to add buster backports repository to install this package. To resolve this, enter the following command in CLI:
sudo sh -c "echo 'deb http://deb.debian.org/debian buster-backports main contrib non-free' > /etc/apt/sources.list.d/buster-backports.list"
After executing the command above, it is recommended to verify if the command worked. To do so, enter the following line in CLI:
cat /etc/apt/sources.list.d/buster-backports.list
An informational message with the following output will appear:
Initial setup of tools and services in VPS
To begin the installation process, issue the following commands. These commands will make sure the operating system is up to date and, additionally, it will install iptables and wireguard packages. Enter the following command:
apt update && apt upgrade -y && apt install iptables -y && apt install wireguard -y
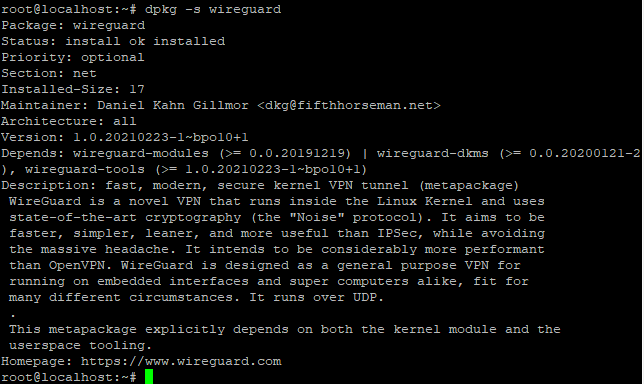
This command will make sure your system is up to date, install newest base packages. Then it will install iptables package as well as wireguard package. You can verify if package was installed by issuing dpkg -s <package name> command in the CLI. For example, to confirm if wireguard has been installed successfully, type in dpkg -s wireguard and then press enter. The following output should be shown (output may differ slightly, depending on currently installed WireGuard version):
Generating WireGuard key pairs
In order for the VPN tunnel to work, both VPS and router must have their own public and private key pairs. The private key will be used for data decryption coming from the peer while public key will encrypt traffic going to the peer.
Warning! Never share or put your private key in public space.
To generate key pairs on VPS, enter the following commands into the CLI:
cd /etc/wireguard/
wg genkey | tee privatekey | wg pubkey > publickey
First command changes your current location in file system to the wireguard folder while the second one generates private key from which the public key is generated accordingly.
To verify whether the key generation was successful, enter the following commands:
cat privatekey
cat publickey
If the keys have been generated successfully, these commands will show the following output (the keys will differ, this is just an example, do not use these!):
Installing the WireGuard package on the router
Once the internet is up and running on the router, navigate to the configuration page and proceed to install the WireGuard package (if not already installed) via package manager or CLI. It is highly recommended to reboot router after installing, even if router itself doesn’t prompt for it. To install the package by using the web UI, follow these steps:
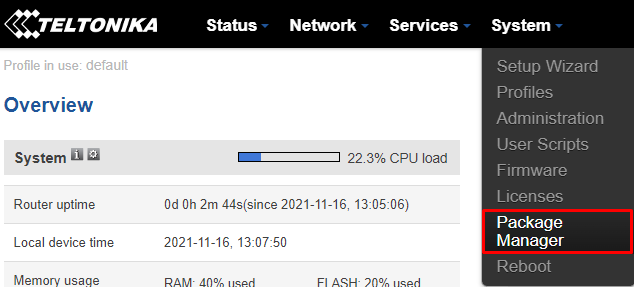
Login to the router via browser (default IP: 192.168.1.1). Once logged in, navigate to “Package Manager” (System>Package Manager):
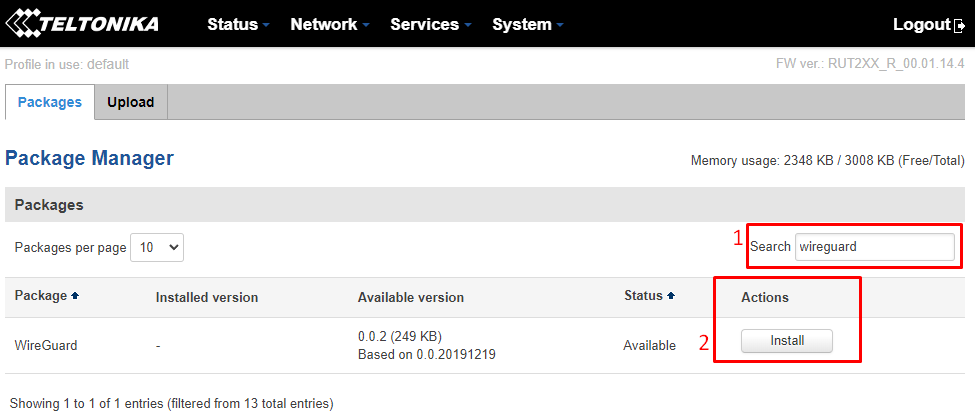
When the "Package Manager" page loads, in the search bar enter "wireguard". There should be a package ready to be installed, once it shows up, click on "Install":
The confirmation window will then open, click on "Proceed":
Give the route some time to install WireGuard package. If it's successful, you may see a success message such as this:
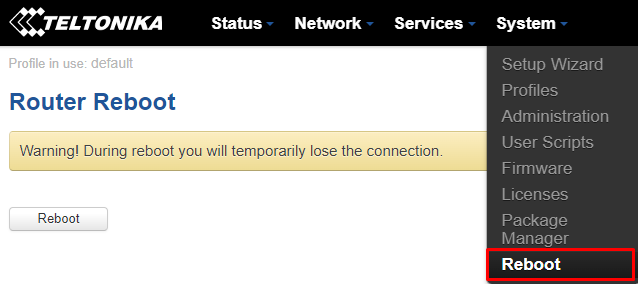
Right after installing the package successfully, restarting router is highly recommended. To do that, navigate to "System>Reboot":
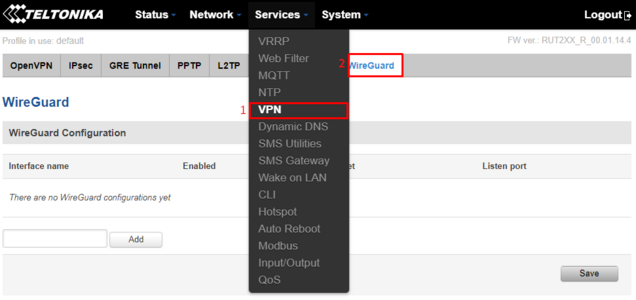
After the router is done rebooting, log back into it via https://192.168.1.1. After logging back into the router, navigate to "Services>VPN>WireGuard":
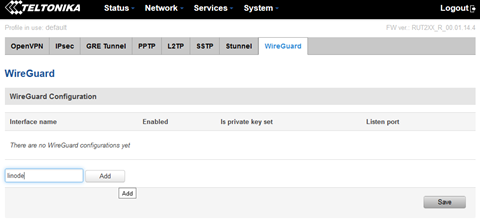
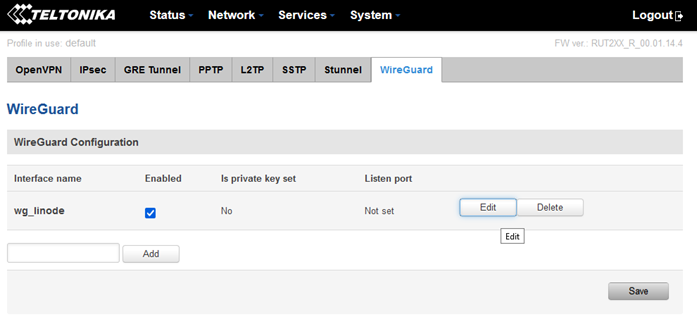
Add new interface with any name. In this example "linode" will be used as name for our Wireguard interface on router side.
Once it's created, edit the new inteface by clicking "Edit":
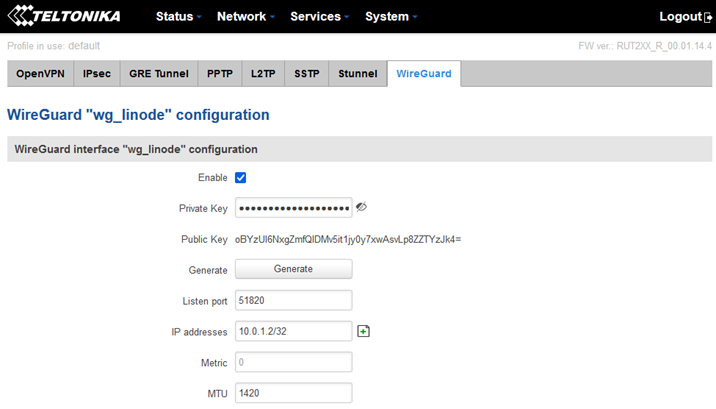
When the configuration page loads, make sure "Enable" box is ticked on (if not already enabled).
Next, click "Generate" to generate key pairs. When key pairs are visible, make sure to copy the public key from router, it will be needed later for Wireguard configuration on VPS side. Next, enter the following configuration in specified fields:
"Listen port" - leave it as default: 51820
"IP addresses" - enter: 10.0.1.2/32
"Metric" - leave empty
"MTU" - enter: 1420
The configuration should look something like this (the public key will differ, don't copy it from here!)
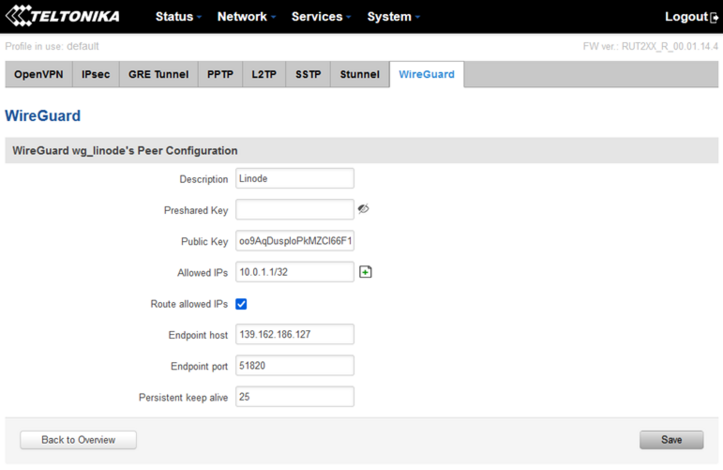
Next, in the Peer section click "Add". After adding, click "Edit".
In description field you can type anything to describe the peer (virtual private server)
"Preshared key" - leave field empty
"Public key" - copy and paste the public key of your peer (which was generated by the virtual private server)
"Allowed IPs" - for this config put in 10.0.1.1/32
"Route allowed IPs" - enable the box
"Endpoint host" - IP address of VPS (public IP)
"Endpoint port" - enter 51820 if not already entered
"Persistent keep alive" - 25 (recommended value)
The final result of peer configuration on the router side should look something like this (public key should be different):
Configuring static IP reservation for the Helium miner
While not mandatory, it is highly recommended to add a LAN IP reservation for the Helium miner to make sure port forward rule, which will be defined later, always points to the correct device. In order to do this, refer to this section: #Configuring static LAN IP lease for the Helium miner
Adding a port forward rule to the router
Wrapping up with the router configuration, it's necessary to create a single port forward rule so that router knows what to do with any incoming traffic that's got a destination port of 44158, TCP. To accomplish this, navigate to "Network>Firewall>Port Forwarding":
At the bottom of this page, you will find a section to create new port forward rule. Enter the following values in the following fields:
"Name" - name of port forward rule
"Protocol" - TCP
"External ports" - 44158
"Internal IP" - IP address of Helium miner in LAN
"Internal ports" - 44158
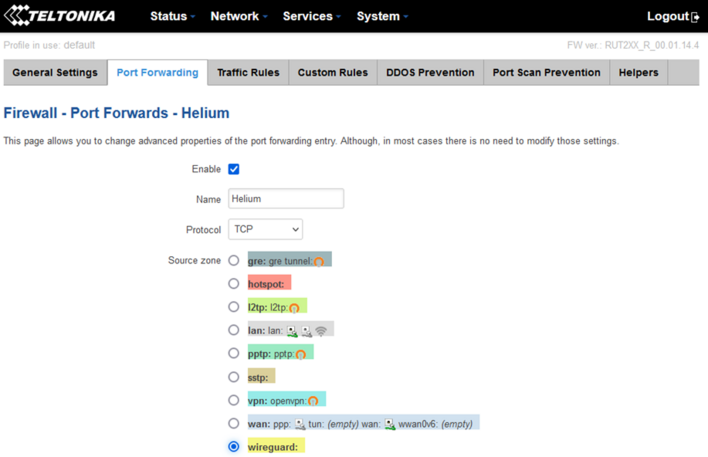
After the rule has been created, click on "Edit" to edit it:
Edit "Source zone" by selecting the zone from "wan" to "wireguard":
Leave everything else, go to the bottom of the page and click "Save".
Adding additional configuration to VPS WireGuard file
For the very last configuration step there are some additional firewall rules and WireGuard configuration that must be added on the VPS. Proceed with this step by going back to the VPS configuration with PuTTY via SSH. Once there, start by editing the Wireguard configuration file. Before copying this configuration, make sure to change PrivateKey field by entering the private key value that was generated earlier by the VPS. To double-check it, enter the following commands in the CLI of VPS:
cd /etc/wireguard/
cat privatekey
Additionally, make sure to edit PublicKey field. Enter the public key generated by your router in the field. Leave everything else as-is.
[Interface]
ListenPort = 51820
PrivateKey = Copy-paste the Private key generated by the VPS from earlier commands
Address = 10.0.1.1/24
MTU = 1420
PostUp = iptables -A FORWARD -p tcp --tcp-flags SYN,RST SYN -j TCPMSS --set-mss 1240
PostUp = iptables -A FORWARD -i wg0 -j ACCEPT; iptables -t nat -A POSTROUTING -o eth0 -j MASQUERADE
PostUp = iptables -A FORWARD -i eth0 -o wg0 -p tcp --syn --dport 44158 -m conntrack --ctstate NEW -j ACCEPT
PostUp = iptables -A FORWARD -i eth0 -o wg0 -m conntrack --ctstate ESTABLISHED,RELATED -j ACCEPT
PostUp = iptables -t nat -A PREROUTING -i eth0 -p tcp --dport 44158 -j DNAT --to-destination 10.0.1.2
PostUp = iptables -t nat -A POSTROUTING -o wg0 -p tcp --dport 44158 -d 10.0.1.2 -j SNAT --to-source 10.0.1.1
PostDown = iptables -D FORWARD -p tcp --tcp-flags SYN,RST SYN -j TCPMSS --set-mss 1240
PostDown = iptables -D FORWARD -i wg0 -j ACCEPT; iptables -t nat -D POSTROUTING -o eth0 -j MASQUERADE
PostDown = iptables -D FORWARD -i eth0 -o wg0 -p tcp --syn --dport 44158 -m conntrack --ctstate NEW -j ACCEPT
PostDown = iptables -D FORWARD -i eth0 -o wg0 -m conntrack --ctstate ESTABLISHED,RELATED -j ACCEPT
PostDown = iptables -t nat -D PREROUTING -i eth0 -p tcp --dport 44158 -j DNAT --to-destination 10.0.1.2
PostDown = iptables -t nat -A POSTROUTING -o wg0 -p tcp --dport 44158 -d 10.0.1.2 -j SNAT --to-source 10.0.1.1
[Peer]
PublicKey = Copy-paste the Public key generated by the router
AllowedIPs = 10.0.1.2/32
Endpoint = 0.0.0.0:51820
Warning! Remember to edit the private and public key values if you haven't, otherwise the VPN tunnel will not work at all!
After all necessary values for keys have been edited, we can create a new configuration file and copy provided commands, then save the configuration file. In this example, “nano” text editor is used. Enter the following command in CLI and copy paste the configuration above:
nano /etc/wireguard/wg0.conf
Note: to paste a command using PuTTY, simply copy this code and switch back to PuTTY, then enter the nano command and right click once in the empty space of PuTTY client window.
To finish editing and save your file, click CTRL+S (save) and CTRL+X (exit).
Before wrapping up and establishing the tunnel, we need to add some additional configuration to our system file. Firstly, enable forwarding with the following command:
echo net.ipv4.ip_forward=1 >> /etc/sysctl.conf
To wrap up this section, enter the following line in CLI:
sysctl -p
Starting the WireGuard interface
Finally, it's time to bring our WireGuard VPN tunnel online. If every step has been completed successfully up until this point, then it will be possible to bring up the Wireguard interface and establish a secure tunnel between the VPS and the router. Enter every command provided below in order.
Begin by adding Wireguard service to startup. This will bring Wireguard tunnel back up in case of unexpected shutdown/reboot of VPS:
systemctl enable [email protected]
systemctl daemon-reload
Next, start VPN service:
systemctl start wg-quick@wg0
Once done, enter the following command.
systemctl status [email protected]
If everything up until this point has been done in a correct manner, the following output should be shown in the output of CLI:
This was the last step of this configuration example. At this point, the tunnel should be up and running and there should be connectivity between the VPS and the router. Additionally, it’s highly recommended to check and verify whether the Helium port (44158, TCP) is open from the internet side. To do this, go to any website that can verify port forwarding (for example: https://www.yougetsignal.com/tools/open-ports/). Once there, enter the remote address of VPS (external IP of your VPS) and port number 44158 when checking for port forward. If it’s working, the port should be open:
External links
Resources used in this guide:
- https://docs.helium.com/troubleshooting/network-troubleshooting/ - Helium recommendation regarding the port forward
- https://datatracker.ietf.org/doc/html/rfc1918 - RFC of private IP addresses
- https://www.putty.org - PuTTY client for SSH connection
- https://teltonika-networks.com/product/rms - Teltonika Remote Management System
- https://www.whatismyip.com - Online tool to check external IP address
- https://www.yougetsignal.com/tools/open-ports - Online tool to verify open/closed ports

