Difference between revisions of "Domnev"
| Line 57: | Line 57: | ||
If you have already set up your wireless access point - skip this step. | If you have already set up your wireless access point - skip this step. | ||
| − | + | * Login to your router's WebUI. You can do this by entering the router's LAN IP address (192.168.1.1 by default) into the URL field of your web browser. | |
| − | [[File: | + | * Go to the '''Network → Wireless''' page. |
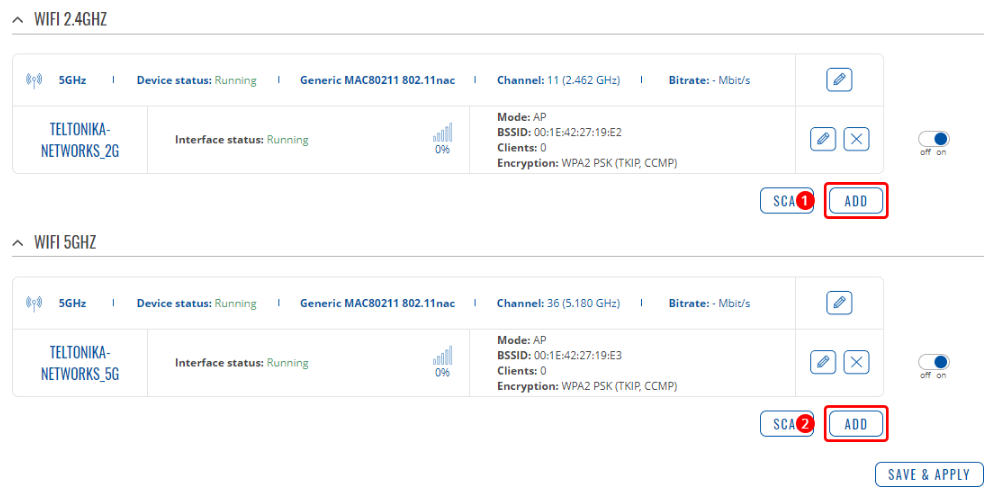
| + | * '''Click 'Add'''' to create a new Wireless Access Point. Depending on your needs, choose a 2.4 GHz ('''1''') or 5 GHz ('''2''') Access Point.[[File:Wifia.png|border|center]] | ||
| + | |||
| + | |||
After it you will be prompt to edit a new wireless access point. In the '''General Setup''' tab select: | After it you will be prompt to edit a new wireless access point. In the '''General Setup''' tab select: | ||
| Line 74: | Line 77: | ||
===Set up hotspot=== | ===Set up hotspot=== | ||
| − | + | Navigate to '''''Services''' → '''Hotspot''''' and add a new Hotspot Instance. To do so, find the '''Add New Instance''' section and select your Wireless AP in the interface list, then press Add. | |
[[File:Hotspotconfig1.png|border|center]] | [[File:Hotspotconfig1.png|border|center]] | ||
'''Hotspot configuration''' | '''Hotspot configuration''' | ||
| − | |||
| − | + | In the '''General tab''' do the following steps: | |
| − | Check ''' | + | # Check '''Enable;''' |
| − | + | # Authentication mode - '''Radius'''. | |
| − | + | [[File:Hotspotconfig2.png|border|center]] | |
| − | + | Then go to '''Radius''' tab and enter the configuration details from cobot: | |
| − | + | # '''RADIUS Servers''' - 130.211.138.166, 104.198.250.153; | |
| + | # '''Authentication port''' - 13143; | ||
| + | # '''Radius secret key''' - 4L1pnC5jMIlfZH2T; | ||
| + | # '''Save & Apply'''. | ||
| − | + | [[File:Hotspotconfiga.png|border|center|1258x1258px]] | |
| − | [[File: | ||
==Test your Hotspot== | ==Test your Hotspot== | ||
Revision as of 09:28, 16 September 2022
Summary
This chapter is a guide on configuring cobot.me provider hotspot instance on RUTX routers.
If you're having trouble finding this page or some of the parameters described here on your device's WebUI, you should turn on "Advanced WebUI" mode. You can do that by clicking the "Basic" button under "Mode", which is located at the top-right corner of the WebUI.
[[File:Networking_{{{series}}}_manual_webui_basic_advanced_mode.gif|border|class=tlt-border]]
Step 1: cobot.me configuration
Login
First, go to cobot.me and log into your account (LOG IN in the top right corner). If you don't have a registered account then you need to create one - click Try Cobot.

Sign Up
After clicking Try Cobot you will be redirected to register page. Enter you account information and click Next.

Next step is to enter further information of your account. After entering it click Add Space.

Set Up new radius server
If you're having trouble finding this page or some of the parameters described here on your cobot account, you should turn on "Admin" mode. You can do that by clicking the "Admin" button at the top-right corner of the cobot website.

In the opened window click SETUP icon, then - Wifi Integration. You will be prompted to Radius Wifi Integration window. Click the Set up Radius Server.

Network details
You will be given your Radius server configuration data that you will need in the next step.

Add Wifi Guest Accounts
Click Wifi Guest Accounts in the bottom of the page to add accounts to let users access your wifi.

Type user account information and click Add Account.

At the bottom of the page you can see all your created users.

Step 2: Router configuration
Log in
Open your RUTX homepage. That can be done by entering 192.168.1.1 in your internet browser's URL bar and log in with your credentials - the default credentials are admin as Username and admin01 as Password (the address can different - depending if you changed it or not).
Creating wireless access point
If you have already set up your wireless access point - skip this step.
- Login to your router's WebUI. You can do this by entering the router's LAN IP address (192.168.1.1 by default) into the URL field of your web browser.
- Go to the Network → Wireless page.
- Click 'Add' to create a new Wireless Access Point. Depending on your needs, choose a 2.4 GHz (1) or 5 GHz (2) Access Point.

After it you will be prompt to edit a new wireless access point. In the General Setup tab select:
- Check Enable;
- Mode - Access Point;
- ESSID - Your desired Extended Service Set Identifier name;
- Network - Choose the network you want to attach to this wireless interface or fill out the create field to define a new network.

Navigate to Wireless Security tab and choose your Encryption method. When you are done, click Save & Apply.

Set up hotspot
Navigate to Services → Hotspot and add a new Hotspot Instance. To do so, find the Add New Instance section and select your Wireless AP in the interface list, then press Add.

Hotspot configuration
In the General tab do the following steps:
- Check Enable;
- Authentication mode - Radius.

Then go to Radius tab and enter the configuration details from cobot:
- RADIUS Servers - 130.211.138.166, 104.198.250.153;
- Authentication port - 13143;
- Radius secret key - 4L1pnC5jMIlfZH2T;
- Save & Apply.

Test your Hotspot
Try connecting to your router using computer or mobile phone.
Select your router.

After successful connection visit any website. You should be redirected to hotspot login page.
Type your username and password.
Click Login

You should see a message Authorization Successful


