Firewall traffic rules
What is a traffic rule?
The Traffic rules tab is used to set firewall rules that filter traffic moving through the device. In simple terms, traffic rules determine, what firewall rules are being applied to these packets. The packets can be allowed, blocked, or rejected based on the IP addresses and port numbers in the packet headers, as well as from which firewall zone the packet is coming and to which zone it is destined. This information can be used choose and pick to which packets the rules should apply.
Traffic rule settings can be found by navigating to Network -> Firewall -> Traffic rules via WebUI.
The new rules are created in the ‘Add new instance’ section of the settings page. Rule names can be any and are used for management purposes only.
The traffic is evaluated against each rule in the traffic rules from top to bottom. This means that if there are two distinct rules, one that allows traffic on specific IP and another rule that blocks the traffic on that same IP, only the first rule will apply, and the traffic will be allowed. The traffic will be evaluated against the first rule and stop without checking the second rule because the packet already matches the first rule. Hence, if the first rule that allows traffic is above the rule that blocks traffic, the traffic will pass, and the second rule will be ignored.
It is important to be mindful of the order of traffic rules. The rules can always be rearranged by simply clicking on the symbol on the left side of the rule and dragging the rule where it is needed.
It is possible to define both, specific IP addresses to block hosts, as well as networks to block whole networks of devices. Examples are:
- Full IP address for a host:
- 192.168.1.151
- Network using CIDR notation:
- 84.15.239.0/24
It is also possible to define single ports, as well as a range of ports.
- To apply the rule for two ports, 22 and 443:
- Add port 22
- Add port 443
- Apply the rule to all ports from 1200 to 1600:
- Add ports 1200-1600
A command ‘nslookup <hostname>’ can be used on both, Windows and Linux machines to resolve a hostname to the IP address. For example, ‘nslookup www.wikipedia.org’ resolves to IP addresses for this website. These IP addresses can be used as the destination IP in the traffic rule. This command works on RutOS as well, as RutOS is based on OpenWRT, a Linux distribution.
Many services have a well-known default port assigned to them. For example, MQTT uses port number 1883. The rule to allow traffic on port 1883 is created automatically when Teltonika devices are configured to use MQTT. However, if you are experiencing an issue where MQTT traffic is dropped, you can check the traffic rules to ensure that the rule which accepts traffic on port 1883 exists and is enabled.
Traffic rule usage examples
Allow a single host to access a web server in WAN.
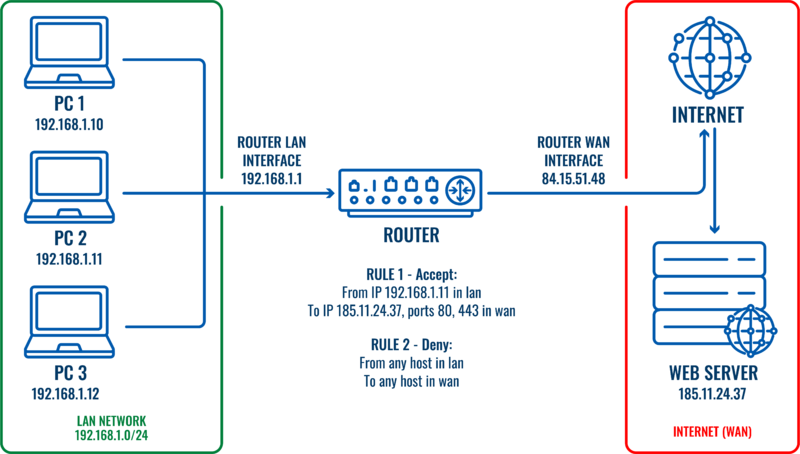
Let’s imagine that we would like to restrict traffic for this LAN network (192.168.1.0/24) and only one host needs to have access to the web server (185.11.24.37) on the internet. To achieve this, traffic rules could be configured.
Two traffic rules would be required for this scenario:
- One traffic rule with lower priority to block all traffic from LAN to WAN.
- Another traffic rule with higher priority to allow a specific host (PC2) to access the web server.
All network traffic coming from the specified host (192.168.1.11) will match the first rule and will be allowed. All other traffic coming from other hosts on the local Network will not match the first rule, but will match the second rule and will be dropped.
In this scenario only the host named ‘PC2’ on the LAN will be able to reach a web server in WAN.
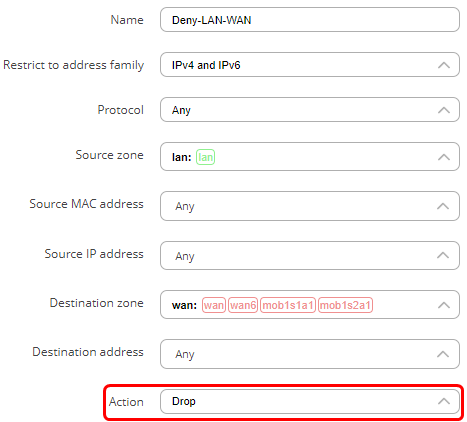
Create and configure the first rule to block all local traffic to WAN.
- In the ‘Add type’ field choose ‘Add new forward rule’.
- Enter a name of your choice for this rule.
- Choose LAN as source zone.
- Choose WAN as destination zone.
- Click ‘Add’.
A new window will pop-out where you will be able to specify additional settings. You can also access these settings by finding your rule in the traffic rules and pressing a ‘pencil’ button to edit settings for that rule.
- In the action field choose ‘Drop’
Scroll down and press ‘Save & Apply’.
The new rule is created and enabled. To verify, go to the last page in ‘Traffic rules’ and verify that the rule is configured correctly and is enabled.
Create and configure the second rule to allow the host to access the web server:
- In the ‘Add type’ field choose ‘Add new forward rule’.
- Enter a name of your choice for this rule.
- Choose LAN as source zone.
- Choose WAN as destination zone.
- Click ‘Add’.
A new window will pop-out where you will be able to specify additional settings. You can also access these settings by finding your rule in the traffic rules and pressing a ‘pencil’ button to edit settings for that rule.
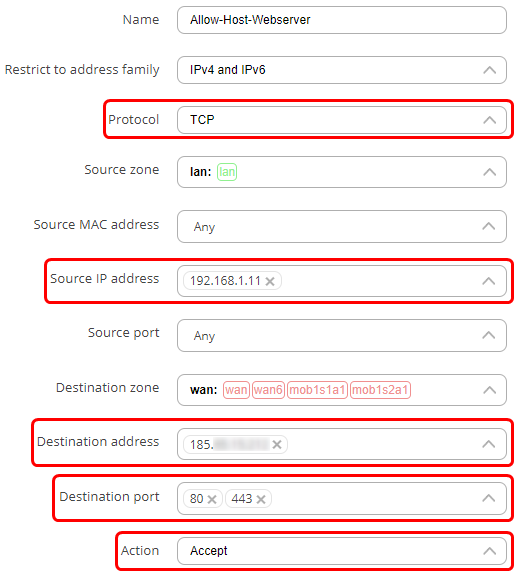
- In the protocol field, choose TCP+UDP.
- In the source IP address enter the IP address of the host in LAN that you wish to allow to access the web server. In this example, the IP address of PC2 is 192.168.1.11.
- In the destination address field, enter the IP address of the web server, which is 185.11.24.37 in this example.
- In the destination port field add ports ’80’ and ‘443’. These are HTTP and HTTPS port numbers that are used for communication with a web server.
- In the action field choose ‘Accept’.
You can specify additional settings as you wish. For example, you can set times when this rule should apply. This way, the host will be able to access the web server only at certain times.
Scroll down and press ‘Save & Apply’.
The new rule is created and enabled. To verify, go to the last page in ‘Traffic rules’ and verify that the rule is configured correctly and is enabled. In addition, we need to move the second rule and ensure that the second rule is above the first rule.
These rules indicates that traffic from the host 192.168.1.11 in LAN destined to the IP address of 185.11.24.37 on ports 80 and 443 in WAN must be accepted. The ‘Accept forward’ indicates the action (accept). The slider on the right side shows that the rule is enabled. The rule is above the Deny-LAN-WAN rule, so that traffic from host 192.168.1.11 (PC2) matches the first rule and is accepted. Traffic from other hosts in LAN will match the second rule and will be dropped.
Opening a port on the device.
To open a port on the device for WAN:
- In the add type field select the ‘Open ports on router’ option.
- Enter a name of your choice for this rule.
- Select a protocol that will be allowed to access the port. TCP + UDP by default
- Enter an external port that you want to open.
- Press the ‘Add’ button.
A new window will pop-out where you will be able to specify additional settings. For the purpose of just opening a port, no additional settings are required. Scroll down and press ‘Save & Apply’.
The new rule is created and enabled. To verify, go to the last page in ‘Traffic rules’ and verify that the rule is configured correctly and is enabled.
Here we can see that a new rule was created. It accepts TCP, UDP traffic from any host in WAN coming to the router on port 8080. The slider on the right side is set to ‘on’ indicating that the rule is enabled.
Open ports on the device for a specific LAN host.
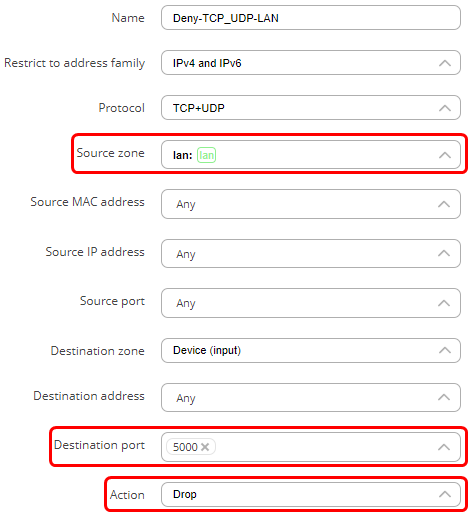
To open a port for only one host on LAN you would need to create 2 traffic rules. One rule to block LAN traffic from accessing the port on device, and the second rule to allow only a single host to access that port. Both rules have similarities. The steps below describe how to create and configure both rules with differences mentioned.
First rule:
- In the ‘Add type’ field choose ‘open ports on router’.
- Enter a name of your choice for this rule.
- Select 'TCP+UDP' as protocols.
- Enter an external port to block.
- Click ‘Add’.
A new window will pop-out where you will be able to specify additional settings.
- Choose LAN as the source zone.
- Leave the source IP field ‘any’ or specify a LAN network to block.
- In the action field choose ‘Drop’.
Scroll down and press ‘Save & Apply’.
The second rule:
- In the ‘Add type’ field choose ‘open ports on router’.
- Enter a name of your choice for this rule that allow host on a specified port.
- Select 'TCP+UDP' as protocols.
- Enter an external port to allow.
- Click ‘Add’.
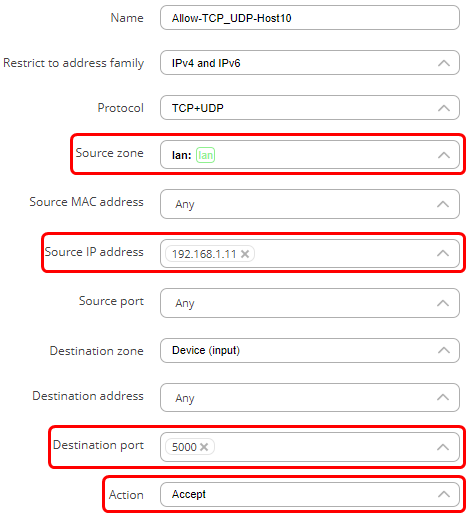
- set the source IP address to the IP address of the host.
- In the action field choose ‘Accept’.
Scroll down and press ‘Save & Apply’.
The new rules are created and enabled. To verify, go to the last page in ‘Traffic rules’ and verify that the rule is configured correctly and is enabled. These rules indicate that any traffic coming from host 192.168.11.50 in the LAN to port 5000 on the device will be accepted. The slider on the right side shows that the rule is enabled. Drag the second rule to be above the first rule, so the traffic from the host is matched against it and is allowed to access the device on port 5000. All other traffic from the local network coming to port 5000 on the router will be dropped because it will match the second rule. For example, if port is set to 53 (a port used by DNS), only this host would be allowed to use DNS service running on the device. Similarly, if the ports are set to 80 and 443, only that specific IP address will be able to access the WebUI of the device.
Allow to remotely access the WebUI.
By default, all the traffic from WAN to the router is rejected. A traffic rule can be configured to allow a specific IP address to access the WebUI of the router. It is a bad practice to allow all devices on the internet to be able to connect to the router, so only a single IP address will be able to do that in this example.
- In the ‘Add type’ field choose ‘Open ports on router.
- Enter a name of your choice for this rule.
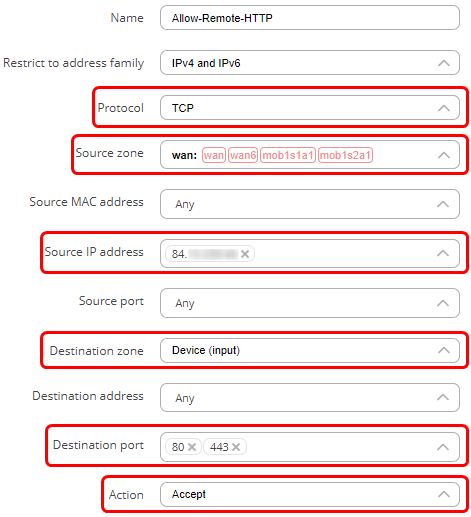
- Choose TCP as the protocol.
- In the external port field, enter ports 80 and 443 (HTTP(S)) so that only the access to the WebUI is allowed. Click ‘Add’.
A new window will pop-out where you will be able to specify additional settings. You can also access these settings by finding your rule in the traffic rules and pressing a ‘pencil’ button to edit settings for that rule.
- In the source IP enter the IP address from which you want to be able to access the WebUI.
- Destination zone should be set to Device (input).
- In the destination IP address choose the IP address of the router.
- In the action field choose ‘Accept’.
You can specify additional settings as you wish.
Scroll down and press ‘Save & Apply’.
The new rule is created and enabled. To verify, go to the last page in ‘Traffic rules’ and verify that the rule is configured correctly and is enabled.
The rule indicates that TCP traffic coming from the host 138.199.19.170 in the WAN to the device (router) on ports 80 and 443 will be accepted. The ‘Accept input’ indicates the action (accept). The slider on the right side shows that the rule is enabled.
In this scenario, only the host 138.199.19.170 will be able to access the WebUI of the router via it’s public IP. Similarly, if the port is set to 22 instead of 80 and 443, the remote host would be able to connect to the device via SSH, but not WebUI.
Block LAN network from accessing WAN on selected ports.
In this scenario devices on the LAN will not be able to send traffic to WAN on selected ports.
- In the ‘Add type’ field choose ‘Add new forward rule’.
- Enter a name of your choice for this rule.
- Choose LAN as the source zone.
- Choose WAN as the destination zone.
- Click ‘Add’.
A new window will pop-out where you will be able to specify additional settings. You can also access these settings by finding your rule in the traffic rules and pressing a ‘pencil’ button to edit settings for that rule.
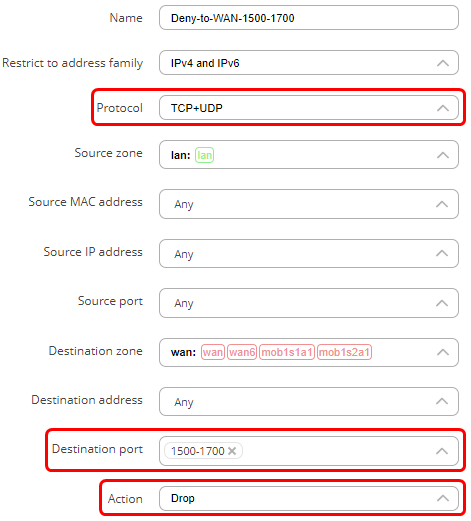
- Select 'TCP+UDP' as protocol.
- In the destination port field enter the range of ports you wish to deny (For example, ‘1500-1700’), or list specific ports by leaving spaces in-between port numbers (For example, ‘80 443’).
- In the action field choose ‘Drop’.
You can specify additional settings as you wish.
Scroll down and press ‘Save & Apply’.
The new rule is created and enabled. To verify, go to the last page in ‘Traffic rules’ and verify that the rule is configured correctly and is enabled.

In this scenario, the traffic coming from the LAN devices to WAN on any port from a range of 1500-1700 will be dropped. The ‘Discard forward’ indicates the action (drop). The slider on the right side shows that the rule is enabled.
Block specific host on the LAN from accessing WAN on certain times.
In this scenario, a specific PC will not be able to send traffic to WAN during specified time periods. To block a certain PC, a MAC address is used. This is an address of a physical device and can belong to that device only. This is opposed to IP addresses, which can be easily changed.
- In the ‘Add type’ field choose ‘Add new forward rule’.
- Enter a name of your choice for this rule.
- Choose LAN as source zone.
- Choose WAN as destination zone.
- Click ‘Add’.
A new window will pop-out where you will be able to specify additional settings. You can also access these settings by finding your rule in the traffic rules and pressing a ‘pencil’ button to edit settings for that rule.
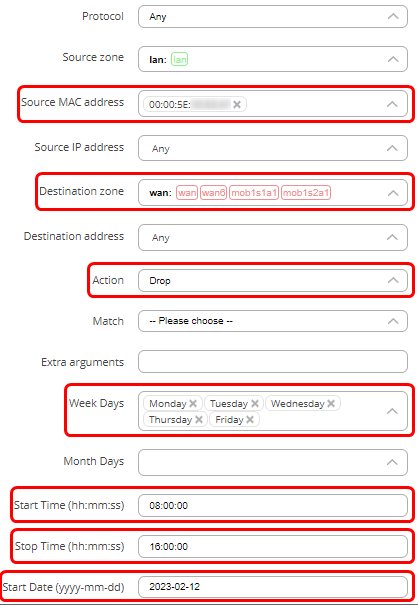
- In the source MAC address choose the MAC address of the host to who the rule will apply. You can enter a custom MAC address.
- In the action field choose ‘Drop’.
- On weekdays you can choose on which days the rule will apply (The device will not be able to communicate). You can choose days of the month, start and stop times, and other time settings.
You can specify additional settings as you wish.
Scroll down and press ‘Save & Apply’.
The new rule is created and enabled. To verify, go to the last page in ‘Traffic rules’ and verify that the rule is configured correctly and is enabled.
This rule indicates that the PC with mac address of 00:00:5e:00:53:af will not be able to send traffic to WAN. The ‘Discard forward’ indicates the action (drop). The rule does not show the times at which this rule is applied, but the times can be found on the settings page (‘Pencil’ button). This rule will be applied for the first time on the 12th of February, 2023. Then, every Monday, Tuesday, Wednesday, Thursday, and Friday, from 8 AM to 4 PM this PC will not be able to send traffic to WAN.

