|
|
| (2 intermediate revisions by the same user not shown) |
| Line 1: |
Line 1: |
| − |
| |
| − | <p style="color:red">The information in this page is updated in accordance with [https://wiki.teltonika-networks.com/view/FW_%26_SDK_Downloads'''00.07.05.0'''] firmware version. .</p>
| |
| − |
| |
| | ==Introduction== | | ==Introduction== |
| − | This article contains instructions on how to extend RUT956 router hotspot network using TAP100 access point.
| + | <p>An embedded-SIM (eSIM) or embedded universal integrated circuit card (eUICC) is a form of programmable SIM card that is embedded directly into a device. The surface mount format provides the same electrical interface as the full size, 2FF, and 3FF SIM cards, but is soldered to a circuit board as part of the manufacturing process. In machine to machine (M2M) applications where there is no requirement to change the SIM card, this avoids the requirement for a connector, improving reliability and security. An eSIM can be provisioned remotely; end-users can add or remove operators without the need to physically swap a SIM from the device. |
| − | ==Configuration overview and prerequisites==
| + | </p> |
| − | Before we begin, let's take a look at the configuration that we are attempting to achieve and the prerequisites that make it possible. For this setup we are going to use RUT956 which LAN IP is 192.168.5.1 and TAP100 which LAN IP is 192.168.5.2
| |
| − | | |
| − | [[File:Topology test test.jpg|border|class=tlt-border]]
| |
| − | | |
| − | '''Prerequisites:'''
| |
| − | <ul> | |
| − | <li> RUT956 </li>
| |
| − | <li> TAP100 </li>
| |
| − | <li> End device (PC, Laptop, Smartphone) </li>
| |
| − | </ul>
| |
| − | | |
| − | If you're having trouble finding any page or some of the parameters described here on your device's WebUI, you should turn on "'''Advanced WebUI'''" mode. You can do that by clicking the "'''Advanced'''" button, which is located at the top-right corner of the WebUI.
| |
| − | [[File:Networking rutos manual webui basic advanced mode 75.gif|border|class=tlt-border]]
| |
| − | | |
| − | ==Router configuration==
| |
| − | ===Configuring router LAN interface===
| |
| − | ----
| |
| − | Go to '''Network -> LAN''' and press edit button and in pop-up window perform following actions :
| |
| − | <ol>
| |
| − | <li> Enter IPv4 address. </li>
| |
| − | <li>Disable DHCP server </li>
| |
| − | </ol>
| |
| − | [[File:LAN_Hotspot.png|border|class=tlt-border]]
| |
| − | | |
| − | ===Router Hotspot configuration===
| |
| − | ----
| |
| − | ====Creating hotspot local user====
| |
| − | ----
| |
| − | To configure HotSpot instance on RUT956 router, you should firstly download HotSpot package from device package manager. It can be found by navigating on router WebUI to '''System -> Package Manager -> Packages'''.
| |
| − | | |
| − | Once you have installed Hotspot package you need to navigate to '''Services -> Hotspot -> Local users''' to configure local user because we are going to set "local users" authentication method for our Hotspot instance. Once there do the following steps :
| |
| − | | |
| − | <ol>
| |
| − | <li>Enter any username. </li>
| |
| − | <li>Enter any password. </li>
| |
| − | <li>Press add button. </li>
| |
| − | </ol>
| |
| − | [[File:Local Users 956 Hotspot.png|border|class=tlt-border]]
| |
| − | ----
| |
| − | ====Hotspot interface configuration====
| |
| − | ----
| |
| − | Once we created hotspot local user, it's time to configure hotspot interface. To do this, we need to navigate on router WebUI to '''Services -> Hotspot -> General'''.
| |
| − | Once, there we need to do the following :
| |
| − | <ol>
| |
| − | <li> Choose LAN interface.</li>
| |
| − | <li> Press "ADD" button. </li>
| |
| − | </ol> | |
| − | [[File:New Instance Hotspot.png|border|class=tlt-border]]
| |
| | | | |
| − | Now, in pop-up window press enable button. Everything else you can leave by default or make changes according to your wishes. In this configuration, we are gonna leave everything by default.
| + | <p>In order to use eSIM with Teltonika Networks devices, some basic requirements must be met.</p> |
| | + | ==eSIM Dimensions== |
| | + | <p>Must match standard MFF2 eSIM size:</p> |
| | | | |
| − | [[File:Hotpost interface enable.png|border|class=tlt-border]] | + | [[File:ESIMreq.jpg|border|class=tlt-border|800px]] |
| | | | |
| | | | |
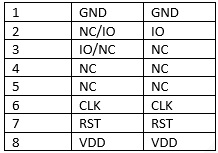
| − | ==Access point (TAP100) configuration== | + | ==eSIM Pin-Out== |
| − | From router side, we have configured everything we need to. It's time to configure TAP100.
| + | <p>There are two default eSIM pin-outs:</p> |
| | + | [[File:Pin-outs.jpg|border|class=tlt-border|300px]] |
| | + | <p>The only difference in pin-outs is the IO pin – 2 or 3. Both versions of pin-outs are suitable for devices with eSIM.</p> |
| | | | |
| − | First of all, we are going to connect to TAP100 WebUI.
| + | ==Requirements for eSIM packing reel: == |
| | + | <p>13“ in diameter.</p> |
Introduction
An embedded-SIM (eSIM) or embedded universal integrated circuit card (eUICC) is a form of programmable SIM card that is embedded directly into a device. The surface mount format provides the same electrical interface as the full size, 2FF, and 3FF SIM cards, but is soldered to a circuit board as part of the manufacturing process. In machine to machine (M2M) applications where there is no requirement to change the SIM card, this avoids the requirement for a connector, improving reliability and security. An eSIM can be provisioned remotely; end-users can add or remove operators without the need to physically swap a SIM from the device.
In order to use eSIM with Teltonika Networks devices, some basic requirements must be met.
eSIM Dimensions
Must match standard MFF2 eSIM size:

eSIM Pin-Out
There are two default eSIM pin-outs:
The only difference in pin-outs is the IO pin – 2 or 3. Both versions of pin-outs are suitable for devices with eSIM.
Requirements for eSIM packing reel:
13“ in diameter.


