Difference between revisions of "OpenVPN Access Control"
m (Edit 1) |
m |
||
| Line 7: | Line 7: | ||
1)Navigate to System -> Administration -> Certificates | 1)Navigate to System -> Administration -> Certificates | ||
| + | |||
2)Generate 2 certificates with a keysize 1024: | 2)Generate 2 certificates with a keysize 1024: | ||
| + | |||
2.1) CA | 2.1) CA | ||
| + | |||
2.2) Server | 2.2) Server | ||
| + | |||
3) In Certificate Manager download Server certificate | 3) In Certificate Manager download Server certificate | ||
| − | [[File:Certificate download.png|thumb]] | + | |
| + | [[File:Certificate download.png|none|thumb|alt=|1000x1000px]] | ||
For any OpenVPN clients, You will need to generate “Client” certificates, download certificate and key, and send them to the client | For any OpenVPN clients, You will need to generate “Client” certificates, download certificate and key, and send them to the client | ||
| Line 20: | Line 25: | ||
1) Connect to WebUI and enable Advanced mode | 1) Connect to WebUI and enable Advanced mode | ||
| − | [[File:Advanced mode toggle.png|thumb| | + | [[File:Advanced mode toggle.png|none|thumb|alt=|1000x1000px]] |
2) Navigate to Services -> VPN -> OpenVPN | 2) Navigate to Services -> VPN -> OpenVPN | ||
| + | |||
3) Add a new OpenVPN instance with a Server role | 3) Add a new OpenVPN instance with a Server role | ||
| + | |||
4) Create an OpenVPN server with these settings | 4) Create an OpenVPN server with these settings | ||
| − | [[File:OpenVPN server settings.png|thumb| | + | |
| + | [[File:OpenVPN server settings.png|none|thumb|alt=|1000x1000px]] | ||
Virtual network IP address – 10.0.0.0 | Virtual network IP address – 10.0.0.0 | ||
| + | |||
Virtual network netmask – 255.255.255.240 | Virtual network netmask – 255.255.255.240 | ||
| + | |||
Client to client – disabled | Client to client – disabled | ||
| + | |||
| + | Certificate files from device - on | ||
| + | |||
| + | 5) Press "Save & Apply", enable OpenVPN server and check if the server is online | ||
| + | |||
| + | [[File:OpenVPN server is online.png|none|thumb|alt=|1000x1000px]] | ||
| + | |||
| + | <h1>Connecting clients to the OpenVPN server</h1> | ||
| + | |||
| + | 1) | ||
Revision as of 11:42, 26 March 2024
Introduction
In this example, we will configure an OpenVPN server and will manage which resources can be accessed by separate clients
Generating certificates for an OpenVPN server
1)Navigate to System -> Administration -> Certificates
2)Generate 2 certificates with a keysize 1024:
2.1) CA
2.2) Server
3) In Certificate Manager download Server certificate
For any OpenVPN clients, You will need to generate “Client” certificates, download certificate and key, and send them to the client
Creating an OpenVPN server
1) Connect to WebUI and enable Advanced mode
2) Navigate to Services -> VPN -> OpenVPN
3) Add a new OpenVPN instance with a Server role
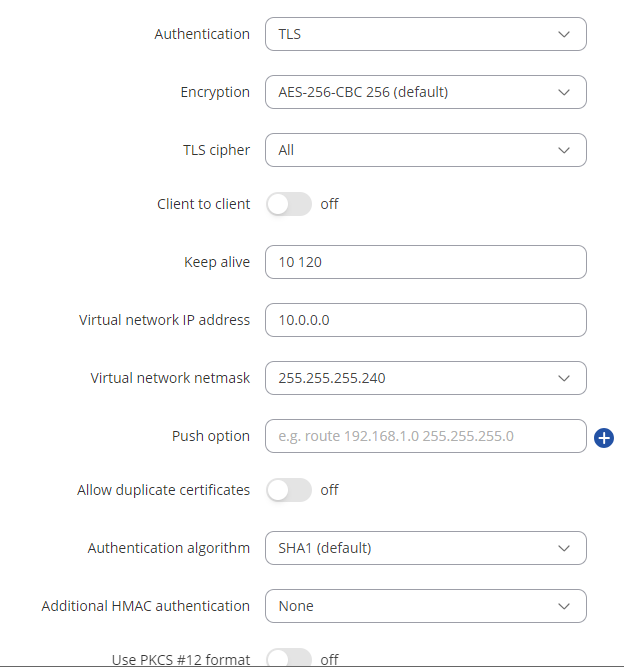
4) Create an OpenVPN server with these settings
Virtual network IP address – 10.0.0.0
Virtual network netmask – 255.255.255.240
Client to client – disabled
Certificate files from device - on
5) Press "Save & Apply", enable OpenVPN server and check if the server is online
Connecting clients to the OpenVPN server
1)


